DRIVER_VERIFIER_DETECTED_VIOLATION_LIVEDUMP is a BSOD error occurs with bugcheck value 0x000001C4 in Windows 10. This Blue Screen, in fact, indicates detection of any device driver to create corruption in the in system. The prime reason would be the culprit driver specified in the Windows Registry in the same period, substantial inspection enabled by Kernel. Well, the whole thing doesn’t end here rather, you might term it as Stop error.
Stop error DRIVER VERIFIER DETECTED VIOLATION LIVEDUMP Blue Screen Of Death issue usually occurs in the devices due to outdated drivers. Apart from the main reason, Malware infection, missing system elements, third-party antivirus conflict, clash of two similar programs are found to cause this problem. Hardware issues like using external one, low space because of junk accumulation may also play the spell. You will encounter abnormal restarting of windows, lots of error messages, freezing of desktop area as well as irregular flashing on display. Immediate action is a must to eliminate DRIVER_VERIFIER_DETECTED_VIOLATION_LIVEDUMP in Windows 10. We will discuss the most effective ways to recover a computer from this notorious issue in this writing. So, let’s begin –
DRIVER_VERIFIER_DETECTED_VIOLATION_LIVEDUMP in Windows 10
Here is how to fix DRIVER_VERIFIER_DETECTED_VIOLATION_LIVEDUMP BSOD Windows 10 –
BSOD error in machines is not new and people from different end came forward with solutions to dismiss it. We have checked all of those and compiled this segment with only the most effective ones. Some of these are very basic ideas while few have professional attire. Let’s start resolving Fix DRIVER VERIFIER DETECTED VIOLATION LIVEDUMP in Windows 10 with those processes.
Inhibit Windows from Restarting Automatically
The first thing that happens in a User PC after being affected is, it restarts automatically and leaves no room to apply the resolution or even securitizing the cause. This is not at all acceptable and we need to disable this thing. Here is how to do –
Step-1: If you are in any ongoing processes, Press Win+D and head to the display.
Step-2: Move the cursor to This PC and perform a click on it.
Step-3: Choose Properties.
Step-4: When shifted to “System” Window, select Advanced system settings from left pane.
Step-4: Once the System Properties Wizard shows up, switch to Advanced tab and scroll down to Startup and Recovery section.
Step-5: Do a click on the Settings option and let the system to open a separate popup window.
Step-6: Move down and System failure area and uncheck the box against Automatically restart.
Step-7: Hit Ok button to save the changes and leave wizard.
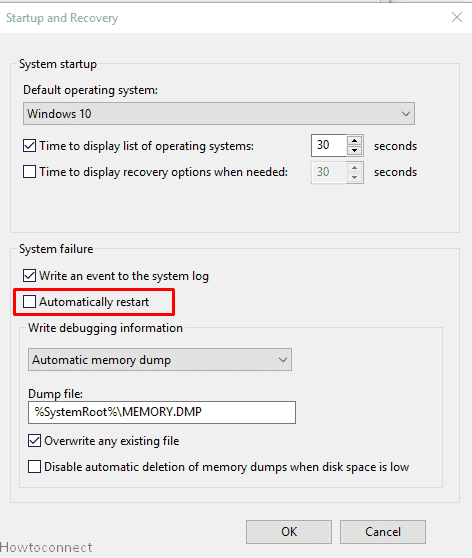
This will block the automatic restarting which was pretty annoying. Do not consider this as a resolution process rather it will create a proper environment to deploy others. Move on to the next solution once done.
How to Disable Automatic Restart When System Failure in Windows 10
Boot the Device in Safe Mode
From the very early days to recent, whenever people found out any serious issues regarding windows, enabling Safe Mode came out as rescuer. In the case of DRIVER_VERIFIER_DETECTED_VIOLATION_LIVEDUMP in Windows 10, you might consider the same. With activating, Windows will load the basic programs only and the issue should stay no more. Have a look at the progress –
- Press the Shift button from the keyboard at the same time make a click on the Start button.
- In the same condition, hit the Power Cog. And choose Restart option from menu.
- Upon Restarting, there will be a blue screen showing a bunch of options here. Hit Troubleshoot from this page.
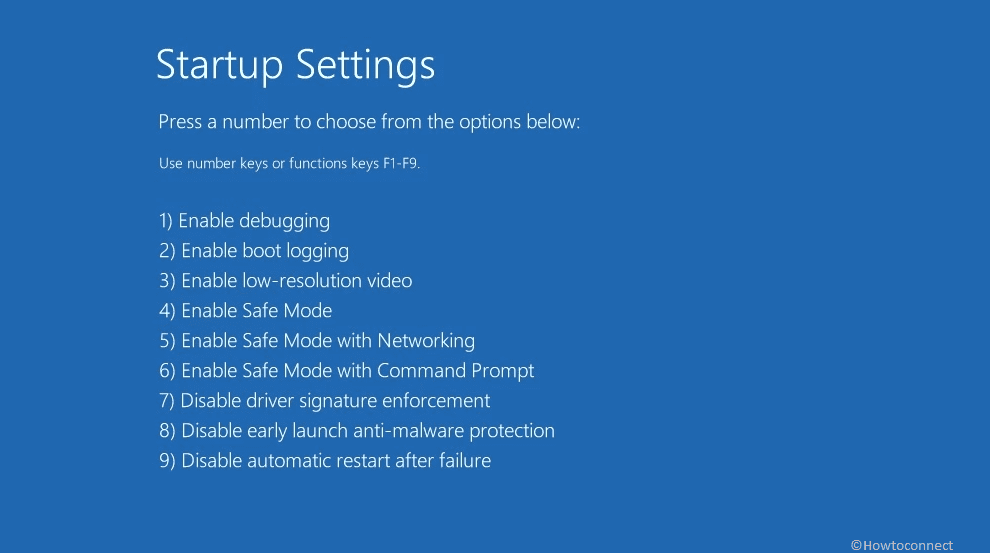
- When the next screen comes in, choose Advanced options and later on Startup Settings.
- Moving on next, click on Restart icon located at the bottom right corner and let the device to reboot again.
- When sign back in again, you will see a series of options along with Enable Safe Mode.
- Now, start pressing the F4 key at a stretch and boot the PC in Safe Mode.
3 Ways to Boot Windows 10 Into Safe mode
Unplug and Reconnect the Hardware accessories
Reports are evident that Hardware accessories like an external Hard Drive can cause the BSOD error quite often. Therefore, the only solution is to unplug them and then reconnect again following the below way –
- Disconnect all the accessories in order and keep aside in a separate place.
- Reboot the Windows in Normal way (Start Menu- Power icon-Restart).
- Upon a successful restarting, re-plug all of them that you have disconnected before carefully.
- Open the Browser and visit to the manufacturer website of specific Hardware item and download the updated driver eventually.
- Install them finally on the device and start working normally. Hope the DRIVER VERIFIER DETECTED VIOLATION LIVEDUMP error will no longer occur.
Run Windows Blue Screen Troubleshooter
As a part of making Windows 10 greatest, Microsoft provided Blue Screen Troubleshooter in Settings app. This can potentially resolve DRIVER_VERIFIER_DETECTED_VIOLATION_LIVEDUMP.
Step#-1: Press Win+I to launch Windows settings app.
Step#-2: When in the UI, move ahead to Update & Security and make a click on it.
Step#-3: Once the next screen hits the display, choose Troubleshoot from the left pane.
Step#-4: Jump on the adjacent right and click Blue screen from the list. Now select Run the Troubleshooter.
Step#-5: The scanning and detection will start and resolve if finds any issues. Once finished, restart the device and check whether DRIVER VERIFIER DETECTED VIOLATION LIVEDUMP error exists.
Blue Screen Troubleshooter Windows 10 to Fix BSOD
Get the Windows Up to date
As the update files contain bug fixes, latest features and other necessary things, you really need to install them in time. However, often updating the Windows serves as DRIVER_VERIFIER_DETECTED_VIOLATION_LIVEDUMP in Windows 10 resolution. So
- Make sure Windows 10 is connected with an active Internet connection or Wi-Fi before starting with this solution.
- Open the Settings app and move ahead to Update & Security.
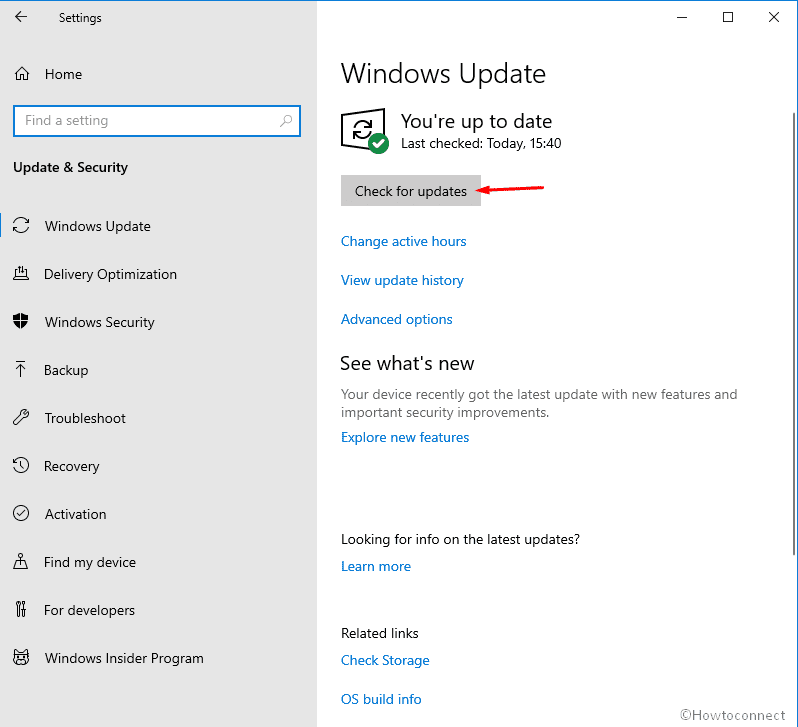
- Once the additional settings page opens up, choose Windows Update from left and shift to the corresponding pane.
- Here, you might see “You’re up to date” dialog along with the last checked date and time. Click Check for updates from here.
- Once searching ends, the list of items will be visible and you need to select the Download option.
- When download finishes, installation will take place automatically and you might see a prompt to restart the windows. Co-operate with what the instruction says.
- Once the updating finishes, there should not be any more errors in the system.
Uninstall programs causing DRIVER_VERIFIER_DETECTED_VIOLATION_LIVEDUMP
Very often similar programs conflict with each other and end up causing DRIVER VERIFIER DETECTED VIOLATION LIVEDUMP in Windows 10. Therefore, you might uninstall the relatively less important ones for the sake of eliminating this issue.
- Press Win and I keys together, choose Apps and pass forward to next page.
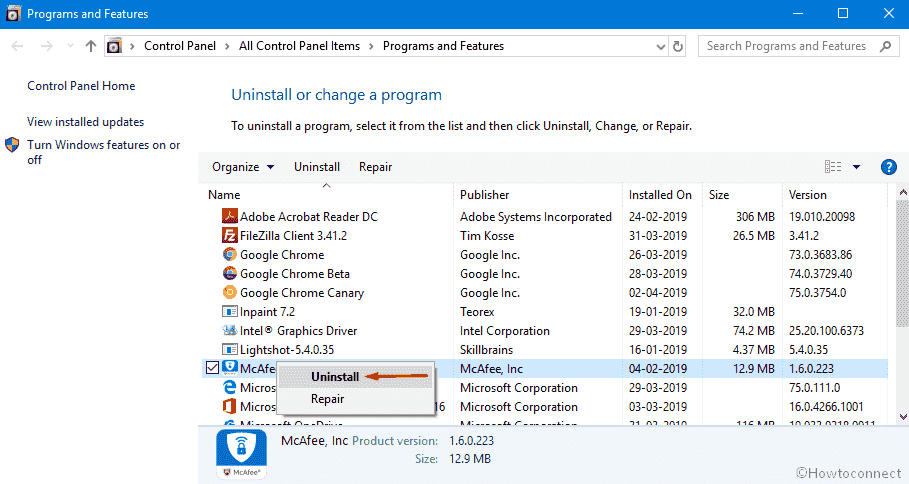
- Select Program & Features from left pane and jump to right.
- From the list of installed apps, reach out to the one causing DRIVER_VERIFIER_DETECTED_VIOLATION_LIVEDUMP BSOD error.
- Perform a click on each and choose Uninstall option from extended pane.
- Follow on-screen guidelines to completely uninstall the programs.
How to Completely Uninstall Software From Windows 10 – Beginners
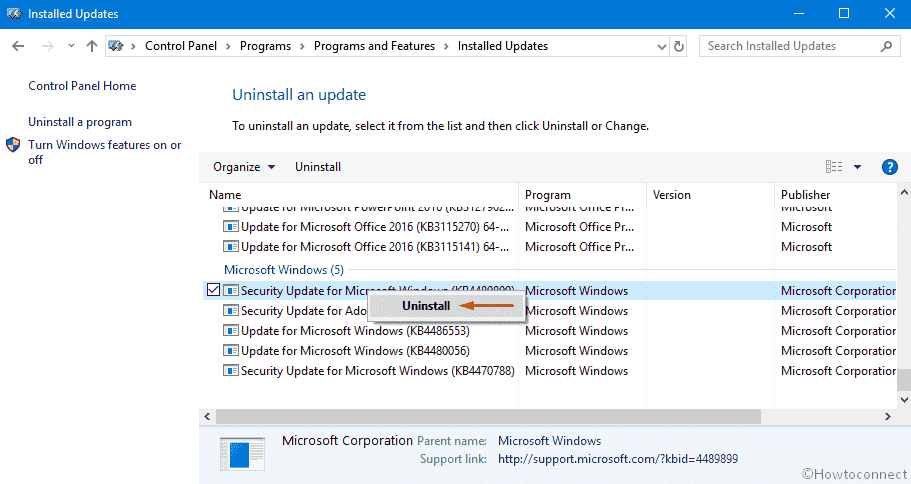
Uninstall culprit updates
Windows update is a smooth automatic process and usually accomplished normally. Unfortunately, it terminates abnormally, can call in BSOD errors. Therefore, if it happens so, problematic files need to be deleted using following instructions –
- Launch Windows Settings app using methods above.
- When opens, move ahead to Update & Security and hit a click on it.
- Once in the next screen, choose Windows Update from left pane and reach the corresponding right side.
- Hit the link with option View update history and let system display all the past installs.
- From the following page, choose Uninstall updates to proceed forward.
- When Program and Features window cuts the view, choose the recently received patch and finally hit the Uninstall option.
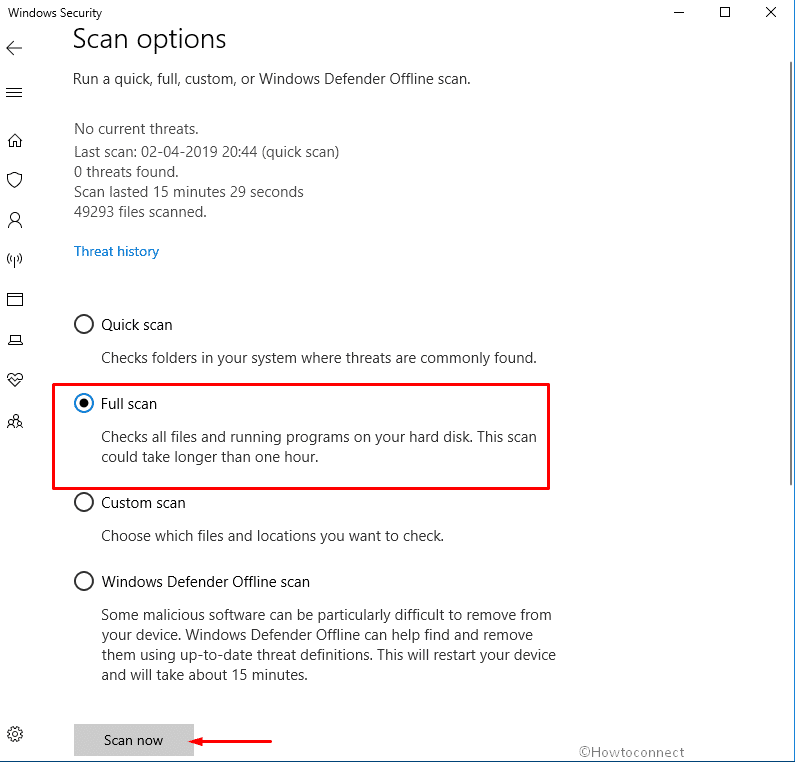
Carry out a Full System Scan with Windows Security
Virus when enters the system, forcibly deletes the necessary data and leads DRIVER_VERIFIER_DETECTED_VIOLATION_LIVEDUMP in Windows 10 to occur. In the age of tech revolution, it’s really tough to stay away from them and only way is to carry out regular checks. A full system scan through Windows Security is as follows –
- Press the Win & S keys and invoke Taskbar search.
- Type security in the empty field and when Windows Security appears in result,click on it.
- When in the application, select Virus & threat protection from left and move on to facing pane.
- Click the link with title Scan options and choose the radio button with Full scan option.
- Perform a click on the Scan now button and let the process begin sharply.
- Once finished, you will be able to see the results on display. If there is a trace of virus, hit the Clean threats option and eliminate them.
- Proceeding forward, when the next page comes in, there will be three options there for you. Choose Remove option and also make a click on the Start actions button to take the necessary measures.
How to Run Windows Defender Full Scan in Windows 10
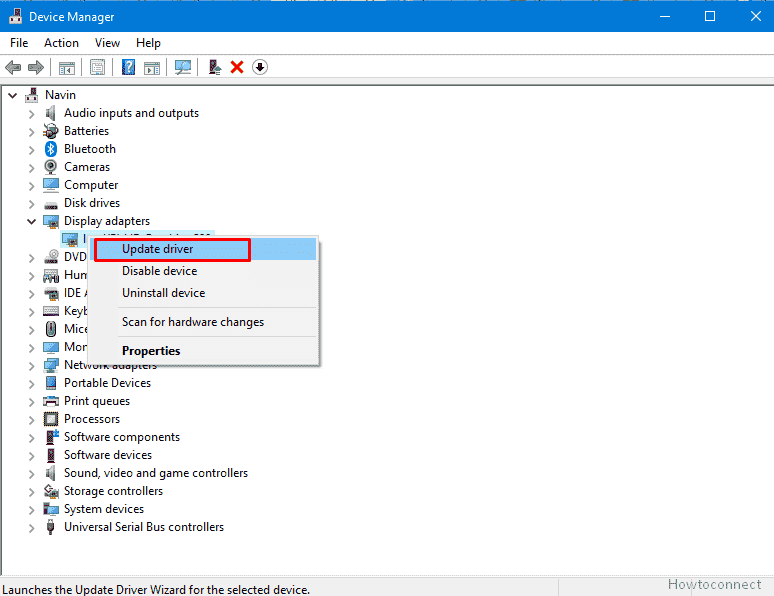
Update all the drivers with Yellow indication in Device manager
While studying the causes of DRIVER_VERIFIER_DETECTED_VIOLATION_LIVEDUMP in Windows 10, we found outdated device drivers are the prime suspects. We need to update them and the whole thing should be easier in Default Device Manager Utility. Here is the process to move ahead-
- Invoke the taskbar Search and type device manager there in the box.
- When it appears in the result, select to open in a separate window.
- Once the new screen is visible, have a close look in the console and find out the devices with exclamation mark.
- If have any, click to expand each one successively.
- Right click on the ones having Yellow mark.
- Select Update driver option from menu and after that go with the visible instruction available here.
- Once updating ends successfully, Restart the device and see if the DRIVER VERIFIER DETECTED VIOLATION LIVEDUMP error occurs.
Update All Drivers in Windows 10 Simultaneously
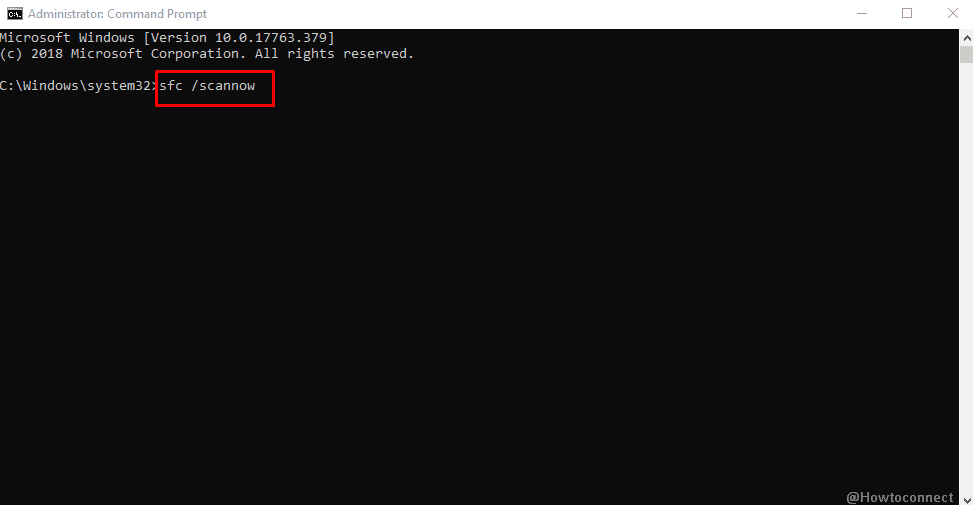
Run SFC /SCANNOW Command line tool in Elevated Command Prompt
Corruption in the installation files comes at the top for DRIVER_VERIFIER_DETECTED_VIOLATION_LIVEDUMP error. Therefore, Microsoft provided System file checker utility to automatically detect and fix them.
- Click the Taskbar Search to float it up, type cmd.exe in the empty space and when results show up, right click on Command Prompt.
- Select Run as Administrator option and once UAC prompts for permission, give the consent by hitting Yes button.
- Once Command Prompt (admin) opens up, type
sfc /scannowjust after C:\Windows\system32> and hit Enter key. - The System File Checker will start detecting problems automatically and if found, resolve eventually.
- This process might take several minutes. Once finished, Restart Windows.
- Once Sign back, check for the error is there or not.
SFC /Scannow, DISM.Exe, CHKDSK Windows 10
Uninstall Third Party Anti-virus Tool from Windows
Previously, we have seen that, Malware once get involved in the system, can erase system components and call BSOD errors. You can usually think of having an Anti-malware tool in the PC and dismiss them. But the reality is, sometimes, Third party anti-virus tools can cause DRIVER_VERIFIER_DETECTED_VIOLATION_LIVEDUMP in Windows 10. Microsoft dedicated Windows Security to serve this purpose and you can think of removing the other from windows.
- Invoke the Run dialog on screen by pressing Windows and R keys together.
- When it appears, type appwiz.cpl in the search box and hit Enter button from keyboard.
- When Programs and Features window comes to appearance, reach out to the software in the list.
- Perform a double click on it and follow the on-screen guidelines to uninstall it completely.
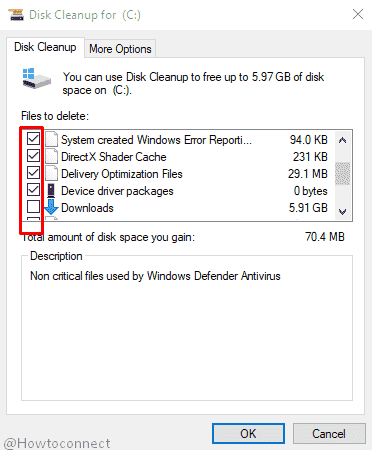
Clean the Junks from Hard Disk to provide additional space
Junks are the temporary files produces while you work with the system. They are stored in Disk drive and when gets big in volume, occupy a good amount of space and make the device to slow down. Disk Cleanup Utility cleans them and helps to resolve DRIVER VERIFIER DETECTED VIOLATION LIVEDUMP in Windows 10.
- Type cleanmgr in the taskbar search field.
- Once Disk Cleanup appears in the result, click it.
- A small popup wizard will ask you to choose the drive that you want to clean. Select the drive (for example, C:) by clicking on the drop-down menu and hit Enter key.
- The Utility will start with calculating the amount of space it can recover out of volume. When the new popup hits on screen, move ahead to bottom and select Clean up system files option.
- The small popup will appear again and you need to choose the drive like before once more. Click Ok.
- From the rolled up wizard Disk Cleanup for (C:), Check all the boxes from Files to delete: segment but leave Downloads.
- Perform a thorough check in the Recycle Bin and if have anything necessary, restore them to proper place.
- Now, hit the Ok button from the bottom of wizard and let the process begin.
- Once the freeing up is done, See if the error still exists.
Windows 10 – How to Open and Use Disk Cleanup
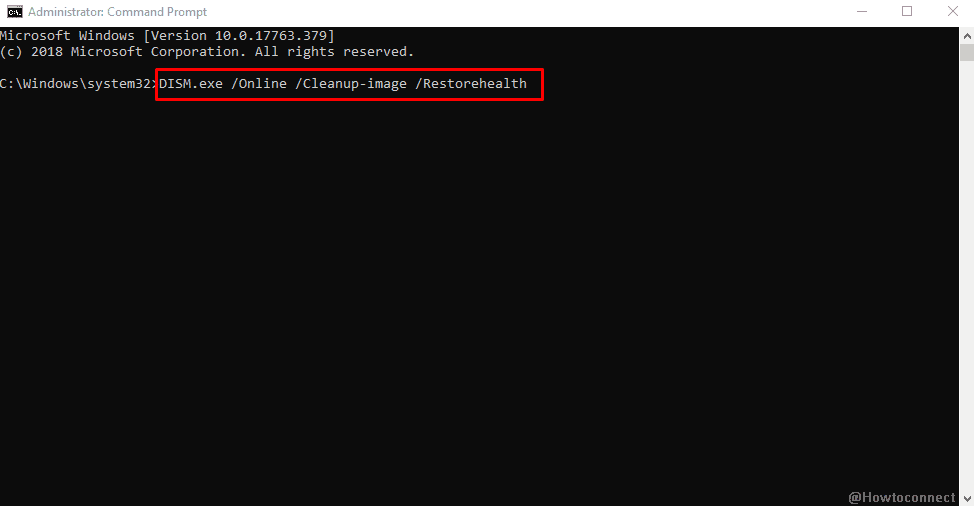
Execute the DISM tool in Elevated Command Prompt
Faulty Windows image files are responsible to cause BSOD error in the system and Microsoft came out with a built-in solution for that. DISM aka Deployment Image Servicing and Management tool can repair them automatically and you can get rid of the error.
- Press and Hold Windows key and hit the S button from the keyboard to call Taskbar Search on screen.
- Write CMD in the box and make a right click on the appearing Command Prompt in the result.
- Choose the Run as Administrator option and also Tap Yes when UAC asks for permission.
- When in Elevated Command Prompt Window, type the command as below at the base of cursor –
DISM.exe /Online /Cleanup-image /Restorehealth- Hit the Enter key and let the utility to begin action. Wait patiently until the process finishes. It might take up to 10 minutes.
- When ends normally, Reboot Windows and after signing back again, check if there is DRIVER VERIFIER DETECTED VIOLATION LIVEDUMP present.
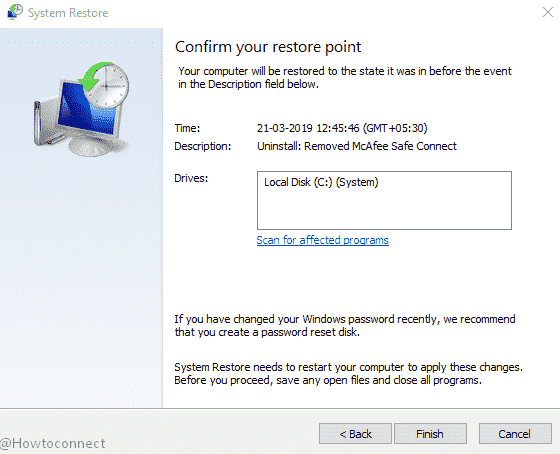
Revert the recent changes done on Windows
You might experience DRIVER_VERIFIER_DETECTED_VIOLATION_LIVEDUMP in Windows 10 after making any change on the system like installing a program or Uninstalling one. In this case, there is a preferable solution and that is undo the changes by returning back to a point.
- Right click on Start.
- Select Run option and let it open in the display.
- In the empty search box, type rstrui and also hit the Ok button from below.
- When System Restore Wizard become visible, hit the Next option
- Check Show more restore points to reveal all dates and times.
- Choose the last one and hit Next option.
- When the next window comes in to play, choose Finish to start the action.
System Restore in Windows 10, 8 and set new Restore Points: How to do
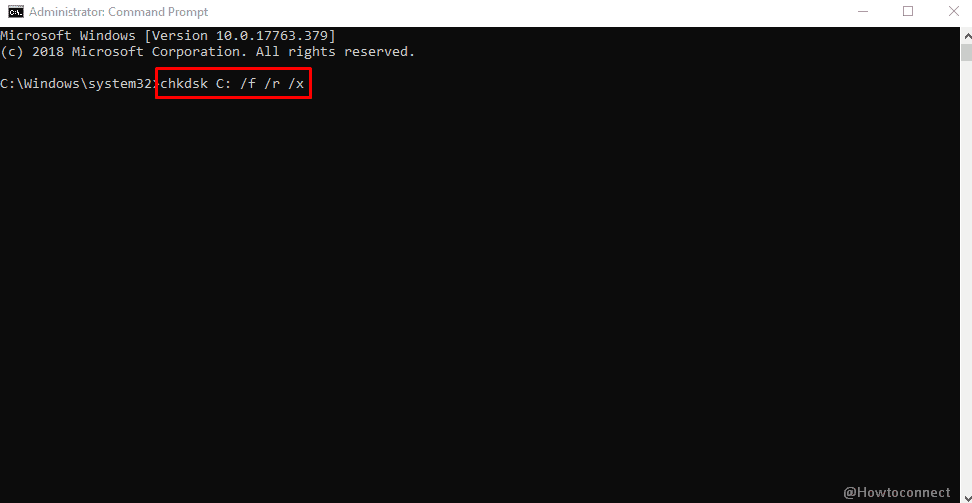
Detect and fix the Poor sectors in Hard Disk
DRIVER_VERIFIER_DETECTED_VIOLATION_LIVEDUMP in Windows 10 is sometimes a result of Poor segments in the Hard Disk. Therefore, the CHKDSK utility can be a savior in this case. In the Elevated Command Prompt, run the command tool to execute the utility using the below instructions –
- Open the Elevated Command Prompt following any of the methods shown above.
- When the Black window appears, type the command in below format at the base of blinking cursor –
chkdsk [Drive:] [parameters]
- This command line tool when activated after hitting Enter key will start showing the Disk Status only. Since the Purpose is to detect the poor areas in volume and fix them, you need to modify the command little like following –
/f /r /x
Here, f stands for fixing the poor areas found in the whole volume.
r indicates detecting those dreadful areas in all over volume.
x will stand for forcing the whole volume to dismount before process begins.
So, the final command will look like chkdsk C: /f /r /x having all the characters in it.
Note- C: represents the Disk Drive where we have installed the Windows. Use D:. E: alternatively as you do.
Now, once the system starts the process automatically, wait until it finishes off nicely. Later on, Restart the device and check for the error.
How to Check if Your Computer’s Hard Disk Drive is Bad
Fix up Memory Problems to resolve DRIVER_VERIFIER_DETECTED_VIOLATION_LIVEDUMP
Incorrect allocation of memory, use of unauthorized USB stick can be also responsible to cause this BSOD error. Hence, we can proceed for Memory Diagnostic using below instructions –
- First thing first, if you have any ongoing processes, save and close them all before starting.
- Open the Taskbar Search and type Windows Memory here.
- Hit Windows Memory Diagnostic when visible in the result.
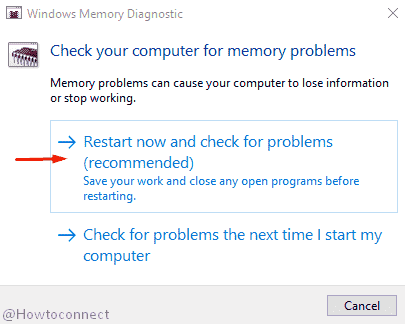
- A new popup will show up now and you need to choose Restart now and check for problems (recommended) option.
- With this, a blue screen will appear detecting memory problems. The machine will Reboot automatically when it reaches to 100%.
- Once sign back, you will see the result in the Notification area location in the system tray.
Windows 10 – How to Detect RAM Issues with Windows Memory Diagnostic Tool
Perform Clean Installation as Last Resort
By now, we think you have already tried out all the above procedures and it’s quite unfortunate if you cannot really solve DRIVER_VERIFIER_DETECTED_VIOLATION_LIVEDUMP issue. Well, don’t be frustrated as there is also another final resolution left. As a last resort, you can think of performing a complete installation of Windows 10 to the latest version.
Before stepping out for that, save all the important files, data, and every single necessary items in a safe place as Back up. Think of using an external drive or USB stick to keep separated. If you have never done before, seek help from professional people. This will save time and reduce risk of going wrong. Hope you can get rid of all problems including DRIVER_VERIFIER_DETECTED_VIOLATION_LIVEDUMP in Windows 10.
How to Clean Install Windows 10 October 2018 Update
That’s All!!!