Like many other users, you might be facing a post upgradation problem on Windows 11 or 10. One issue is e1460-b305 Epson Scanner Error that affects the functionality of the device. When this error code appears, the scanner stops working and it fails to establish communication with the computer.
Main reason behind e1460-b305 Epson Scanner Error is the configuration of the Settings in File Explorer. Furthermore, incorrect settings of Service, Connection, and outdated driver might cause this scanner problem in Windows 11 or 10. Sometimes, long cables are also obstructive in running a scanner. See – How to Fix 0xC1900101 Windows 11 Install Error (Solved!).
e1460-b305 Epson Scanner Error in Windows 10 and 11
Here is how to fix e1460-b305 Epson Scanner Error in Windows 11 or 10
Way-1: Disable Compatibility Mode
In most cases, the scanner is automatically set to compatibility mode after installing an update. So to fix the error you need to check whether the device is not shifted to the mode after the upgradations and disable if it is using the below troubleshooting steps –
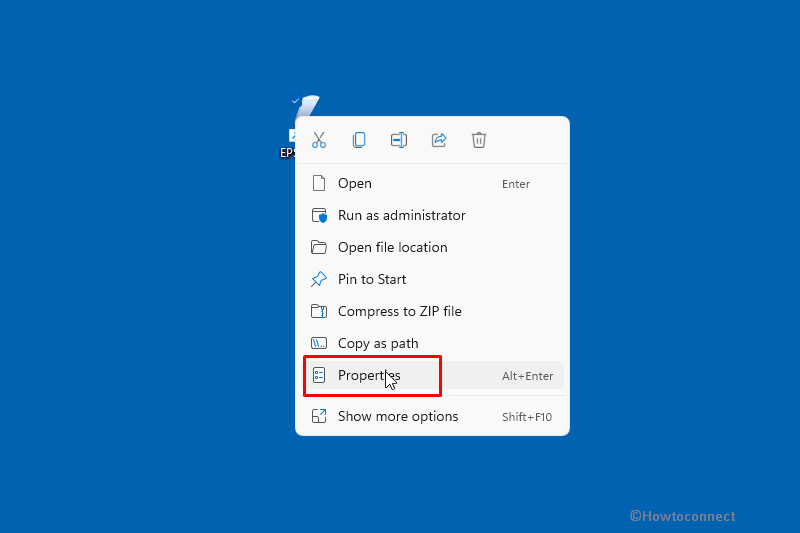
- Find the Epson scan icon located on the desktop.
- Right-click on it.
- Select – Properties.
- On the ‘Epson scan Properties’ wizard, click on the – Compatibility tab.
- See if “Run this program in compatibility mode for:” is checked. If it is checked uncheck the box.
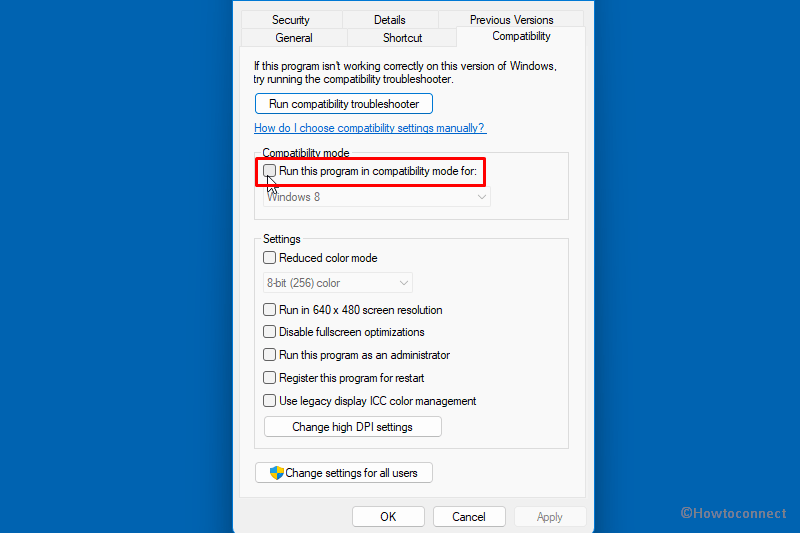
- Click Apply and then OK.
- Close the EPSON Scan application and then open it again.
Way-2: Enable Windows Image Acquisition service (WIA) Service
Epson scanner not working problem occurs when WIA service is in disabled status. So, in order to solve configure Windows Image Acquisition service in the manner that it may not stop the process of scanning.
- Click – Start.
- Type – Services.
- Press – Enter.
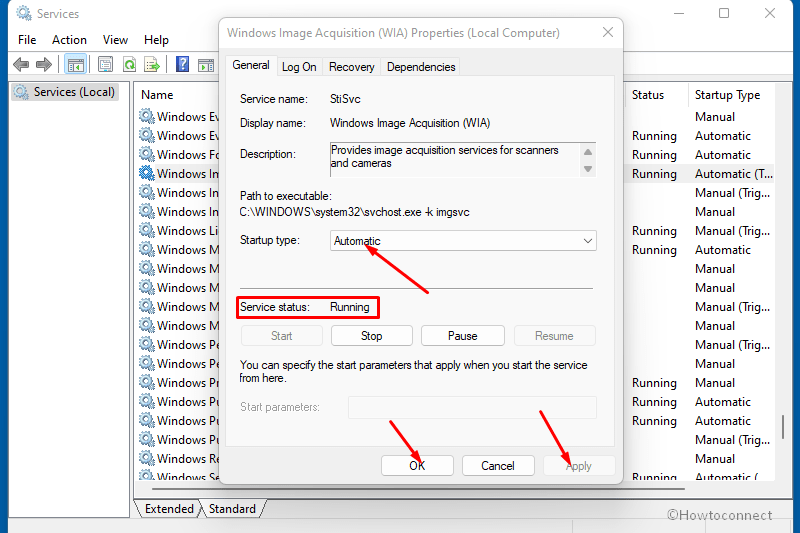
- Once the Services window appears, scroll down and find – Windows Image Acquisition service (WIA).
- Right-click on this service and choose – Properties.
- Click the dropdown for Startup type.
- Select – Automatic.
- Under Service status, click on – Start.
- Select Apply followed by OK.
- If both are set properly then leave it.
Way-3: Set the connection to solve e1460-b305 Epson Scanner Error
Connecting your scanner over WiFi may be a little problematic because very often the Epson scan app becomes unable to automatically link the scanner with the network address. To fix this, you can manually input the address and get your scanner running in no time again.
- Double click on EPSON Scan
- On the application and locate – Epson Scan Settings.
- Under “Connection”, Select – Network option.
- Click – Add.
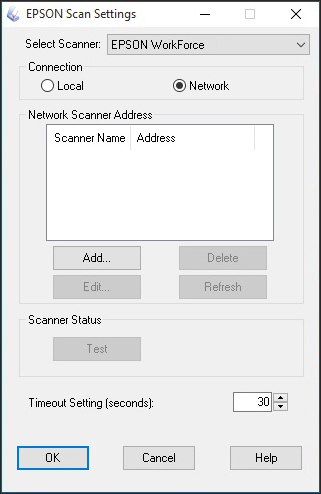
- Make sure your Scanner name is in the “Name” section.
- In the Search for address section, select IP address.
- Click – OK.

See – How to Find Printer’s IP and MAC Address in Windows 10.
Way-4: Use shorter USB cables
This may be amusing but it is possible that the reason why your Epson scanner does not work is that the USB cable is too long. Sellers assure you of the quality of long cables, but most times, signals get lost while traveling through lengthy cables.
If your scanner is far from you, you may want to bring it closer. Consider using shorter USB cables. If it is successful then you know that your scanner’s inability to function was due to loss of signals due to very long cables.
Way-5: Ensure your scanner drivers are up to update
There are two case scenarios when it comes to scanner drivers. Either your scanner driver was removed when you upgraded to Windows 10 or the presently installed driver is not compatible with your Windows 10 variant. For both scenarios, you have to update the driver to fix e1460-b305 Epson Scanner Error problem. Visit the Epson official website and choose the most recent Windows 10 driver. Ensure you download a driver that is compatible with your Windows 10 variant.
- Press Windows + R.
- In the dialog box, type devmgmt.msc
- Press Enter.
- Double click on Imaging devices.
- Find your scanner hardware, right-click on it.
- Select – Update driver.
- A dialog will pop up asking you which way you want to search for drivers. Choose “Browse my computer for driver software”
- Select the downloaded driver file and update.
- Restart your computer system and test if it is successful.
You can get help from – How to update drivers in Windows 11 (Best ways).
Way-6: Change your Printer Port from LPT1 to USB001
Most printers in recent times have evolved using LPT to USB. Upgrading to Windows 10 can affect your printer’s functionality in this way. You can try changing the printer ports to see if it will help.
- On your keyboard, press Winkey + R.
- Type – control.
- Press – Enter.
- At the top-right corner of the screen, in the control panel, look for the “Large icons” option and click on it.
- Select – Device and Printers.
- Right-click on the Printer option, then select the “Properties” option.
- Click on the “Ports” option and change the preferred printer port from “LPT1” to “USB 001.”
- Disconnect your scanner and after a few moments, reconnect it.
- Finally, test if it is successful.
Methods list:
Way-1: Disable Compatibility Mode
Way-2: Enable Windows Image Acquisition service (WIA) Service
Way-3: Set the connection
Way-4: Use shorter USB cables
Way-5: Ensure your scanner drivers are up to update
Way-6: Change your Printer Port from LPT1 to USB001
That’s all!!