Windows 10 users often found to struggle with blue screen errors that keep coming on randomly without any prior notice or warning. Some of these errors get resolved with a simple restart where some are difficult to deal with. FAST_ERESOURCE_PRECONDITION_VIOLATION is one nagging at the same time rare BSOD that makes the system inoperable and sometimes inaccessible. This particular bug check has a value of 0x000001C6. The fatal code points out that the current thread is performing an invalid call to a fast resource routine.
FAST ERESOURCE PRECONDITION VIOLATION mostly shows up after a critical system crash. Besides, corrupted system components, wrongly coded software programs, outdated OS, and the existence of malware are highly responsible to cause the blue screen of death. There might be other reasons too such as damaged registry, buggy Windows update, software conflict, and incompatible BIOS version. As this particular BSOD is hard to recover, you might need to try out all probable workarounds listed below.
FAST_ERESOURCE_PRECONDITION_VIOLATION
Here is how to fix FAST_ERESOURCE_PRECONDITION_VIOLATION in Windows 10 –
1] Boot to Safe Mode with Networking
If FAST ERESOURCE PRECONDITION VIOLATION BSOD prevents you from accessing the system, enter into Safe mode to get entry first. This special startup lets Windows start with basic software and services moreover make the troubleshooting process easier. Even if you have access, Safe mode is highly recommended as it provides an environment where deploying workarounds is comparatively easy going. To boot into Safe mode –
- Press – Windows + S.
- Type – advanced startup.
- Hit – Enter.
- From the right pane, click – Restart now.
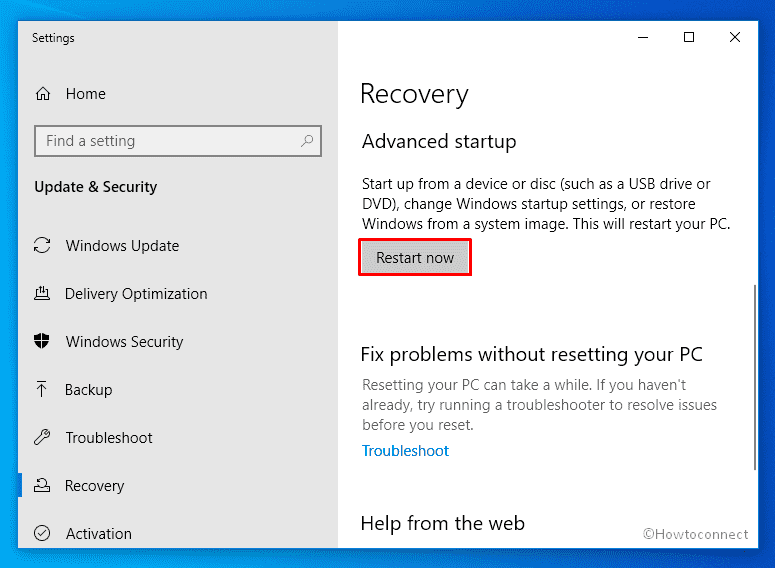
- Once on the next screen, select Troubleshoot => Advanced options => Startup Settings sequentially.
- Click – Restart.
- When the system starts, press 5 or f5 to enable Safe Mode with Networking.
Safe Mode with Networking is more convenient to troubleshoot critical issues as it let the system access Internet which is a must for some workarounds. After booting into this startup, perform the task or re-create the situation that was giving rise to blue screen error. If the system brings forth the BSOD, you can be sure that there is something wrong with Windows itself. After forcing the system if it still runs error-free, there is a high chance that third-party programs or services are responsible. Once you know what actually caused the BSOD, try out further workarounds accordingly.
2] Disable random shutdown
FAST_ERESOURCE_PRECONDITION_VIOLATION is the result of critical system crashes and causes severe damage to the Windows 10 device. To minimize the aftereffect of such crashes, Windows reboot itself time and again. Due to these random restarts, the system becomes completely inoperable and unworkable. As a result, you fail to carry out any workaround that works to fix the blue screen error.
Automatic Restart is a built-in Windows feature and it comes pre-enabled in the system. You are allowed to tweak this default setting and toggle the feature off to prevent Windows from restarting. Though disabling automatic restart won’t work as a hotfix, doing so will make the system more stable and let you deploy probable resolutions without any hitch. Here are the steps to follow –
- Press – Windows key.
- Type – advanced system settings.
- Hit – Enter.
- From the newly appeared wizard, click Settings present under Startup and Recovery.
- Deselect the checkbox placed before Automatically restart.
- Click – OK.
- Close System Properties.
3] Check for malware to resolve FAST_ERESOURCE_PRECONDITION_VIOLATION
Windows 10 generally doesn’t get affected by malware when Windows security remains active. If you are using any reliable third-party antimalware program, that will keep your system safe too. In case of not using either the built-in or third-party software, the system becomes easy prey to get affected by viruses. Once the malware manages entrance, they affect essential system components and oftentimes result in blue screen error.
Malware can be anywhere from online to offline but not all of them are detrimental. Some viruses start replicating themselves right after entering into the system and keep doing the same until you stop them from spreading more. In most cases, we don’t notice them initially as they remain in disguise. When some of the essential Windows elements go missing or stops functioning because of such threats, the system gives rise to errors like FAST_ERESOURCE_PRECONDITION_VIOLATION. Therefore, cleaning the existing threats is a must. To do so –
- Press – Windows + Q.
- Type in – Virus & threat protection.
- Hit – Enter.
- When Windows Security turns up, move to its right pane.
- Click the link – Scan options.
- Select the radio button set before Full scan.
- Click – Scan now.
- If the utility traces out any malware, hit – Clean Threat.
- After that, click Remove subsequently Start actions.
- Reboot Windows device.
4] Rollback driver update
Besides major updates, Microsoft keeps delivering cumulative and feature updates for Windows 10 quite regularly. These updates generally include new features, improvements, security patches, and bug fixes. In addition to that, device drivers receive the latest version too. Due to poor internet connection, often the system gets broken update files for drivers or Microsoft itself provides buggy updates. You may also get the wrong or faulty driver update while installing it manually. As a result, device drivers don’t perform the way they must be.
Broken and incompatible device drivers are one of the main reasons that cause blue screen errors on Windows 10. Though it’s always beneficial to keep your drivers updated, what matters most is compatibility. So, if you started conflicting FAST_ERESOURCE_PRECONDITION_VIOLATION BSOD after updating any driver, either roll back to the previous state or uninstall the same. In case you don’t know which driver got update recently, check the driver list first and then go for rolling back. Here’s how –
- Press – Windows + I.
- Choose – Update & Security.
- Move to the right pane and click – View update history.
- Expand Driver Updates section present under Update history.
- Note down the drivers that received updates.
- Later on, press – Windows + X.
- Select – Device Manager.
- Double-click the hardware that has received an update lately.
- Right-click the driver you want to roll back and choose – Properties.
- Shift to Driver tab.
- Click – Roll back Driver.
- Provide a reason for what you want to restore and hit – Yes.
- After rolling back successfully, close Device Manager.
- Restart Windows when the system asks for it.
5] Uninstall Windows 10 update
Microsoft releases every Windows patch with the intention to make the system steady, stable, and not to mention error-free. Unfortunately, some of the patches come along with bugs and broken installation files. Also, the system many times ends up installing broken setup files due to a bad internet connection or some other reason.
No matter how, if the latest update turns out to be a buggy one, the system may give rise to FAST ERESOURCE PRECONDITION VIOLATION error. In such a case, uninstalling the recent update usually solves the issue. Follow the way to get rid of buggy Windows update –
- Press – Windows key.
- Insert – view update history.
- Hit – Enter.
- Click the link – Uninstall updates.
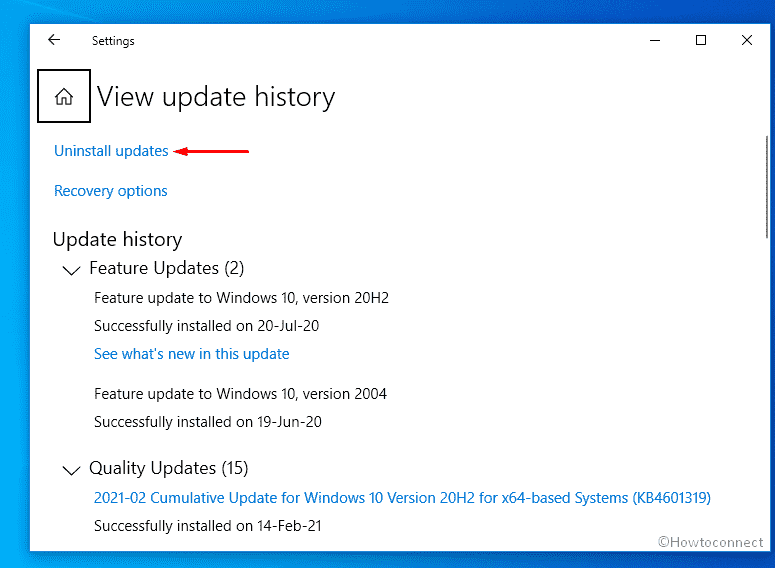
- Scroll down to reach the Microsoft Windows section.
- Select the KB version you received for the last time.
- From the top ribbon, click – Uninstall.
- Comply with further instructions that come on screen.
- After completion of the removal process, reboot the device.
6] Resolve corrupted system elements to fix FAST_ERESOURCE_PRECONDITION_VIOLATION
System components are a crucial part of any OS and if they go missing or become corrupted, FAST_ERESOURCE_PRECONDITION_VIOLATION BSOD may evolve. To deal with such issues, Windows offers a tool named System File Checker. When you run its dedicated command line, the utility immediately starts scanning system components and then lets you know if there is corruption or any other changes. Not just that, Windows will then go on to replace any wrongly modified and corrupted files with the default ones.
Oftentimes, System File Checker fails to resolve the existing corruption. In such a case, DISM comes as a rescue. When you will run its command-line in elevated Command Prompt, the utility will scan the system and correct the problem that was preventing System File Checker from working properly. As issues associated with System File Checker are also related to DISM, you might need to run both of them. Here are the steps in detail –
- Click – Start button.
- Type – cmd.
- Press – Ctrl + Shift + Enter.
- To allow User Account Control, click – Yes.
- In elevated Command Prompt, insert –
Sfc /scannow. - Hit – Enter.
- Let the scanning process hit 100%.
- If the utility fixed found corruption, close Command Prompt and then restart Windows 10.
- In case System File Checker fails to fix the issue, execute
DISM /Online /Cleanup-Image /RestoreHealthin the same elevated Command Prompt.
The progress may seem slow in the beginning, but hold your patience and don’t cancel the ongoing process. Once the process ends, a message will appear pointing out if a change has been made. After viewing the message, restart your computer and run the System File Checker command again. Hopefully, the utility will this time replace found corrupt files.
7] Fix hard disk error
When you encounter any blue screen error, there is a high probability that the hard disk drive is either corrupted or damaged. When a disk incurs soft or logical errors, the system fails to read some parts of the drive. These unreadable parts of the hard disk drive are called bad sectors. A bad hard disk doesn’t necessarily mean that the disk drive is physically damaged. Sometimes bad sector refers to software problems and sometimes external damage.
Software-related issues usually take place due to accidental power failure, overheat, and forcibly pulled-out cable. On the other hand, physical damage that refers to a hard bad sector can be a result of production faults, accidental fall down, water damage, etc. To deal with the logical hard disk error, chkdsk command-line utility comes handy. When you execute it in elevated Command Prompt, the tool scans the whole disk volume and fixes found errors automatically. In case of physical damage, you might need to change the hardware.
- Open Command Prompt as admin.
- Copy
chkdsk C: /f /r /xand paste it in the black pane. - Hit – Enter.
- Don’t interrupt the process in between and wait patiently.
- Analyze the outcome the utility shows up.
- If the found issue is resolved, reboot the device. Otherwise, do what the report suggests.
8] Install available Windows update to get rid of FAST_ERESOURCE_PRECONDITION_VIOLATION
Oftentimes users come across FAST_ERESOURCE_PRECONDITION_VIOLATION after installing a recent update. Microsoft after getting reports about the same releases a newer patch that fixes the BSOD automatically. Though the process sometimes takes time, it’s worth waiting as the issue will be resolved all by itself.
If your PC is set to receive the latest Windows update automatically, you don’t need to do anything to get the upcoming patch. Since the bug fix comes through a cumulative update, you also don’t need to apply any previous updates before you install the latest version. To get the update immediately, you can manually check whether it’s available or not. Before you jump into the process, make sure to include drivers in the Windows update. Here are the steps –
- Press – Windows + R.
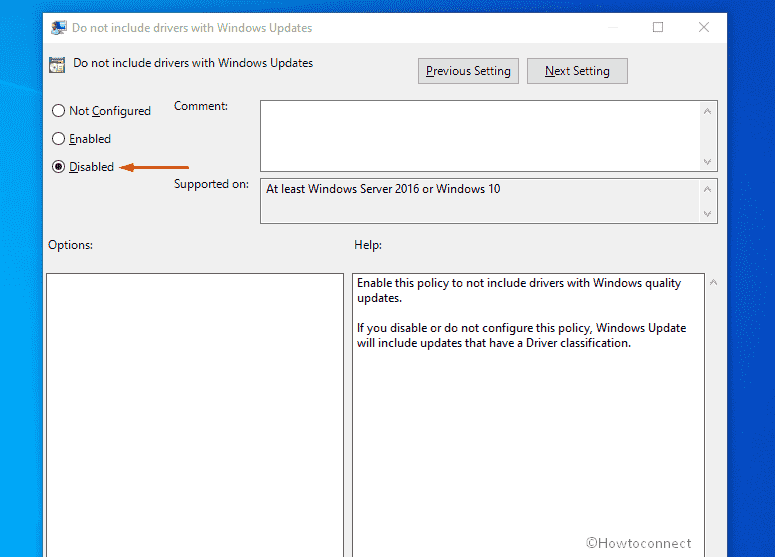
- In the dialog box, insert – gpedit.msc.
- Click – OK.
- Navigate to – Computer Configuration/Administrative Templates/Windows Components/Windows Update.
- Move to the right pane.
- Double-click – Do not include drivers with Windows Updates.
- Select the radio button set before Disabled.
- Click Apply and then OK.
After doing so, you will receive available updates for device drivers every time the system installs a newer Windows patch. Now, let’s see how you can get Windows update manually –
- Press – Windows + I.
- Choose – Update & Security.
- From the right-hand side, click – Check for updates.
- If any newer patch is available, hit – Download
- When the downloading process ends, click – Install now.
- After completion of the installation, hit the button – Restart now.
9] Reinstall faulty Device Driver
If FAST_ERESOURCE_PRECONDITION_VIOLATION continues to occur after rolling back and updating device drivers, check if a faulty driver still exists. For this purpose, Windows 10 has a built-in tool named Driver Verifier. The main work of this utility is to replace the default operating system subroutines with ones that are specifically developed to catch device driver bugs.
When Driver Verifier is active on your system, it monitors and stresses drivers to track down any unusual activity that is giving rise to BSOD. To make use of the utility so that it can detect the troublesome driver, follow the below steps –
- Press – Windows key.
- Write down – verifier.
- Hit – Enter.
- Give permission to User Account Control by clicking – Yes.
- Select the radio button set before Create custom settings (for code developers).
- Click – Next.

- Check all boxes except DDI compliance checking and Randomized low resources simulation.
- Hit – Next.
- Choose the radio button set alongside Select driver names from a list.
- Click – Next.
- Select non-Microsoft drivers.
- Click – Finish.
- To make sure Driver Verifier is running, open Command Prompt first.
- Insert verifier /querysettings in the black pane.
- Hit – Enter.
- If Verifier is running, the system will return a list of drivers.
- In case it doesn’t, perform the below steps once again.
- After being sure, restart the Windows device.
- Use the Windows 10 machine normally.
- When FAST_ERESOURCE_PRECONDITION_VIOLATION shows up this time, Driver Verifier will display the faulty drivers’ name.
Note – This process may take a maximum of 36 hours, but you can force the system by re-creating the scenario that was bringing forth the blue screen error.
- Once you know which driver is the culprit, reinstall the same.
10] Reconnect USB devices
FAST ERESOURCE PRECONDITION VIOLATION BSOD often gets generated by connected peripherals like printers, external hard drives, scanners, and Bluetooth devices. This might happen due to incompatible USB adapters. If this is the real case, disconnect all attached peripherals from the USB ports. After that, restart the PC and see if the blue screen error still exists. If no error shows up, connect all accessories again and while doing so, check if any particular item is triggering the BSOD.
If any specific item is causing the blue screen error, you might need to change the peripheral with a new one. Before doing so, run the hardware troubleshooter first and see if it helps. This utility reviews as well as diagnoses operational or technical problems within a hardware device or peripherals. To run the tool –
- Click – Start icon.
- Type – cmd.
- Press – Ctrl + Shift + Enter.
- To allow User Account Control, click – Yes.
- On Command Prompt, insert the following and hit Enter –
msdt.exe -id DeviceDiagnostic
- When Hardware and Devices Troubleshooter becomes visible, click – Next.
- After analyzing the system, the utility will reveal devices that have problems.
- Opt for the device you want to troubleshoot and click – Next.
- If the tool offers an automatic repair, hit – Apply this fix.
- In the end, click Next to allow the system to restart.
11] Free up disk space to fix FAST_ERESOURCE_PRECONDITION_VIOLATION
If the disk where Windows is installed doesn’t have enough free space, FAST_ERESOURCE_PRECONDITION_VIOLATION may evolve. Besides system failures, low disk space makes the machine laggy and you may fail to use the PC systematically. Each day after every single use, the system stores a considerable number of temporary files. These files mainly include shader cache, browsing data, and downloaded contents, old update files, etc. All of these items are saved in the (C:) drive. After being full, it affects the Windows operation and gives rise to several error codes.
Temporary files are almost useless moreover end up occupying a huge hard disk space if not cleaned regularly. By making enough free space, you can improve PC performance furthermore eradicate some of the unexpected issues. Disk Cleanup is a built-in Windows utility that helps to wipe out unwanted files in bulk amount without affecting the device performance. On top of that, this tool offers free hand to delete any data from categorized sections. To use the utility, here are the steps to follow
- Click the search icon from the taskbar.
- Type in – cleanmgr.
- Hit – Enter.
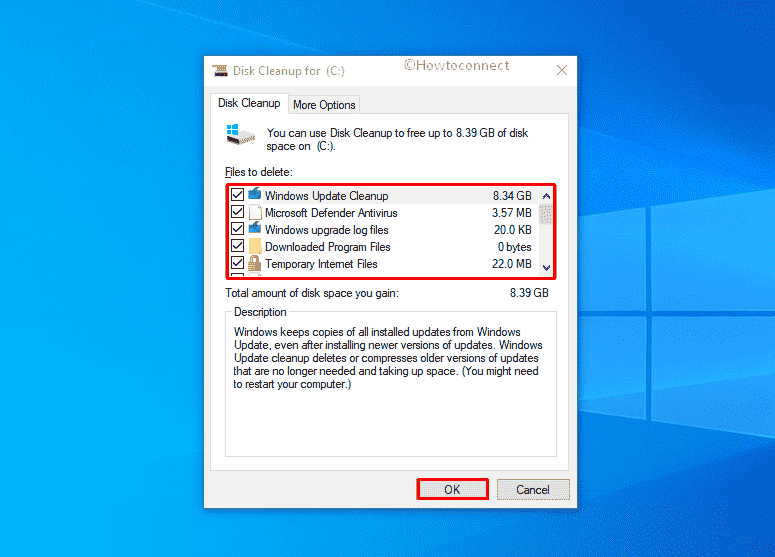
- When Driver selection pop-up emerges, click – OK.
- From the bottom left, hit – Clean up system files.
- Click – OK.
- Check all the boxes lying under Files to delete segment.
- To start the cleaning up process, click – OK.
- When the process ends, reboot the Windows device.
12] Uninstall software that causes conflict
When your system has multiple software that is used to accomplish the same task, both can conflict with each other and results in system crashes. Such collisions cause instabilities in your operating system and often lead to component misplacement. When the system fails to get an essential element while carrying out an operation, errors like FAST_ERESOURCE_PRECONDITION_VIOLATION may show up.
Even so, Windows 10 includes a great number of pre-installed software; some advanced apps are needed for specialized tasks. As these programs are easily accessible either from the web or Microsoft store, you may end up installing so many. Some of the applications you get from unauthorized vendors often carry bugs in themselves and cause blue screen errors. Therefore, download software from a trusted source only and also avoid installing apps that you will hardly use. To uninstall unwanted apps, follow the below steps –
- Press – Windows + X.
- Choose – Apps and Features.
- Move to the right pane of the dedicated settings page.
- Look for the applications that have similar congruence.
- When you get any, select the one.
- Click – Uninstall.
- To give final consent, hit – Uninstall.
- Keep following further instructions if any.
- Uninstall all unnecessary applications similarly.
- In the end, restart the device.
13] Test RAM to detect bad sector
RAM is not the main memory module of a device but it plays a significant role to ensure smooth functioning. This memory unit basically stores temporary data while the CPU is executing other tasks. When bad sectors form in it, you will notice unpredictable behavior in your Windows 10 device. In some cases, dreadful blue screen of deaths evolves too.
Bad sectors in RAM usually form due to overheating, sudden power surges, and unexpected restarts. RAM can be faulty because of production fault and accidental fall too. If the issue is non-physical, it gets fixed with few diagnoses in most cases. In case of external damage, you will have to replace the unit with a new one. Before changing the same, run Memory diagnostic tool to know if you have a bad memory module. Follow the way –
- Click – Windows + S.
- In the search bar, insert – mdsched.exe.
- Click – Enter.
- Pick – Restart now and check for problems (Recommended) option.
- Don’t interrupt the process in between and let the utility detect RAM issues.
- Windows 10 will restart normally after the test is completely over.
- You will get the diagnosis report in the notification area.
- In case the utility didn’t find out any issue that means that the RAM is not faulty.
- If there is an error, research the issue and see if it can be fixed.
By default, Memory Diagnostic opts for Standard Mode. This mode is ample for most issues but if you think your RAM needs an advanced test, run the tool again. Press F1 on your keyboard as soon as your computer starts up to see advanced options. Opt for the Extended test for an in-depth examination.
14] Do a Clean Boot to get rid of FAST_ERESOURCE_PRECONDITION_VIOLATION
Oftentimes, third-party programs or services running background conflict with the default ones which later lead to FAST_ERESOURCE_PRECONDITION_VIOLATION. In such a situation, a clean boot can help in troubleshooting. This startup is quite similar to Safe Boot but differs in the action of carrying out tests and diagnoses. The system will also boot with a minimal number of startup applications to make the troubleshooting easier.
When you will clean boot Windows 10, the OS will start with default drivers and startup programs only. Therefore, you can be sure if the blue screen error is originated from any Microsoft or non-Microsoft service. Furthermore, you will also get to know whether a background program is interfering with the system. To start Windows 10 with Clean Boot, imitate the below steps –
- Press – Windows + R.
- In the Run box, put – msconfig.
- Click – OK.
- Doing so will bring forth System Configuration wizard.
- Click the radio button set before Selective startup.
- Uncheck the option – Load startup items.
- Shift to Services tab.
- Check the box present alongside Hide all Microsoft services.
- Click – Disable all.
- Move to Startup tab.
- Click the link – Open Task Manager.
- Select any enabled program and click – Disable.
- Disable all startup applications in this way.
- Close Task Manager.
- When back to System Configuration wizard, click Apply and then OK.
- Reboot Windows.
15] Check Event Viewer to diagnose FAST_ERESOURCE_PRECONDITION_VIOLATION
In most cases, we don’t know what actually caused the blue screen error on Windows 10 PC. As a result, we start deploying all plausible resolutions that usually fix such issues. Some BSODs are pretty hard to recover and the process of troubleshooting may seem disappointing at a point.
In such situations, you might want to find more details about the problem so that the diagnosis process becomes easier. Windows includes a built-in tool named Event Viewer that records details of system crashes, hardware failures, software conflicts, and every other issue. To make use of the tool use these steps –
- Right-click the Start button.
- Select – Event Viewer.
- From left column, double-click – Windows Logs.
- Right-click System and select – Filter Current Log.
- Hit the drop-down menu located beside Logged.
- Opt for a time range when FAST_ERESOURCE_PRECONDITION_VIOLATION appeared.
- Reach to Event level section.
- Click the checkboxes set for Critical and Error options.
- Hit – OK.
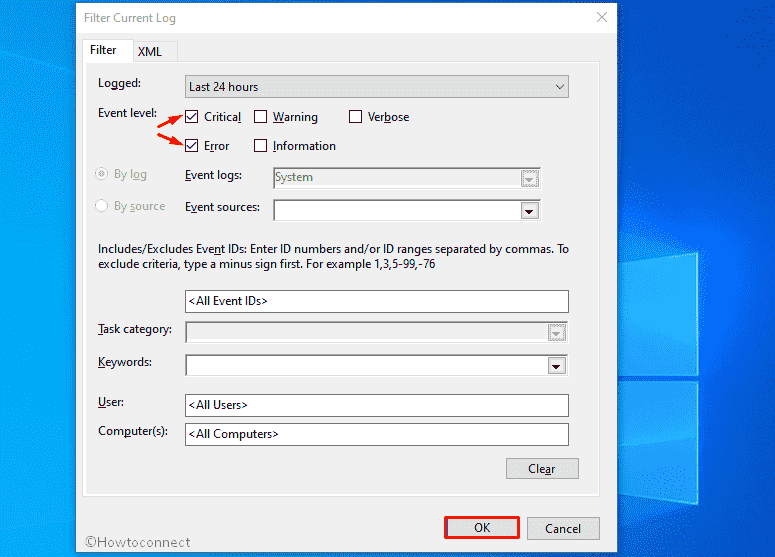
- Open each log to learn more details about the blue screen of death.
- Review event log details and take further steps accordingly.
16] Install the latest and compatible BIOS version
BIOS is one of the main at the same time most delicate components of a Windows 10 machine. Though it’s a software component, many hardware items largely depend on this. The main work of this firmware is to control the data flow between Windows OS and the attached peripherals. When it becomes outdated, various issues may take place including FAST_ERESOURCE_PRECONDITION_VIOLATION. Therefore, it’s necessary to keep the BIOS up-to-date. For that –
- Press – Windows + S.
- Write down – msinfo32.
- Hit – Enter.
- Check the info of BIOS Version/Date.
- Note down the same.
- Close System Information window.
- Open a web browser you prefer.
- Visit the makers’ website of your BIOS.
- Look for the current and most importantly compatible version of BIOS using the previous info got.
- Download the setup file.
- Go to the directory where the system saves downloaded items.
- Double-click the exe file you got.
- Follow on-screen instructions to complete the installation process.
- Lastly, reboot the device.
17] Disable Fast startup to fix FAST_ERESOURCE_PRECONDITION_VIOLATION
Fast Boot is a combination of the computer’s usual shutting down process and Hibernate. When this feature remains active, the system carries over every single process to the next session. To be more specific, this special boot stores the internal information of your system in its memory by the time you switch it off so that Windows starts faster. In order to stop Windows 10 from carrying over any info about FAST_ERESOURCE_PRECONDITION_VIOLATION, disabling fast startup is necessary. To do so –
- Right-click the battery icon from the system tray.
- Choose – Power Options.
- From the left overlay, click – What the power buttons do.
- Hit the link that says – Change settings that are currently unavailable.
- Uncheck the box set before Turn on fast startup (recommended).
- Click – Save Changes.
18] Diagnose Windows 10 with automatic repair
When Windows fails to boot due to a blue screen error or any other startup issue, try out the Automatic repair that the OS offers. This startup repair comes into action at the third boot and immediately starts diagnosing the issue. Once activated, the utility scans system files, registry settings, configuration settings and runs other diagnosis tools too.
This startup repair is set to run automatically but some of you prefer to keep it disabled as it often leads to an unexpected repair loop. If you also turned it off earlier, enable the repair mode manually so that the tool starts working again. Here are the steps to follow –
- Open Windows Settings app.
- Select – Update & Security.
- From the left column, select – Recovery.
- Click Restart now located beneath Advanced startup.
- Select Troubleshoot =>Advanced options => Startup Repair each in turn.
- When Automatic Repair page shows up, provide credentials of your account.
- Click – Continue.
- After completion of the diagnosis process, check if the issue still persists.
19] Load previous error-free state
Sometimes FAST_ERESOURCE_PRECONDITION_VIOLATION arises after installing new software or making changes in the settings or services. This mainly happens if the new changes don’t go with the system configuration or these modifications tweaked the registry wrongly. If you can’t be sure which change actually causing BSOD, go back to an earlier state where the OS was working error-free. To accomplish this process, follow the below process –
- Press – Windows key.
- Write down – rstrui.
- Press – Enter.
- When System Restore wizard appears, click – Next.
- Pick a restore point available there.
- Click – Scan for affected programs.
- Select the applications you want to wipe out.
- Go back to System Restore wizard.
- Click – Next.
- To start restoring process, hit – Finish.
20] Reinstall Windows 10
Clean install is the last resort to try out right now. Once you install the system afresh, all content related to user files will be removed from the local disk. Doing so oftentimes fixes errors like FAST_ERESOURCE_PRECONDITION_VIOLATION too. Here is how to proceed –
- Visit Software Download webpage that Microsoft offers.
- Click – Download tool now.
- Double-click the setup file you just got.
- To approve appeared User Account Control, click – Yes.
- When setup wizard turns up, click – Accept.
- Select – Create installation media (USB flash drive, DVD, or ISO file) for another PC.
- Hit – Next.
- Check whether the Language, Edition, and Architecture are set correctly.
- Click – Next.
- Choose – ISO file.
- Hit – Next.
- Select a location where you want to save the setup file.
- Click – Save.
- After that, hit – Finish.
- Visit the directory where you saved the file.
- Double-click the setup file.
- Follow on-screen guidelines to complete the installation process.
Methods list
1] Boot to Safe Mode with Networking
2] Disable random shutdown
3] Check for malware
4] Rollback driver update
5] Uninstall Windows 10 update
6] Resolve corrupted system elements
7] Fix hard disk error
8] Install available Windows update
9] Reinstall faulty Device Driver
10] Reconnect USB devices
11] Free up disk space
12] Uninstall software that causes conflict
13] Test RAM to detect bad sector
14] Do a Clean Boot
15] Check Event Viewer to diagnose FAST_ERESOURCE_PRECONDITION_VIOLATION
16] Install the latest and compatible BIOS version
17] Disable Fast startup
18] Diagnose Windows 10 with automatic repair
19] Load previous error-free state
20] Reinstall Windows 10
That’s all!!!