Windows 10 includes multiple processes running in background and controlling different tasks. But some of them create issues in the operating system as they cause high CPU usage and abnormal memory consumption, limit performance, and frequently throw error messages. One such problem is GameBarPresenceWriter.exe error pop up that crashes games, causes input lag, and even latency spikes.
Basically, GameBarPresenceWriter.exe is an executable file that is directly connected with the Xbox app and Game Bar. Though being a useful feature, sometimes it generates several problems and uses more resources. As a result, users come across this error while they make an attempt to launch or run any game. The best possible resolution to get rid of this issue is to disable the process itself. However, the task can be accomplished by modifying the registry entries. So let’s begin –
GameBarPresenceWriter.exe Error Pop up
Here is How to Fix GameBarPresenceWriter.exe error pop up in Windows 10 –
1] Turn off the Game bar
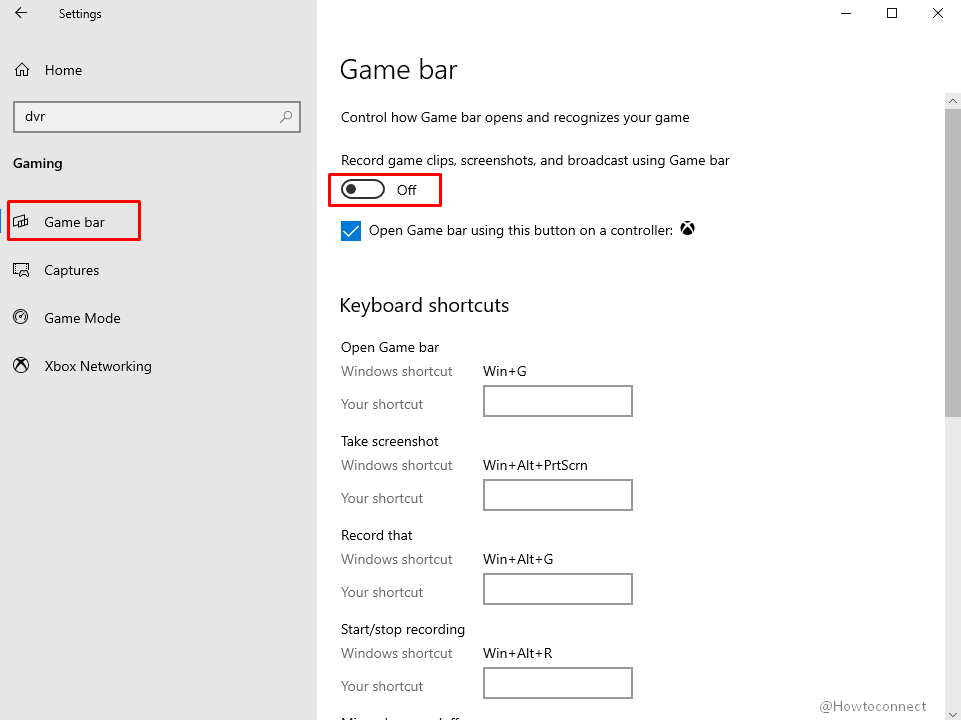
Many users find that the pop up stops showing after they turned off the game bar from settings. So first try this solution and see if fixes GameBarPresenceWriter.exe error by following instructions –
- Open Windows Settings (Windows logo + I keys)
- Select Gaming
- Go to the right pane of the next page and use the toggle switch under Game bar to turn off.
Modify Registry Key to fix GameBarPresenceWriter.exe Error Pop up
- Press Windows logo and R keys.
- Type the command regedit, click OK
- On the UAC popup, hit Yes.
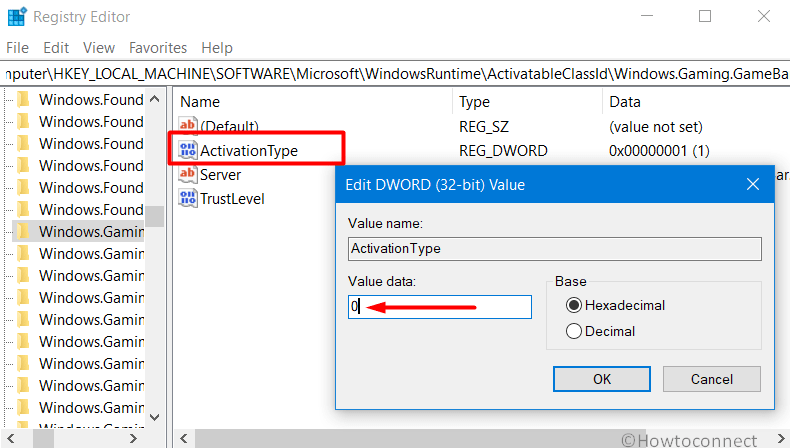
- Once you access Registry Editor, navigate to the below-given path –
HKEY_LOCAL_MACHINE\SOFTWARE\Microsoft\WindowsRuntime\
ActivatableClassId\Windows.Gaming.GameBar.PresenceServer.Internal.PresenceWriter- Do a right-click on Windows.Gaming.GameBar.PresenceServer.Internal.PresenceWriter and choose Permissions.
- Under Groups or user names, choose “Everyone”, or “Administrators” or “Current User” depending on who is accessing the PC currently.
- Select Full Control checkbox for Allow in the lower box.
- Click Apply followed by a hit on OK.
- Now, on the right pane of the Registry Editor, double-click on ActivationType DWORD. Set 0 as its data value and click OK.
- Restart PC or Windows Explorer.
- This will fix GameBarPresenceWriter.exe Error Pop up.
If the Changes show Insufficient Permissions error –
For some users, accomplishing the above steps will typically throw an Insufficient Permissions error. If you also come across this, then go through these steps to modify permissions –
- Fire up the Registry Editor and go to the path mentioned above.
- Perform a right-click on Windows.Gaming.GameBar.PresenceServer.Internal.PresenceWriter and click Permissions.
- Click the Advanced button.
- By default, it will display the Owner as TrustedInstaller; but as you own this PC, change the dominance. So click Change link.
- Again click Advanced on the Select User or Group popup.
- Hit Find now button.
- Select your username from the list that appears at the bottom, click OK.
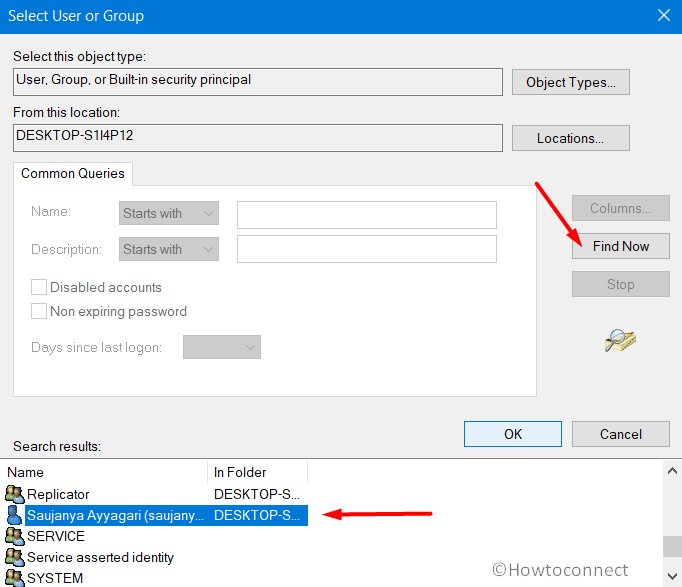
- Hit OK on the Users or Group wizard as well.
- Click Apply and OK buttons to get the ownership.
- Tick mark Full control checkbox next to Allow option for Administrators and save the changes hitting OK.
- Now, switch to the adjacent pane and double-click the DWORD ActivationType.
- Assign 0 as its Value data, click OK.
- Finally, Restart Windows 10 PC to fix GameBarPresenceWriter.exe Error Pop up.
That’s all!!!