You might have encountered an issue where the hard disk space showing less or more than actual in Windows 10. All files when selected inside a drive you find a difference between the space displaying in File Explorer with the real amount. The system reports the wrong disk space because of several reasons.
Incorrect disk space issue occurs because of Obsolete disk drivers, hidden files, multiple System Restore points, outdated Windows, etc. So if you are also facing wrong drive size occupied, then try out the below listed simple and effective workarounds. Any basic user can follow them to retrieve the correct disk space. Let’s begin –
Hard disk space showing less or more than actual
Here is How to Hard disk space showing less or more than actual in Windows 10 –
1] Update Hard Drive Driver
First of all, it is best to check the hard drive drivers and make sure they have the latest version installed. An obsolete driver always causes unwanted issues in the device and this incorrect display of free space can also be one of them. Hence, observe the below guidelines and update the hard drive driver –
- Make a right-click on the Start icon and from the pop up Win+X menu, choose Device Manager.
- Once it shows up, locate, and expand Disk drives.
- Right-click on the defective hard drive and select Update driver.
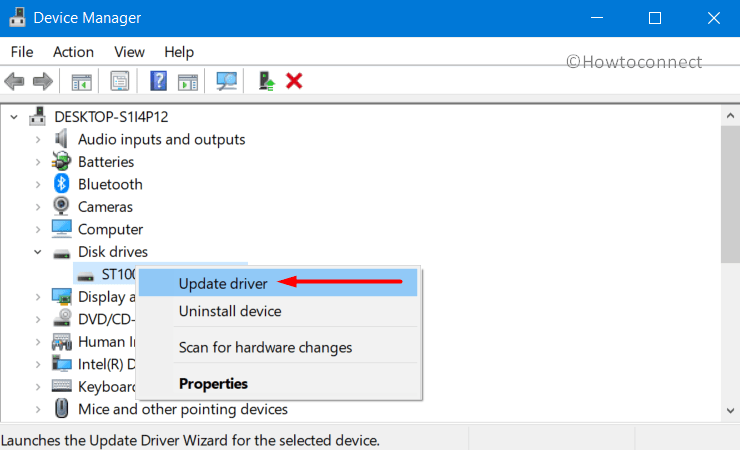
- Subsequently, do a click on Search automatically for updated software option from the wizard.
- Once the installation gets over, reboot the device for the changes to be effective.
Note – Additionally, you can also navigate to the official website of your hard drive manufacturer. Find out the latest driver version and grab the same, manually install and then check if Hard disk space showing less or more than actual.
2] Check Hard Disk for Errors
Chkdsk is one of the built-in command-line utility and it basically scrutinizes the file system and metadata of a volume. The scan will detect for logical as well as physical errors on the drive. This is the most powerful tool as it not only check the disk but also makes an attempt to scan errors and repair them. Simply go through the below series of steps to carry out this command –
- Type cmd.exe on taskbar search box and select “Run as administrator” from the right pane.
- Upon a UAC popup, click Yes to grant permission.
- Once into the elevated Command Prompt, insert the given text and hit Enter –
chkdsk C: /f /r /x
- Wait for the scan to get over as it will check and scan the system drive for errors. Moreover, it will repair the file system corruption and bad sectors in the drive if errors were found.
3] Unhide the Hidden and System Files
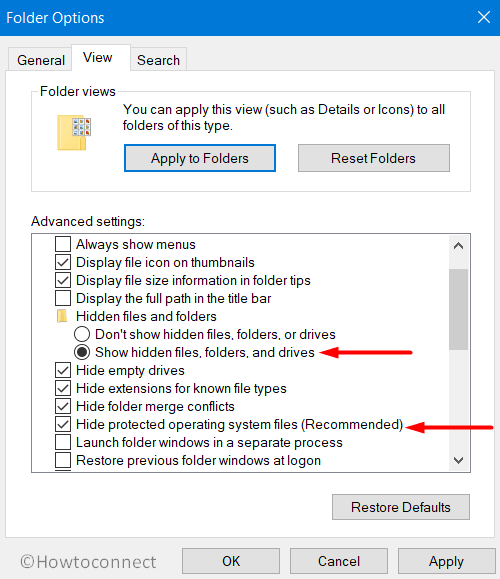
By default, File Explorer does not display the files that are marked as hidden or system. Consequently, they are not included in the calculation and hard disk shows incorrect capacity. Hence, changing that setting will actually increase the “Size on disk” and this can go up by approximately 7 Gigabytes. It happens because all the hidden files on the machine will be included in the calculation, most importantly, it will calculate the system swap file and hibernation file. They are pretty large in their respective sizes and are often marked as hidden. Follow the below steps to change the settings in File Explorer –
- Open File Explorer by using “Win+E” hotkey.
- Click View on the toolbar.
- Select Options.
- In the Folder Options window, switch to the View tab to explore all the options.
- Under Advanced settings, scroll down and check mark the options “Show hidden files, folders, and drives” and “Hide protected operating system files” respectively.
- Now, remove the junk by clearing out the unwanted hidden files or photos.
- Restart Windows 10 PC and then check Hard disk space showing less or more than actual.
Note – Once the search for the files is over, hide the folders again. Ensure that you don’t delete any file in the C: Drive.
4] Run System Maintenance Troubleshooter to Fix hard disk space showing less or more than actual
Hard disk space showing less or more than actual can also occur due to Windows glitch. Thankfully, Windows includes a system maintenance troubleshooter that will detect the inconsistencies and resolve the issue all by itself. You can find this in the classic Control Panel and it is not listed in the Settings app. So go through the below guidelines to run the troubleshooter –
- Fire up Windows search, type control panel, and hit Enter.
- Make the applet into large or small view and select Troubleshooting.
- Click on System and Security category.
- Do a right-click on System Maintenance and choose “Run as administrator“.
- Once the troubleshooter wizard comes into view, click Advanced and select Apply repairs automatically option. Click Next.
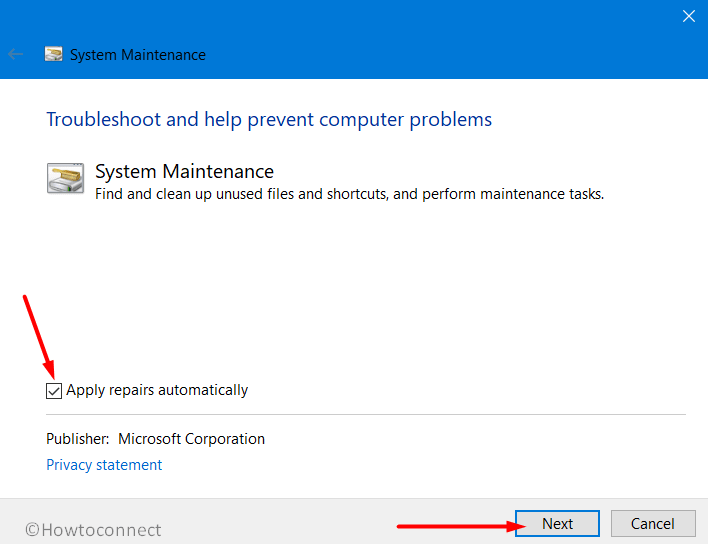
- Let the tool complete detecting the system for any inconsistencies. If the tool recommends a fix, click on Apply and allow the repair to finish.
- After it is over, reboot the device and upon startup check hard disk space.
5] Convert Hard Disk from MBR to GPT
Hard drive space issue is related to the external one, then it might be due to MBR and this can be fixed by converting “MBR” to “GPT” followed by making fresh disk partition. There are several 3rd party utilities that do this conversion but you can make it possible using diskpart itself. Observe the below steps to do the same manually for the same –
- Right-click on Start, choose Run and type cmd in its text box.
- Jointly press “Ctrl+Shift+Enter” keys to straight away open Command Prompt as Admin from Run dialog.
- On the UAC pop-up, click Yes to proceed.
- When into the black window, type in
diskpartand hit Enter. - Next,
insert list diskand press Enter.
Important – Here, carefully see and note down the disk number that you prefer to convert to GPT.
- Moving on, type the below two commands and press Enter after each –
select disk number of disk
convert gpt
Note – In the above command, substitute number of disk with the actual number.
- Once the conversion is over, exit Command Prompt.
6] Remove Previous System Restore Points
Experts point out there is one culprit that consumes lots of space but does not show up in Windows is System Restore. It was also found that in some of the affected computers, the System Restore ended up taking around 250 GB space. Therefore, as a simple resolution, you can delete all the restore points for the system drive to recover some valuable space. Though it is a useful feature, completely disabling System Restore is not suggested. However, you can delete all the restore points up to a point and also limit the Max Usage of the tool for the future. So go through these instructions to get rid of the old system restore points –
- Open Control Panel using any of your preferred ways. Click System icon when all the list of items becomes visible.
- Click System Protection on the upper left side of the following page.
- System Protection tab will show up by default in the System Properties wizard.
- Select the system drive and click Configure button.
- Under Disk Space Usage field make sure that the Max Usage is not set above 10%. For example, you have a 1TB HDD, keeping its 10% for system restore will be more than enough.
- Now, click the Delete button that is against Delete all restore points. This will clear out the space that is currently occupied by System Restore.
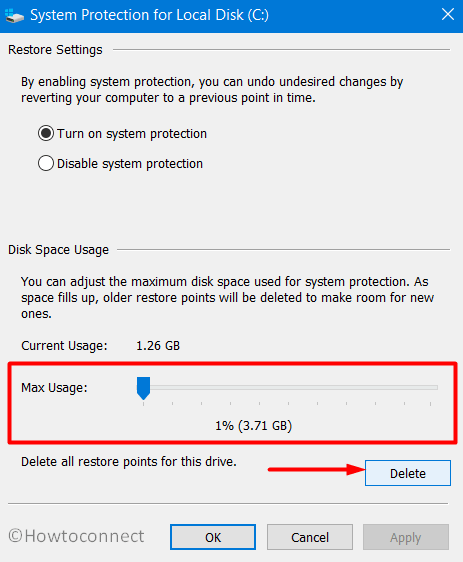
- To save the current configuration, click Apply and then reboot the PC to implement the changes.
7] Fix hard disk space showing less or more than actual by Deleting $RECYCLE.BIN Folder
In several cases, users confront the hard disk space showing less or more than actual due to $RECYCLE.BIN folder. Incorrect drive issue was also evident in the previous editions of Windows 10 as well. The problem indicates that you need to easily retrieve the missing free space by removing $RECYCLE.BIN folder. Follow the below guidelines to accomplish this solution –
- Go to taskbar search box and cmd in its text field.
- This will bring Command Prompt in the result. Right-click on it and select “Run as administrator”.
- If you come across UAC prompt, hit Yes.
- Now, insert the given below command and hit Enter to execute the removal of $RECYCLE.BIN folder –
rd /S "$RECYCLE.BIN"
- Confirm the deletion by pressing Enter or Y key.
- Once the removal of the folder gets over, restart the PC for the changes to be effective.
8] Update Windows 10 to its Latest Version
Your system is not running the latest update or build of Windows 10, then there is probability that you will have to deal with an Explorer.exe bug. When such an issue occurs, the utility becomes unable to correctly read metadata of file types and it fails to calculate the accurate size of folders which eventually leads to incorrect display of free space. Therefore, to update Windows 10, do the following –
- Press “Win+I” hotkey to directly open Windows Settings.
- Select Update & Security.
- By default Windows Update is selected on the left sidebar. Switch to the right pane and click Check for updates.
- Let the system display all the available updates, click Download to grab them.
- If they require a restart, carry it out for complete installation.
Methods:
1] Update Hard Drive Driver
2] Check Hard Disk for Errors
3] Unhide the Hidden and System Files
4] Run System Maintenance Troubleshooter
5] Convert Hard Disk from MBR to GPT
6] Remove Previous System Restore Points
7] Delete $RECYCLE.BIN Folder
8] Update Windows 10 to its Latest Version
That’s all!!