HARDWARE_WATCHDOG_TIMEOUT is pretty rare blue screen of death at the same time stubborn enough to get rid of. System generates this issue with bug check code 0x000001CF which indicates Windows 10 has become inaccessible due to unexpected restart or shutdown moreover fails to process timer tricks.
Though various malfunctions can bring forth HARDWARE WATCHDOG TIMEOUT blue screen error, outdated device drivers, bad RAM, corrupt system components, and low disk space are found to be guilty in most cases.
HARDWARE WATCHDOG TIMEOUT
Here is how to fix HARDWARE WATCHDOG TIMEOUT Error in Windows 10 –
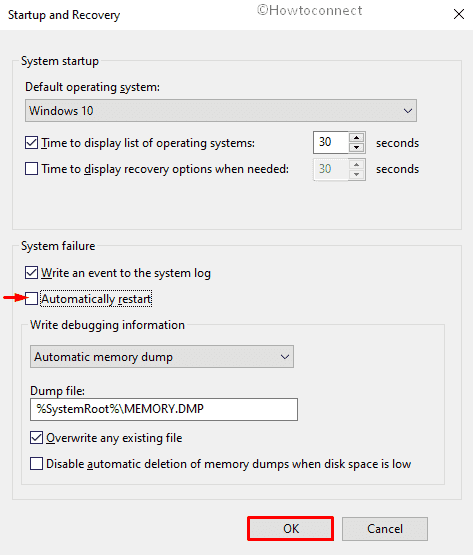
Once the system generates HARDWARE_WATCHDOG_TIMEOUT, Windows 10 restart itself time and again without prior notice just for avoiding farther damages. As a result, you don’t get enough scope to try out workarounds effectively. Therefore, disable auto shutdown procedure before jump into the solutions straightaway so that you can deploy listed methods without a hitch. Steps are as followed –
- Press Win+D hotkey together to reach desktop screen.
- Right-click on This PC and select Properties.
- Click Advanced system settings from left overlay.
- Take your cursor to Startup and Recovery section and hit Settings button lying beneath the same.
- Move down to System failure and then uncheck the box set to Automatically restart.
- Click the OK button to make the changes effective, thereafter, start working with the plausible workarounds.
1] Run SFC /Scannow to repair corrupted system files
System resources are very much important to run an operating system satisfactorily but when some of them go missing various issues arise. Though you are not allowed to delete system components anyhow even through the use of permissions, either the same can get misplaced or corrupted.
Forced shutdown, virus attack, memory problems, and power outage are more likely to mischief with system files. No matter what the cause is, sfc /scannow command utility will work to replace moreover restore corrupted components from the cached copy to Windows system folder automatically. Procedure to run system file checker is conferred below –
- Click on taskbar search and type cmd.exe.
- When Command Prompt becomes visible at top of search result, click Run as Administrator option.
- Give consent to UAC by hitting Yes button.
- Once the black window comes in view, put
SFC /Scannoweventually, press Enter key. - Wait patiently until the utility detects and fixes all corrupted windows resources along with DLL files automatically.
- After completion, if system file checker fails to recover anything, you will get a report accordingly. Hence, take necessary steps pursuant to the outcome of scanning process.
2] Get latest Windows 10 patches to fix HARDWARE WATCHDOG TIMEOUT
Microsoft usually provides latest fix and features automatically unless you disable Windows update. Like every other program, software installed in Windows 10 needs to be updated timely for ensuring better performance.
Once the system gets outdated, it becomes an easy target for cybercriminals to inject viruses. After getting infected with any kind of hazardous malware, you may confront several issues along with HARDWARE WATCHDOG TIMEOUT blue screen of death. This is the reason why keeping Windows updated is so much important.
- Press Windows and I keyboard shortcut to open Settings app.
- Click on Update & Security.
- Permute to the right pane and hit Check for updates button even though the page shows You’re up to date.
- If the system gets any available update, hit Download button.
- Stay in front of the device until the installation process finishes as the system may ask to reboot Windows 10 several times.
3] Do virus scan and clean threats
Infection of viruses affects the usual operation of your system badly by generating obtrusive error codes. Even though not all malware are that much destructive, taking them lightly can give rise to major problems such as HARDWARE_WATCHDOG_TIMEOUT.
Generally, virus makes entrance to your PC through spam mail or unprotected web and after entering into the system, it starts replicating itself. Moreover, to hide their own identity, they mostly disguise themselves as genuine components so that no one notices. Hence, run full scan to detect if any virus exists in your Windows 10 device –
- Press Win+X simultaneously and choose Settings.
- Once the application opens up, opt for Update & Security.
- Select Windows Security from the left column and shift to the right pane.
- Pick up Virus & threat protection option.
- When a separate window shows up, click Scan options link from right surface.
- Click the radio button of Full scan followed by clicking Scan now button.
- Wait patiently until the scanning process finishes.
- If the system traces any virus, click Clean Threats button to remove the same.
- In case of detecting the virus and know more about it, click See threat details link.
4] Settle upon defective Windows image files
System file checker often fails to correct detected corrupt files, as a result, HARDWARE WATCHDOG TIMEOUT blue screen of death keeps coming on even though it seems resolved at first glance. DISM command comes to retrieve from such a situation as it scans for corruption at the same time takes necessary steps to settle upon any issues it finds. Steps to run the utility are as followed –
- Press Win+R to bring forth Run command.
- Type cmd.exe in the dialog box followed by pressing Ctrl+Shift+Enter at once.
- Hit Yes if a UAC turns up for consent.
- Insert the following command and hit Enter –
DISM.exe /Online /Cleanup-image /Restorehealth
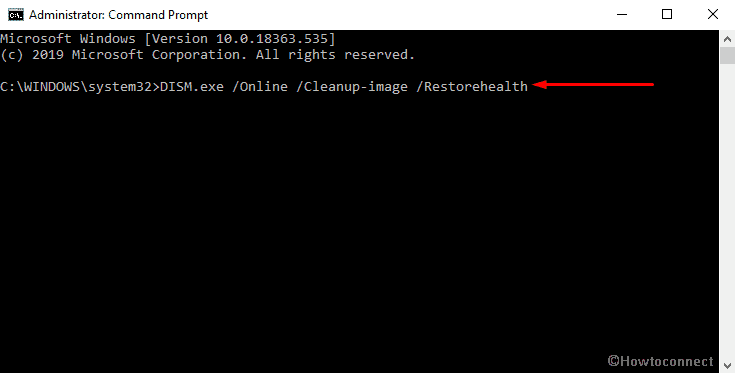
The process might be time-intensive if corruption is found during the scan of the Windows images. For your information, there is a time when the procedure gets stuck in between, however, this is no cause to concern as scanning should start after a moment automatically.
5] Take help of Device Manager to get the latest drivers
Device drivers are core components of any operating system as they make your hardware function according to plan. When something unusual eventuates with those drivers, operational speed of Windows 10 becomes slower and in worst cases, bug check code 0x000001CF is being generated. After getting hint about corrupted device drivers, system tries to alert us in several ways but most of the time we neglect the warnings. We not only disregard upcoming issues but also force the system to shut down as a cure after which things become more complicated.
To stay away from such situation, keeping device drivers up-to-date is a must. Though Windows update is designed to do this automatically while installing cumulative updates but there is a time when the option is turned off. Under such circumstances, get latest device drivers manually by following below steps –
- Right-click on Start button and choose Device Manager from the upper part of the Power user menu.
- Look for the devices having yellow exclamation marks beside them and expand the same by double-clicking.
- Right-click on the driver listed here and select Update driver option.
- Choose Search automatically for updated driver software.
- Do the same for each driver listed under the device having a yellow warning sign also update those items that seem suspicious to you.
- After completion, restart Windows 10 so that the changes can take effect.
6] Clean junk files to fix HARDWARE WATCHDOG TIMEOUT
System forms temporary files when a program fails to share out enough memory for the tasks it needs to perform. Temp files are pretty much important to serve necessary purposes, often the same slowdown Windows 10 and generate blue screen error, especially after prolonged use. Still, we can’t inculpate temporary files exclusively for such incidents as large browser cache size, old and unused programs are largely responsible too.
Procedure for deleting unnecessary files is not hard at all but if you are thinking to do it manually that will definitely take longer time. Therefore, take help of built-in Disk cleanup utility to remove junks in one go. Doing so will not only fix HARDWARE_WATCHDOG_TIMEOUT but also speed up moreover improve the performance of hard drive.
- Press Win key and S simultaneously and type cleanmgr in Windows search.
- Hit Enter to launch Disk Cleanup.
- Click on OK for the small pop-up where C: driver is selected by default.
- Hit the option entitled Clean up system files from the bottom.
- Again, click the OK button for Driver selection wizard.
- Check all the options lying beneath Files to delete.
Note – Careful about Downloads and Recycle Bin option moreover make sure you didn’t leave any important files there. In case of having any, keep those options unchecked.
- Click the OK button to initiate the cleaning procedure.
- On finishing, reboot the Windows and check if bug check code 0x000001CF still persists.
7] Check for RAM and memory issues
HARDWARE WATCHDOG TIMEOUT error often shows up while using memory-intensive programs, especially heavy games, and 3D applications. If same happened to you, there is no doubt bad RAM is the culprit. Corruption in Random Access Memory not only brings forward blue screen error but also gives rise to other issues, in addition, make Windows 10 device inaccessible. To overcome, test RAM stability as soon as possible and find out if there any bad form exists. To do so –
- Click on Start icon and type memory.
- Select Windows Memory Diagnostic when showing up under Best match.
- Opt for Restart now and check for problems (recommended).
- After finishing first cycle of rebooting, the utility will start detecting memory issues.
- When the progress hits 100 %, windows will prompt to reboot again.
- After the desktop loads, the result of diagnosis will be available in the System tray.
If you miss the diagnosis report somehow, don’t freak out as you can manually check them through Event viewer. For that –
- Open Run Dialog box and type eventvwr.msc.
- Click the OK button.
- Once Event Viewer becomes visible, navigate to Windows Logs => System.
- To get quick access, click the Find option from right pane.
- Type MemoryDiagnostic into the text field followed by clicking Find Next.
8] Start Windows 10 in Safe Mode to fix HARDWARE WATCHDOG TIMEOUT
After getting affected by blue screen error, Windows stops functioning properly, as a result, you find difficulty while accessing troubleshooting tools. At that time, eradicating bug check code 0x000001CF seems hard as rock. In such instance, boot Windows 10 into Safe mode so that the operating system loads with minimal user interface and essential services that are must to run the device.
This special start-up limits Windows operation with core driver and networking support so you get a scope to find out if any third-party application is generating HARDWARE_WATCHDOG_TIMEOUT. Here are the steps you need to follow –
- Click taskbar search icon, type control panel and hit Enter.
- Set its View by option to small icons.
- Click Administrative Tools from the available links.
- Double-click on System Configuration in order to open the same.
- Shift into the Boot tab.
- Hover the mouse pointer to Boot options segment and check the box against Safe boot.
- Click the radio button set for Minimal.
- Hit Apply button first and then OK to save these changes.
- Next, restart the PC using any convenient way.
- Once it powers up, continuously press F8 key until the next page shows up.
- Thereafter, select the Safe Mode option.
- Boot into Safe Mode on the subsequent move.
9] Disable antivirus program to avoid conflict
Even though Windows security works as a safeguard to keep you safe by preventing vulnerable threats from attacking, often users install third-party antimalware programs for more protection. We won’t say other antivirus applications are useless but when similar software tries to perform one task, both conflict with each other moreover lost important components. As a consequent, HARDWARE WATCHDOG TIMEOUT blue screen error rise up.
Only way to hinder such complications is either disabling built-in Windows security or third-party security program installed on your device. Both procedures are described below, go with preferred one –
Disable third-party antivirus
- Click on the arrow icon located in the system tray.
- Right-click on the antivirus icon that is installed on your device.
- Choose the option that says Disable or similar to this.
- If the system asks to choose a time slot after which the software will turn on automatically, pick a suitable one.
Note – The procedure may vary for different programs but most of the time it will be quiet similar.
Disable Windows Security
- Open Windows Settings and choose Update & Security.
- Pick out Windows Security from left overlay.
- Pass to the right-pane and click Virus & threat protection.
- Move down to Virus & threat protection settings followed by clicking the link Manage settings.
- Turn off the toggle button of Real-time protection.
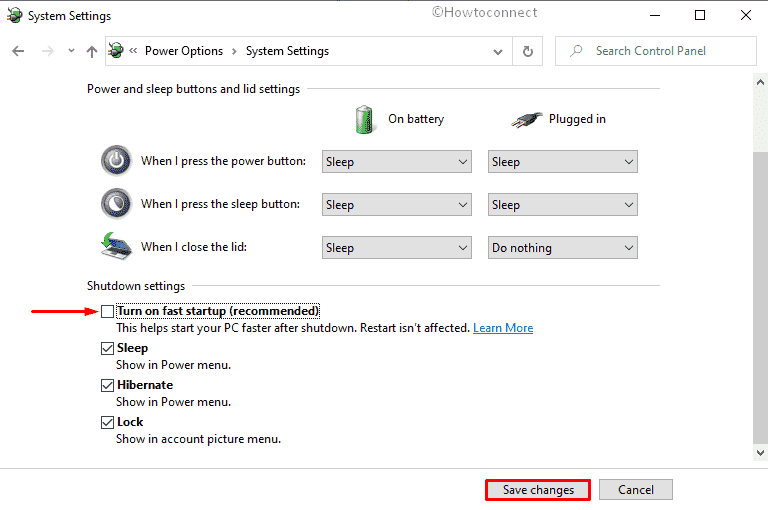
10] Discontinue fast startup to fix HARDWARE WATCHDOG TIMEOUT
Fast Startup is a coalescence of normal shutdown and hibernate feature which is designed to store internal information of your system in memory when you turn the OS off. This particular setting saves details of everything and helps Windows 10 to load faster when you power it up next time. There is a high chance that the info of bug check code 0x000001CF is being saved in the memory which is making a loop of this blue screen error time and again. Hence, turn off fast startup and see if it helps –
- First of all, open Control panel.
- Set the View by option to Small icons.
- Search for Power Options eventually click on the same.
- Select Choose what the power buttons do link from the left-hand side.
- Click Change settings that are currently unavailable to unveil the hidden options.
- Move down and uncheck the box set for Turn on fast startup (recommended).
- Once done, click Save Changes button to make the modifications effective.
11] Disable or Rollback Driver
HARDWARE_WATCHDOG_TIMEOUT may make appearances due to wrong version of device drivers. Though we always talk about the importance of updating drivers, main goal should be installing compatible ones rather than getting a new build. So if you have confronted Windows 10 blue screen error just after making changes in a driver, go back to earlier version or disable the same for a while. Process to do so is given below –
- using any convenient way.
- When it shows up, look for the device you updated and double-click on the same.
- Right-click on the driver you want to modify and choose Properties.
- On the upcoming wizard, shift to the Driver tab and click either Roll Back Driver or Disable Device button.
12] Bring disk checking utility into service
Due to prolonged use, hard disk forms bad sectors in it which later end up casing several bugs and problems, HARDWARE WATCHDOG TIMEOUT is one of them. Usually, chkdsk command-line utility points out damaged or malfunctioned sectors on the hard drive as bad and recover them in most cases. In worst situation, you might need to change your hard disk with a new one. To run disk checking utility, go through below steps –
- Press Win+R and type cmd in the Run dialog box.
- Press Ctrl+Shift+Enter altogether to invoke Command prompt with admin privilege.
- Click on Yes when a User Account Control asks for permission.
- Type the following command and then hit Enter key –
chkdsk C: /f /r /x
13] Perform a clean boot to fix HARDWARE WATCHDOG TIMEOUT
Clean boot is a special troubleshooting process that permits your Windows 10 to power up with only basic files and services required to run the system. This booting procedure works to ascertain blue screen error and resolve them as well. Apart from that, the same process settles upon performance issues, software conflicts and more.
When you perform a clean boot, Windows limits the regular services and other optional features so that the problem can be determined easily. Once the blue screen of death you are trying to troubleshoot gets fixed, Windows 10 will get back to normal environment by restoring all functionality and features.
- Click the search icon located in the taskbar and type control panel.
- Hit Enter once you view Control Panel in the search result.
- Set its View by option to small icons.
- Click Administrative Tools from the available links.
- Open System Configuration by double-clicking on the same.
- Click the radio button set to Selective startup and uncheck the box located beside Load startup items.
- Next, move to Services tab and click the checkbox adjacent to Hide all Microsoft services
- Hit Disable all button.
- Thereafter, shift to the Startup tab and click on the link Open Task Manager.
- When Task manager becomes visible with Startup tab opened, right-click on each item one at a time and choose Disable for all.
- Go back to the System Configuration window and click on Apply followed by OK.
14] Remove apps that perform same task
When your Windows 10 device is replete with unnecessary apps, they not only consume memory space but also generate unwanted issues. Moreover, applications have similar characteristics are prone to clash with each other in order to show self-conceit which later causes disaster.
During the conflict, most of the time essential system elements become corrupted, as a result, Windows 10 fails at startup and error like HARDWARE_WATCHDOG_TIMEOUT turns up. Hence, there is a possibility that removing unwanted apps will fix blue screen of death if not the procedure will free up hard disk memory after which the performance of PC will improve for sure. Here is how you should proceed –
- Press Win+X hotkey and opt for Apps and Features.
- Pass to the right-hand side and look for the suspicious applications having similar congruence also find out the programs you hardly use.
- Once found, click on the app and hit Uninstall from the extended tray.
- If a UAC prompts, select Yes.
- Keep following the on-screen guidelines to remove unnecessary programs completely.
- Repeat same procedure for each app that is inessential moreover may rise up bug check code 0x000001CF.
- Lastly, Reboot the PC.
15] Try out automatic repair
Automatic repair is a default troubleshooting process that gets launched automatically at third boot when startup error occurs. But there is a high chance that you have disabled this individual repair tool earlier as it often disturbs users by creating its own loop. Still, you should enable the same again while resolving HARDWARE WATCHDOG TIMEOUT as the tool does both diagnostic tests to detect issues and repair found errors. To make automatic repair work, imitate below steps –
- Press Windows key and I together followed by clicking on Update & Security.
- Select Recovery from the subsections on the left column.
- Pass to the right column and click Restart now button located directly below Advanced startup.
- Once the system powers up, navigate to Troubleshoot =>Advanced options => Startup Repair.
- When Automatic Repair window rolls out, insert the credentials of your Microsoft account.
- Eventually, click Continue to commence the repairing process.
16] Get rid of faulty Windows Update Files to fix HARDWARE WATCHDOG TIMEOUT
Where getting Windows update is pretty much obligated to maintain a healthy PC, buggy and faulty patches can be troublesome and bring forward HARDWARE_WATCHDOG_TIMEOUT. If this is the case for you, Microsoft will soon provide a patch that will take away caused blue screen error. But definitely this process needs some time to be done. Therefore, rather than waiting for a fix from Microsoft, uninstall the faulty build that rose up the issue. Steps to do so are as followed –
- Head over to Strat menu => Settings => Update & Security => Windows update.
- Move to right surface and click on View Update History.
- Consequently, hit the link entitled Uninstall Updates.
- In the existing window, look for the most recently received patch.
- Right-click on the same and select Uninstall.
- Keep going with on-screen instruction until the updates are entirely removed.
17] Download and install recent BIOS version
BIOS is a core component of Windows as it plays an important role to make your system run when you turn it on furthermore assist the hardware to initialize during the booting process. Moreover, BIOS provides runtime services for Windows and programs not to mention manage data flow with attached devices. The time it becomes outdated you may confront with blue screen of death which is hard to resolve, hence, update BIOS right away and check if it helps –
- Press Win+R to put forward Run command.
- Type msinfo32 in the text box eventually hit Enter key.
- When System Information page comes into the view, type BIOS version in its search bar and click the Find button.
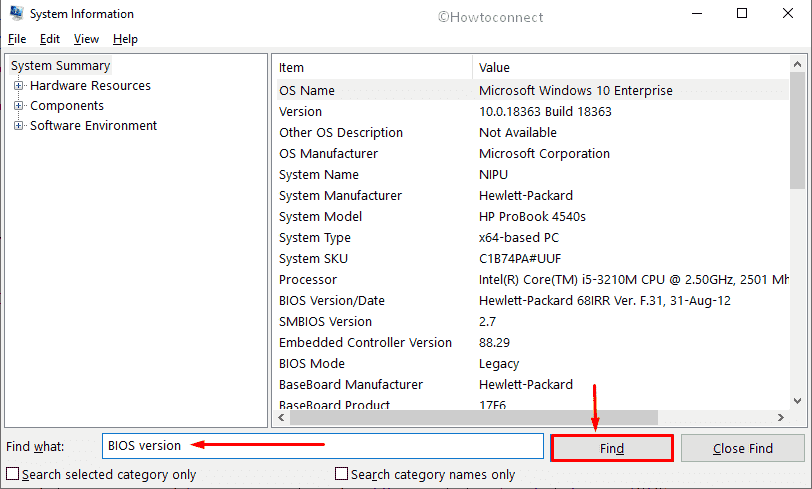
- Note down the information you get here thereafter close the window.
- Later on, open a web browser you prefer and visit the manufacturer’s website for your BIOS.
- In the end, download the update files and install them as well.
18] Isolate the connection of external accessories
Many users reported that they started getting HARDWARE WATCHDOG TIMEOUT blue screen of death just after connecting or adding hardware components. This incident clearly makes external accessories blameworthy. In order to check and confirm the issue, detach or disconnect the component you recently added for a while and see whether the stop code still persists.
In case you stop receiving bug check code 0x000001CF after disconnecting the hardware devices, any components could be the one accountable for such an erroneous situation. Therefore, plug those accessories one at a time and find out the particular hardware that was causing the issue. After getting the same, try getting an update for the device or hardware by going to the manufacturer’s website.
19] Use Blue Screen Troubleshooter to fix HARDWARE WATCHDOG TIMEOUT
Troubleshooting blue screen of death HARDWARE WATCHDOG TIMEOUT is hard enough. To make your job a little easier Microsoft launched blue screen troubleshooter which is designed to fix the issue automatically. Previously, this built-in utility was accessible from Windows settings app but in recent versions, you will get the same in Control Panel. Here is how to run it –
- Write bluescreen in Windows search.
- From the appearing result, pick out Find and fix bluescreen problems.
- Troubleshooting wizard will start detecting the reason behind HARDWARE_WATCHDOG_TIMEOUT.
- After completion, take necessary steps suggested by the tool to fix blue screen error.
Or else,
- Visit Microsoft site which contains inside information on blue screen of death.
- Scroll down a bit to reach When did you get the error? section.
- Either click the radio button of After an update was installed or While using my device.
- System will take further steps, all you need to do is follow on-screen guidelines.
20] Go back to the error-free state using System Restore
If HARDWARE WATCHDOG TIMEOUT error starts showing up due to software changes or any other modification you did, go back to an earlier state. To do so, System restore will be handy as it takes you back to a point where everything was functioning normally also reinstates system settings, files, and drivers.
- Press Windows key and type rstrui followed by hitting Enter key.
- Once the System Restore wizard becomes visible, click on Next.
- Opt for the last restore point and again hit Next.
- In the end, hit Finish button to go back to the previous state.
Methods:
1] Run Sfc /scannow to repair corrupted system files
2] Get latest Windows 10 patches
3] Do virus scan and clean threats
4] Settle upon defective Windows image files
5] Take help of Device Manager to get the latest drivers
6] Clean junk files
7] Check for RAM and memory issues
8] Start Windows 10 in Safe Mode
9] Disable antivirus program to avoid conflict
10] Discontinue fast startup
11] Disable or Rollback Driver
12] Bring disk checking utility into service
13] Perform a clean boot
14] Remove apps that perform same task
15] Try out automatic repair
16] Get rid of faulty Windows Update Files
17] Download and install recent BIOS version
18] Isolate the connection of external accessories
19] Use Blue Screen Troubleshooter
20] Go back to the error-free state using System Restore
That’s all!!