HYPERGUARD VIOLATION Error in Windows 10 points out that the kernel has gone through some critical code or corrupted data. This Blue screen of death holds a bug check value of 0x0000018C which usually shows up during the startup of a program. Besides, Windows restarts automatically quite often thus prevent you to operate the system effectively. HYPERGUARD_VIOLATION mostly comes up when a driver makes any changes either in critical kernel code or data. Another primary reason that causes this BSOD is hardware corruption such as bad sectors of RAM holding kernel related items.
HYPERGUARD VIOLATION Windows 10 BSOD error also makes an appearance due to virus infection, troublesome memory, missing DLL file and faulty windows images. Other reasons that may lead you to error code 0x0000018C are the presence of problematic areas in the hard disk, low space in it or often using additional hardware accessories. As there is no specific reason behind this stop code, you might need to try several workarounds to fix it up.
HYPERGUARD VIOLATION Error in Windows 10 Solutions
Here is How to fix HYPERGUARD VIOLATION Error in Windows 10 –
1] Repair corrupted system resources and recover missing DLL files
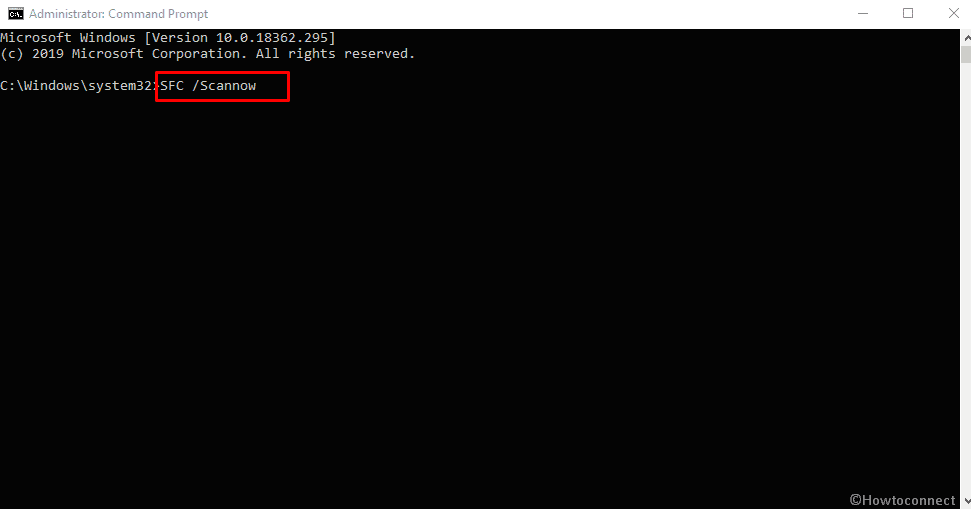
Corrupted system components and missing DLL files cause lots of havoc in the Windows 10 PC. HYPERGUARD_VIOLATION is one of the among. In order to recover the issue, you need to execute System File Checker. Here is how to deploy the workaround –
- In the first instance, open Command Prompt as an administrator.
- When it makes an appearance, simply type the below command and press Enter –
Sfc /scannow
This process will take time so don’t interrupt in between. After the scan gets over, check for the occurrence of the BSOD HYPERGUARD VIOLATION accompanied by stop code 0x0000018C. Usually, the system automatically fixes the issue, unfortunately, if the problem is big, take necessary steps accordingly.
2] Download and install available Windows 10 patches
Microsoft releases major build twice in a year and cumulative updates quite regularly containing fixes for several errors along with blue screen of death. Usually, you get these updates automatically but even though check once manually if any patch is available for your system. Here is how to do so –
Note- Before jump into the process, make sure your PC is connected with high-speed internet. If your system is using Mobile hotspot, disable the Metered Connection first to initiate the procedure.
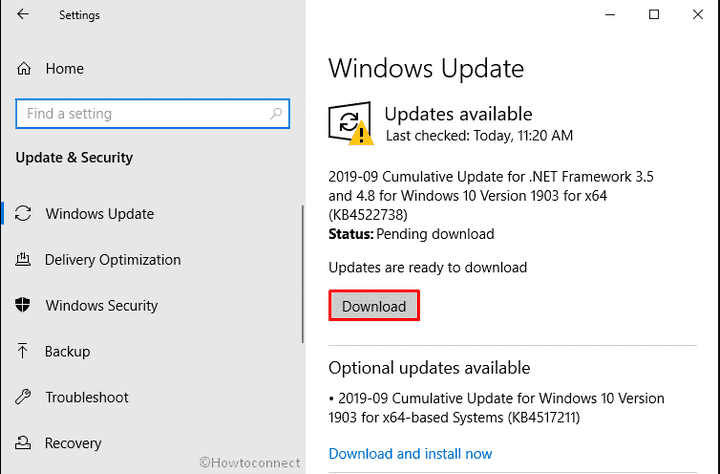
- Right-click on Start button and select Settings from the appearing Power user menu.
- Once it comes into the sight, click Update & Security tile.
- On the succeeding page, shift to the right pane and then click Check for updates button.
- When the search finishes, the list of pending items will become visible. Hit Download button to initiate the downloading process.
- Upon finishing, the installation will begin automatically. Be present in front of your Windows 10 device as it will ask to restart the PC several times to implement the changes.
3] Update troublesome drivers
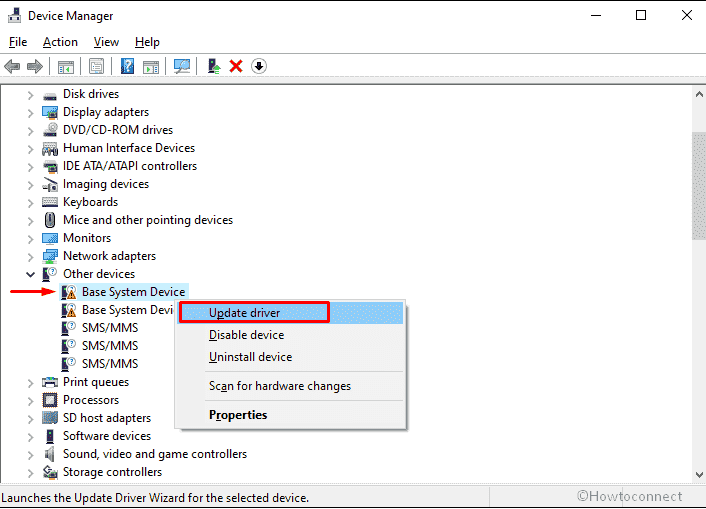
Every time you come across a BSOD error like HYPERGUARD VIOLATION, defective, outdated and incompatible driver turn out as guilty. To keep this notorious problem away, you need to update all drivers immediately. It is also important to make your drivers more effective and prepare your PC to work faster. Windows Device Manager stands out to be the best utility to perform the same task as outdated drivers are represented with the yellow indicating sign here. Thus the process of finding out the faulty item becomes easier. Here is how to update the drivers using the default app –
- Press Win+S shortcut to raise Windows Taskbar search.
- Write Device Manager in the text bar and upon appearing the result, hit Enter key.
- When Device Manager rolls out, take a look in the devices list and check if there is an exclamation mark in them.
- If there is any, double click the device to expand its driver list.
- Hereafter, right-click on the driver having a yellow warning sign and select Update driver option.
- To complete the procedure, follow the upcoming guidelines on display.
- Update all drivers having yellow indication signs in the same way and lastly Restart your PC.
4] Remove third-party antivirus from your computer
To stay away from malware, you often install third-party antivirus programs on your PC. As a result, it clashes with the built-in software and both become incompatible along with several errors including HYPERGUARD_VIOLATION. To be very frank, in the era to use Windows Security, other antiviruses are not needed at all. So, it will be wise to uninstall them and to do so go through the below process –
- Open Run Dialog box and type appwiz.cpl in the specific field followed by clicking OK button.
- When Programs and Features come up in a separate window, locate the antivirus software from the available app list.
- Make a click on the same and select Uninstall from the top ribbon.
- Hereafter, follow the guidelines that become visible on-screen to remove the program completely.
5] Rectify the defective Windows image files
HYPERGUARD VIOLATION Windows 10 BSOD error might turn up due to corrupted image files. Among the many dangers and punishments of having a phony ID and involving them for terrible, many can’t see the advantage of having one when utilized for good. Among those beneficial things that a phony ID scans Have you at any point been in a circumstance where you are prohibited from a gathering that is entering a spot or design essentially in light of the fact that you don’t have the right ID? This is particularly evident when you have a significant arrangement or movement to do inside the structure or spot. Having a phony ID to get to spots and structures. If so, you need to repair them right away by executing the DISM command line. To access and utilize this tool, proceed with the following steps –
- Press Windows key and R together to invoke the Run dialog.
- Once appears, write cmd in the text box provided and thereafter press Ctrl+ Shift+ Enter keys simultaneously.
- Click Yes to provide consent to the UAC dialog to Open Command Prompt as Admin From Run Dialog.
- In the black window, put the below command line and to activate the same, hit Enter –
DISM.exe /Online /Cleanup-image /Restorehealth
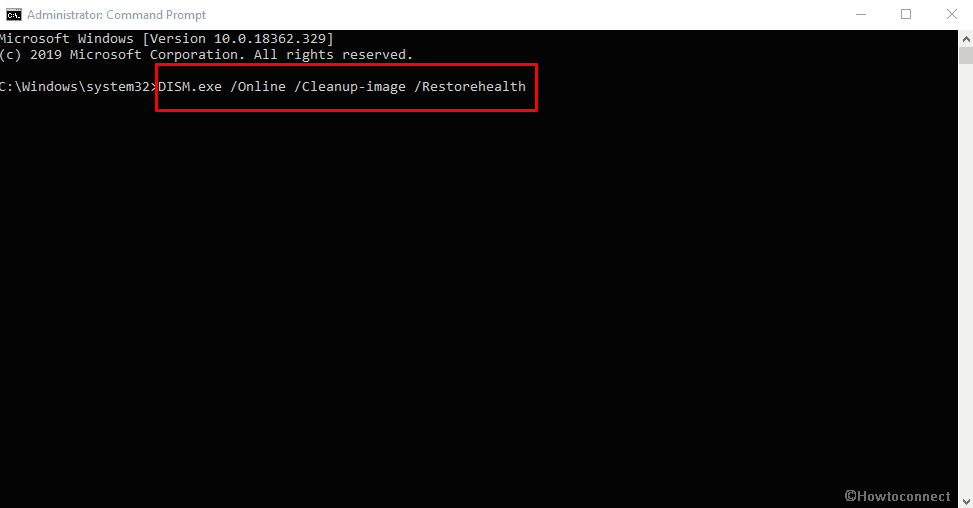
The scan will immediately start to detect and fix all the defective Windows image files automatically causing HYPERGUARD VIOLATION not to mention stop code 0x0000018C. Regardless of other command utility, this will also be a lengthy process, so, wait patiently.
6] Boot into Safe Mode to load basic programs only
To deal with HYPERGUARD_VIOLATION BSOD error that Windows 10 comes across, booting in Safe Mode considered one of the most efficient methods. This special Startup mode loads only root applications, thereby if the stop code has been generated by advance settings or additional apps, it might disappear.
- Press the Win+I hotkeys to bring forward Windows Settings app.
- When the main interface appears, click on Update & Security.
- From the consequent page, select Recovery from the left column and move along to right side.
- Take your cursor underneath the Advanced startup area and click Restart now button.
- When your Windows powers up, it will ask you to choose the next step, select Troubleshoot from the startup screen.
- Out of troubleshoot menu, choose Advanced Options and subsequently Startup Settings.
- Once you get informed that your machine can be restarted with the use of additional settings which is Enable Safe Mode, click power icon located at the bottom right and select Restart.
- Subsequent to this, press f4 from your keyboard to enter into Safe mode.
Now, the Windows 10 operating system will be started with default apps and services. In case the BSOD HYPERGUARD_VIOLATION in conjunction with stop code 0x0000018C passes out of sight, it is quite sure that a third-party application or hardware problem was generating the issue.
7] Clean off the Junk files
When you use Windows OS for very long, junk files are created for execution objectives. Though they are temporary, they occupy a good amount of space in the storage. With the time being, it becomes big in size making the operation of the device slower and often causes HYPERGUARD VIOLATION BSOD error. Disk Cleanup Utility helps to clean off those junks to make some free space and eradicate issues related to this.
- Invoke Run command with the help of Windows and R hotkey eventually type cleanmgr in the text field.
- On the upcoming wizard, check all the boxes available under Files to delete section leaving out Downloads. Also, make sure that there is nothing important left in the Recycle bin.
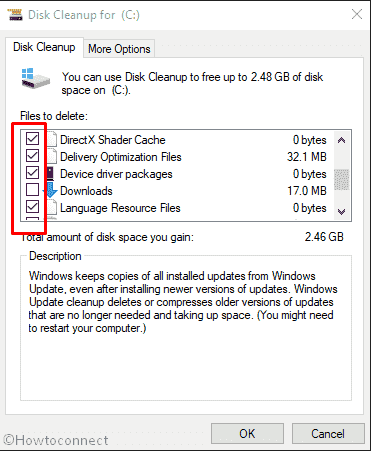
- In the end, hit the OK button to start the removal procedure.
8] Eliminate existing malware using Window Security
Staying protected from malware is a real challenge nowadays as it is present everywhere on the web. When you visit some broken website or click an untrusted link, they enter into the system. Thereafter, causes the necessary files to be removed from the system and deteriorates others. Often it ends up generating HYPERGUARD_VIOLATION Windows 10 BSOD error. However, you can wipe out these bugs easily with built-in Windows Security. Follow the below guidelines to remove malware from your PC –
- Get access to Windows search bar by pressing Win+S keyboard shortcut simultaneously.
- Type full scan in the text space there and when the result shows up, select Virus & threat protection from the top.
- Upon opening the app, move to the adjacent right and click Scan options link.
- On the imminent page, hit the radio button of Full scan followed by clicking Scan now.
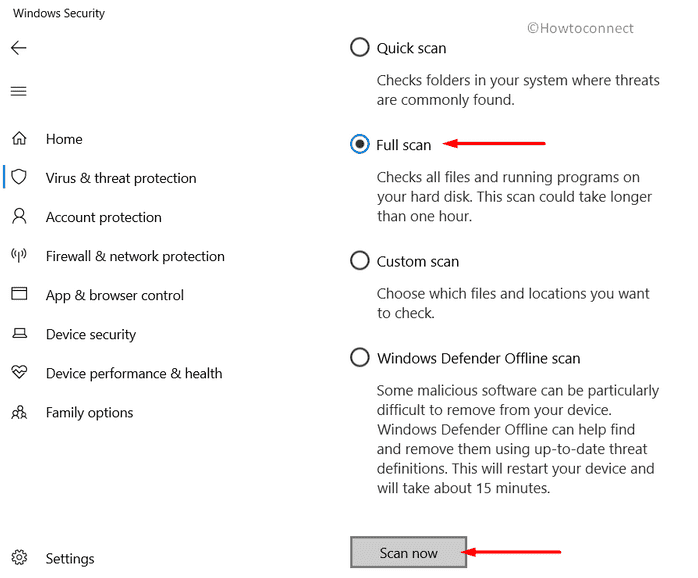
- Once the process ends, the app will show up the malware if found any. Click Clean threats option to dismiss them.
- Moving ahead to the subsequent page, select Remove first and then Start actions to clear them completely.
9] Settle upon memory issues
Memory issues are composed of erroneous allocation in the disk and presence of uncertain areas in the RAM. These actually make the system very much prone to get affected with BSOD errors including HYPERGUARD VIOLATION. To fix it up, utilize Windows Memory Diagnostic tool by following below steps –
- Open Windows Settings using any convenient way you prefer.
- When the app rolls out, type memory in its search bar and then choose Diagnose your computer’s memory problems from the appeared outcome.
- From the impending pop-up, click Restart now and check for problems (recommended) option.
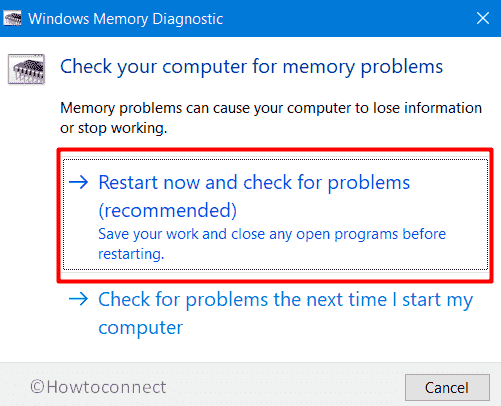
- Windows will prompt to reboot now and once it starts you will see the tool is detecting RAM issues in the system.
- When the process hits 100%, the PC will restart automatically once again.
- After loading back, view the result of this diagnosis in the notification area of System Tray.
- 10] Execute CHKDSK Utility to fix bad sector of Hard Disk
When your PC is under heavy load, it may form bad sectors in hard disk that eventually call up HYPERGUARD_VIOLATION Windows 10 BSOD error. Fortunately, you can improve things up executing disk checking utility in elevated Command Prompt. Here is the guideline to follow through –
- Right-click on empty space of Taskbar and select Task Manager.
- When in the app UI, click More details if it is not expanded already.
- Next, click File from the top left end (menu bar) followed by choosing Run a new task.
- On the upcoming prompt up, type cmd in the blank text area and check the box ahead of Create this task with administrative privileges.
- Either press Enter key or click the OK button to bring forth elevated Command Prompt.
- If a UAC turns up for asking your permission, click Yes to go ahead.
- When the black panel loads successfully, type the following command line and hit Enter to execute the same –
chkdsk C: /f /r /x
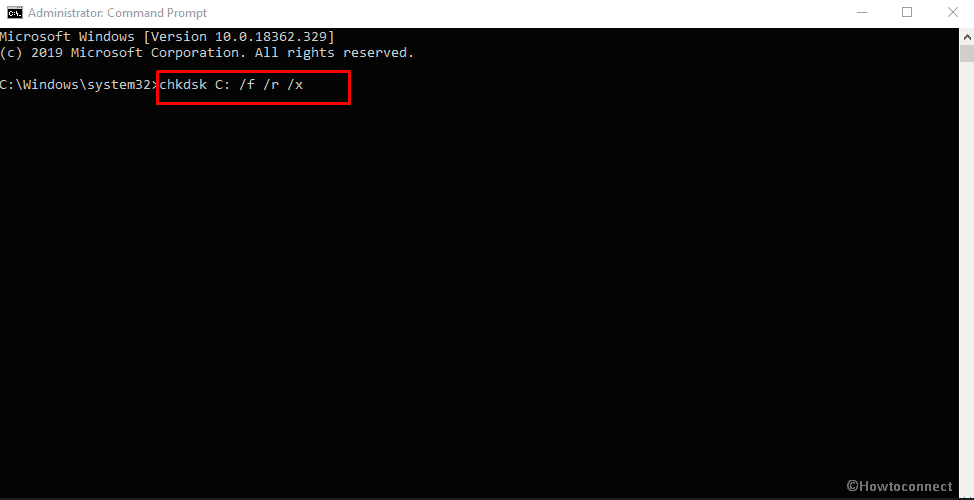
Where,
“f” works to fix up the issue that exists in the volume.
Letter “r” helps to detect the poor sectors in the Hard Disk.
“x” makes the whole volume to get off before initiating the process.
Important – C: is the drive letter where the operating system is installed. If you have used another driver for the same, replace the letter accordingly.
11] Make Automatic Restart inoperative
You might find difficulties to work along with a device affected with HYPERGUARD VIOLATION BSOD Error as the computer restarts automatically without prior notice. Thus, you need to tweak default settings a little in order to disable automatic restart in Windows 10. Here is how to do it –
- Save all ongoing tasks and press Win+D hotkeys together to head over the desktop screen.
- Once you go there, perform a right-click on This PC icon and select Properties from the fly-out menu.
- When System window comes into the view, click Advanced system settings from the left pane.
- The moment System Properties wizard becomes visible, click Settings button located under Startup and Recovery region.
- On the forthcoming wizard, hover the mouse pointer to the System failure section and uncheck the box beside Automatically restart.
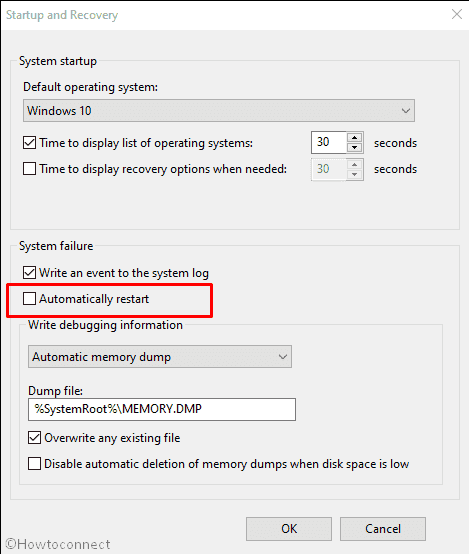
- Lastly, click the OK button to implement these changes.
12] Uninstall apps having similar pertinency
Programs that have similar applicability tend to conflict with each other as they try to perform the same task. In the process of collision, they lose the necessary components from each and also from the PC. The ultimate effect is HYPERGUARD_VIOLATION BSOD error. Well, you can easily get out of such a situation by deleting the unnecessary apps. To remove a program from the system, follow below instructions –
- Press Win+X hotkey and select Apps and Features option from the quick link menu.
- On the following page, shift to the right side and go through the applications.
- Locate the suspicious app, click on the same and hit Uninstall from the extended pane.
- If UAC prompts, select Yes to proceed.
Follow the on-screen guidelines to remove the app completely. Thereafter, repeat the same for other dubious programs to get rid of HYPERGUARD_VIOLATION.
13] Disengage the connection of external accessories
While external hardware is very much needed to get a better user experience, it’s unfortunate that HYPERGUARD VIOLATION blue screen of death often shows up after connecting any. However, you can fix the issue easily by disconnecting those and when the issue resolves, reconnect them again. Here is the process –
- First of all, unplug the accessories connected with your PC and keep them aside in a safe place.
- Then, Restart Windows 10 as you always do. When it starts, do check for stop code 0x0000018C.
- If no issue comes up, reconnect the components one by one.
- After that, launch a web browser from your computer and visit the manufacturer website of each external accessories.
- Subsequently, download and install the latest drivers from there.
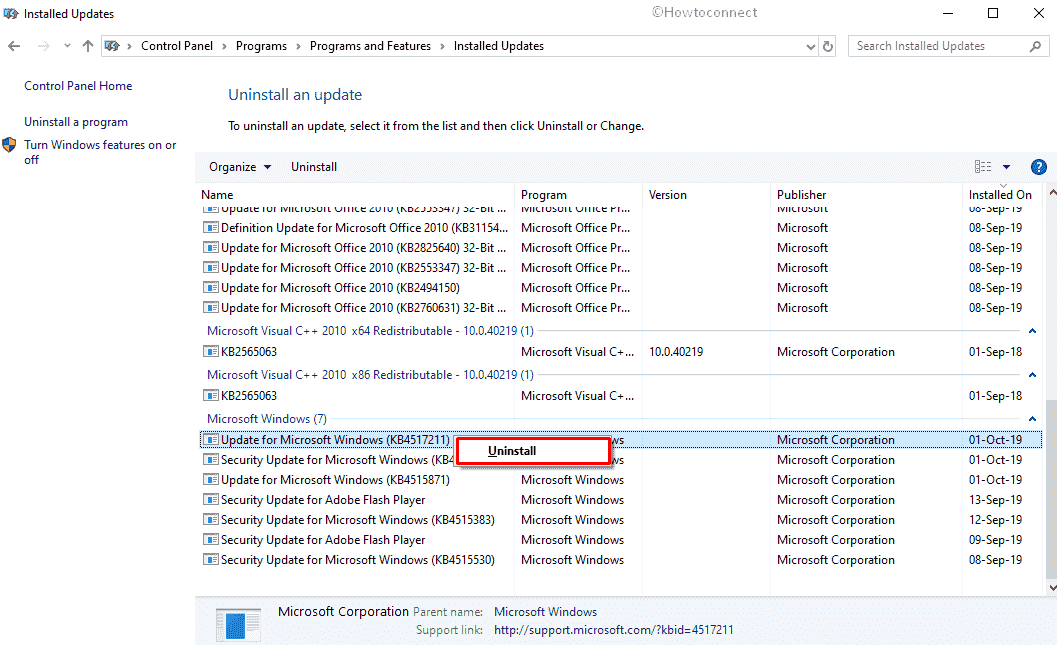
14] Get rid of faulty Windows Update Files
Usually, Windows update is carried out through the Settings app automatically. But in rare cases, the process ends up midway with defective files that are responsible to bring forward HYPERGUARD_VIOLATION along with stop code 0x0000018C. To eliminate this troublesome update, follow the below guidelines –
- Press Windows key and click the gear icon located in the bottom left corner of the Start menu.
- When the Settings app becomes visible, head to Update & Security region.
- After following page loads, jump to the right side and click View update history link.
- From the next page, choose Uninstall updates to open up the Installed Updates page by default.
- In the current window, reach to the latest received patch with the help of the installed date.
- Once found, right-click on same and select Uninstall option.
15] Bring Blue Screen Troubleshooter into play
Since when BSOD stop codes started spreading faster, Microsoft came out with a built-in app to obliterate the error. The utility is known as Blue Screen Troubleshooter and it made its way out Fall Creators Update version. Previously, you were able to access the tool through Windows Settings app but right now you need to run it online –
- Click the search icon located in the Taskbar and type bluescreen.
- When the result comes into the sight, click Find and fix bluescreen problems from the top.
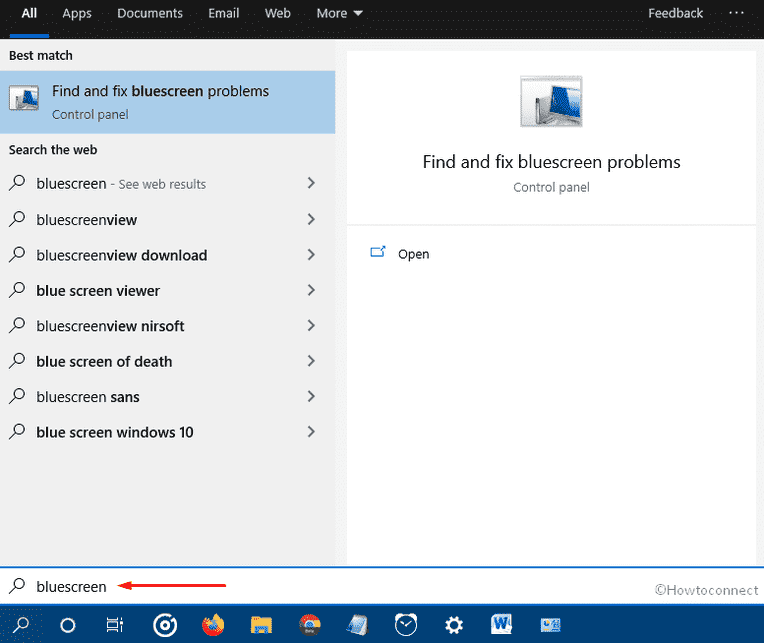
- This will bring forth Troubleshooting wizard on the screen right away.
16] Update BIOS
Another reason to put forward HYPERGUARD VIOLATION Windows 10 BSOD error is an outdated BIOS. As it is one of the most sensitive components of your system, anything wrong in it can influence the PC to work badly. Besides, many hardware accessories are entirely dependent on the same thus you need to be very careful while tweaking this. Here is the process you need to follow –
- Press Windows key and choose Run from the Win+X menu.
- After it becomes visible, type msinfo32 in the blank text box eventually hit Enter key.
- When System Information page turns up, type BIOS version in its search bar and click the Find button.
- Once you get the information about the developer as well as the version of BIOS, close that current page.
- Now, open a web browser and visit the manufacturer’s website for BIOS using the information you got. Following that, download the update files and install them as well.
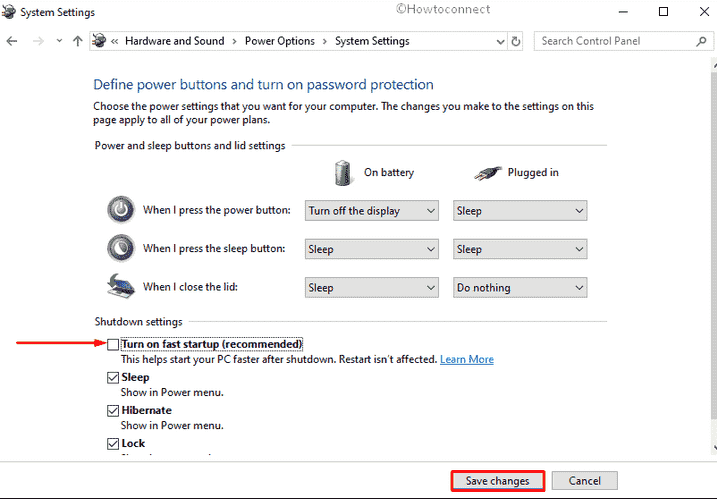
17] Put fast startup out of action
Generally, Fast Startup remains enabled in Windows 10 so that the OS can store information about the activity of yours while turning off the device. Next time when you switch it on, the operating system uses those data to carry on your PC. Consequently, if the device is affected with HYPERGUARD_VIOLATION, you need to disable Fast startup so that the OS doesn’t store anything about the stop code 0x0000018C. Here is how to proceed –
- Right-click on the battery icon from Taskbar and choose Power Options.
- From the upcoming window, select Choose what the power buttons do link located in the left pane.
- Next, click Change settings that are currently unavailable. This will bring forth the hidden options immediately at the bottom of the current page.
- Move down and uncheck the box assigned for Turn on fast startup (recommended).
- Ultimately, click Save Changes button so that the alterations can take place.
18] Go for automatic repair
Microsoft came up with Automatic Repair with an ability to fix startup failure errors such as HYPERGUARD VIOLATION. Though it has certain limitations, you can give it a try to eradicate the blue screen of death. Let’s see the process –
- Click the quick actions button from the Notification bar and choose All settings.
- From the app UI, click Update & Security tile.
- On the consequent page, choose Recovery from the subsections on the left column.
- Pass out to the right side and click Restart now button located under Advanced startup.
- Wait until the device gets restarted followed by choosing Troubleshoot =>Advanced options => Startup Repair.
- Once you get into the Automatic Repair, provide the credentials of your account and then click Continue to initiate the procedure.
19] Revert to the error-free state using System Restore
You might confront HYPERGUARD VIOLATION BSOD error just after making any changes in the registry or others. Fortunately, there is a way to emerge from this condition and revert back to the error-free state. To do so, you need to use System Restore and here is the process –
- Press Win+Q at the same time and type rstrui in the blank search bar followed by hitting Enter.
- Once the System Restore wizard comes into the view, click Next button to proceed.
- Thereafter, do a click on Show more restore points to view all available options.
- Choose the lastest one in the list and again click on Next.
- In the end, hit Finish button to go back to the previous state.
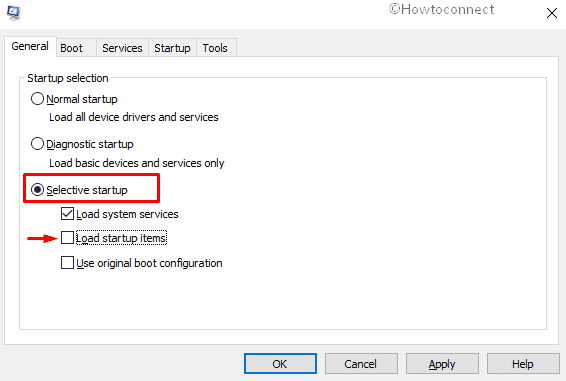
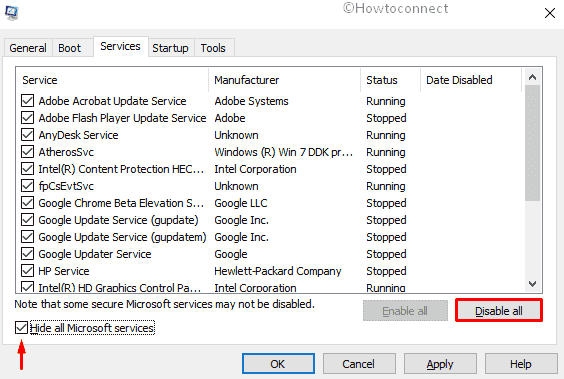
20] Perform a clean boot
Often few programs or services in your PC bring up HYPERGUARD_VIOLATION BSOD with stop code 0x0000018C. If this is the case for you, deactivate them all for a while by going through the Clean Boot. Follow the steps below to do it –
- First of all, type control panel in Taskbar search and hit Enter key.
- When Control Panel shows up, make the applets into small view and click on Administrative Tools.
- From the impending page, locate System Configuration and double-click the same.
- On the upcoming wizard, click the radio button of Selective startup and uncheck the box reserved for Load startup items.
- Thereafter, shift to Services tab and click the checkbox of Hide all Microsoft services followed by hitting Disable all button.
- After doing so, head over to the Startup tab and click on the link Open Task Manager.
- This will launch the Manager with Startup tab opened. Right-click on each item listed here and choose Disable individually.
- Now, get back to the System Configuration window and click on Apply and then OK to implement the changes.
Methods:
1] Repair corrupted system resources and recover missing DLL files
2] Download and install available Windows 10 patches
3] Update troublesome drivers
4] Remove third-party antivirus from your computer
5] Rectify the defective Windows image files
6] Boot into Safe Mode to load basic programs only
7] Clean off the Junk files
8] Eliminate existing malware using Window Security
9] Settle upon memory issues
10] Execute CHKDSK Utility to fix bad sector of Hard Disk
11] Make Automatic Restart inoperative
12] Uninstall apps having similar pertinency
13] Disengage the connection of external accessories
14] Get rid of faulty Windows Update Files
15] Bring Blue Screen Troubleshooter into play
16] Update BIOS
17] Put fast startup out of action
18] Go for automatic repair
19] Revert to the error-free state using System Restore
20] Perform a clean boot
That’s all!!