Blue Screen error has brought tremendous trouble over the years in the Windows system. Usually, such setbacks are originated from outdated drivers or missing when some system components are found in corrupted state. BSOD error results in causing irregular flashing on display, freezing of desktop, and obviously rebooting unexpectedly quite often. INVALID_KERNEL_STACK_ADDRESS BSOD in Windows 10 has a bug check code of 0x000001CE resembles the context switch has experienced an invalid initial Kernel Stack address.
INVALID_KERNEL_STACK_ADDRESS Blue Screen Error is a stubborn issue and has a wide range of sources of orientation. Somewhere it may be a result of drivers, outdated Operating System, missing system files due to malicious attack, and software collision. Whereas, a few people have encountered the same with very small issue like trouble connecting a new Hardware device. Since the causes in most cases are untraceable, we need to apply quite a few resolutions in order to fix it. Here is the list of Workarounds with quick links for your easy navigating to them. Let’s begin –
INVALID_KERNEL_STACK_ADDRESS Blue Screen Error
Here is how to fix INVALID_KERNEL_STACK_ADDRESS –
These workarounds are proven to recover an affected Windows from INVALID_KERNEL_STACK_ADDRESS BSOD error. Before we apply them, the system must be ready and stable. Blue Screen error forces Windows to restart repeatedly without showing off any warning. Doing anything including troubleshooting becomes very tough in this condition hence, we need to disable this Automatic Restarting feature. To do so, follow the below steps –
- In the beginning, try to save all the ongoing tasks and close them eventually.
- Move over to the Desktop area by pressing Win and D at once.
- Once the Desktop loads, do a right click on This PC icon.
- Choose Properties option from visible menu.
- When a new window unfolds, click the Advanced system settings lying on its left pane.
- After the System Properties Window opens, jump into the Advanced tab.
- Scroll down to Startup and Recovery area and eventually click the Settings option.
- In a few seconds, another pop up will show up. Move on it’s System failure area.
- Hover downward and uncheck the box that reads “Automatically restart”.
- Finally, click the Ok button at the bottom and save these changes.
With these changes become effective, Windows will not go for automatic rebooting anymore. This is the time you can follow the below section and apply the resolution processes –
1] Run System File Checker and rectify Windows core components
Oftentimes it may happen that, few components from Windows core are missing or defective. To find out the cause of, we have found, malicious invaders when sneaking through the defense line, they cause the mess. System files lose their originality as the virus encrypts them by replicating. Another major reason is a software collision in the operating system which eventually results in missing a good number of necessary files.
All these reasons cause INVALID_KERNEL_STACK_ADDRESS BSOD error in Windows 10. You have to rectify these files first to resolve the blue screen error. System File Checker is a built-in tool to carry out this task for you. Here is how to rectify the dreadful components using System File Checker –
- Press Win and R hotkeys together to invoke the Run dialog first.
- Paste “cmd.exe” text in the search box provided on Run.
- Press altogether Ctrl + Shift + Enter keys.
- Once User Account Control will prompt up for permission, click Yes to continue.
- Elevated Command Prompt will open up in a while.
- Now, type the below command tool and press Enter key –
Sfc/ scannow
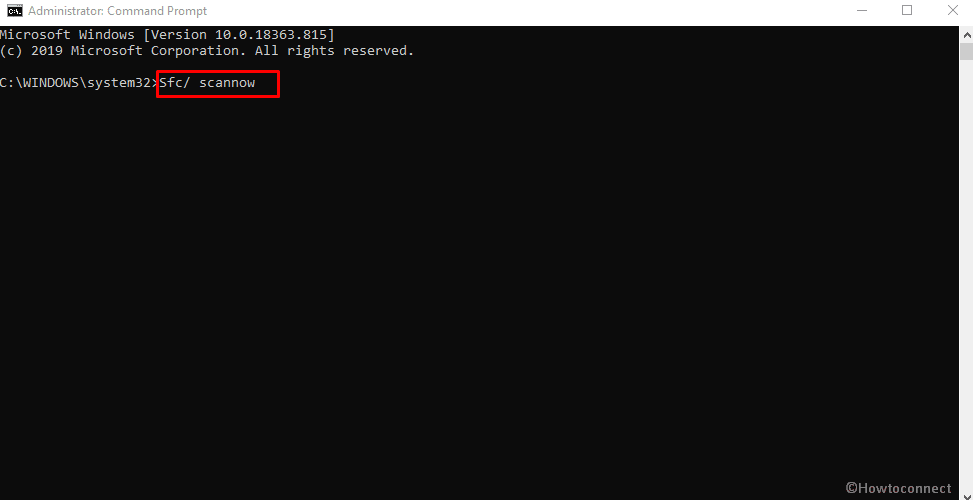
- Immediately the System file checker tool will start looking for corrupted and missing system components in the device.
- The utility will rectify all of these detected items automatically and the process might be little lengthy.
- Once the process ends, Reboot the Windows and make the changes effective.
2] Install all the latest Windows Update patches to fix INVALID_KERNEL_STACK_ADDRESS
Update files are packed up with some features, security patches as well as on-point fixes for potential bugs. Microsoft releases such Windows updates quite often in order to keep the OPerating System healthy and free from Bugs & issues. Users need to install them upon release since an outdated OS is prone to get affected with Blue Screen error having bugcheck code 0x000001CE.
Normally, this Updating process is automatic; if the device is connected with is an active internet connection, Downloading starts automatically. But there is a little trouble here as well, often the Windows update process gets entangled in complications. We can proceed to install the files manually following below guidelines –
- Open up Windows Settings app by pressing Win & I keys simultaneously.
- When the app unfolds, click on Update & Security.
- From the succeeding page, click on Windows Update located at the left ribbon.
- Transfer yourself to alongside pane and click on Check for updates link.
- When all the update files are available upon searching, hit Download.
- Installation commences automatically after finishing the downloading.
- To complete the process, you may need to attend a couple of Restarting processes.
3] Install the latest update for drivers
In the beginning, we have traced out the reasons behind INVALID_KERNEL_STACK_ADDRESS BSOD error and pointed drivers may be the main culprits. Drivers in the Operating System play an important role of maintaining communication between computer bus and specific hardware devices. When they are kept outdated, plenty of issues along with Blue Screen error may occur.
You can update these drivers using Device Manager easily as outdated items will have separate indications. Here is how to proceed –
- Open the Power user menu pressing WIn and X hotkeys.
- choose Run to invoke the dialog.
- Type “devmgmt.msc” in the search box provided with wizard and press Enter key.
- after the Device Manager window opens, look for an outdated device with mark of exclamation on it.
- Extend the device and open up all the drivers adhered to it by double clicking.
- Make a right click on the outdated driver followed by selecting Update Driver option.
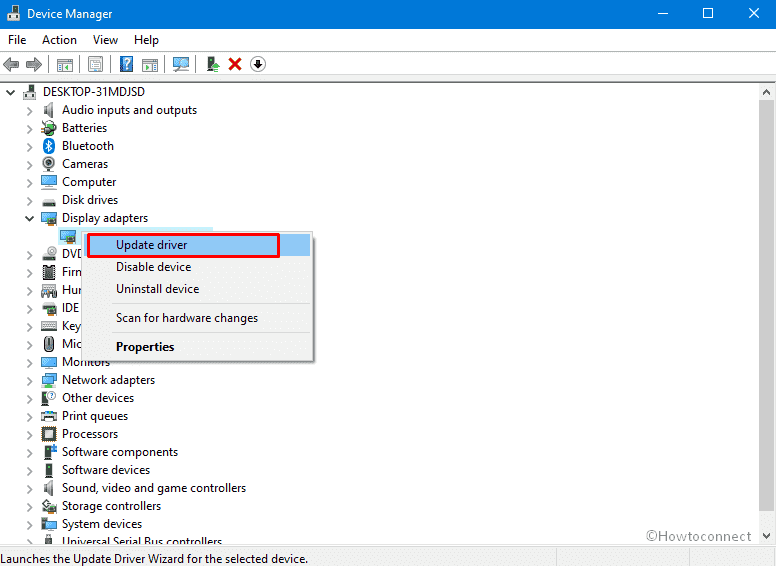
- Complete the process following on-screen guidelines provided.
- Lastly, Restart the Device and let all the changes to be saved.
4] Roll back defective updates from recently updated drivers
Updating drivers bear huge importance for protecting the device from getting infected with bugs and problems. Microsoft has also made this updating process autonomous with Windows upgrade. This great feature has to turn out to be evolving some unexpected problems according to a few users.
Some of the problematic updates are getting installed in the system. In the end, Blue Screen issue with bug check code 0x000001CE evolve. In such a condition, you need to Roll back the specific driver to default to remove the update. To complete the process, follow the below steps –
- Press Win+Q hotkeys together to open up Taskbar Search.
- Write device manager in the void text space.
- Choose the same “Device Manager” from the arriving result.
- Once moved to the app, move out for the suspicious device.
- Once reached, spread out driver’s list by clicking the device.
- Make a right-click on the driver that received update recently.
- Choose Properties option.
- After a pop up window arrives, enter into its Driver tab.
- Click on “Roll Back Driver” option from here to load the previous version for this one.
- Complete the process by following the guidelines prompting on the screen.
- Once done, reboot the Windows and when loading the next session, check if the error has resolved.
5] Fix memory problems to solve INVALID_KERNEL_STACK_ADDRESS
Memory problems with bad RAM issues are always very serious issues for causing severe damages to the system. No exception, INVALID_KERNEL_STACK_ADDRESS BSOD error occurs when the device encounters memory problems. To rectify these setbacks, Windows Memory Diagnostic tool is super handy. The process is as follows –
- Open the Start menu pressing the Windows key.
- Select the gear icon to launch Windows Settings app.
- When the window unrolls, type memory in the search box provided here.
- Choose Diagnose your computer’s memory problems option from results.
- From the Windows Memory Diagnostic wizard, choose the option saying Restart now and check for problems (recommended).
- In a while, Windows will Reboot.
- When a new session comes in, a blue screen will start digging out Memory issues in the system.
- After this process reaches 100%, Windows will restart itself for the second time.
- Coming back to another session of Windows, you can check the detected issues and their status in the System Tray of Notification area.
6] Clean up unnecessary files from Disk drive
Disk space is really very important for running the system without any significant lag. System produces bulk of junk files, temporary system components, cache, and stores them in the disk drive. Eventually, the disk space gets low and functionality deteriorates. Very often blue screen error with bug check code 0x000001CE occurs when the space is insufficient. These files are unnecessary mostly and we can wipe out them up to make more room. Disk Cleanup tool can be your ultimate utility in executing this task. Here is how to perform –
- Open the Run dialog pressing Win+R hotkeys together.
- When the wizard launches, type cleanmgr in its text area.
- Click Ok button from the wizard.
- In a few seconds, a small pop-up will rise up immediately asking to choose the drive name.
- Select C: and press Enter key.
- In a while, a new wizard will arrive by the name of Disk Clean for OS (C:).
- Move down in the popup and click Clean up system files.
- Once asked to choose the drive, select C: again and hit Enter key as well.
- From the succeeding window Disk Cleanup for (C:), check all the options sitting under Files to delete.
- Finally, click the OK button and let the tool to initiate cleanup.
7] Revert back the Windows to a previous restore point
Installing programs imprint trace in the Windows Registry same as uninstalling an existing one. Oftentimes, we forcibly terminate an uninstallation or cancel installing something. This has an adverse effect on Windows Registry and ultimate result will be INVALID_KERNEL_STACK_ADDRESS BSOD error.
If you are coming across a blue screen error after such installation, you may reverse Windows to a previous state where the error was not prevalent. The process is called System Restore and you can accomplish the task using below instructions –
- Open Run dialog first.
- Type ‘rstrui’ in blank typing area of the wizard and hit Enter key.
- When the System Restore window revealed, select “Show more restore points” option.
- From the succeeding window, choose the latest point.
- Hit the hit Next option in the process.
- When the next page arrives, click the Finish and start restoring process.
8] Update BIOS to resolve INVALID_KERNEL_STACK_ADDRESS
The Firmware that runs initially after a device is brought to home from shop and powered up is the BIOS. This is the most crucial part of Windows that manages data flow between OS and the inherent devices connected to it like hard disk, video adapter, keyboard, mouse, and printer.
When the BIOS is outdated, some very serious problems show up in the system where INVALID_KERNEL_STACK_ADDRESS BSOD standout to be the worst. No way can we leave it outdated and the updating process is very easy. Follow the below steps to do so –
- Open the Taskbar Search pressing Win+Q hotkeys at once.
- In the blank typing area, enter text msinfo32.
- Choose System Information when it is visible in the result.
- Once moved to a new window, look for BIOS Version/Date on the right pane.
- Once found, note down the information displayed against this category
- Close the System Information window and launch a web browser from device and visit the maker’s page for BIOS using noted info.
- Choose the compatible file based on your system requirement and click Download.
- When downloading ends, Install the update files and make BIOS up to date.
9] Start the Windows in Safe Boot Mode
Booting in the Safe Mode is the most primitive and reliable idea to troubleshoot critical issues and resolve them accordingly. This is usually a special startup procedure where Windows powers up loading only the basic programs, default settings. Therefore, if there is any error resulted from third party applications, it will resolve automatically. However, you can take the necessary actions against that very application. Booting in Safe Mode resolves Blue Screen error with bug check code 0x000001CE as well. Here is how to carry out the task –
- In the beginning of the process, save all the ongoing programs and close them to avoid losing data.
- Make a move to the Desktop area pressing Win+D at once.
- When in the Desktop, press the combination keys Alt+f4 collectively.
- Select Restart option clicking the drop-down list located under What do you want the computer to do?
- The device will restart and in the next session startup, you will see a blue screen holding a few options.
- Choose Troubleshoot from the menu.
- Once a new menu arrives, choose Advanced options and then Startup Settings in the process.
- Scroll down to the right bottom corner of this page and click the Power cog.
- After this reboot, you will come across a new menu ear on display. Choose Boot in Safe Mode to enter into the mode.
10] Perform Clean Boot to Windows 10
Apparently, Safe Boot Mode and Clean Boot seem pretty similar with their functionality and troubleshooting but there is a bit dissimilarity in between. The Clean boot basically an ancient troubleshooting technique that people worldwide use to identify the performance issues in Booting process, error messages, software conflicts and many more. This will load the Operating system with the least number of programs and services while booting. This startup method is also well prudent to resolve INVALID_KERNEL_STACK_ADDRESS BSOD error in Windows 10. To complete the task, follow the below guidelines –
- Type “Windows Administrative Tools” in the empty text area of the taskbar search.
- Select the utility when it appears in the result.
- Move out for the System Configuration and make a double click on the same.
- In the newly opened window, choose the radio button before Selective startup in General tab.
- Move ahead and uncheck the box before Load startup items.
- Jump into the Services tab and put a tick mark to the box against Hide all Microsoft services.
- Scroll down and select the Disable all button from same wizard.
- Enter the Startup tab next and click the link that reads Open Task Manager.
- Upon opening the Task Manager, do a right-click on each program listed in this console one by one and chooses Disable for each one.
- Move back in the System Configuration wizard and click on Apply button first followed by clicking OK.
11] Rectify the defective Windows image files with DISM tool
Before each major update, Microsoft release ISO components containing Windows Image Files in them. When such files are corrupted due to malicious infection or some other issues, Blue Screen error with bug check code 0x000001CE may appear in the system.
In order to rectify eventually resolve the BSOD issue, DISM tool appears as the best. Since the utility powers up only in the Elevated Command Prompt, we need to run it first. Here is how to use the DISM tool –
- Type cmd.exe in the blank text field of the taskbar search.
- When Command Prompt arrives as result, make a right-click on it.
- Select Run as Administrator from appearing menu.
- Click on Yes when User Account Control pops up for permission.
- In the next black window, enter following text at the blinking cursor –
DISM.exe /Online /Cleanup-image /Restorehealth
- Now, press Enter key to activate the DISM tool.
- The utility will detect corrupt Windows image files and correct them accordingly.
- Since the process will search through the components in the system, it may take longer than usual.
- Once done, Restart Windows 10 to make these changes effective.
12] Uninstall dual applications and restrict software collision
Carting out various tasks on the computer could be complex if the supportive programs were not created in time. Such applications keep coming in the regular interval with the necessity you fell. Several of the programs may have different names but the functionality is same. When such applications stay in a system, they may engage in conflict we term as Software collision.
Due to this, many of the system files are deleted and the Windows face INVALID_KERNEL_STACK_ADDRESS error. To get rid of this risk, we can uninstall unnecessary applications especially the duplicate ones. You need to follow the below guidelines to uninstall an app –
- Press the Windows key and X and invoke the Power user menu.
- Select Apps and Features from the top.
- When Apps & features Settings unveils, jump to the right side pane.
- Reach out to the program you opt to uninstall.
- Click the name and also select Uninstall after expanded pane.
- When UAC asks for permission, click on Yes button.
- Once the uninstallation process finishes, restart the device to save the changes.
13] Run Full System Scan in Windows Security to kill malware
Unfortunately, most of the anti-malware programs were more or less failed to provide optimum security. Microsoft, therefore, came up with Windows Security with its robust construction against viruses. The utility also intends to keep Windows safe always providing real-time protection both Online and Offline.
If the malware can manage to enter into the system, it will not only steal the data but also deteriorate the system file. Often Blue Screen error with bug check code 0x000001CE appears in the system for this reason. You can use Windows Security to detect that malware and resolve them. Here are the guidelines –
- Press Windows key to open up the start menu.
- Scroll down alphabetically in the App list and reach to select Windows Security.
- Select the app to launch in a separate window.
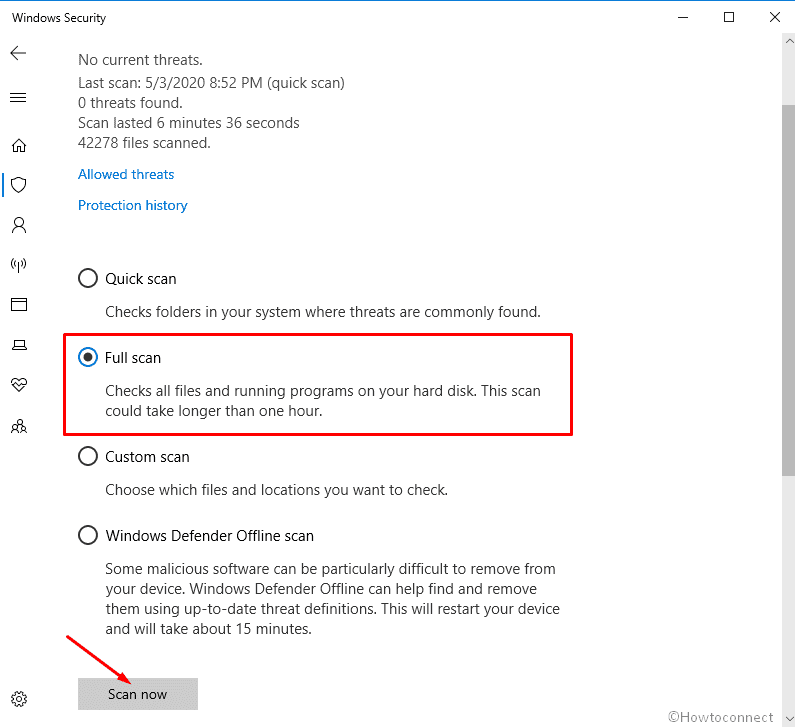
- Choose Virus & threat protection from the left pane.
- Head over to alongside pane and make a click on Scan options link.
- All the methods are being visible here; hit the radio button set for Full scan option.
- Click Scan now button and commence searching process.
- When the utility trace out some malware after searching, you will see the list on display. At that moment, click the Clean Threat option to get rid of them.
- From the succeeding page and select Remove button first and then Start actions to clean up all the threats.
14] Deploy Windows Blue Screen Troubleshooter
With Blue Screen error becoming very much common in computers around the globe, Microsoft engineers came up with an innovation. This is Blue screen troubleshooter that once runs, detects BSOD issue and implies the necessary steps to the users. To resolve the INVALID_KERNEL_STACK_ADDRESS BSOD error, we can use this tool. The instructions are as follows –
- Open the Run dialog and type control panel in its blank search box.
- Click on Ok button and let the app open up.
- The UI may show only the Categories hence, click on dropdown menu beside View by and select Large icons or Small icons.
- When the UI readjusts, choose Troubleshooting.
- From the succeeding window, choose View all option from left pane
- In the next page, double click the Blue Screen option from second place.
- The Troubleshooter wizard will appear soon. Click Advanced link fro left bottom corner of this page.
- From the following page, check the box that reads Apply repairs automatically.
- Hit the Next button to initiate the process.
- With the process ends, the utility will repair it if any drawback is detected. Ensure an active internet connection with the device as the task will use Online resources.
Another way to run the Troubleshooter is by using direct Online tool from Microsoft web page. The procedure is as follows –
Using Direct Online Tool to solve INVALID_KERNEL_STACK_ADDRESS
- Launch the Microsoft Edge or any other web browsers.
- Make a move to Microsoft’s online troubleshooting by clicking this link.
- In the upcoming page, hover down to When did you get the error? Section.
- Click on any one the radio button from here based on the problem you are getting.
- The page will now show stepwise tasks to resolve existing issue.
- Follow them to the point and fix the error eventually.
15] Uninstall problematic Windows Update files
Installing Windows update in time is very much essential to keep the OS healthy as well as free from troubles. The process is automatic and mostly this task is carried out behind users’ notice if the device is connected to the internet. Oftentimes it may happen that, a dreadful or partially buggy update has been installed.
Therefore, if you are getting a blue screen error with code 0x000001CE after a Windows Update, that specific installation may be guilty. Uninstalling that patch will fix the issue and the instructions are as follows –
- Open the Start menu and click cog to launch Settings app.
- From the UI appearing next, click on Update & Security tile.
- From the succeeding page, select Windows Update from left pane.
- Jump to the alongside pane and hover down to View update history link.
- Click on the link to experience the next page.
- Click on the Uninstall updates link
- In a moment, Program and Features page will open up from Control Panel. Head over to the dreadful update files installed before.
- Select the suspicious one and hit Uninstall button appearing at the top.
- Follow the on-screen guidance until the process ends.
- When the task finishes, restart the Windows using usual way.
16] Get rid of Third-party anti-virus program
Even the third party anti-virus software may be a reason to give away Blue Screen error with bug check code 0x000001CE sometimes. Though many of these programs are very much helpful to eliminate malware, few are not trustworthy.
Again, if you have Windows Security, there is no need for a third-party security solution. Instead, keeping two similar programs can be detrimental to cause a software collision. Hence, uninstall third party security solution from Windows 10 using below steps –
- Open the Run dialog using the combination Windows key and R.
- Type in appwiz.cpl in the provided box on Run.
- Press Enter key to open up Program and Features window.
- In the new page, move out to the third party anti-malware solution.
- Do a right on the same and select Uninstall.
- Click Yes when the UAC prompts for authentication.
- After the process of Uninstallation ends, reboot the system and save these changes to it.
17] Disable Fast Boot Mode to fix INVALID_KERNEL_STACK_ADDRESS
Fast Boot is a combination of computer’s two power options Shut down and Hibernate. The process usually collects information from the ongoing session to boot the device faster in the nest startup. This will carry over all the data including BSOD error and the issue will not be fixed.
Therefore, disabling Fast Boot will help in resolving the INVALID_KERNEL_STACK_ADDRESS Blue Screen Error. Here is how to turn off Fast startup –
- Move the pointer to the rightmost corner of Taskbar and make a right-click on the battery icon.
- Select Power Options once the visible menu.
- In the succeeding window, select What the power buttons do link from left column.
- Once the following page unrolls, Click on Change settings that are currently unavailable to unveil the hidden options.
- Scroll down and uncheck the box set for Turn on fast startup (recommended).
- Finally, click the Save Changes button from the bottom.
18] Find out bad areas in Hard Disk and rectify them
Using the same hard Disk over the years causes few issues in it as we seldom refer to replace the same. Besides, the Hard disk is often maintained in good health in spite of having bunch of ways of solutions.
Bad areas in the Hard Disk will cause INVALID_KERNEL_STACK_ADDRESS BSOD error definitely unless resolved. To detect these areas and fix, Disk Checking Tool is much popular. To Run the utility, follow the below guidelines –
- Manage access to the Elevated Command Prompt using the same instructions mentioned in above workaround.
- When in the black window, enter following command line tool –
chkdsk C: /f /r /x
- Press Enter key and in some moments, Disk Checking tool will now find out bad areas present in HDD and eventually fix those automatically.
- Wait patiently until the process ends completely.
- Once finished the task, Reboot Windows 10.
- When the next session will begin, there will be no blue screen error in Windows 10 as expected.
19] Temporarily disconnect hardware accessories
Many people in the tech forums have claimed to be affected with Blue Screen error after connecting a new hardware device. In fact, accessories like mouse, keyboard, speaker, or even a printer is a dire need to make tasks easier. You may come across INVALID_KERNEL_STACK_ADDRESS Blue Screen error after such operation as well.
Well, the snag has an easy fix and it is only removing the accessory temporarily. The solution is found to be working across the globe. Be very careful while disconnecting these devices and Reboot Windows afterward. If the error doesn’t show up in the next session, connect and use the hardware devices simply.
Methods:
1] Run System File Checker and rectify Windows core components
2] Install all the latest Windows Update patches
3] Install the latest update for drivers
4] Roll back defective updates from recently updated drivers
5] Fix memory problems from Windows
6] Clean up unnecessary files from Disk drive
7] Revert back the Windows to a previous Restore point
8] Update BIOS for affected Windows
9] Start the Windows in Safe Boot Mode
10] Perform Clean Boot to Windows 10
11] Rectify the defective Windows image files with DISM tool
12] Uninstall dual applications and restrict software collision
13] Run Full System Scan in Windows Security to kill malware
14] Deploy Windows Blue Screen Troubleshooter
15] Uninstall problematic Windows Update files
16] Get rid of Third-party anti-virus program
17] Disable Fast Boot Mode for Windows 10
18] Find out bad areas in Hard Disk and rectify them
19] Temporarily disconnect hardware accessories
That’s all!!