Laptops having an integrated Logitech webcam encounters an annoying issue. You might also have experienced lvrs64.sys Blue Screen. lvrs64.sys is a file from Logitech Webcam Software essential to run camera on when on Windows 10. This is a driver application that can cause Blue screen of Death issue due to incompatibility or having an unstable version. Commonly the error occurs when running a video call using the webcam and when happens so the system crashes and accidentally restarts without giving you any time to save your ongoing work.
Now it is obvious that Logitech webcam causes blue screen the fix is very easy as you need to perform some driver update related tasks. Outdated application, its conflict with the system files, malware infection are the more potential causes of this lvrs64.sys BSOD. You can easily resolve this nagging issue by either uninstalling the latest driver of the webcam or if you haven’t updated it then by installing the updates or by simply replacing the faulty webcam.
lvrs64.sys Blue Screen Error in Windows 10
Here is How to fix lvrs64.sys Blue Screen Error in Windows 10 –
1] Uninstall or Roll back driver
Logitech Webcam Driver establishes communication between the hardware and the Windows 10 built-in camera app to make it usable. The company rolls out updates to make the software compatible with the app. For some reason, the released driver update might be buggy having conflicting behavior that corrupt lvrs64.sys. Consequently, the file started creating an obstruction in the normal functioning of the Windows operating system. Finally, the system crashed lvrs64.sys Blue Screen Error blue screen of death occurred.
For a quick fix, you can rollback or disable the Logitech driver from the Device Manager by following steps –
- Unplug the webcam first (If integrated leave as it is).
- Press the – Windows + X.
- Select the – Device Manager.
- Double-click – Imaging devices.
- Right-click webcam driver and choose – Uninstall device.
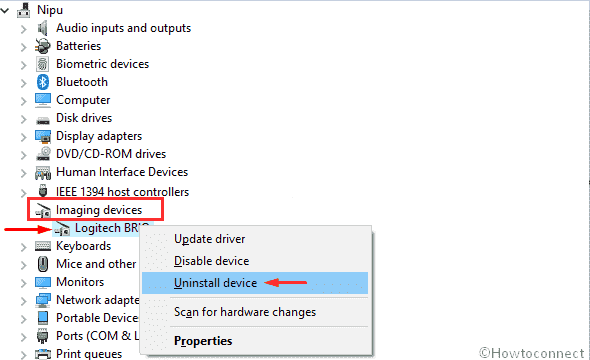
- Click the checkbox set before Delete the driver software for this device.
- Finally, hit – Uninstall.
- Lastly, restart Windows 10.
You can also roll back the driver if it was updated recently. For that –
- Follow steps 1-4 from the above.
- Right-click existing driver and choose – Properties.
- Go to – Driver tab.
- Click – Roll Back Driver.
- Follow on-screen instructions if any.
This would undo all the driver updates and changes that were made and would most likely eradicate the persisting lvrs64.sys blue screen error issue.
2] Update webcam driver to fix lvrs64.sys Blue Screen Error
Microsoft rolls out updates for Windows every month following a schedule and sometimes more enhancing the performance and efficiency of your system. But the peripheral devices become outdated resulting in incompatibility issues on your PC. This lvrs64.sys blue screen error is such an instance. Since you never or rarely update your webcam device driver over a period of time its driver software becomes obsolete and starts causing BSOD. The only way out to fix this issue is to update its driver software so follow the instructions for the same –
- Press – Windows + S.
- Type in – devmgmt.
- Hit – Enter.
- Expand – Imaging devices.
- Right-click the webcam and select – Update driver.
- Select – Browse my computer for driver software.
- Next, choose – Let me pick from a list of device drivers on my computer.
- Pick – USB Video Device.
- Click – Next.
- Close Device Manager and restart the PC.
This should have resolved your error, now reboot your PC to incorporate the update and check if the lvrs64.sys blue screen error still comes up.
3] Uninstall and Reinstall your Webcam software
Sometimes camera app on Windows might also be a cause lvrs64.sys Blue Screen Error. However, it is a built-in application but an incorrect update or a third-party tool often corrupts it. Fortunately, there are ways to uninstall and reinstall the same that can rescue from the error. Here are the guidelines –
- Click the search icon from taskbar.
- Type – appwiz.cpl.
- Press – Enter.
- From Programs and Features window, select your Installed webcam.
- Click – Uninstall.
- When a UAC appears, hit – Yes.
- Close the wizard when the process completes.
- Reboot your PC.
Once you have uninstalled the webcam check if the error still comes up (it most certainly shouldn’t).
Methods list
1] Uninstall or Roll back driver
2] Update webcam driver
3] Uninstall and Reinstall your Webcam software
That’s all!!