Today, in this article, we will discuss another interesting Blue Screen issue and its possible solutions. Loaded with a wide number of reasons, the BSODs are unpredictable until it hits your PC. One such annoying error message is MICROCODE REVISION MISMATCH that accompanies a stop code 0x0000017E in Windows 10. It is a little complicated thing for a normal user to interpret this error and code. However, this indicates that one or more than 1 processor in the multiprocessor configuration has inconsistent microcode loaded. Before an affected user can understand what’s happening with his system, the device goes for an auto-reboot with an intention to save the PC from further loss. The common reasons are the outdated drivers and operating system, missing system files, bad areas in hard disk and more. So, go through the below list to try them out and see which one works for your system.
MICROCODE REVISION MISMATCH
Here is how to Fix MICROCODE REVISION MISMATCH Error 0x0000017E in Windows 10 –
1] Ensure to Keep the Drivers up to Date
Drivers always play an integral role in the functioning of an operating system. In this regard, Windows 10 is no exception and if any drivers are not functioning with their latest versions, people may face issues like MICROCODE REVISION MISMATCH. So, you need to ensure that all the drivers are up to date and running with the latest versions. Here is how to find and update them –
- Press the key combination Win + X and choose Device Manager from the list.
- Once the console opens up, locate the devices that display a yellow warning sign next to them.
- When you find them, expand and right-click on their respective devices one by one. Choose Update driver.
- Select Search automatically for drivers from the wizard that shows up.
- After the installation gets over, restart the device and see for the BSOD.
2] Repair Corrupted System Files
When you begin to encounter MICROCODE REVISION MISMATCH Error, there is a good chance that one or more system files have gone corrupted or missing. Though Windows 10 is designed to protect the system files sometimes it happens that due to reasons like sudden power failure, mismatched versions, update errors, etc the files become faulty. To deal with such conditions, Microsoft provides a tiny, powerful command-line tool called System File Checker. It will scan all the integral components including DLL files and if detects any problematic file, it will instantly replace it. So, let us head forward and see how to deploy this solution –
- Insert the command cmd.exe in the taskbar search box. When Command Prompt shows as the result, click Run as administrator option on the extended search pane.
- Click Yes if User Account Control pops up for permission.
- In the black window, insert the below-given command and hit Enter to start the process.
sfc /scannow
- Wait for the scan to complete 100% and it will take a good amount of time for it. Upon completion, it will display the result.
- For better results, reboot the device and then see for the error.
3] Conduct a Full PC Scan
Virus or malware attack is quite common among Windows 10 users. They can harm the integral components of the system by hiding deep inside the system files. A computer gets affected by such attacks through several means and one such common is the Internet. Visiting any malicious site, or clicking on suspicious links are always the doorway for malware. They damage the integral elements, files, settings of the system. So, once you perform a full scan, it will diagnose all the files, running programs, boot record to remove viruses and security threats. This is how you can do this task using Windows Security –
- Go to the system tray and click the Show hidden icons arrow. Once all the icons are visible, click the shield one.
- This will immediately launch the Windows Security app on the PC screen.
- Select the Virus & threat protection category.
- Click the Scan options link.
- Choose the Full Scan radio button on the following page. Hit the Scan now button to initiate the detection.
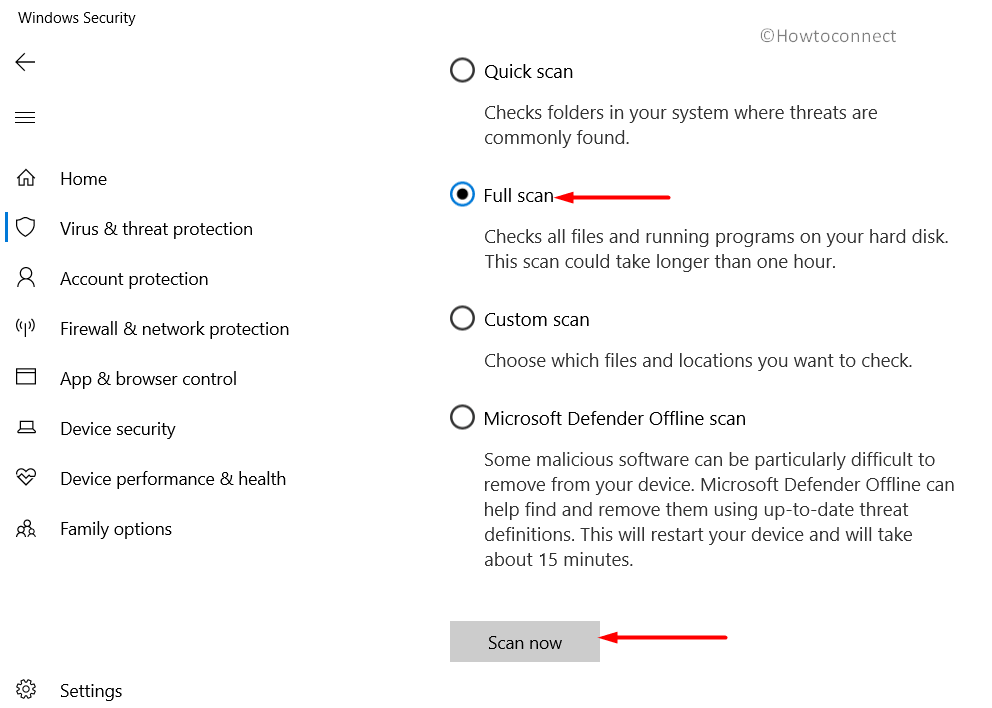
- The entire scan will take a lot of time as it will get deep into the system to find out the threats. In the end, click the Clean Threats button to start the removing process.
- Select Remove followed by a hit on the Start action button to get rid of the malware.
- Once the system is threat-free, you will not encounter MICROCODE REVISION MISMATCH Error.
4] Fix MICROCODE REVISION MISMATCH by Repairing Defective Windows Image Files
In situations when replacement files inside Windows 10 image get corrupted or damaged in any way, you are likely to encounter unexpected errors. This particular issue needs a DISM command-line tool that would scan and repair the “install.wim” image. Go through the below directions on how to deploy this workaround –
- Do a right-click on Start and choose the Run option from the Win+X menu.
- Type cmd and press Ctrl + Shift + Enter keys altogether to Open Command Prompt as Admin From Run Dialog.
- Click Yes on the UAC prompt and insert the below command line in the black window that shows up.
DISM.exe/online/cleanup-image/Restorehealth
- Press Enter and the DISM tool will connect to the Windows Update servers. Depending upon the severity, it will download and replace the damaged files in the local image for Windows 10.
5] Install Pending Updates
One of the major reasons for the occurrence of any BSOD including MICROCODE REVISION MISMATCH error is the outdated operating system. Microsoft releases a wide range of Tuesday patches, cumulative updates, preview builds, and more regularly. These packages are important to install as they contain new features, a lot of fixes for bugs and issues, etc. So, the devices that don’t install the updates periodically are likely to face a number of problems. Hence, go through the below steps and ensure to install all the pending patches right away –
- First, press “Win + I” key to open Windows Settings, the built-in component of the operating system.
- Once into it, click Update & security.
- Click Check for updates button that is available on the right pane. Windows will start scanning for the updates that your device needs to install.
- The same page will eventually list out all the updates, select the Download button to grab them.
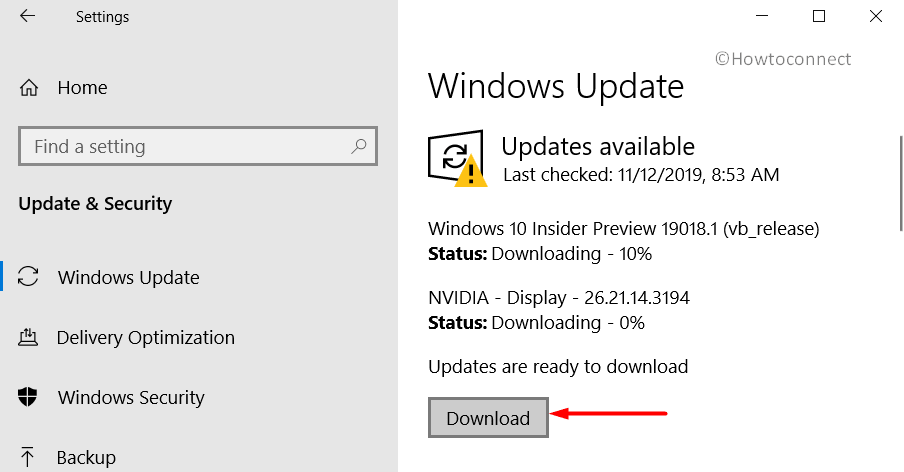
- You can view the downloading progress and when it gets over, reboot the device. However, the update(s) will guide you for installation.
6] Run Blue Screen Troubleshooter
The giant software provides all the necessary security options to make Windows 10 healthy. In order to deal with the BSOD error, a dedicated Blue Screen troubleshooter is there in the Settings app. This tool would scan, detect, and fix all the possible causes that create such issues. No internet connection is required to run the troubleshooter and here is the process –
- Press the Windows key and click the cog icon to access Settings.
- Head to the Update & security category.
- Select the Troubleshooter subsection and choose the Blue Screen option. Click Run the troubleshooter button.
- The tool will take requisite action depending on the result it gets while scanning. For better results, simply restart the device and then check for MICROCODE REVISION MISMATCH.
7] Perform a Memory Test
One of the common causes of a BSOD is a failing of memory. When the system suspects memory issues it will throw an unexpected error. The dedicated tool to deal with RAM issues is Windows Memory Diagnostic. Unfortunately, the utility cannot run within Windows and hence the computer reboots to make it function. Let us see how to carry out this solution –
- On the taskbar search box, type memory, and select “Windows Memory Diagnostic“.
- The tool will show up with two options, select Restart now and check for problems (recommended).
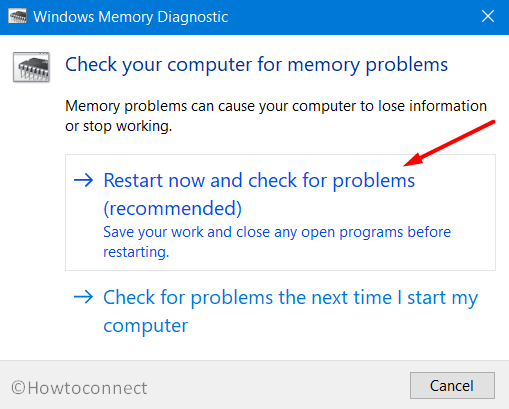
- The system would warn you to close down all the running programs and will begin the shutdown process. The computer would restart with the tool diagnosing the issues.
- Upon startup, you can view the result on the system tray. If it finds any errors in the diagnosis, it will report you the same with the necessary course of action to take.
8] Update BIOS to Fix MICROCODE REVISION MISMATCH
The BIOS needs to be updated to avoid the occurrence of any BSOD. There is a number of components that operate as a subordinate of BIOS. Hence, this makes it necessary to always have the latest version.
- Open Run dialog by jointly hitting “Win + R” hotkeys. Insert the command msinfo32 and click OK.
- This would immediately open System Information.
- Locate and see the Value next to the item BIOS version/date. Then, launch any web browser and navigate to the BIOS manufacturer website.
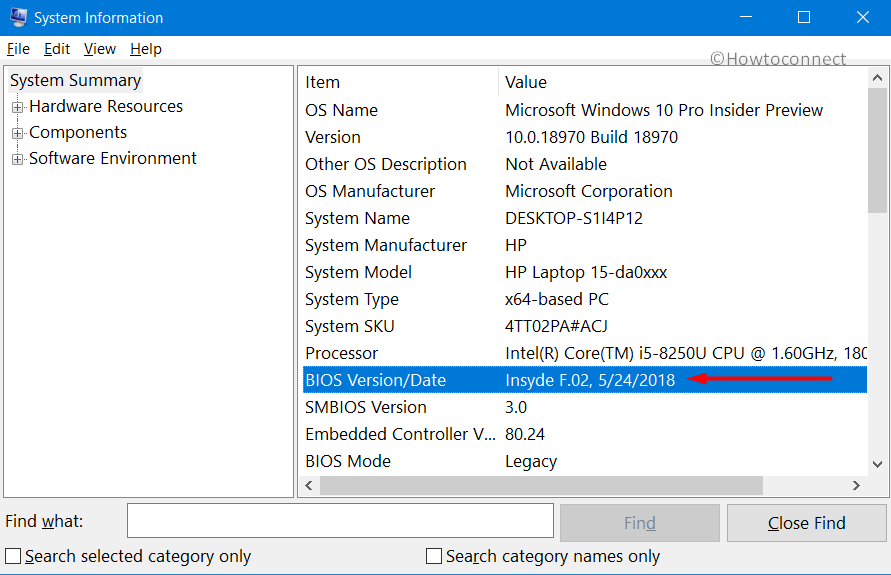
- Search for your BIOS model and download its latest version. Go through the instructions manual to install the updated file. Updating the BIOS would eventually bypass the MICROCODE REVISION MISMATCH error.
9] Remove External Hardware
Sometimes, your device’s external hardware can also be the possible reason for BSOD like MICROCODE REVISION MISMATCH. So, just unplug the external storage drives and devices. You need to plug out all the hardware devices that don’t require the basic functioning of the device. Restart Windows 10 PC and if you don’t experience any issues, the external device(s) might be the root cause of the problem.
For further support, you need to contact the manufacturer of the problematic device.
10] Uninstall 3rd Party Antivirus to Fix MICROCODE REVISION MISMATCH
The installation of the 3rd party free antivirus often changes the integral settings of the system such as some Registry entries. As a result, these modifications create conflicts that lead to several problems including BSODs. Therefore, another workaround that you can try is to remove such antimalware solutions from the device. While uninstalling, you need to ensure that all its settings are also removed to make PC healthy and safe. This is how you will do this –
- Perform a right-click on the Start icon and choose Apps and Features from the menu.
- From the list of installed applications, find and select the third-party antivirus program.
- Click the Uninstall button.
- Go through the direction of the app to complete its removal from the device. Reboot the PC and hopefully, you will not get MICROCODE REVISION MISMATCH again.
11] Rectify Bad Areas in the Hard Disk
Bad areas in the hard disk are also the possible reason behind the occurrence of any BSOD. This happens when the disk is in use for a long time. You cannot control this behavior but can definitely deal with the situation. All you need is to run a command-line tool that would repair the bad areas.
- Get access to the Run dialog and type cmd in the box. Press Ctrl + Shift + Enter keys to launch an elevated Command Prompt.
- Insert the given command and press Enter to execute it.
Chkdsk c: /f /r/x
- The disk checking utility will detect and rectify the bad areas. Once the scan gets over, restart the device and then see for the error and the stop code.
12] Uninstall Faulty Update Files
Though Windows 10 is designed to get the updates automatically but sometimes due to several reasons, the installation process does not complete as expected. Complications like low disk space, network connection problems, system failure, etc can corrupt the update files. So, in such situations, you need to remove the last installed patch from the system and see if this works.
- Launch the Settings app by using the shortcut keys “Win + I”.
- Select Update & security.
- Do a click on View update history.
- From the following page, click the link saying Uninstall updates.
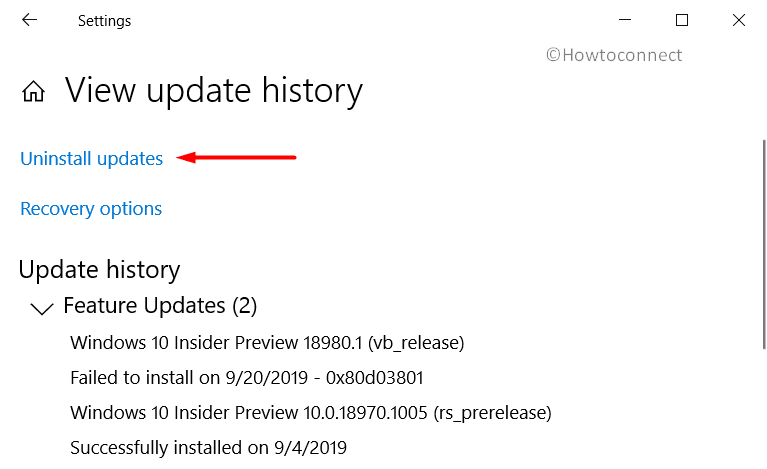
- Choose the latest installed patch from the list of downloads and click the Uninstall button at the top.
- Confirm the removal process and delete the entire package from the system. To see if this resolves the MICROCODE REVISION MISMATCH error, reboot the device.
13] Fix MICROCODE REVISION MISMATCH – Keep Disk Drive Clean
The continuous accumulation of junk items, temporary files, internet browser cache, and more things consume the valuable space of the disk drive. When the system starts running out of space, it will create several issues and BSOD is one of them. Sufficient area in the disk drive is always important and wipe out the junk, you need to use Disk Cleanup utility.
- On the taskbar search box, insert the command cleanmgr and press Enter.
- Choose the disk drive letter from the dropdown of the tool.
- Disk Cleanup will start detecting the areas that you can free up. Click the Cleanup system files button.
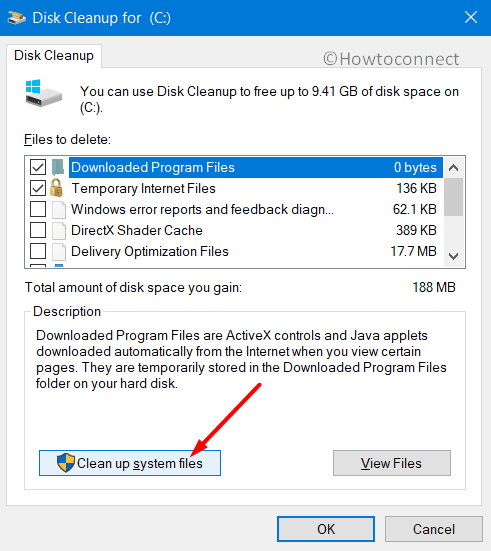
- Again choose the same disk drive letter and click OK.
- After scanning the system, the tool will display the files you need to clean. Select all the checkboxes and click OK to start the removal process. If you have any important files stored in any of the listed folders, save them to a secure location to avoid loss.
- Once the cleaning is done, restart the computer and see if the error persists or not.
14] Conduct a System Restore
One of the last solutions that you can try to get rid of MICROCODE REVISION MISMATCH is performing a System Restore. This procedure will take back your device to the time when everything was working normally. However, to make this workaround work, you should have already created a restore point earlier. In its absence, you cannot carry out this task. But if you have one, this is how you can get back to the working condition –
- Fire up the Run dialog and input the command rstrui. Press Enter to see System restore wizard on the screen.
- Click Next.
- Select the box namely Show more restore points.
- Choose the latest one and click Next.
- Click the Finish button on the wizard to start the restoring process.
Hopefully, by now, you are able to bypass this annoying MICROCODE REVISION MISMATCH error. If you have more interesting tips to resolve this BSOD, do share them with us in the comments section below.
Methods:
1] Ensure to Keep the Drivers up to Date
2] Repair Corrupted System Files
3] Conduct a Full PC Scan
4] Repair Defective Windows Image Files
5] Install Pending Updates
6] Run Blue Screen Troubleshooter
7] Perform a Memory Test
8] Update BIOS
9] Remove External Hardware
10] Uninstall 3rd Party Antivirus
11] Rectify Bad Areas in the Hard Disk
12] Uninstall Faulty Update Files
13] Keep Disk Drive Clean
14] Conduct a System Restore
That’s all!!
