You may encounter msvcrt.dll crash while running a program or install it on Windows 10 PC. Commonly, this issue occurs when a shared file either goes missing or gets corrupted. Once affected, the system generates several runtime error messages which indicate that the DLL file is attempting to load during the startup in Windows or already running. As some applications and games are partially dependent on this specific item, it’s pretty important to know how to fix msvcrt.dll crash in Windows 10.
Msvcrt.dll is a special component of the Windows which is required to open files developed with Visual C++ framework OR general C++ functions. It mainly stores information and instructions for executable files so that multiple programs can share the same dll in order to make Windows 10 PC fast. The file usually goes missing due to unintended deletion, bad sectors on the hard drive, system crash or malware infection. Furthermore, failure of electrical power supply at the time of loading Windows can bring forward msvcrt.dll error.
Solutions to fix msvcrt.dll crash in Windows 10
Here is how to fix msvcrt.dll crash in Windows 10 –
1] Bring back msvcrt.dll from Recycle Bin
If you have wiped out msvcrt.dll Windows 10 file deliberately or unintentionally, the easiest way to recover it is from the Recycle bin. Here’s how to proceed –
Step-1: Press Windows key and D on the keyboard simultaneously.
Step-2: Double click on Recycle Bin.
Step-3: Once it appears, search for msvcrt.dll from the available list. If there are too many items available there, use the search bar to find it quickly.
Step-4: After found, right-click on msvcrt.dll and choose Restore option.
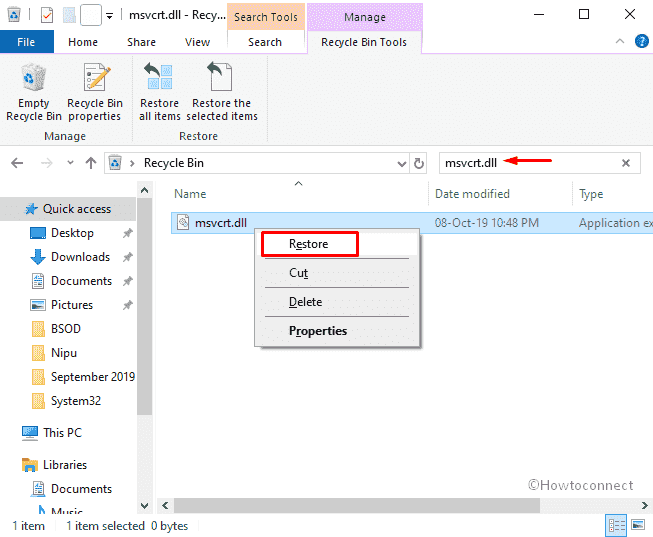
By chance, if you’ve already removed all the contents, you need to call up a third-party app that is effective to restore accidentally deleted data.
2] Use installation disc to recover the file
With the help of the installation disc, you can recuperate the missing msvcrt.dll moreover set down afresh and authentic copy of the same. Follow the below guidelines to do –
- Put in the Windows installation disc into the CD / DVD drive of your PC.
- Once the Windows Setup wizard appears, click on Next.
- Then, press Shift and f10 hotkey together to open Command Prompt.
- Onto the current screen, copy-paste the following commands and hit Enter –
cd system32

ren msvcrt.dll msvcrt.bak

D:

cd \i386

expand msvcrt.dl_ C:\windows\system32

exit
Here, C:\ and D:\ assume your Windows installation is on the C:\ drive plus CD / DVD reader is assigned to the D:\ drive respectively. You should replace these letters according to your drives.
3] Replace msvcrt.dll manually
To fix msvcrt.dll Crash issue, you can download the missing file manually from a trusted website and then place it into your system. Hopefully, the current will allow Windows to read the associated files thus prevent errors to come across.
- Navigate any trustworthy website where msvcrt.dll file is available and download it.
- Upon completion, go to the Downloads folder and unzip the msvcrt.dll you just got.
- Afterward, press Windows+R at one go invoke Run dialog box.
- Put C:\Windows\System32 in the text field and hit the OK button.
- On the forthcoming page, locate msvcrt.dll ultimately right-click on the same and select Rename.
- Set the name as msvcrtBACKUP.dll.
- Now, again go back to the Downloads folder and copy the new unzipped msvcrt.dll file and paste it to System32 directory.
- At last, Restart your PC so that the changes can take place.
4] Download Visual C++ Redistributable followed by installing them
We said earlier that msvcrt.dll Crash shows up into your system because of missing DLL files. To retrieve the same, you need to grab Visual C++ Redistributable from the official website of Microsoft. Subsequent to completion of the downloading process, install it so that the new file can replace missing msvcrt.dll file.
5] Make your operating system up-to-date
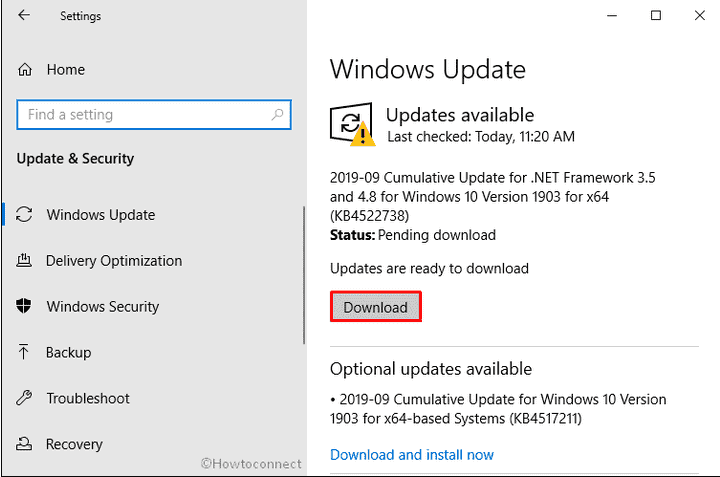
In case, msvcrt.dll goes missing due to some system corruption, the fix should be included in the recent Windows update. When you install the new patch, traceless dll files will take the right place automatically thus fix msvcrt.dll Crash. Here is the process you need to go through to get the update –
- Press Win logo and I altogether launch Windows Settings app.
- Click Update & Security.
- On the consequent page, click Check for updates button.
- If the system finds any update available, click Download to initiate the process.
6] Reinstall the programs that use msvcrt.dll to run
Multiple users report that they get msvcrt.dll crash issue while running a specific program. This scenario indicates to uninstall the item from the system and reinstall it again. Here’s how –
- Click the search icon located at the Taskbar and type control panel.
- When the result shows up, hit Enter.
- On the Control Panel window, set the View by type to Small icons.
- Choose Programs and Features to view the list of installed app.
- Next, look for the app that is creating the issue and click on the same.
- Select Uninstall option from the top ribbon hereafter follow the on-screen instructions to remove the program completely.
- When the process ends up, Restart Windows 10 in the usual way.
- Again download the program you uninstalled and check if the msvcrt.dll error is settled.
7] Scan your full device with the help of Windows Security
Virus infection causes serious damage to the system and often deletes important components such as a DLL file. Hence, you need to run a full scan so that the lost msvcrt.dll Windows 10 file can be recovered automatically. For this purpose, Windows Security will be the best choice rather than using third-party antivirus programs.
- Right-click on Start button and choose Settings from the Power-user menu.
- From the main app interface, click on Update & Security tile.
- On the upcoming page, choose Windows Security from the left pane and shift to the adjacent right.
- Click Virus & threat protection.
- When a new page becomes visible, select Scan options link.
- On the subsequent page, select the radio button assigned for Full scan followed by clicking Scan now.
8] Run System file checker to Fix msvcrt.dll Crash
If somehow Msvcrt.dll becomes corrupted or missing, System file checker will help to restore the same. Here is the process you need to follow –
- Open Run dialog box and type cmd.exe in the text bar located next to Open.
- Press Ctrl+Shift+Enter keyboard shortcut at once to launch Command Prompt with admin privilege.
- A UAC will become apparent, click Yes button to give your consent.
- When the black window comes into the view, type the following command line and hit Enter to execute it – Sfc /scannow
Now, the system will start detecting issues related to msvcrt.dll Windows 10. Once found, the utility should restore the lost file and solve other problems as well. Unfortunately, if things are complicated you need to investigate more by viewing the log report thus take necessary steps to fix msvcrt.dll Crash.
9] Update video card devices
If you are having msvcrt.dll error while playing a 3D game, there is a good chance that the video driver of your device is responsible for this. Mostly outdated and incompatible video card brings forward such Windows 10 error. So, you need to update it through Device Manager to fix msvcrt.dll Crash. To do so –
- Press Win+X and choose Device Manager.
- Double click on Display adapters.
- Now, right-click on the video card installed in your operating system and select Update driver.
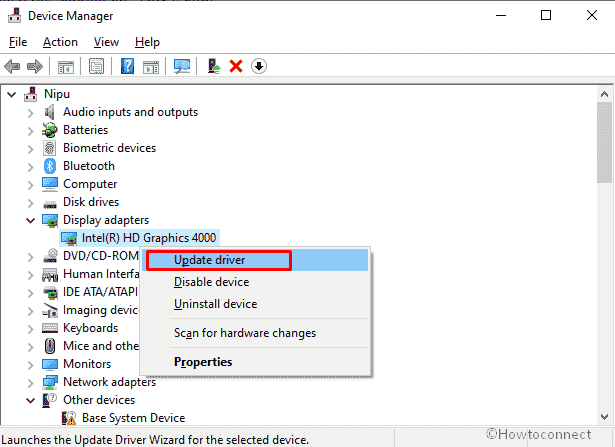
- Thereafter, pursue the instructions coming on the screen in order to update the driver completely.
- Upon finishing, restart the device and check if msvcrt.dll Windows 10 error still exists.
10] Look over the memory issues
Memory in your PC is pretty much sensitive and any wrong allocation forces the component to cause errors along with msvcrt.dll Crash. So perfect idea, in this case, is performing a memory test if you suspect that the Windows 10 error is coming from the RAM. Steps are as follows –
- Click on Start, type memory, and then press Enter.
- Once a wizard appears, select “Restart and check for problems (recommended)” option.
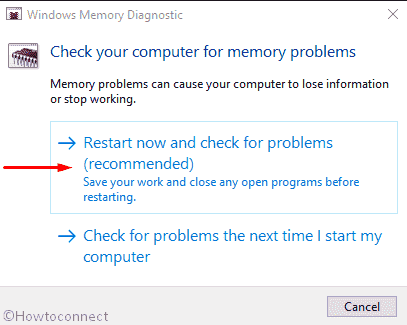
The action will bring a blue screen and start detecting memory issues of the system. As the progress reaches 100%, Windows will restart automatically.
After startup, results of diagnosis will be available in the system tray of the notification area.
11] Test your hard drive hereby Disk checking utility
Prolonged use of device often leads a system to form bad sectors in Hard disk causing multiple errors such as msvcrt.dll. Disk checking tool comes handy in this situation as it checks the full segment of HDD and repairs them automatically. To use it –
- Open elevated Command Prompt using a convenient way.
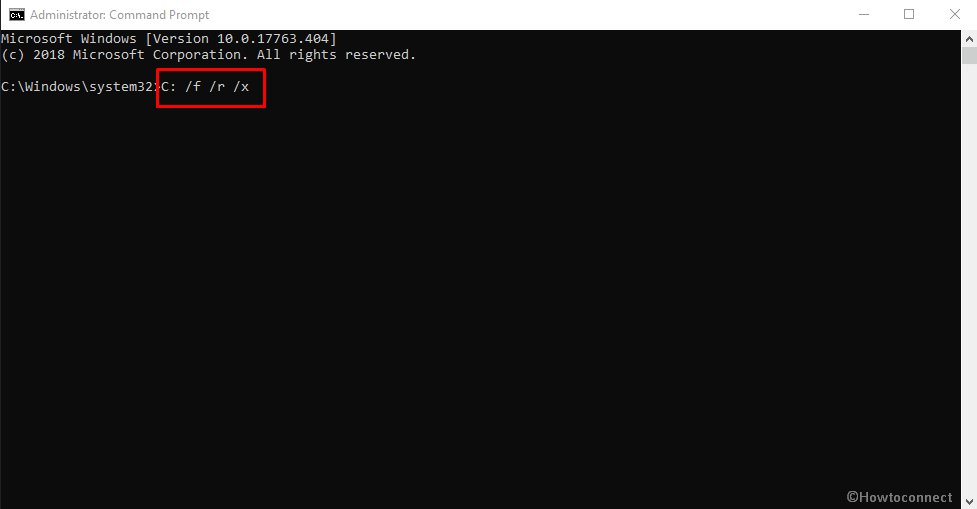
- When in the black window, type the below command at the base of winking cursor and finally hit Enter –
chkdsk C: /f /r /x
12] Clean the Registry to Fix msvcrt.dll Crash
Your PC may get affected with msvcrt.dll Crash due to corrupted registry entries. To clean it manually, follow the below steps carefully –
Step#1: Press Windows key and Q at the same time to invoke the search.
Step#2: Type regedit in the search bar and hit Enter.
Step#3: A UAC will prompt up, hit the Yes button to open Registry Editor.
Step#4: Navigate the following path –
HKEY_LOCAL_MACHINE\SOFTWARE\Microsoft\Windows\CurrentVersion\SharedDLLs
Step#5: Look over the DWORD values and find out which one has broken path.
Step#6: After getting the same, right-click on the entries and select Delete.
Step#7: In this moment, reach out to the following location –
HKEY_CURRENT_USER\Software\Microsoft\Windows\CurrentVersion\Run
Step#8: Check out for span startup registry entry and delete it in the same way you did earlier.
After completing the above steps correctly, a lot of garbage entries will be removed from the Registry thus fix msvcrt.dll Windows 10 error too. If you find this method complicated,
13] Roll back the recently updated driver
Often faulty update of a specific driver can cause msvcrt.dll error in Windows 10 PC. If you are havings the stop code just after updating any, rollback to the previous version of the same.
- First of all, call up Run command with the help of Windows and R keyboard shortcut.
- When it comes into the sight, put devmgmt.msc in the empty text field and click the OK button.
- On the Device Manager console, locate the driver which were updated recently.
- Right-click on the same and select Properties.
- On the forthcoming wizard, jump to Driver tab and click the button Roll Back Driver.
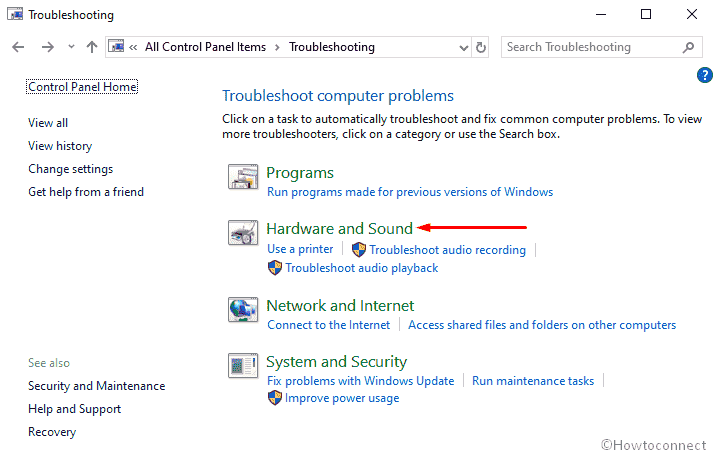
14] Troubleshoot hardware problems to solve msvcrt.dll Crash
When you face Windows 10 msvcrt.dll Crash, running Hardware troubleshooter is a good way to settle them down. Here are the following steps to use them –
- Open Control Panel and set its View by type to Large icons.
- Choose Troubleshooting from the visible list.
- On the imminent page, click the option entitled Hardware and sound to reveal all troubleshooting menu.

- Locate the faulty hardware and click on the same. It will put forward the troubleshooting wizard.
- Hit the Next button to initiate the process.
- When the process ends, apply the fix that system presents and reboot your computer.
15] Go back to the previous state of your Windows 10 device
If you come across msvcrt.dll Crash just after making any recent changes in the system, you can use the restore point to get back to the state where the PC was working fine without any glitches. Here is how to proceed –
- Go to the Taskbar search box, type in the command rstrui and hit Enter.
- When System Restore wizard becomes visible, click Next button to view all the available points.
- Choose the latest one from the list and again click Next to proceed further.
- Lastly, hit Finish button to initiate the restoration. Once you roll back to the previous point, you will not confront msvcrt.dll error anymore.
Methods:
1] Bring back msvcrt.dll from Recycle Bin
2] Use installation disc to recover the file
3] Replace msvcrt.dll manually
4] Download Visual C++ Redistributable followed by installing them
5] Make your operating system up-to-date
6] Reinstall the programs that use msvcrt.dll to run
7] Scan your full device with the help of Windows Security
8] Run System file checker in elevated Command Prompt
9] Update video card devices
10] Look over the memory issues
11] Test your hard drive hereby Disk checking utility
12] Clean the Registry
13] Roll back the recently updated driver
14] Troubleshoot hardware problems
15] Go back to the previous state of your Windows 10 device
That’s all!!

