09/11/2021 LCU Known issues lists some Network printer error codes such as 0x00000709 (“ERROR_INVALID_PRINTER_NAME”), 0x000006e4 (“RPC_S_CANNOT_SUPPORT”), and 0x0000007c (“ERROR_INVALID_LEVEL”) for Windows 10 v2004, v20H2, v21H1. Furthermore, after installing KB5007189 multiple users are reporting to encounter #283, 0x0000011b, and other error codes that prevent connecting a printer to Windows 10 system. So we are going to cover here all the printer problems that started after you received the November 2021 security patch.
Origin of these printer problems lies in the Print Nightmare vulnerability that occurred in the month of July in 2021. Actually, an attacker penetrated the security wall of Windows 10 remotely through Print spooler service. Dealing with this vulnerability Microsoft restricted non-admin users from installing or updating any printing device driver to neutralize the chance of further attack. The security again became intact but many users started complaining about different error codes appearing when connecting to a printer. These codes were 0x00000709, 0x0000011b, #283, and other with message “Windows cannot connect to printer” or “Operation could not be completed”. Fortunately, you can fix your printer and add it successfully to the Windows 10 PC with the workarounds here.
Network Printer Error KB5007189 0x00000709,0x0000011b, #283 Windows 10
Here is how to fix Fix Network Printing Error #283, 0x00000709, 0x0000011b, KB5007189 Windows 10 –
Way-1: Uninstall KB5007189
Uninstallation of a patch is the foremost solution hitting to mind when getting an error after installing a Windows update. This is also natural, therefore, if you find any of the error codes #283, 0x00000709, 0x0000011b, or other; uninstalling KB5007189 will fix the problem.
A] Via Settings
- Press – Winkey+R.
- Type – appwiz.cpl.
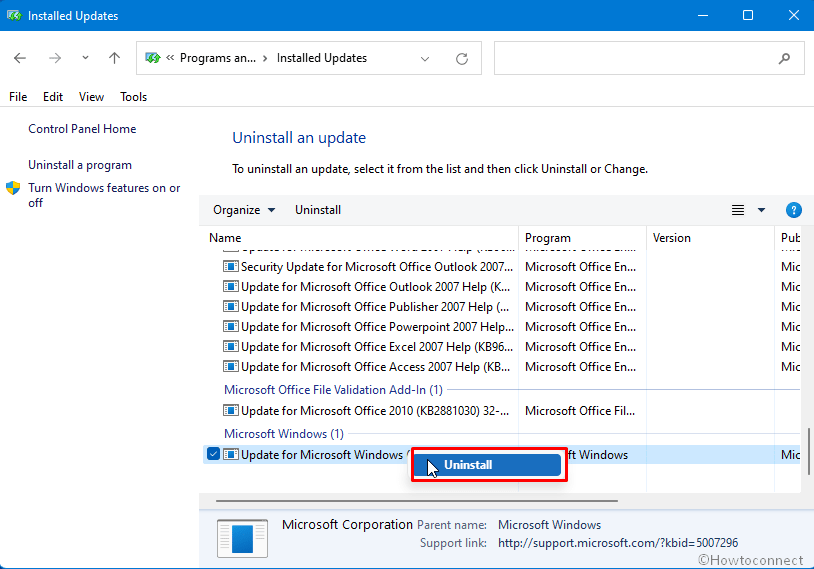
- When Program & Features window appears, click the link – .View installed updates.
- Move down and locate KB5007189.
- Right-click on it.
- Select – Uninstall.
- ClickYes on the confirmation prompt.
- Pursue the guidelines till the end and ensure that the patch is fully uninstalled.
B] Through cmd command
You might experience trouble in uninstalling the patch using the above method at times, but don’t worry, try performing the same task using cmd command –
- Click – Start.
- Type – cmd.
- Select – Run as administrator.
- Go with – Yes on UAC prompt.
- When Command prompt appears, type – wusa /uninstall /kb:5007189
- Hit – Enter.
- If you are asked to confirm, click – Yes.
C] Pause updates or Hide updates
Soon after the removal of the patch, you might notice that it is AGAIN automatically downloaded and asking you to install. So, after KB5007189 is uninstalled successfully you will have to make an arrangement to stop the automatic installation of the cumulative update. There are 2 ways in this concern – 1. Using Pause updates and 2. through Hide updates. Pause updates is the easier one as you need to only go to – Settings (Windows + I) > Windows update and click on Pause updates. But this has also a drawback; you will have to repeatedly Pause the update at an interval of a certain date. You can also use the second method easily –
- Download the built-in – Windows 10 Update Disable Tool.
- Extract the file and run the wushowhide.diagcab.
- Follow the guidelines on the tool as they will be self-explanatory.
However, you might get help from – Windows 10 Update Disable Tool [Download].
Way-2: Edit Registry to fix KB5007189 printer error
Microsoft rolled out a workaround to fix the printing problems that occur after installing cumulative updates. According to this, you will have to edit registry to fix 0x0000011b, #283, 0x00000709 or other related to printer that started after getting KB5007189 on your system. In addition to manually adding registry keys and values, you can also use a cmd command for the same which is rather easier. One more thing, editing registry is risky so before following this method make sure that you can proficiently handle this tool.
A] Using Registry Setting
- Click – Search.
- Type – regedit.exe.
- Hit- enter.
- On User account control prompt, select – Yes.
- Once the Registry Editor opens up, navigate to the following location by browsing (or using copy-paste-hit through address bar) –
HKEY_LOCAL_MACHINE\Software\Policies\Microsoft\Windows NT\Printers\PointAndPrint
- Right-click on an empty place in the right pane.
- Select – New > DWORD (32-bit) Value.
- Provide a name to this value – RestrictDriverInstallationToAdministrators.
- Open Value data by double-clicking on it.
- Enter 0 in the Value data box.
- Click – OK.
- Restart the system and check as the printer error should be fixed now.
- Still, the error is not solved then download Network_Printing_Error.zip.
- Unzip the file and right-click on Network_Printing_Error.reg.
- Select – Open.
- Click Yes on UAC prompt.
- Again click Yes on Registry Editor warning pop up.
- Reboot your device and now everything should be fine.
B] Through Command prompt
- Launch command prompt as administrator following the method as provided in Way-1 B.
- Copy the following –
reg add "HKEY_LOCAL_MACHINE\Software\Policies\Microsoft\Windows NT\Printers\PointAndPrint" /v RestrictDriverInstallationToAdministrators /t REG_DWORD /d 1 /f- Paste into the Command prompt.
- Press the – “Enter”.
- Reboot and see if the issue is solved.
From – Microsoft support.
Way-3: Add a network printer through Static IP address
In case, printer errors appear after installing KB5007189 cumulative update and you don’t want to uninstall the LCU then this method will solve your problem. You can manually add a share network printer through Static IP address or hostname to fix #283, 0x0000011b, 0x00000709, or other printing issues on Windows 10 19043.1320, 19042.1320, 19041.1320 –
- Hit – Windows and I keys.
- Click – Devices.
- From the left pane, Choose – Printer & scanner.
- Go to the right and click – +Add a printer or scanner.
- You come across a link after a while – The printer that I want isn’t listed; click on it.

- A separate wizard will come out named – Add a printer.
- Check the option – Add a printer using a TCP/IP or hostname.
- Click – Next.
- Now, type IP address or Hostname of the printer and choose “Next”.
- The system will identify the printer and show its name.
- Select – Next.
- In case, you are running a shared printer then check – ‘Share this printer so that others on your network can find and use it’.
- Otherwise, check – Do not share this printer and click on Next.
- Now click Print a test page and make sure it is not generating any error.
- At last, click – Finish.
For the users who don’t know how to find IP address of the printer then follow the guidelines –
- Press Windows + S on the keyboard.
- Type – control.
- Hit – Enter.
- When the Control panel is launched change it to Small or Large icons view.
- Select – Devices and Printers.
- Right-click on the printer device you are going to add and choose – Properties.
- Go to the Location field.
- This will have the IP address inside you are looking for.
Alternatively, see – How to Find Printer’s IP and MAC Address in Windows 10.
Way-4: Run built-in Printer troubleshooter
Certain users report that the Windows 10 built-in troubleshooter may fix KB5007189 printer problems. This utility will detect the underlying reasons and then repair ‘Windows cannot connect to the printer’ error if you follow the steps –
- Hit – Windows + S.
- Type – troubleshooter.
- Press – Enter.
- This will take you straight to the Troubleshooters Settings page.
- Click on – Printer.
- Finally, click – Run the troubleshooter.
Way-5: Properly Set Print Spooler service
Services is the most basic tool in Windows that can manage the printing operations and print job that is why its configuration should be correct. You need to ensure in this app that Spooler service startup type is automatic and its Status is Running. You can now the easy method for – How to Disable/Enable Print Spooling Service Windows 10.
- Press the – Winkey + S.
- Type – Services.
- Next, press – Enter.
- Find – Print Spooler.
- Double click on the service
- Confirm that the Startup type is set to Automatic.
- If not, click on the drop-down and choose – Automatic.
- Below Service status, click on – Start.
Way-6: Update printer driver
When KB5007189 error #283 adding printer Windows 10, 0x0000011b or 0x00000709 occurs outdated driver might be the root cause. Even Microsoft states in this case – “Use the same version of the print driver on the print client and the print server. The problem will be fixed externally by keeping the print drivers up-to-date. Still, the error continues, establish contact with the OEM helpline aka manufacturer’s support”. Hence, follow the steps to update the printer driver –
- Press Windows and R keys at a time.
- Type – devmgmt.msc.
- When the Device Manager opens up, double click on Printer.
- This will reveal all the drivers, right-click on the appropriate one and select – Update driver.
- Select – Search automatically for drivers.
- Repeat the same with Print Queue if showing.
- Reboot the PC and check the error; hopefully, it should be fixed.
- If not then go to the manufacturer’s website of the Printer and find the driver and manually download and install it.
Methods list:
Way-1: Uninstall KB5007189
Way-2: Edit Registry
Way-3: Add a network printer through Static IP address
Way-4: Run built-in Printer troubleshooter
Way-5: Properly Set Print Spooler service
Way-6: Update printer driver
That’s all!!