OneNote is one of the most popular built-in apps that allows you to take daily notes, arrange necessary information, and share them as well. The best feature offered by this utility is, it works everywhere virtually over Windows 10 devices and on the web. Unfortunately, a few OneNote Errors occur when using the app on a daily basis which is mostly related to synchronization.
Besides, some issues, as well as non-functionalities, are pretty usual too. So today, we will discuss some effective resolutions to fix OneNote Errors in Windows 10 in this write-up. Let’s explore the problems and their workarounds –
OneNote Errors in Windows 10
Here is How to Fix OneNote Errors in Windows 10 –
Error-1: Notes won’t sync from OneDrive or Share Point
Sometimes, users may face some setbacks with syncing of OneNote which is stored in OneDrive or the latest version of SharePoint. Hence, in that case, accessing the notebook in OneNote for the web might be helpful. This will facilitate the troubleshooting in the application caused by the OneNote itself or from the server. For the detailed process, see below –
- Open the OneNote app, click on File, and choose Info.
- On the right pane, do a right-click on the URL visible underneath the notebook. Select Copy from the available menu.
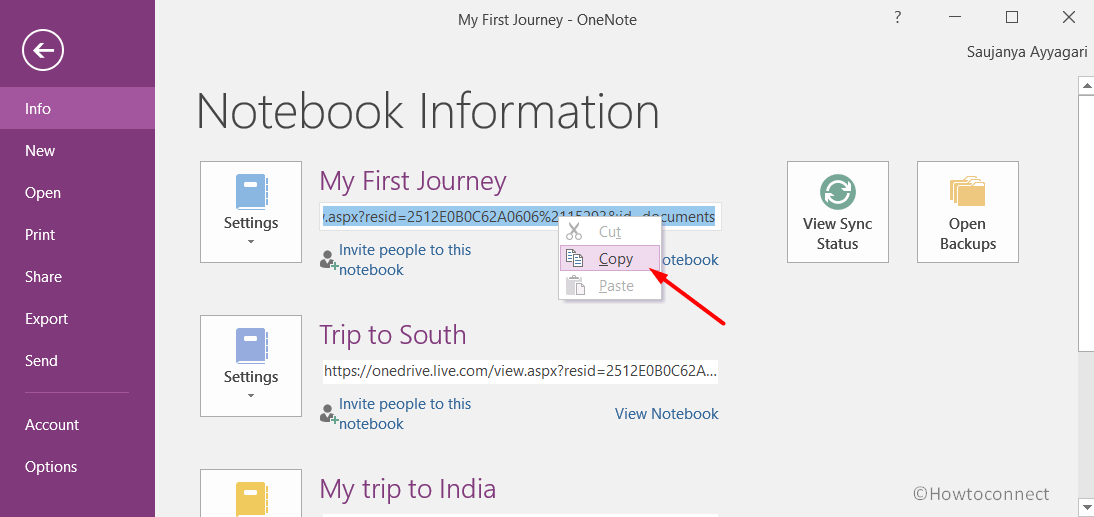
- Now, launch the default web browser and paste the URL at the address bar.
- Press Enter key to load the selected notebook in OneNote for the web.
If the process works successfully for opening the notebook in the web version of OneNote including all the changes done, there might be issues with the Desktop version of this app. For that, closing and re-opening the notebook will be a preferable solution to reset the connection.
- Launch the OneNote app, click on File and select Info option.
- Click on the Settings located next to the name of the affected notebook.
- Select Close.
- Move back to the notebook in the web version of app in browser and Edit in OneNote on the ribbon.
With respect to opening the notebook in OneNote web version, if the file is unable to load indicates a problem is with the server itself. If the page is visible on the web but modifications don’t appear, it confirms the data hasn’t been synced yet due to some specific issues. For that, follow the below guidelines –
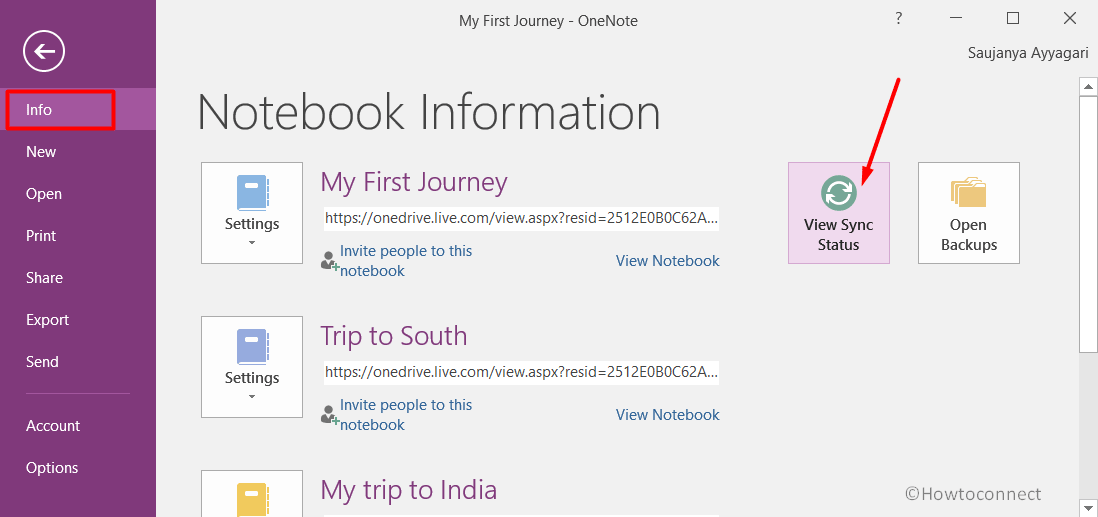
- Fire up OneNote and navigate to File => Info.
- Make a click on View Sync Status button.
- Check the error in the dialog box as well as note down the code.
- Contact Microsoft website mentioning the error code for a solution.
Error-2: Problems in syncing one specific section
Syncing issues may happen for a particular section in OneNote when shared which can be resolved by following below steps –
- On the OneNote application, navigate to File > Info > View Sync Status.
- When the Shared Notebook Synchronization dialog box appears, select any notebook icon having a yellow triangle warning. It will show the name of any section vulnerable to cause sync problems.
- Finally, the Sync Now button located beside the notebook containing the defective section.
Sometimes, a single notebook section also fails to sync accurately. For that, follow the below instructions –
- Create a new section in the same defective notebook.
- From the old notebook, right-click on each page and select Copy.
- Paste each to the newly created notebook.
- After all the pages are already in the new notebook, press Shift+F9 at once to manually sync this.
- In the end, follow the progress bar to complete syncing.
When the new page syncing finishes, you can proceed to remove the old page. After doing so, you can start working with a new one and rename the same. If the above steps don’t work for you, it can be a result of some corrupted sections from Notebook Recycle Bin. Deleting that will resolve the problem proceeding through below process –
- Open the OneNote as well as the defective notebook.
- Do a click on History tab, followed by selecting Notebook Recycle Bin.
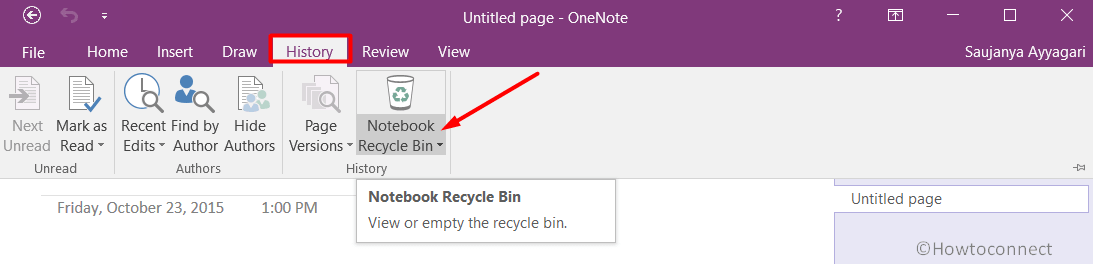
- Execute a right-click on the selected page or section, and choose Move or Copy.
- Paste the same to another section you like.
- When the task finishes, delete the previous section or page in the process.
Error-3: Conflicts in Synchronization or Merge conflicts
Merge conflict messages usually come up when two users attempt to edit the same section of a notebook at the same time. Whether it is editing the same note, part of the page, modifying a paragraph, error messages start coming up in the yellow information bar. To save the data loss, OneNote saves multiple pages when such a thing happens and an icon shows up on the page confirming the conflict. To fix this mess, follow the below steps –
- Make a click on the yellow information bar at the top of the page. It will show the list of conflicts highlighted in red color.
- Copy the information from this page having merge conflict error.
- Paste the same to main page.
- Once the task finishes, do a right-click on the page tab and select Delete to remove the conflicting page.
Error-4: “Server is busy” sync errors
Some errors like “Server is busy” occurs usually when a notebook is stored in “SharePoint Online”, “SharePoint“, or in an “OneDrive” for some business purposes. Typically they are more likely to be sync errors but in reality, these are authentication setbacks. You can resolve such errors through below guidelines –
- Sign Out from the current session of OneNote and then sign in again.
- Close the notebook and re-open it after a while.
- Ensure the proper access to a notebook through the web, SharePoint, and SharePoint Online.
Error-5: “Not enough space” sync errors
We may often come across an error text by malicious code 0xE00015E0 which indicates there is low disk space and sometimes lacks memory for a notebook to sync some sections. These are the results of large backup files which often resolve after deleting the backup or optimizing the notebook. Here are the guidelines to accomplish the task –
Delete an existing backup file
- Press Windows key and Q at once to open Taskbar Search.
- In the blank text area, type %localappdata% and press Enter key.
- When the File Explorer opens, head over to Microsoft folder => OneNote =>16.0 => Backup.
- Here, Delete the files or folders which you don’t want to save in the Backup folder.
Optimize OneNote notebook
- While OneNote application is open, click File and select Options.
- Select Save & Backup from the left pane.
- Do a click on Optimize All Files Now.
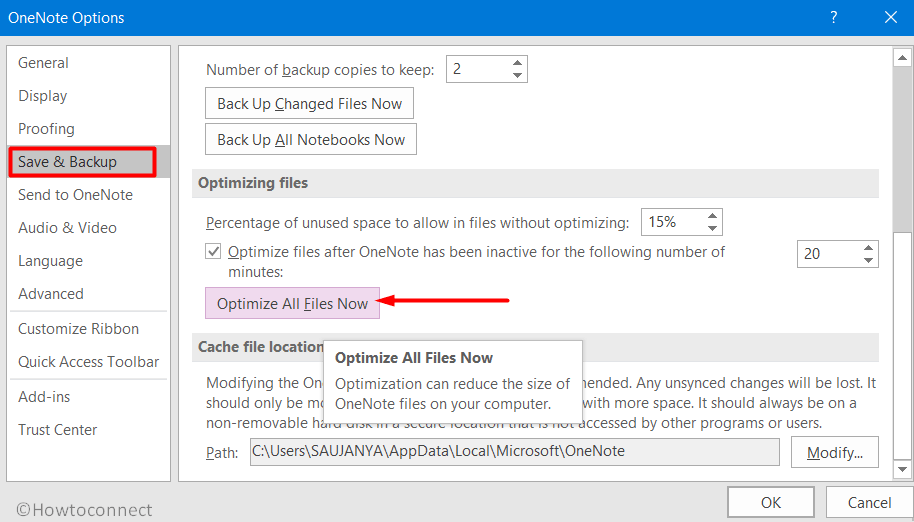
The process might consume several minutes to optimize the files.
Error-6: OneNote Errors – Service not available
Service not available error is an outcome of following error codes –
0xE0000784 - Web DAV is Disabled error in OneNote0xE000078B - Server Timeout error in OneNote0xE4020040 - Store Busy Retry Later error in OneNote
For these errors, workarounds are as follows –
0xE0000784 – Web DAV is Disabled error in OneNote
The error code indicates OneNote is unable to use the WebClient service on the device while accessing the notebook. To resolve this issue, follow the below steps –
- Open Run dialog and to do so press Win+R hotkeys together.
- Type in the command services.msc and then hit Enter.
- Locate and right-click the WebClient service. Choose Properties.
- Once the Properties window shows up, change the Startup Type to Automatic.
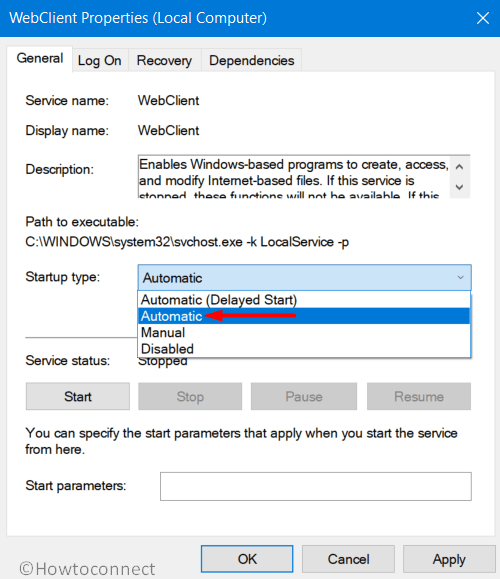
- Finally, click Start, hit the OK button and reboot the device to implement the changes.
0xE000078B -Server Timeout error in OneNote
This specific error code defines that OneNote has communication problems with the web server where the notebook is stored. These types of issues mostly happen due to server timeout, busy, or can’t respond to the request drawbacks. When the error shows up, you don’t need to worry a lot since it will resolve automatically in a few minutes.
0xE4020040 – Store Busy Retry Later error in OneNote
Error code 0xE4020040 represents OneNote can’t sync one or more notebooks. This happens when the server is momentarily busy or unavailable where the notebook is stored. Often these are the results of routine maintenance of the server which may resolve automatically.
Error-7: Problems associated with Misplaced sections in OneNote
Misplaced sections will be evident in a notebook when the app tries to sync the specific section and unable to find the file. In case of such problems, a Misplaced Sections icon shows up in the Notebook list. This problematic section will stay in the shared notebook until the time OneNote finds the new location for this. Moreover, this can happen if anyone misplaced or deleted the section. To resolve that, perform the below tasks –
Move a misplaced section to another notebook
In case a section in a shared notebook has trouble in syncing but the data contained in it is very much important, then move the unsynced section to a new notebook. The procedure is as follows –
- Do a click on Misplaced Sections in the Notebooks list.
- Execute a right-click on the tab of the misplaced section which needs to be moved. Select Move or Copy.
- From the dialog box that comes into view, select the notebook or location you want to move the section to.
Delete a misplaced section from your notebook
When it comes to deleting a section intentionally, you can remove the misplaced section proceeding through following way –
- Select the Misplaced Sections in the Notebooks list.
- Do a right-click on the name of the section you opt to delete. Click on Delete.
Error-8: OneNote Errors on SharePoint
In case of storing the notebooks in the SharePoint, these are usually saved in the Document Libraries. If any user enables a few other features, it may cause sync error as well.
Certain sync issues are likely to occur when the SharePoint has the following features enabled –
- Required check-in/check-out,
- Versions (major or minor),
- Any required Properties columns.
Note: To view or modify these properties, ensure to have SharePoint administrator privileges. In case of failure to make changes, users can contact the SharePoint administrator in his/her organization.
To resolve those cases, you may need to follow the below instructions –
Turn off the Check-in/Check-out in the SharePoint Document Library
- Open the SharePoint and navigate to the Document Library.
- Click Settings. Select Library Settings > Versioning Settings from the Library Tools.
- Change the Require Check Out option to No.
Turn off Versions in the SharePoint Document Library
- In the beginning, navigate to the Document Library in SharePoint.
- Choose Library > Library Settings > Versioning Settings from the Library Tools ribbon.
- Modify the Document Version History option to No Versioning.
Turn off Required Properties in the SharePoint Document Library
- On the Document Library of SharePoint, go to Library > Library Settings.
- Head over to Columns table and see whether any items have a checkmark under the Required column.
- Click any item marked as necessary.
- Finally, change the Require that this column contains information option to No.
Error-9: Collaboration Space sync problems
Sync complications in collaboration space often occur when a number of students attempt to edit the same page location at the same time. The same setback happens as well when a large file attachment is added on the edited page. To avoid these troubles, you may follow the below guidelines –
- Break up the Student groups into the small cluster (a group can have a maximum of 6 members).
- For each group of students, generate a separate “section tab“.
- Instruct each student to edit in different places of a page or they can create their own also.
- Lastly, don’t add large files as attachments.
Error-10: Miscellaneous sync related OneNote Errors
Some other drawbacks may also arise in OneNote with specific bug check codes like the following –
- 0xE000002E – Out of Sync with Store error in OneNote
- 0xE4010641 – Network Disconnected error in OneNote
- 0xE40105F9 – Unsupported Client Build error in OneNote
- 0xE4020045 – Unsupported Client error in OneNote
- 0xE000005E – ReferencedRevisionNotFound error in OneNote
- 0xE0190193 – 403: Forbidden error in OneNote
If you have also encountered one of these issues, the resolution will be as mentioned below –
0xE000002E – Out of Sync with Store error in OneNote
The Error code 0xE000002E in the OneNote is a simple issue and it has a very easy fix. Only refreshing the app will help to resolve the problem. As the app cannot be refreshed automatically hence, users can do it manually. It’s a temporary problem and so simply press Shift+F9 hotkey in order to resolve the error while OneNote is functioning.
0xE4010641 – Network Disconnected error in OneNote
Basically, disconnection from the network generates error code 0xE4010641. It means due to this poor connectivity, the OneNote fails to sync one or more notebooks. Moreover, the same can happen when the network location where the notebooks are stored is not available. Notebook is usually stored in SharePoint, OneDrive, or a local network and inaccessibility can happen due to below reasons –
- It might be a temporary or intermittent server connectivity issue and will be fixed automatically. You can manually press Shift+F9 keys or click Sync Now button in the Notebook Sync Status dialog box to eliminate the problem also.
- The server may be temporarily unavailable or in Offline as the machine where the SharePoint site located in an organization is turned off. Try to access the root address of the server in order to verify the outage to fix the problem. For more accurate resolution, talk to the IT admin or SharePoint provider and report the trouble.
- The notebook you are trying to access does not exist in the network location. It happens when someone has already deleted the same from the server. In that case, log in to OneDrive to check if the file exists there or not. If you are not sure about the location of that file, navigate to File > Info in OneNote and check out the address of your notebook.
0xE40105F9 – Unsupported Client Build error in OneNote
This error in OneNote represents, it fails to sync one or more notebooks as a user is accessing an old version. In that case, you need to download the latest version of OneNote and try syncing again. The guidelines are as follows –
OneNote 2013 desktop version
- Close the OneNote 2013 app and then Open Windows Settings => Update & Security => Windows Update.
- Do a click on Check for Updates.
- Click Download to install all available updates including that of Microsoft Office as well.
- Restart Windows 10 PC, start OneNote again, and try syncing the notebooks using keystrokes Shift+F9.
In case you didn’t get the updates using the above guidelines, approach manually –
- Launch the OneNote 2013, click File => Account.
- Click Check for Updates.
0xE4020045 – Unsupported Client error in OneNote
Users come across this trouble after clicking a yellow Info Bar which actually appears when a locally stored notebook was dragged or added to OneDrive for syncing, backing up, or sharing. The issue indicates that a notebook is a cloud-based one though OneNote can still treat it as a local stored unless completely moved. To fix the problem, guidelines are as follows –
- First of all, make sure to close OneNote app if it is still running.
- Moving on, go to the folder in the computer’s hard drive storing the affected notebook.
- The default location for Windows notebook is usually
C:\Users\<username>\Documents\OneNote Notebooks. - Copy the folder with the affected notebook having the same name.
- Paste it to the root folder of your main hard drive. It will immediately eradicate the copy of the notebook out of the cloud storage sync scope.
- Do a click on This PC icon from File Explorer. Make a double-click to open the hard drive root location to which you just copied the notebook previously.
- Once you reach the copied notebook folder, perform a double-click on the “Open Notebook.onetoc2” file.
- If you don’t find the file, double-click any other available “.onetoc2” file in this folder.
- Lately, when the OneNote 2016 for Windows opens up, the notes from the copied notebook folder will display properly.
0xE000005E – ReferencedRevisionNotFound error in OneNote
When an application fails to sync a specific section of your notebook, this error pops up. The error is mostly temporary and resolves only by refreshing manually pressing Shift+F9 keys at once. However, if the issue comes very frequently, follow the below steps to resolve –
- Make a right-click the name of your notebook and choose Notebook Sync Status.
- Click the tiny arrow next to the notebook having the problem.
- Select Close and then generate a section in the same notebook like the one containing the error.
- In the process, Copy or move all of the pages from the old section that’s not syncing to the new section.
- As a final step, wipe out the old section and then re-sync the notebook by pressing “Shift+F9“.
0xE0190193 – 403: Forbidden error in OneNote
If you come across error code 0xE0190193 all of a sudden, indicates that the section you are trying to access is no longer available. It may be a result of accidentally modifying permission by the owner of the notebook from the server admin.
To resolve the problem, you need to contact the owner and ask to change the permission again.
Methods:
1] Notes won’t sync from OneDrive or Share Point
2] Problems in syncing one specific section
3] Conflicts in Synchronization or Merge conflicts
4] “Server is busy” sync errors
5] “Not enough space” sync errors
6] “Service not available” errors
7] Problems associated with Misplaced sections in OneNote
8] Sync errors in notebooks on SharePoint
9] Collaboration Space sync problems
10] Miscellaneous sync errors
That’s all!!