Microsoft is just closer to release the 1st major update of this year entitling Windows 10 May 2020 update. But unluckily this version has started throwing errors related to Wi-Fi, Bluetooth, Audio, bugcheck, and data deletion. In this write-up today, we will have on-point discussion about how to Fix Windows 10 2004 Issues.
Windows 10 May Update is having some snags staring Bluetooth not working. Some issues may be much annoying like Audio cracking problems, and Wi-Fi connectivity setbacks, data deletion bugs as well as Blue screen error to a far extent. All of the drawbacks come up with comparative easy fixes and will be discussed here in brief. Let’s see the issue you get in the list –
Windows 10 2004 May 2020 update Issues and Solutions
Here is how to fix Windows 10 2004 May 2020 update Issues and Solutions –
Issue-1: Windows 10 2004 May 2020 Update is not installing
As usual, release Windows 10 2004 May 2020 Update will be also available to download and install via Settings app> Update & Security > Windows Update > Check for updates. Devices matching system requirements will receive the files but many users encounter Update is not installing setbacks. Some of the error codes you may encounter are 0x80240438, 0x800f0986, 0x8024000b, 0x8007370, 0x800f0831. Follow the steps to solve any errors like these –
First of all, ensure the following things before installing the update –
1) Enough space in the disk drive, at least 32GB free storage.
2) The latest Servicing stack update/SSU for Windows 10 20H1 is already installed.
3) Disconnect every additional peripherals and external storage media from the computer like USB drive, SD Card. Other USB devices like wireless printer or mouse, Network card, keyboard receiver are recommended to remove.
4) Temporarily disable or even permanently uninstall any third-party anti-malware solution.
5) Disable the third party drive encryption tools such as VeraCrypt if you have enabled the same. Also, remember to decrypt the OS (C:) drive before proceeding to install the latest updates.
Disable the Developer Mode
Follow the instructions to Disable Developer Mode in Windows 10 if you have enabled it previously –
- Press Windows logo and I keys simultaneously on keyboard.
- When the UI unfolds, click Update & Security.
- Choose For developers from the left pane in the next Settings page.
- Click the radio button that reads Sideload apps from the right side.
- Choose Yes from the popup coming next.
- Now, head back to Settings Home and click Apps.
- Select Apps & features located at the left overlay.
- Shift to right side pane and click the Optional features link.
- After the succeeding page opens, reach out to Windows Developer Mode.
- Click the same and then Uninstall option from expanded pane.
- Once done, Restart the device to make the changes effective.
Now navigate to Settings => Update & Security => Windows update => Check for updates. If still Windows 10 2004 May 2020 Update throws any error then follow the next method –
Delete incomplete Update files
Partial download is one of the most usual reasons causing trouble while installing Windows update. The issue resolves once you wipe out everything in the Windows Update Store folder. Follow the instructions for the same –
- Open the Run dialog box pressing Win+R hotkeys at once.
- Type services.msc and press Enter.
- When the Services Window appears, move over to Windows Update.
- Make a right click on the “service” and choose Stop.
- If the Stop option is grayed out, choose Properties instead.
- In the newly opened wizard, click dropdown menu beside Startup and select Disabled. Keep the Services window open.
- Open the File Explorer pressing Win+E hotkey together.
- Navigate to the path – C:\Windows\SoftwareDistribution/Download.
- When in the SoftwateDistribution/Download folder, press Ctrl+A to select all items.
- Right click and choose Delete.
- Now, Start the Windows update service.
- Once the process is over, reboot Windows 10.
- After coming back to a new session, try installing the patches via Settings app> Update & Security > Windows Update > Check for updates.
Hope, this time the files will be downloaded and installed without any problem.
Use Windows 10 version 2004 Upgrade Assistant
When the above resolution fails to install the updates, you can use the online Windows 10 version 2004 Upgrade Assistant. For that, follow the below guidelines –
- First of all, delete all the items from SoftwareDistribution folder on your system using instructions using the previous workaround.
- Now, launch the web browser from Windows and visit the Windows 10 download site.
- When the web page arrives, click Update now option under Windows 10 May 2020 Update now available section.
- Once the downloading finishes, double click on Windows10Upgrade9252.exe to install the Upgrade Assistant.
- After installing, finally, do a click on Update Now button and comply with on-screen guidelines to Download and install the Windows 10 version 2004.
Rectify the Corrupted Windows system components
Sometimes, corrupted system files may also restrict the update to be installed on the PC. To resolve, you need to rectify troubling Windows components using System File Checker built in utility. Here are the instructions to accomplish this task –
- Open Taskbar Search pressing Win+Q shortcut.
- Type cmd in the blank text area.
- Right-click on Command Prompt when available in the result.
- Select Run as Administrator option.
- Click Yes when UAC prompts.
- In the black window appearing next, enter the command –
Sfc /scannow.
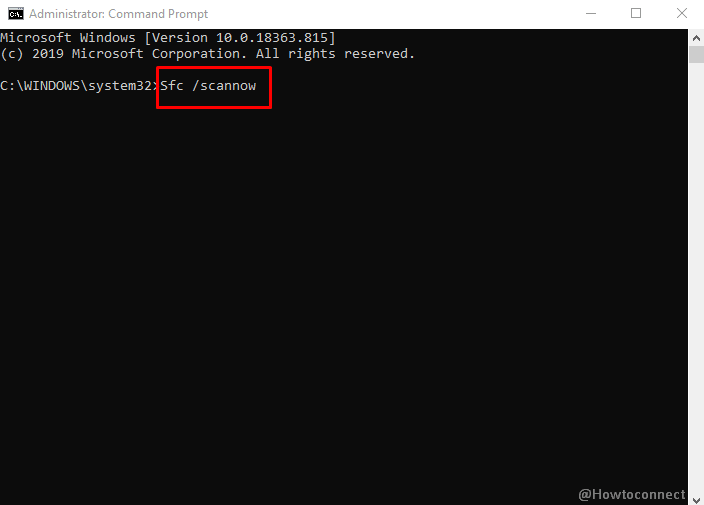
- Press the Enter key in order to execute this command and invoke System File Checker.
- This utility will detect and fix defective system files automatically. Wait until the process ends.
- Once done, Restart the system to bring changes into effect.
Run DISM tool and fix the Windows image files
Defective Windows image files also cause issues while installing Windows 10 2004 May 2020 update. To settle them, Deployment Image Servicing and Management aka DISM tool comes as aa great help. Here is how to use the utility –
- Manage to access elevated Command Prompt using guidelines from the previous method.
- Enter following command just after C:\WINDOWS\system32> –
DISM.exe/Online /Cleanup-Image /Restorehealth
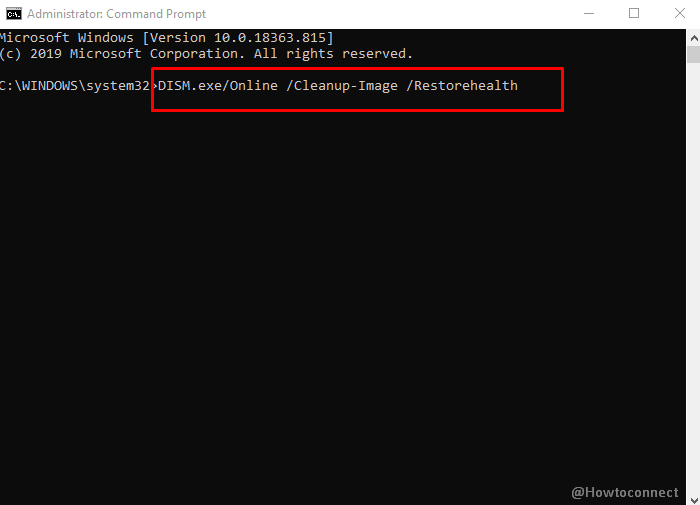
- Press Enter key to activate utility and fix the Windows image files.
- Once Done, Restart Windows 10 obviously to make the changes effective.
Install Windows 10 2004 using bootable installation media
In case the usual method fails to install the updates for Windows 10 2004, you can use a Windows 10 Repair-Upgrade. For this, you have to install v2004 using bootable installation media. This is a very popular choice and recognized among users. To accomplish the task, follow the guidelines –
- Open a web browser, visit the following link and download the Media Creation tool.
- After finishing, run it and create a Bootable media such as USB drive.
- From the drive, Run the “MediaCreationTool2004.exe” file and update the Operating System to Windows 10 2004 edition.
- Alternatively, you can create a bootable media of the version.
- Now you can also follow – How to Use Rufus to Install Windows 10.
See – How to Install Windows 10 2004 May 2020 Update.
Run Windows Update Troubleshooter and fix problems
Windows Update Troubleshooter is an outstanding utility that can fix any of the problems associated with updating newly released build or patch. Once the problems are fixed, you shouldn’t encounter Windows 10 2004 May 2020 update Issues. To accomplish, here are the steps –
- Press “Win+I”.
- Click on “Update & Security”.
- From the next window, select Troubleshoot from the left pane.
- Locate Windows Update on the right.
- Click the same and hit Run the troubleshooter from expanded pane.
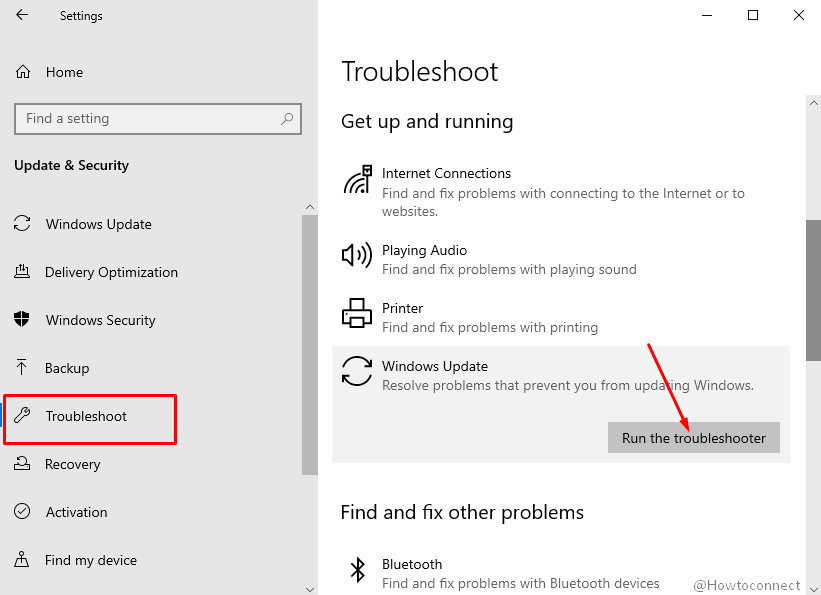
- Troubleshooting will start immediately if the device is connected to an active internet connection. This will also provide guidelines to solve the problem accordingly.
Go to the simplified instructions here – Use Common Windows Update Troubleshooter on Windows 10, 8.1, 7.
Issue-2: Windows 10 2004 May 2020 Update Wi-Fi Issues
On Windows 10 2004 May Update a mass number of users encounter WiFi issues. The form of these problems may vary in devices like slow speed of wireless connection, unable to connect internet provider, configuration deficits. Precisely the non-functionality of network adapter is a pretty common cause leading these errors after installing the latest version of Windows 10.
Most of these issues have common origins such as incompatible drivers, invalid changes in configuration, and stubborn bugs due to feature tweaks in version change. Oftentimes, network driver may get damaged resulting in Wi-Fi problems. Similarly, if the latest driver is not installed, few old configurations can bock the connectivity. So in this section, follow the instructions to fix Windows 10 2004 WiFi issue –
Update the Network adapter driver in using Device manager
Maximum of the Wi-Fi problems originated in Windows 10 2004 have a common root cause and that is related to the driver. Outdated drivers hold most of the doubts which can be fixed easily using Windows Device Manager. Here are the steps to do update the Network driver –
- Open the Run dialog pressing Win+R together.
- Type devmgmt.msc in the empty search area and click Ok button.
- When the Device Manager is launched, move over to Network adapters section.
- Make a double click on the device and unfold the drivers’ list.
- Right-click the appropriate Wi-Fi adapter (for Realtek it will be Realtek RTL8723DE 802.11b/g/n PCIe Adapter)
- Select the Update driver option.
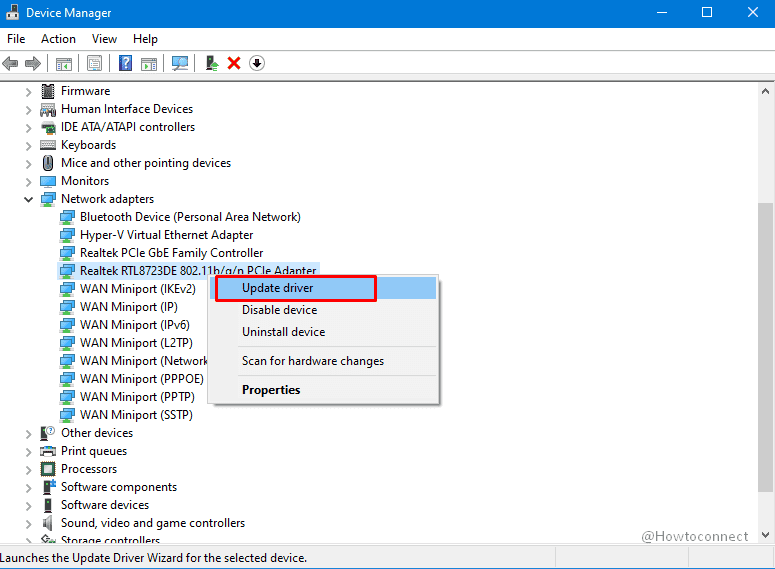
- From the next window upon opening, choose Browse my computer for driver software option.
- Hit Let me pick from a list of available drivers on my computer.
- Highlight the model number by clicking on it.
- Lastly, click the Next
- After the driver is updated, Restart Windows 10.
Browse the details from here – How to Fix WiFi Missing or Not Working in Windows 10.
Use the Network Adapter reset feature in the Settings app
When driver updating fails to resolve the issue, don’t be discouraged, you can still try using the Network Reset tool located using Windows Settings. This will remove the network adapter as well as reinstall the same.
Furthermore, that process will also reset networking components and restore to default settings. This task helps to resolve the slow speed issues of an internet connection n the latest edition of Windows 10. In order to reset the WiFi after installing the Windows 10 May 2020 Update follow the below instructions –
- Save all the ongoing tasks on your computer.
- Open Windows Settings.
- select Network & Internet from succeeding app UI.
- Click Status located at the left pane.
- Scroll down and choose Network reset from the bottom of the left.
- Make a click on the click the Reset now button.
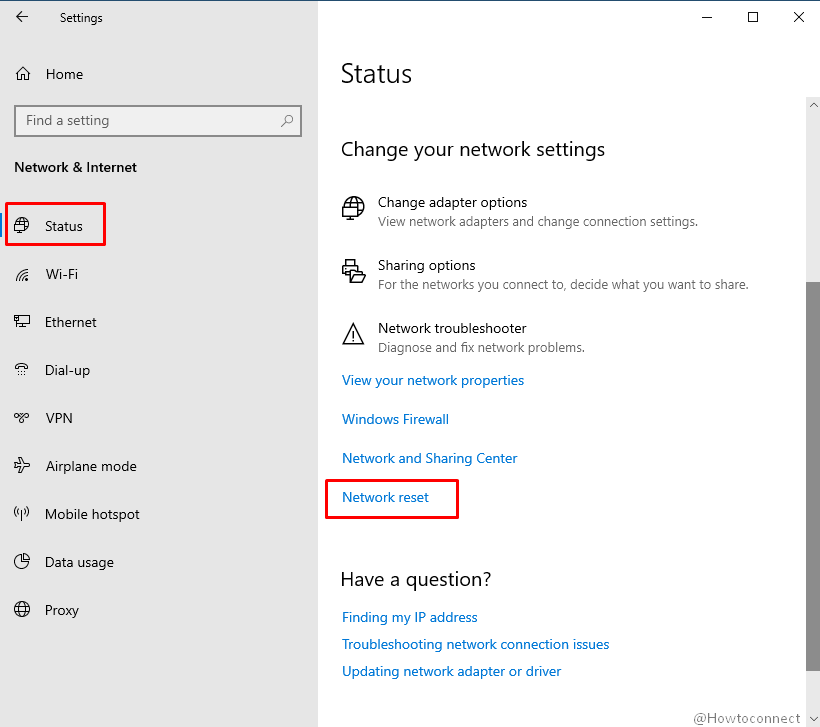
- Select Yes once confirmation dialog prompts.
- After a few minutes, the windows will restart and reset the network.
- Now enter the credential and click on Connect on the network flyout.
If you are running VPN then uninstall and re-install the client software. After that, reconnect to the internet network manually providing login information such as password.
See – How to Reset Network Settings to Default in Windows 10
Run the Windows 10 Network Adapter troubleshooter
Common problems in the Network and Internet have a quick fix option in Windows 10 with the help of Troubleshooter. You can resolve the Wi-Fi problems in version 2004 following below instructions –
- Open the Start menu and click Gear icon.
- Once the Settings app unfolds, click Update & Security tile.
- From the succeeding page, click Troubleshoot located at the left pane.
- On the right pane, click the Network Adapter option as well as hit Run the troubleshooter.
- Highlight Wi-Fi and click Next.
Once the process ends, hopefully, there will be no more Wi-Fi issues in Windows 10 2004.
Get help from – How to Run Network Adapter Troubleshooter in Windows 10.
Restart Router
Furthermore, Restart the Router after installing the new version Windows 10 May 2020 update. This may fix the slower speed issues with Wi-Fi.
Reinstall Windows 10 2004 May Update
Reinstalling the Operating System is the last resort in case all of the above workarounds fail to fix the Wi-Fi issues in Windows 10. Before doing so, we recommend you to wait for the new cumulative patch to be released in a couple of days packed with suitable fixes for this drawback.
Issue-3: Bluetooth not working Issues
Windows 10 2004 May 2020 Update issues include broken Bluetooth. Sometimes, the version seems to show error messages like “Bluetooth is not available”, “unable to connect”, “cannot detect Bluetooth device”, and similar. As expected, Microsoft will soon come up with preferable fixes in the next batch of patches. Before that comes to light, we can use below workarounds and fix Windows 10 2004 Issues precisely Bluetooth cannot connect problems –
Update the Bluetooth driver
A major release of Windows 10 comes up with updated driver packages for every device. Often one or few may be left out and cause issues in the system. If the Bluetooth driver is outdated, you may face consequences for that. Updating driver is an easy task following below guidelines –
- Invoke Power user menu holding down Win+X shortcut.
- Select Run from the list.
- Type devmgmt.msc in the blank text field.
- Press Enter key to open the Device Manager.
- Move over to Bluetooth and expand the drivers’ list.
- Make a right click on the appropriate Bluetooth Device.
- Choose Update driver option.
- From the new popup, click “Search automatically for updated driver software”.
- Keep the device connected with active internet to download and install the driver software.
- Once the task is finished, reboot the Windows 10.
Ensure the Bluetooth Service is running
Sometimes after receiving a new version of OS, few services stop automatically. If the Bluetooth service is disabled, you can expect pairing and other problems on the PC. To run the service again, follow the below steps –
- Click on Start, type services and then press Enter.
- Head over to Bluetooth Support Service.
- Right click the same and choose Start if found disabled.
- In case it is running, make a right click on it and select Restart.
- Close Services and restart the Windows 10 to make changes effective.
Reinstall the Bluetooth driver
With this new version of Windows 10, a few incompatible or defective drivers might get installed as well. If the Bluetooth driver receives a dreadful update, it will not add normally. Try reinstalling the driver using Device manager then. Guidelines are as follows –
- Open the Device Manager using above instructions.
- Reach out to Bluetooth and double click to unfold its driver list.
- Right click Bluetooth device and select Uninstall Device.

- Make sure the box before “Delete the driver software for this device” is unchecked.
- Click “Uninstall”.
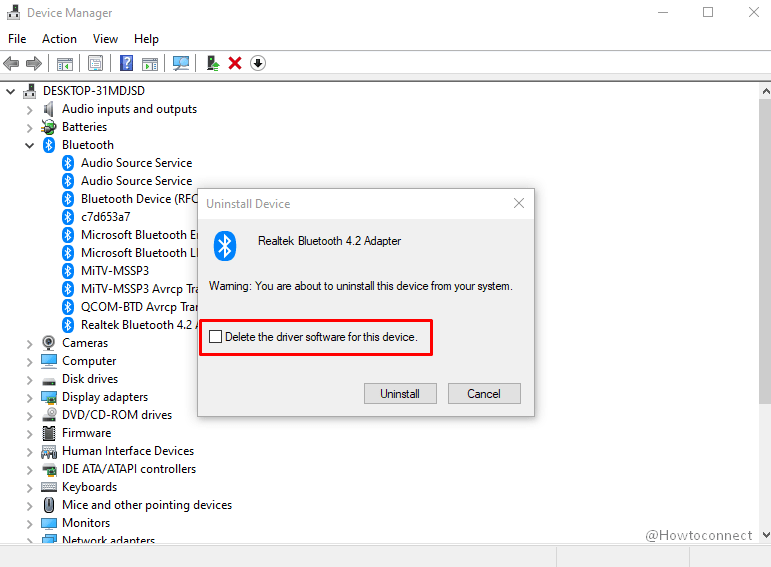
- Restart the device.
Navigate to this post for detail instructions – How to Reinstall Bluetooth Driver in Windows 10.
Change the Power Saving options
Though this resolution seems irrelevant, Power Saving option can stop the Bluetooth device oftentimes. Therefore, changing Power options might resolve the Bluetooth issues in Windows 10 version 2004. The instructions as follows –
- Open Device Manager.
- Reach out to the Bluetooth device.
- Unwrap the drivers’ list by double clicking it.
- Right click on Bluetooth device.
- Select properties.
- In the newly opened pop up, enter Power Management tab.
- Uncheck the box that reads “Allow the computer to turn off this device to save power”.
- Click Ok button and save changes.
Run Windows Bluetooth Troubleshooter
Running the Windows Bluetooth Troubleshooter is always a better idea to rectify Bluetooth issues. Here is how to do it –
- Press the combination of Windows Iogo key and I.
- Click Update & Security.
- From the next page, click Troubleshoot residing in the left pane.
- Move on the right pane and head over to Bluetooth.
- Click the same and hit Run the Troubleshooter.
- Follow the on-screen instructions until the process ends.
- Restart the computer to make the changes working.
Read for more – How to Run Bluetooth Troubleshooter in Windows 10.
Issue-4: Audio cracking problems
Users experience that Windows 10 2004 May 2020 update issues have Audio cracking problem i.e. sound cracks while playing. The occurrence of the PC issue may be an outcome of the basic settings of the internal system. Furthermore, sound hardware may be a culprit as well. Often such issues occur when the device driver gets trouble, leftover in outdated condition. In this segment of Fix: Windows 10 2004 Issues, we will discuss workarounds to resolve Audio Crackling problem. Let’s start –
Change the internal Settings in Windows Registry
Tweaking the Windows Registry may bring improvements in the Sound quality. The Sound chipset downgrades in order to save power sometimes and you may experience the Audio Cracking problems. To configure the registry, here are the instructions –
- Click Start, type regedit and then hit enter.
- Select Yes when UAC prompts to open Windows Registry.
- When it opens in a separate window, navigate to below path –
Computer\HKEY_CURRENT_USER\SOFTWARE\Realtek\Audio\RtkNGUI64\PowerMgnt
- Jump to the right side pane and modify as following –
- Double Click the Delay Time and set the value to 10.
- Click Ok.
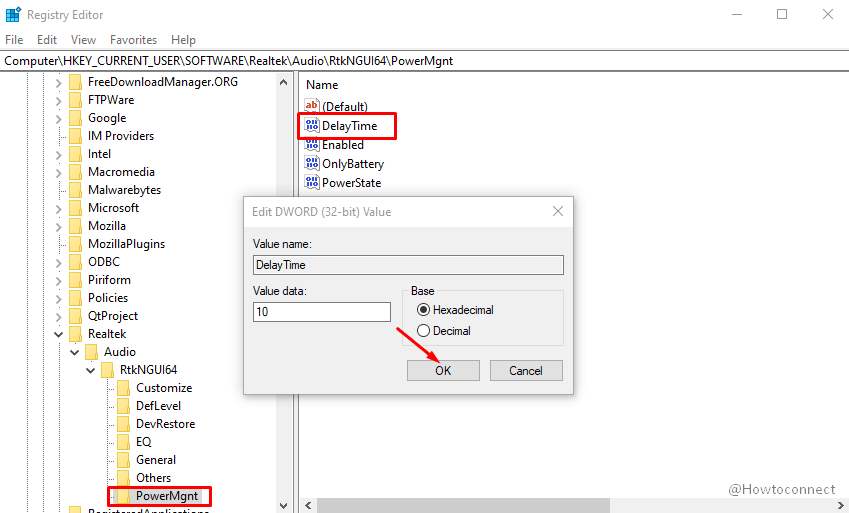
- Make a double click on Enabled DWORD and set value to 0 for disabling the Power Management.
- Move ahead to On Battery and do a double click on it.
- Set the value to 1 to and disable the power management only when the laptop is plugged in.
Update the Sound driver
When the Sound driver is outdated or receives a dreadful update, Audio Cracking issues may popup. For resolving, we can update the driver using Windows Device Manager. Here are the guidelines –
- Open the Device Manager and find out “Audio inputs and outputs”.
- Double click the device and unfold the driver list.
- Right-click the Speaker and select the “Update driver” option.
- From the following window, choose Search automatically for updated driver software.
- Once the task finishes, Restart the computer.
Reinstall Sound driver
If updating doesn’t resolve the trouble, reinstall the driver using the below steps –
- Follow the steps from the above workaround to split up Sound drivers.
- Make a Right click on Speakers and select Uninstall Device.
- Click Uninstall when asked (keep the Delete driver software for the device unchecked).
- After the process ends, Restart the computer.
- After coming back to a new session, download the latest driver from online.
- Install the device driver to use without any trouble.
Change the Sound Format
Windows reserved options for tweaking the sound quality based on speaker irrespective of CD, DVD or even studio. The frequency will vary in all these qualities ranging between 192000 Hz and 44100 Hz. In lieu of using a high quality speaker or misconfigured one, you may experience Audio Cracking issues in Windows 10. To configure correctly, here are the guidelines –
- Open Taskbar Search.
- Type Control Panel and hit Enter.
- When the page revamped, select Sound.
- In the upcoming window, right click the audio device connected.
- Select Properties option.
- Enter into the Advanced tab in succeeding popup window.
- Click the dropdown menu in Default Format area.
- Choose CD quality (the first option in the list).
- Go to “Exclusive mode” section.
- Remove the checkmark from both of the options – “Allow applications to take exclusive control of the device” and “Give exclusive mode application priority”.
- Select Apply and then OK.
- Leave the Control Panel and Restart computer in order to save changes.
Modify the Minimum Processor State
Oftentimes, the minimum processor state may cause Audio Crackling issue in Windows 10. Windows comes with an integrated power saving protocol that reduces Processor usage and saves energy. In the case of that configuration, battery life will extend and audio quality degrades for sure. To tweak these settings, here are the steps –
- Open the Windows Settings app.
- Click the System tile from UI.
- When the succeeding page unrolls, choose Power and Sleep from the left pane.
- Jump to right pane and click Additional power settings link.
- When the Control Panel opens a new window, click Change plan settings link beside the Power plan you are using now.
- Click the Change advanced power settings link from following page.
- In the newly opened popup, head over to Processor power management and split it’s hidden options.
- Double click Minimum processor state.
- Change the value from 5% to 100% for both the options.
- Click the Apply button followed by Ok.
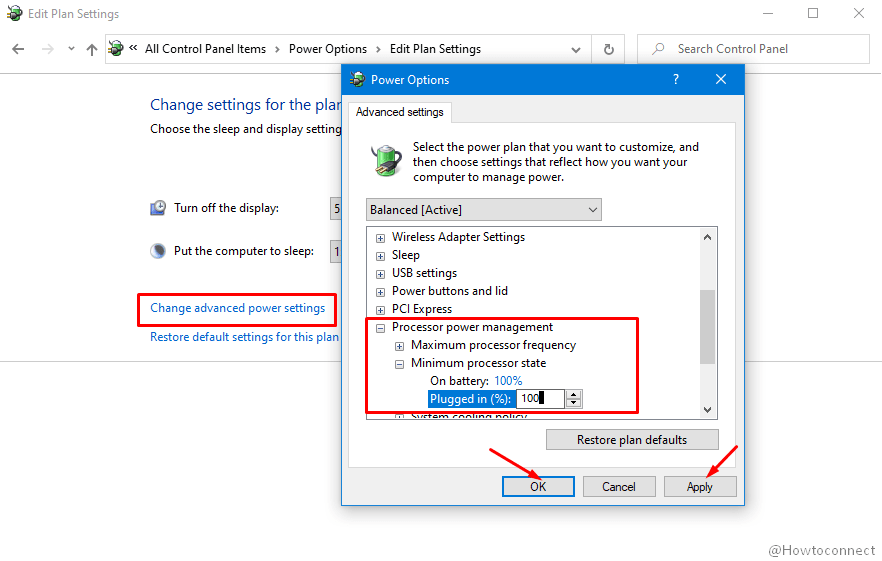
- If the immediate effect doesn’t take place, reboot Windows 10.
Issue-5: Windows 10 2004 May 2020 Update data deletion bugs issues
An awkward issue that has been coming forward since Windows 1909 is deleting personal files. Moreover, the bug also causes the Start menu as well as Settings app to convert in their default state.
Till then the problem gets a potential fix to resolve data deletion in Windows 10 2004, a current fix can help you. The bug usually creates a temporary user account and keep the deleted files in there. Therefore, you can create a new user account and shift all the files there for the time being and then restore data. Here is how to move the data from to a newly created account –
Create a new local Admin Account
In order to move the files to a new admin account, the first task is to create a new account. Here is how to –
- Press the Windows key to open Start menu.
- Select Gear icon and unfold Windows Settings app.
- Click Accounts.
- When the next page unrolls, click Family & other users from left pane.
- On the right side pane, move out to Other users area and click Add someone else to this PC.

- Once the new pop up window floats up, click I don’t have this person’s sign-in information.
- From next, choose the Add a user without a Microsoft account.
- Enter the name of the user, preferably short name.
- Skip the Passwords section for now and click Next.
- Now, click the newly created account under “Other users” section
- Hit the Change account type.
- Choose Administrator clicking dropdown menu from succeeding screen.
- Click the Ok button to save the change.
- Finally, Restart the device to put the new account into effect.
Moving Data to a new account
After you create a new user account, follow the below guidelines now to move all the data from the system to newly created account –
- Open the Run dialog pressing Win+R shortcut.
- Type %homepath% and press Enter.
- After moving into the folder, select all the data from here pressing Ctrl+A hotkeys together. Again Press Ctrl+X to cut all the selected items.
- Press Win+E hotkeys at once and open File Explorer.
- Click the This PC option located at the left pane.
- Double click to open the C: drive located under the “Devices and drives” section.
- Navigate to Users folder and then into your new Profile folder.
- If a warning shows up like “You don’t currently have permission to access this folder” and click Continue button.
- Paste all the data here. You can press Ctrl+V at once.
Note – If you were using OneDrive in the old account, skip this from selected items by clearing the check mark.
Now all of your files are in the new account and that will help you to avoid data deletion from User account.
Issue-6: Windows 10 2004 May 2020 Update Blue Screen Error
Like all other versions released beforehand, Windows 10 2004 May update issues also have also BSOD error and that is quite alarming. Most of these issues occur in a newly installed version due to outdated drivers, corrupted system components, missing files from Windows core, defective Windows image files and oftentimes because of bad areas in the Hard Disk. To fix Windows 10 2004 Issues precisely BSOD errors, deploy below workarounds –
Update Drivers using Device Manager
Usually, during each Windows upgrade, all the OEM drivers get updated automatically. Yet some of them may miss out and left outdated. Such drivers often found to cause Blue Screen errors and hence, they need to be updated as soon as possible.
Windows Device Manager lets you detect the outdated ones easily as they are identified with yellow indication. To update the drivers using Device Manager, follow the below steps-
- Launch the Power user menu by pressing Win+X shortcuts at once.
- Choose “Device Manager” from the list to open the app.
- When shifted to the window, look for the device with mark of exclamation.
- Reach to that device and expand the driver list.
- Make a right click on the driver having yellow indication.
- Choose Update driver option.
- When a new popup opens, click ‘Search automatically for updated driver software’.
- Ensure an active internet connection to download the software.
- Installation takes place automatically upon finishing the downloading.
- Perform the same for other outdated drivers in the console.
- When the task finishes, reboot the Windows 10.
Run System File Checker to rectify defective Windows components
Another most sensitive part from where BSOD errors originate is Windows System files. When these components get corrupted or some of them go missing, Blue Screen error shows up, and fixing these and recovering is possible using SFC. Here is how to run the tool –
- Open the Taskbar Search by pressing Win+Q.
- Type cmd in the blank area.
- When ‘Command Prompt’ arrives in the result, make a right-click on it.
- Select ‘Run as Administrator’ option.
- When User Account Control prompts up, click Yes to continue.
- In the Elevated Command Prompt window, enter below text –
Sfc /scannow
- Use Enter to activate System File Checker.
- This task will take a little longer to detect and fix corrupted system files.
- Once the task ends, Reboot Windows 10.
Use Windows Blue Screen Troubleshooter
If the Blue Screen error seems stubborn and you cannot fix it using usual workarounds, there another way out. Blue Screen Troubleshooter is one of the most important innovations by Microsoft technicians to resolve BSOD error. Now, a new online version is available for the same and the old tool is removed. To use the tool, here are the instructions –
- Launch any web browser from your computer.
- Follow this link to Microsoft Blue Screen Troubleshooter.
- When the web page arrives, scroll down to When did you get the error? Section.
- Choose a radio button from here based on the problem you are getting.
- The page will now show stepwise tasks in order to resolve the Blue Screen error.
- Follow the guidelines to point and fix the error eventually.
Activate DISM tool for the defective Windows image files
Having dreadful Windows image files may lead to blue screen error in Windows 10. To rectify the error, you can use the DISM tool. Deployment Image Servicing and Management is a great utility to correct the Windows image files, thereby resolve BSODs. Here is how to deploy the tool –
- Open the Run dialog.
- Type cmd in the text box.
- Press Ctrl+Shift+Enter keys at once.
- Click Yes when UAC prompts.
- After Elevated Command Prompt opens, enter below command –
DISM /Online /Cleanup-Image /CheckHealth
- Press Enter key and tool will start looking for defective image files and fix them automatically.
- After the process finishes, Reboot Windows to make changes effective.
Go to the Blue Screen of Death error list, check which one you encounter and then read the post.
Methods:
1] Windows 10 2004 May Update is not installing
2] Wi-Fi Issues
3] Bluetooth not working
4] Audio cracking problems
5] Blue Screen Error
6] Data deletion bug
That’s all!!