Users who tried to upgrade to Windows 11 and failed now encounter a peculiar problem with the printer. When trying to print a pdf, error code 0x00000077 Operation could not be completed appears and the job fails . Sometimes, this error also shows when running a Test print. Furthermore, this issue occurs on some of the common users who are running Windows 10 or 11.
Full Error message is like “Operation could not be completed (error 0x00000077), The system does not support the command requested.”. This issue generally happens due to glitches in the printer’s driver, incorrect registry entries, bugs in Windows update, and incorrect connection between printer and laptop or computer.
Printer Error 0x00000077 in Windows 11 or 10
Here is how to fix Printer Error 0x00000077 in Windows 11 or 10 –
Way-1: Reinstall Driver
The root cause of this network printer problem is driver in abundant cases is outdated or malfunctioning driver. The flawful drivers might be updated or reinstalled using the default Windows tool which was previously noon as administrative tool Device Manager. However, a number of third-party programs claim to perform the same task in simpler mode but in my opinion, you should avoid them until this doesn’t seem compulsory. Here because the Device Manager stands far ahead of them for the update or reinstall work, follow the steps –
- Press Windows and X keys.
- Select – Device Manager.
- When the tool is open look for the printing device that is creating problems.
- If you are unable to find it click on View.
- From the drop-down menu, select – Hidden devices.
- Now get at the printer and double click on it.
- Right click on the affected device.
- Choose – Uninstall device.
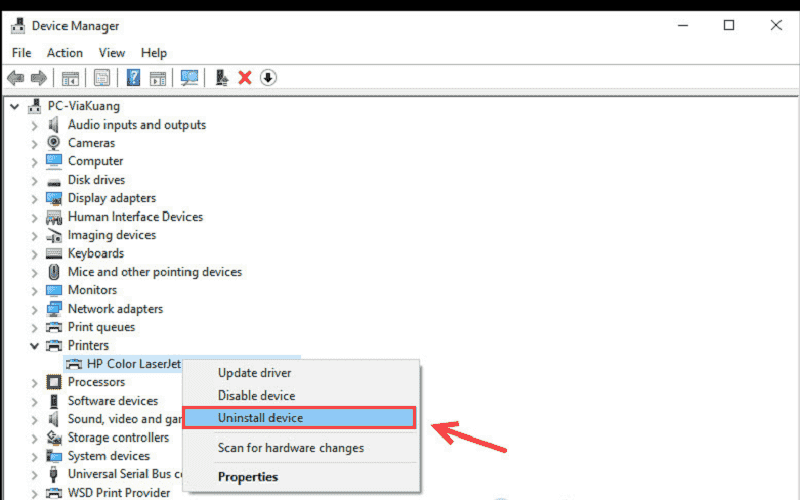
- On the pop-up that prompts, leave the checkbox unchecked.
- Select Uninstall.
- Reboot your computer.
- Try to print and see if the error still persists. If yes then follow the next method.
Way-2: Update printer Driver
Presence of Obsolete driver is again one of the most common reasons for printer error 0x00000077 in Windows 11 and 10 as well. Because of being outdated the driver software becomes either incompatible or corrupt. Instead of running the device, the app starts creating conflicts with the components of the system. In these circumstances, when you try to print a pdf or document, the driver fails to support it and Windows throws the error code. So in order to fix the network printer problem, you need to update driver using the following instructions –
- Right-click on the Start.
- Choose – Run.
- Type – devmgmt.msc.
- Press Enter.
- Double click on the printing device to disclose the items under it.
- Go to the correct device and right-click on it.
- Select – Update driver.
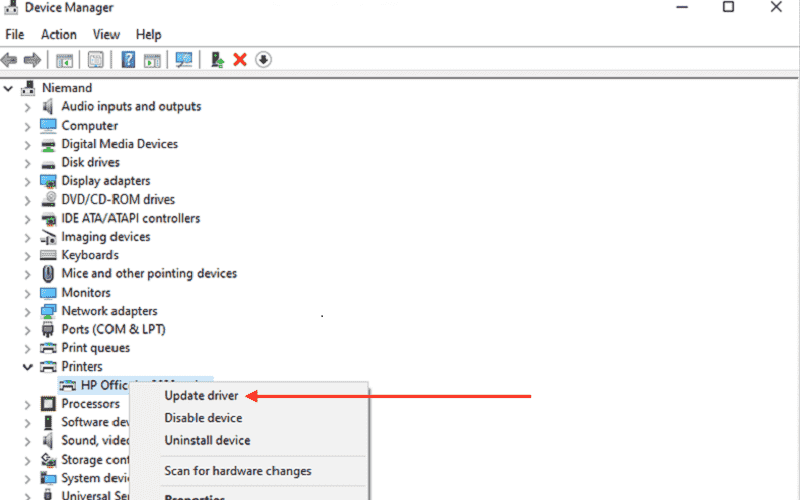
- Once a window appears, click on Install the best driver automatically.
- Restart the machine.
- Start printing and see if you become successful.
Way-3: Detach and reconnect the cords
Sometimes loose or incorrectly fit cords might prevent the printer from working good and cause the error to appear. So before pursuing coming solutions you need to carefully check the wire that connects the printer and PC. It would be better to pull it out and fit again correctly. Also, check the connection of the printer with the electric board and make sure it is perfect. Once checked, start the device, print the PDF, and see if the error is resolved.
Way-4: Remove the installed Printer software from everywhere in the system
With every printer, the company provides software which you have to install in order to run the printer successfully. Also, the same software is available in Microsoft Store that can better behave with Windows 10 and 11. It is recommended to use Microsoft Store app instead of the third-party printer software to conveniently run the printer. For this, remove the software from everywhere in the system by moving with the steps –
- Click on Search from the taskbar.
- Type Control.
- Once the Control panel opens, set View by Small icons or Large icons.
- Click on Devices and Printers.
- In the Devices and Printers window look for your Printer.
- If you find it listed then right-click on it.
- Select Delete or Remove Device.
- Now press “Windows Key and R”.
- Type printui.exe /s.
- Click OK.
- Go to the Drivers tab.
- Look for the Printer driver.
- If you see it click on it and select Remove from the bottom.
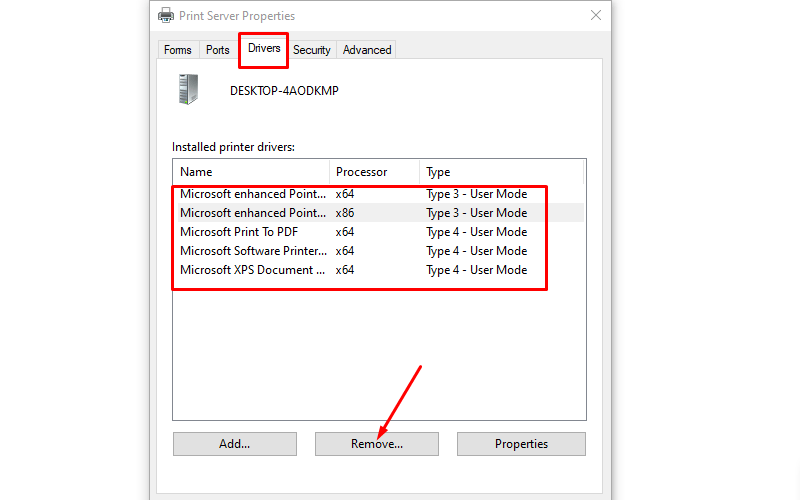
- Select – OK.
- Delete all instances of the same.
- Click Apply then OK on the Print Server Properties windows.
- Exit Devices and Printers.
- Restart the computer.
Way-5: Download official app from Microsoft Store
You have to use the app in the store rather than the software for better performance and avoid issues. So follow the steps and install the app –
- Press Winkey+R.
- Type appwiz.cpl.
- When the Programs and features window comes, find the Printer software.
- Right-click on the application.
- Select – Uninstall.
- Click Yes on verification prompt and follow the onscreen instructions until the the app is completely uninstalled.
- Now, click on Start.
- Select – Microsoft Store.
- In the search bar, type the name of the printer you have.
- Select the proper result.
- Click on Get or install which is showing there.
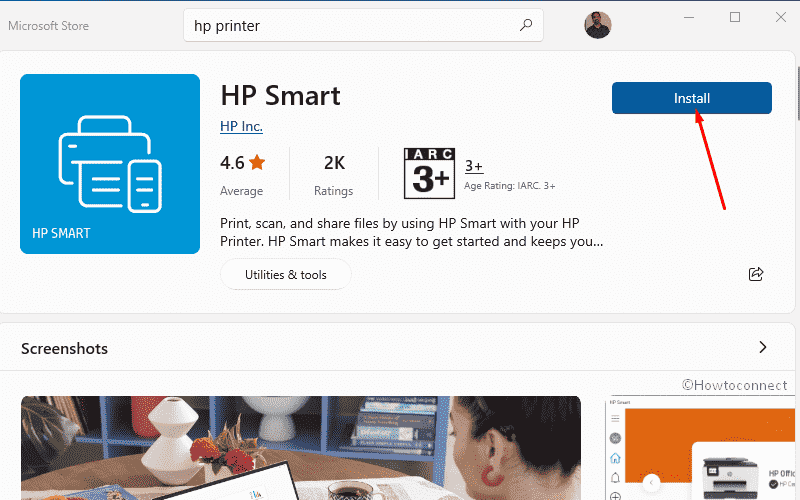
- Allow the app to download and install and open it.
- Connect the printer through the app.
- Check whether the printing work is proceeding correctly or any error is shown.
Way-6: Remove recently installed Windows update
Windows update has been a major reason behind printer problems in Windows 10 and 11. You might have heard printnightmare bug which badly affected print jobs for numerous users running Windows 10. In this concern, we have already covered many posts and written solutions – Fix Printer Error 0x0000052e KB5006738 in Windows 10, Fix Printer Error 0x0000011b KB5005565 in Windows 10 and Fix Printer Error 0x00000709, 0x0000011b KB5006670 Windows 10.
Therefore when printer error 0x00000077 appears there might be a buggy Windows update in the scenario. Now comes to the point where you have to ensure whether a certain Windows update is causing the issue. For this, recall your memory that before the error started Windows has installed an update or not. If yes then good otherwise check the Windows update history to make sure. Once ensured, uninstall the Windows update and the printer issue will be fixed. Follow the guidelines for the complete process –
- Click on Search.
- Type updates.
- Hit Enter.
- When the Settings app loads, click on View update history.
- On the next page, check the dates Windows updates in the list attentively. If any update is installed nearby and before the occurrence of the error then note down its KB number.
- Scroll up and move to the top of the page.
- Click on Uninstall updates.
- When on a separate window, select the KB number.
- Click on Uninstall.
- If a verification pop up shows, click on Yes.
- Hopefully, the error shouldn’t occur now.
Way-7: Check for Windows update and install
Microsoft, as usual, has a track on issues that appear to a mass number of users or occurs due to buggy Windows update. Once known, the company hands it over to a Windows expert or a team of engineers to find a resolution. As soon as they submit the fix Microsoft pushes this with a patch that you need to install. So when Operation could not be completed (error 0x00000077) is generated there is possibility that a patch has been already pushed and you need to install it only. So, go with the following steps –
- Press Windows and I keys simultaneously.
- Select – Update & Security.
- On the next page, click on Check for updates.
- Allow the system to download the updates if pending.
- Once you see a prompt, select Restart now.
- Printer error 0x00000077 must be fixed now.
Way-8: Modify Registry
When you tried to upgrade your computer to Windows 11 and failed and then printer error started you need to modify the registry entries to fix it. In this case, mostly bad driver level issue is created and shared network printer requires to be removed from registry. Here are the steps –
- Click on Start.
- Type – regedit.
- Press Enter.
- Select Yes on UAC prompt.
- Copy the below location address and paste into the address bar of Registry Editor –
HKEY_LOCAL_MACHINE\SOFTWARE\Microsoft\Windows NT\CurrentVersion\Print\Providers\Client Side Rendering Print Provider\Servers\YourPrintServerName\Printers- On this path, if you might notice zombie printers such as Printers{D6B632BD-0B84-49D6-8814-626BD5D8E969}, 4, each with a trailing number.
- Delete these entries and then restart the print spooler service.
- For this, press Winkey and R.
- Type – Services.msc.
- Hit Enter.
- Once the Services Window opens, find Print Spooler.
- Right click on this service and select Restart.
- Finally, restart the computer and the Printer error will be fixed hopefully.
Methods list:
Way-1: Reinstall Driver
Way-2: Update printer Driver
Way-3: Detach and reconnect the cords
Way-4: Remove the installed Printer software from everywhere in the system
Way-5: Download official app from Microsoft Store
Way-6: Remove recently installed Windows update
Way-7: Check for Windows update and install
Way-8: Modify Registry
That’s all!!