After adding a Google account to the Mail app, oftentimes Contacts and Calendar application fails to sync even if the option is enabled. Just the moment Gmail account stops syncing, error code 0x801901f5 shows up that basically indicates an account issue in Windows. The same fatal code is often found to strike while updating the Operating System or during the installation. It’s actually a universal error code and can occur in a variety of system applications.
Error code 0x801901f5 may appear in Windows 10 or 11 for so many reasons and fixing it can be troublesome especially when you don’t know the real culprit. The issue is mostly found to cause by registry corruption, until you rectify it, more applications start failing and the scenario just gets worse as time goes on. Since this is a general opinion, there might be some other factors to trigger such errors like corrupted system files. Besides, incompatible applications, faulty stored cache, outdated device drivers, invalid services can bring forth the same.
Error code 0x801901f5 in Windows 10 or 11
Here is how to fix error code 0x801901f5 in Windows 10 or 11 –
Way-1: Re-enter the added account
If the Gmail account you added somehow becomes invalid, error 0x801901f5 may occur and that will lead to cause syncing not working. You may also notice that the app has imported all your Gmail folders but all of them are blank. Whatever the case is, re-adding the account often fixes the issue since the error is coming from the same. Here are the steps to follow –
- Press Windows key.
- Type – mail.
- When you see the app at the top, hit – Enter.
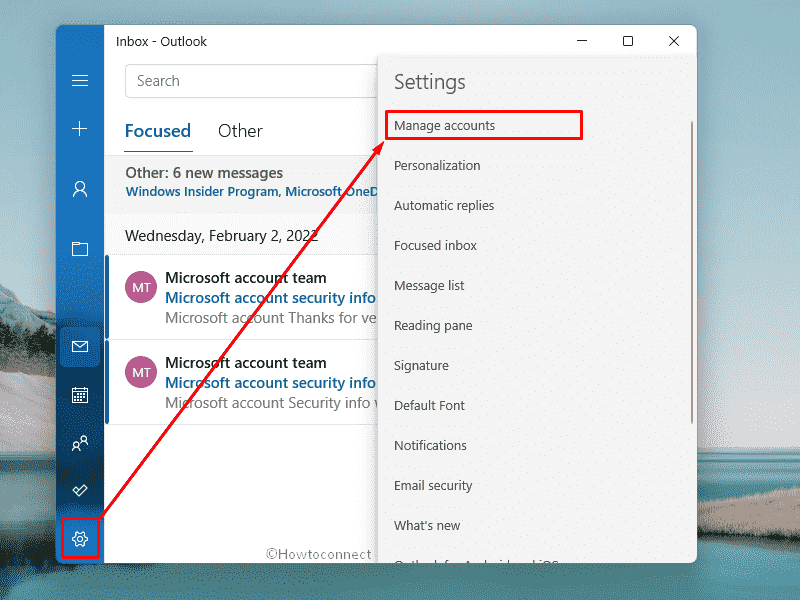
- When Mail app appears, click gear icon from bottom left.
- Select – Manage accounts.
- Choose the account you want to remove.
- Click – Delete account from this device.
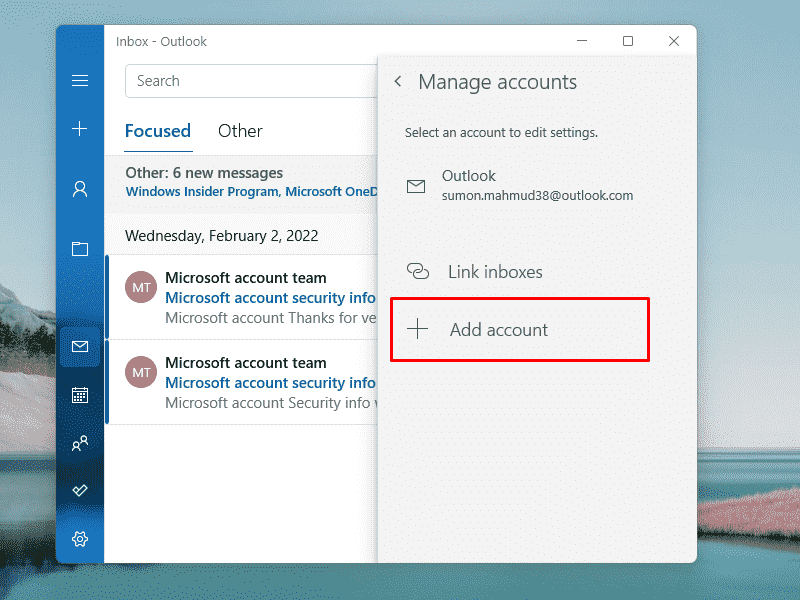
- After removing the account, go back to Manage accounts settings.
- Click – Add account.
- Select which account you want to add.
- Provide correct credentials to add the account.
Way-2: Check for faulty system component
System files play an important role to make the Operating System function proper. These elements don’t get corrupted or missing automatically, there are a variety of reasons that can be involved. In most cases, malware attacks and software conflicts cause the same. As a consequence, some of the applications and services stopped working moreover throw error codes. To fix the existing corruption and recover the missing system components, follow the way –
- Press – Windows + S.
- In the search bar, type – cmd.exe.
- Press – Ctrl + Shift + Enter.
- To allow User Account Control, click – Yes.
- In the black terminal, insert –
sfc /scannow. - To run the command, hit – Enter.
- Wait until the process is 100% complete.
- If the utility fixed found corruption, reboot the machine.
- Or else, insert –
dism /online /cleanup-image /restorehealthin that same elevated command prompt and hit – Enter key. - Restart the PC when the process ends.
- After signing back in, execute SFC scan once again.
Way-3: Reset Mail and Calendar App to resolve 0x801901f5 error code
Error codes are pretty common in Windows operating system and this has been a prominent issue over the years. Sometimes, a few stubborn issues appear when you proceed with installing the latest patches while a few show up because of different applications.
Some of these glitches have firm reasons, proper root causes and you can fix them easily using simple tricks. But few error codes are so weird that it doesn’t have a proper origin, and you have to look to-and-fro for a definite fix. In many cases, Error code 0x801901f5 in Windows 10 or 11 resolves easily only by resetting the Mail and Calendar app in the device. To carry out this, follow the below guidelines –
- Press – Windows + I.
- When Settings app turns up, select – Apps.
- Choose – Apps & features page.
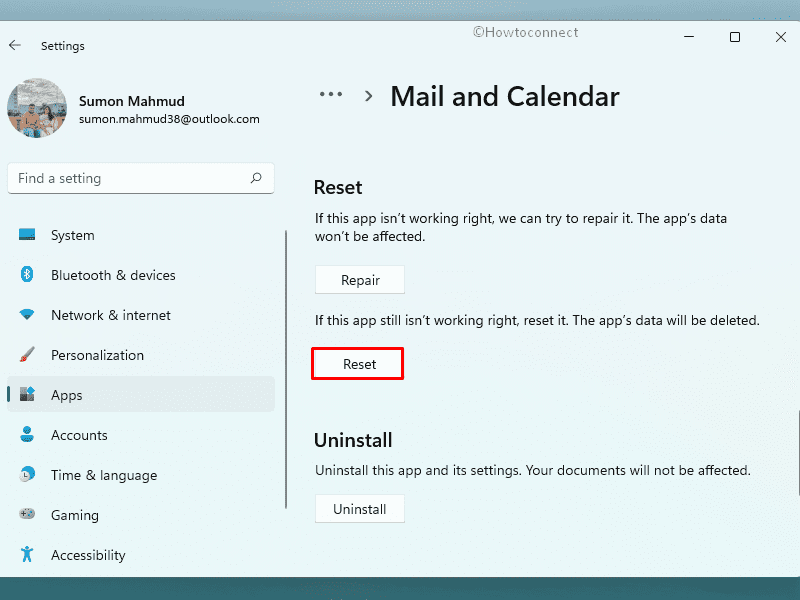
- From the installed applications, find – Mail and Calendar.
- Select the same or click the three-dot icon present beside it.
- Opt for – Advanced options.

- Scroll down to reach Reset section.
- Click – Reset button.
- To give final consent, again click – Reset from appearing pop-up.
Way-4: Clear Microsoft Store cache
Cache is a special type of storage space that accommodates temporary files in order to make the device run faster, sometimes reducing the loading time for a browser or an application. Once you log in to an application for the first time, it needs a few credentials that will be stored as cache and no need to re-submit further. However, a lot of cache in the Microsoft Store can cause the Error code 0x801901f5 in Windows 10 or 11 in your computer as well. To resolve the problem, delete the Windows Store caches following below steps –
- Press – Windows + R.
- In Run dialog box, type – wsreset.exe.
- Click – OK.
- Wait until the Microsoft store appears on the screen.
- Reboot Windows.
Way-5: Disable Windows Firewall Temporarily
Viruses are the most dangerous threat for the devices connected to the network and internet nowadays. Hackers and malware can easily get access to the system and you will lose valuable data, damage the integrity of the system files, and cause severe harm to the machine. A security interface is indeed a necessity to protect your sensitive information and the device’s strength while online. Windows Firewall is a built-in security system that sieves incoming information to the system from the internet. Eventually, the program will block the potentially harmful data effectively incorporation with Firewall.
Disabling Windows Firewall will allow the data packets to enter into the system and excite the network to an unrestricted one ultimately. The usual traffic may surely increase but malicious data will be also there putting the network at a risk. However, Windows Defender works so effectively that, it can often block potential updates considering them as harmful too. For the same, you can experience Error code 0x801901f5 in Windows 10 or 11. To avoid this inconvenience, temporarily disable the application and repeat the scenario that was causing the issue. Once done successfully, don’t forget to enable the feature again. Follow the below guidelines –
- Right-click on Start button and choose Run.
- In the text field, insert control firewall.cpl.
- Click OK.
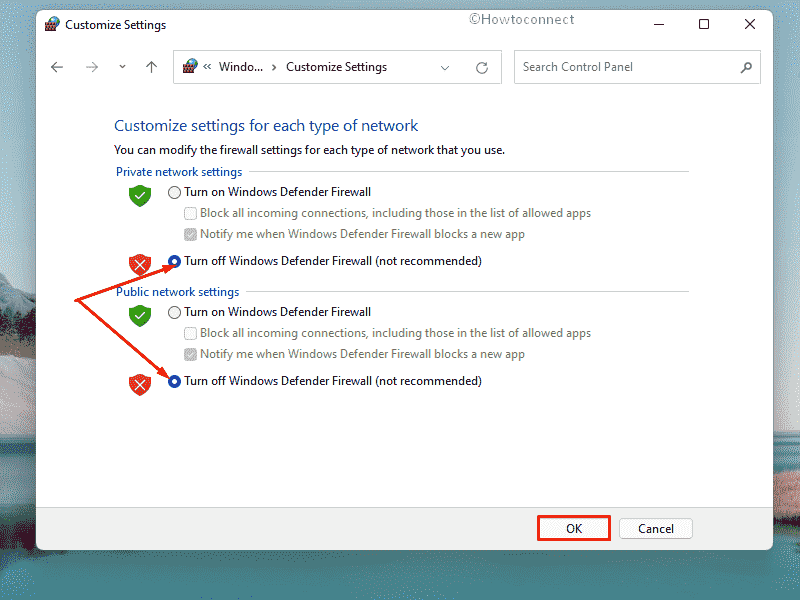
- From the left column of the appearing window, click Turn Windows Defender Firewall on or off.
- Select the radio button set before Turn off Windows Defender Firewall.
- Do the same for both Private and Public network settings.
- Finally, click OK.
Way-6: Run Windows Troubleshooter to fix error 0x801901f5
As the error codes become serious trouble over the past for users, Microsoft came out with a revolutionary outcome. Some of the dedicated troubleshooter was developed and introduced in the OS just to trace out the glitches easily and fix them. If you are experiencing error code 0x801901f5 in Windows 10 or 11 while updating or using any app, try using the Windows Update troubleshooter as well as Windows store troubleshooter. The guidelines are here –
Windows 10
- Press Windows + I.
- Select Update & Security.
- From the left sidebar, select Troubleshoot.
- Move to the right-hand side.
- Click Additional troubleshooters.
- Next, select Windows update.
- From the expanded tray, click Run the troubleshooter.
Windows 11
- Open Settings app.
- From the right pane, choose – Troubleshoot.
- Click – Other troubleshooters.
- Hit – Run located next to Windows update.
- Follow on-screen instructions to continue.
- If the utility suggests an automatic fix, click – Apply this fix.
- Close troubleshooter.
- Reboot Windows.
Similarly, run Windows store apps troubleshooter too.
Way-7: Update outdated device drivers
Device drivers are critical components in Windows Operating System as they maintain the proper communication and interaction between hardware accessories and software driving them. When they are outdated, cannot really perform the assigned task and act adversely. Most of the issues may arise in the machine if you let them stay outdated for a long period of time.
As per many experts, error code 0x801901f5 in Windows 10 or 11 happens if outdated and incompatible device drivers exist in the system. Updating the drivers is simple as Microsoft has provided Windows Device Manager in the OS. You can see which one is outdated, install the latest update for selected drivers from trusted vendors automatically and make changes as necessary like uninstalling them or rolling out a problematic update. Hence, check for faulty drivers and update them following below steps –
- Press – Windows + X.
- Select – Device Manager.
- When Device Manager turns up, expand the device that is showing exclamation beside it.
- Right-click on the faulty driver, and then choose – Update driver.
- From the next prompt, select – Search automatically for drivers.
- End the process by following the on-screen guidelines.
- If the system shows your driver is up-to-date, go to the vendors’ website to check for updates manually.
Way-8: Uninstall third-party antivirus programs
A robust security interface is very much necessary to protect the system from being stolen and protect valuable data. For this reason, anti-malware programs are so popular nowadays and most of the available ones are quite effective. Since Windows Security is a built-in program providing 24/7 real-time protection, you don’t really need a third-party application for the same purpose. Instead, installing a second or third app may have a tendency to cause a software collision which is never expected at all.
Third-party anti-virus programs often misinterpret Windows installer files as suspicious and prevent the device from installing them. External security programs with their associated files may also corrupt the patches even after being downloaded. The result is error code 0x801901f5 in Windows 10 or 11. Therefore, uninstall the third-party anti-virus apps if you have installed them already. Here are the steps to follow –
- Press – Win key + R.
- In the Run command, type – appwiz.cpl.
- Click – OK.
- From Program and Feature window, find the third-party antivirus program installed on your system.
- Right-click the same and select – Uninstall.
- Comply with on-screen instructions to completely remove the application.
- Similarly, uninstall other antivirus programs if you have any.
Way-9: Restart Windows Update Service
Windows Update Services commonly identified as WSUS commences information technology administrator in the system. The purpose is to deploy the latest Windows updates in the operating system by fully managing the distribution of the patches.
The service remains enabled in order to manage the distribution of patches unless accidentally disabled. Error code 0x801901f5 in Windows 10 or 11 may appear if the Windows Update Service is not working. Therefore, enable the service following below instructions –
- Press – Windows key.
- Type – services.
- Hit – Enter.
- When Services window appears, scroll down through the list and locate – Windows Update.
- Double-click the same to open its properties.
- Set the Startup type to Automatic.
- If the service is not running, click – Start.
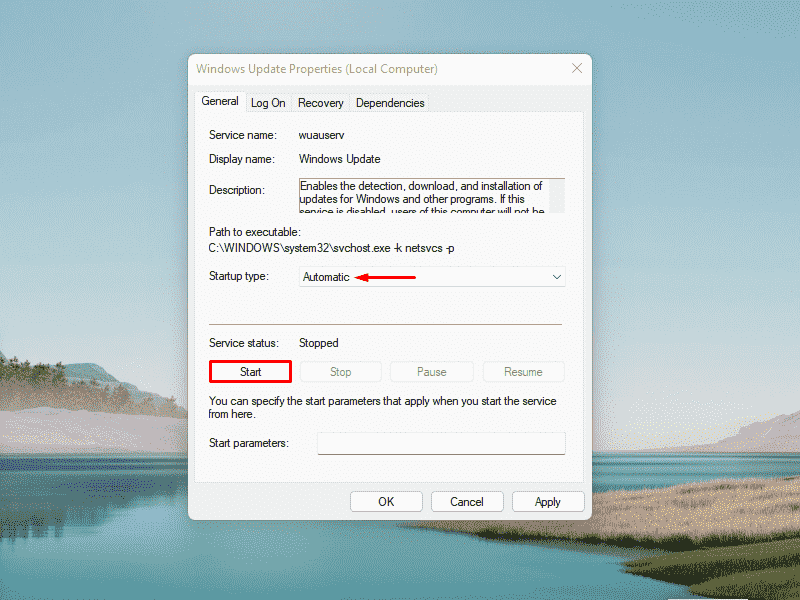
- Finally, hit Apply button followed by OK.
Way-10: Delete problematic apps
Installing various third-party programs in the OS won’t help always instead, you may experience several issues for the same. They take up additional space from the disk, make the system considerably slow, and crash on many occasions. Some programs are really troublesome as they can make the Windows files corrupted with their existing and leftover components.
Third-party programs are not always harmful but consider deleting the ones that are prone to conflict or downloaded from suspicious websites. Since most of the necessary apps are available on Microsoft Store, don’t bother to uninstall unwanted ones as you can get them anytime from this trusted server.
- Press Windows + X keys.
- Choose Apps and Features.
- Go through the applications installed on your PC.
- Select an app you want to delete. If you are using Windows 11, click the three-dot icon present beside the app.
- Choose – Uninstall.
- If asked, confirm the action.
Way-11: Tweak Registry keys
Deleting certain registry keys may fix error code 0x801901f5 in Windows 10 or 11 but the process is a bit complex for normal users. Since we don’t know which abnormal registry is causing the issue, it’s hard to fix the same. However, you can try deleting update-related DWORD keys if the error is evolving during Windows update.
As the workaround is a professional one and may change the device abruptly when goes wrong, follow the guidelines in exact same way. You should take a backup of the necessary components to avoid any unwanted situation.
- Click the search icon from the taskbar.
- Type – regedit.
- Hit – Enter.
- For User Account Control, click – Yes.
- When Registry Editor comes up, navigate to –
HKEY_LOCAL_MACHINE\SOFTWARE\Policies\Microsoft\Windows\WindowsUpdate- Right-click WUServer DWORD key and choose – Delete.
- Delete WIStatusServer as well.
- After doing so, restart Windows.
Way-12: Disable Proxy settings
Error code 0x801901f5 in Windows 10 or 11 often strikes while using several applications and enabled proxy settings could be a potential reason. Disabling the same might be helpful in that case –
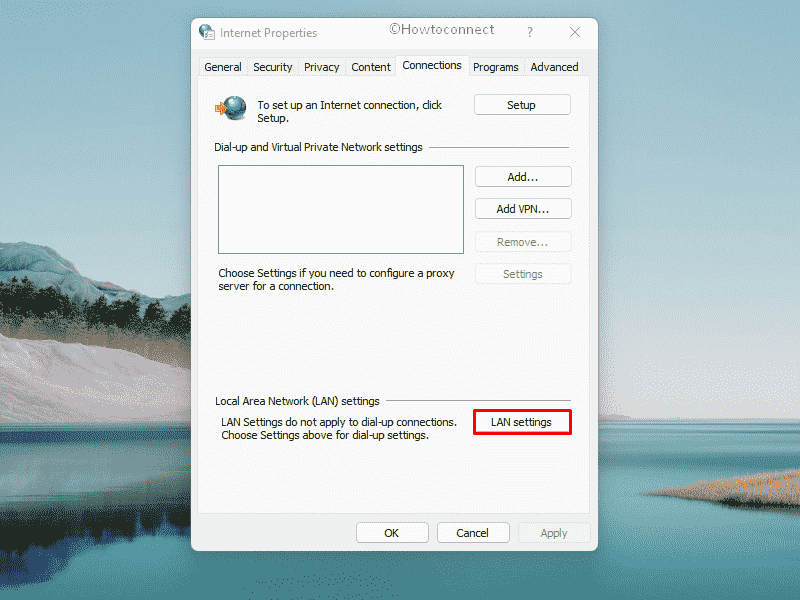
- Open Run Dialog.
- In the command box, type – inetcpl.cpl.
- Click – OK.
- When the dedicated wizard shows up, shift to Connections tab.
- Click – LAN settings.
- Uncheck the box present before Use a proxy server for your LAN.
- Click – OK.
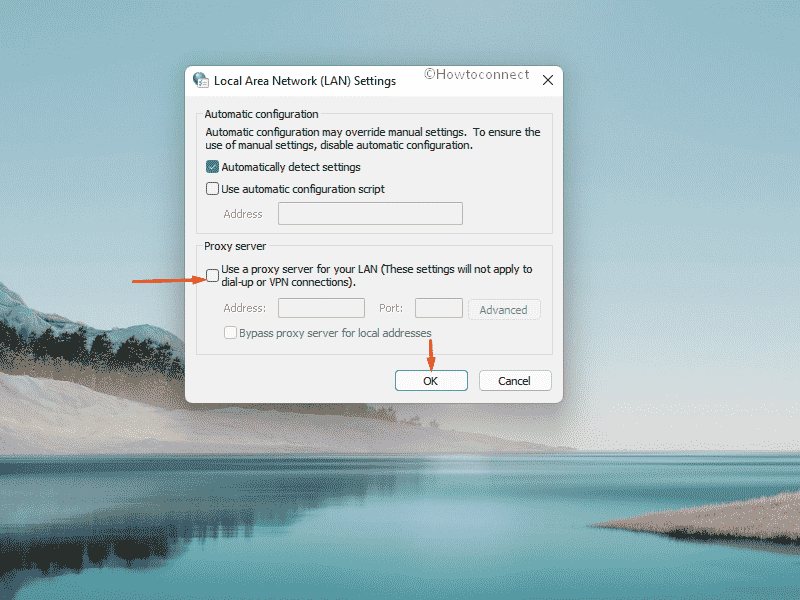
- For Internet Properties wizard, also click Apply and then OK.
Way-13: Reinstall Windows
If nothing from the above works to fix Error code 0x801901f5, reinstalling Windows is the last resort to try out. Doing so is a bit hectic but will give you peace of mind since everything will go back to default state and there will be no glitch from the previous version. Fortunately, you can now do it without losing data.
There are several ways to get an afresh OS, check out How to Reinstall Windows 11 without losing data and try the one you prefer.
Methods list:
Way-1: Re-enter the added account
Way-2: Check for faulty system component
Way-3: Reset Mail and Calendar App
Way-4: Clear Microsoft Store cache
Way-5: Disable Windows Firewall Temporarily
Way-6: Run Windows Troubleshooter
Way-7: Update outdated device drivers
Way-8: Uninstall third-party antivirus programs
Way-9: Restart Windows Update Service
Way-10: Delete problematic apps
Way-11: Tweak Registry keys
Way-12: Disable Proxy settings
Way-13: Reinstall Windows
That’s all!!!