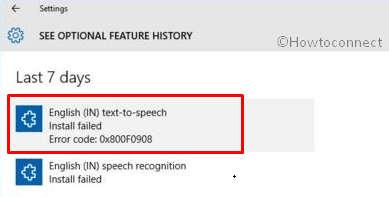
Text to Speech Install Failed 0x800f0908 error creates problems when you attempt to install a language pack or a Speech Recognition on Windows 10. In some cases, this code also appears due to issues in Windows Update. But for certain users, it is just temporary and the download resumes after they retry a couple of times. The root cause behind this code 0x800f0908 is the Internet Connection. Usually, it is the Metered Connection that restricts the data usage and ends up with the error.
Additional language packs are useful for the users that are not fluent English Speakers. Usage of these packs will allow the Windows to run in the native language. To make all the tools, menus, dialog boxes moreover the user interface appear in other languages except English, you need to install an additional “language pack” on your system. As usual, you can install it via Windows Update Feature. But while installing these language packs you can get stuck with the error code 0x800f0908.
Text to Speech Install Failed ox800f0908 in Windows 10 Solutions
Here is How to Fix Text to Speech Install Failed ox800f0908 in Windows 10 –
Disable Metered Connection
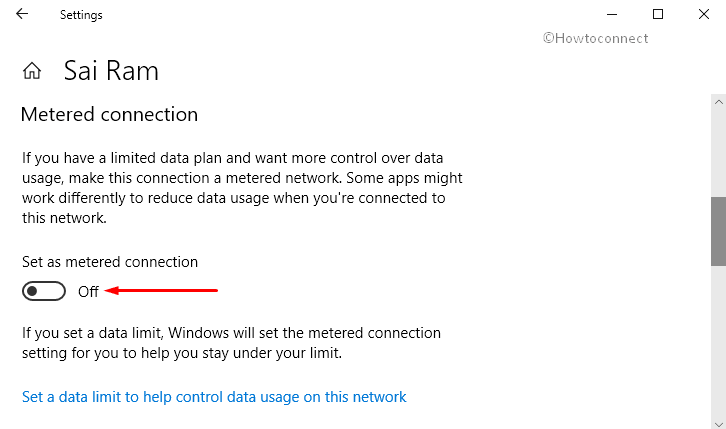
The occurrence of Text to Speech Install Failed 0x800f0908 error actually prevents you from installing the language pack. Experts in the forums suggest you disable the metered connection that will eventually bypass this specific error.
Step-1: Open Windows Settings by hitting “Win + I” hotkey simultaneously.
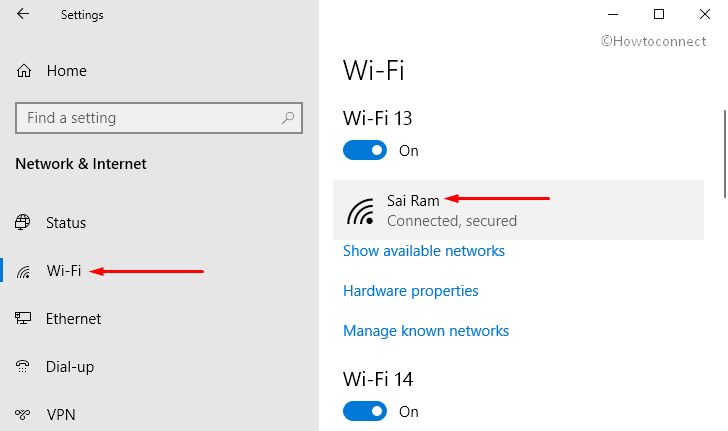
Step-2: Now select Wi-Fi or Ethernet on the left sidebar depending on the network you are using. Switch to the right pane and make a click on the name of your connection (see screenshot).
Step-3: On the following page, locate Metered connection and toggle its switch to OFF.
Step-4: After completing these steps, you need to Restart Windows 10 PC. Now try to install the language pack and the error will not disturb you again.
Windows Update Troubleshooter
Windows Update Troubleshooter is considered the most effective tool to detect as well as fix the update issues. So, once you run this troubleshooter, it will state the root cause, as well as the tool, will fix it automatically.
Here also, launch Settings application. Click Update & Security category on the main interface of the built-in app.
Go to the Troubleshoot section on the left column. Now, switch to the adjacent right pane and locate Windows Update.
Select it and click the button Run the troubleshooter.

The troubleshooting wizard will appear and begin to detect the issues. Once the scan gets complete, it will make an attempt to fix them automatically.
Manually Install Language Packs
If the above workarounds fail to bypass Text to Speech Install Failed 0x800f0908, then try to manually install the language packs. So, first, download the preferred language pack from the internet and then follow these steps to install them properly.
Get access to the Run dialog box by jointly hitting “Win + R” hotkeys. Here, insert lpksetup and click OK to continue.
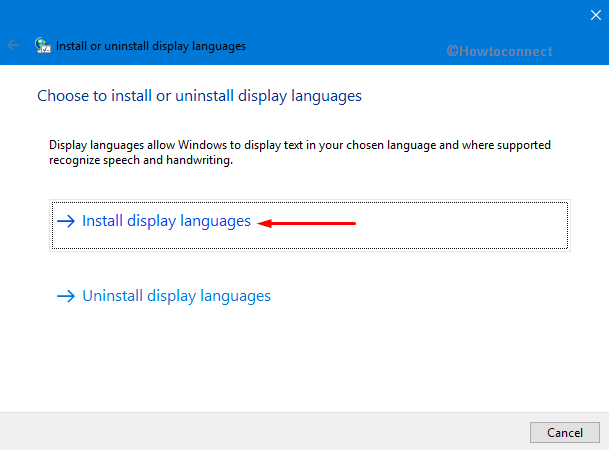
Click Install display languages on the wizard that shows up on the screen.
Click the Browse button and navigate to the folder where the downloaded cabinet language file is stored. After you choose the desired language, click Next.
Move ahead and accept the terms and conditions and click “Next“.
Finally, you will notice that the preferred language is installing. Reboot the system to install the language.
Reset Windows Update Components
Most of the time, some of the misconfigured update files can also lead to Text to Speech Install Failed 0x800f0908. Therefore, another possible solution to get rid of this issue is to reset Windows Update Components.
Open Run dialog box by hitting “Win +R” hotkeys. Type CMD on the text field on Run. To launch elevated Command Prompt, jointly hit “Ctrl + Shift + Enter” keys.
If you come across the UAC prompt, go ahead with the Yes button.
Now, you need to execute the below-mentioned commands in order to stop the “Windows Update Services”, “BITS”, and all the “Cryptographic services”. So, type in or copy-paste these commands and ensure to hit Enter after you insert each one.
net stop bits
net stop wuauserv
net stop appidsvc
net stop cryptsvc
Further, you need to delete the qmgr*.dat files. Input the following command and press Enter to remove the files.
Del “%ALLUSERSPROFILE%\Application Data\Microsoft\Network\Downloader\qmgr*.dat”
Next, type the command given below and hit Enter.
cd /d %windir%\system32
Now to re-register the BITS files moreover the Windows Update files by type the given commands and hit Enter after each command.
regsvr32.exe atl.dll
regsvr32.exe urlmon.dll
regsvr32.exe mshtml.dll
regsvr32.exe shdocvw.dll
regsvr32.exe browseui.dll
regsvr32.exe jscript.dll
regsvr32.exe vbscript.dll
regsvr32.exe scrrun.dll
regsvr32.exe msxml.dll
regsvr32.exe msxml3.dll
regsvr32.exe msxml6.dll
regsvr32.exe actxprxy.dll
regsvr32.exe softpub.dll
regsvr32.exe wintrust.dll
regsvr32.exe dssenh.dll
regsvr32.exe rsaenh.dll
regsvr32.exe gpkcsp.dll
regsvr32.exe sccbase.dll
regsvr32.exe slbcsp.dll
regsvr32.exe cryptdlg.dll
regsvr32.exe oleaut32.dll
regsvr32.exe ole32.dll
regsvr32.exe shell32.dll
regsvr32.exe initpki.dll
regsvr32.exe wuapi.dll
regsvr32.exe wuaueng.dll
regsvr32.exe wuaueng1.dll
regsvr32.exe wucltui.dll
regsvr32.exe wups.dll
regsvr32.exe wups2.dll
regsvr32.exe wuweb.dll
regsvr32.exe qmgr.dll
regsvr32.exe qmgrprxy.dll
regsvr32.exe wucltux.dll
regsvr32.exe muweb.dll
regsvr32.exe wuwebv.dll
Once you run the above commands, its time to Reset the Winsock.
netsh winsock reset
Next, you need to configure the proxy settings through execution of this command.
netsh winhttp reset proxy
Finally, restart the BITS, Windows Update Services, moreover the Cryptographic Services. You need to do this with the help of these 4 commands given below.
net start bits
net start wuauserv
net start appidsvc
net start cryptsvc
Lastly, reboot the system to implement the modifications and get rid of Text to Speech Install Failed 0x800f0908.
That’s All!