Windows updates were never error-free whether it is Windows 11 or 10. Issues may arrive while downloading a newer patch or during the installation and even after completing the download successfully. This context describes how to fix update error 0x80010105 in Windows 10 or 11. Such errors usually take place due to broken Windows update agents. Apart from that, malware attacks, missing system files, enabled developer mode can trigger issues while trying to make effort to update the system.
Lack of maintenance of the system also causes performance problems in Windows. If update error 0x80010105 is a result of simple glitches, it will get resolved automatically when you perform a system restart. But that might not be the case always. If the issue is triggered by any abnormalities of Windows, trying out advanced workarounds is mandatory.
Update error 0x80010105 in Windows 10 or 11
Here is how to fix update error 0x80010105 in Windows 10 or 11 –
Way-1: Check internet connection
In Windows-operated machines, updating is autonomous, i.e. takes place automatically if there is a stable internet connection available. An unstable network won’t allow the OS to start the updating process. Sometimes the updating may start but due to intermittent connection, it stops in the middle and shows unexpected error codes. If you are having update error 0x80010105 in Windows 10 or 11, it is the most basic duty to check the connection.
To have an error-free updating process, make sure the metered connection is disabled for your network. Often, the internet service terminates for no particular reason even after having everything alright. In that case, turn off the router for a minimum of 10 seconds and then turn it on again. For having an ethernet connection, remove the plug for a while and then connect after a few seconds. Hopefully, the updating will take place without any error now.
Way-2: Unplug external peripherals
Some external hardware components such as speakers, printer-scanner, USB devices, or webcams trigger various error codes in Windows without any valid reason. Proceeding for performing a Windows update with all these peripherals can be detrimental whereas, you can disconnect which are not necessary for a while.
Disconnecting the external peripherals that are not basic ones won’t affect the regular operation rather, the updating may continue just fine. Plug them in once the updating finishes successfully.
Way-3: Run Windows Update Troubleshooter
Nevertheless, the Windows updating process is autonomous in all the machines, the process oftentimes stuck in the middle showing error codes. Microsoft has considered the issue with utmost priority and offered a built-in troubleshooter in the OS.
Windows Update troubleshooter as Microsoft explains will disable the automatic running of disk cleanup for a while to install required updates. Furthermore, it will detect other associated glitches for which the process is terminated and fix them using default resources. If you are encountering update error 0x80010105 in Windows 10 or 11, can run the troubleshooter using the below guidelines –
Windows 11
- Press – Windows + I.
- From the right pane, choose – Troubleshoot.
- Click – Other troubleshooters.
- Once on the next page, hit – Run button present next to Windows update.
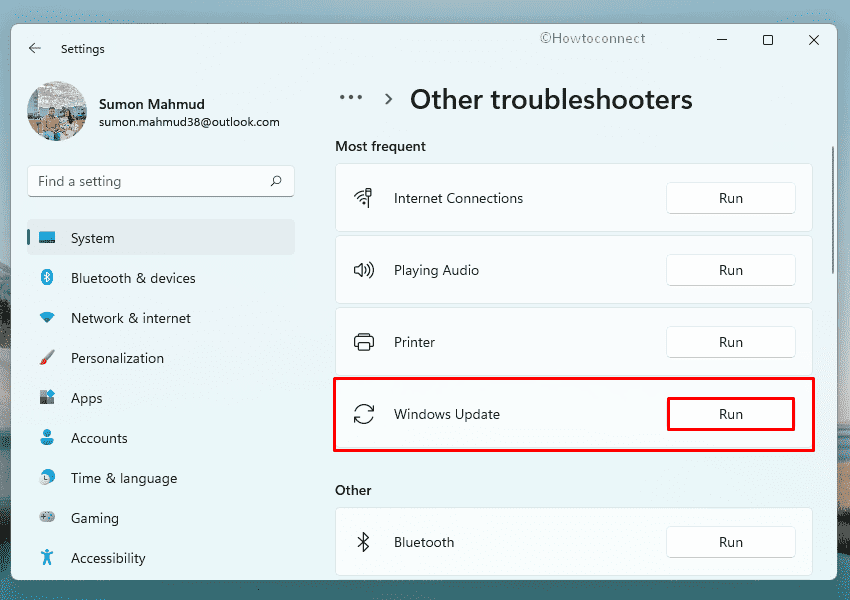
- Follow on-screen instructions to run the troubleshooter.
- After scanning the associated components for abnormalities, the utility will suggest an automatic fix.
- Click – Apply this fix.
Windows 10
- Open Windows Settings.
- Opt for – Update & Security.
- From left overlay, choose – Troubleshoot.
- Move to the right-hand side.
- Click – Additional troubleshooters.
- Select – Windows update.
- Click – Run the troubleshooter from the expanded tray.
Way-4: Download problematic patch manually
An unremitting internet connection is a pre-requirement to download and install an update patch in Windows-operated machines. However, you often move out from such a stable connection and get into trouble. As a preferable alternative to this issue, Microsoft update catalog contains all the update file patches. You can download from here 24/7 whenever the internet service is available and install them at any convenient time. This way, update error 0x80010105 in Windows 10 or 11 will not show up again. To download the specific patch from Microsoft Catalog manually following the below steps –
- Find out the KB number that the system is failing to install.
- Press – Windows + S
- Type – update history.
- Hit – Enter.
- When the Settings page appears, note down the KB number showing the error.
- Navigate to the official website of Microsoft Update Catalog.
- Click the search bar of the webpage and type the patch KB number you noted.
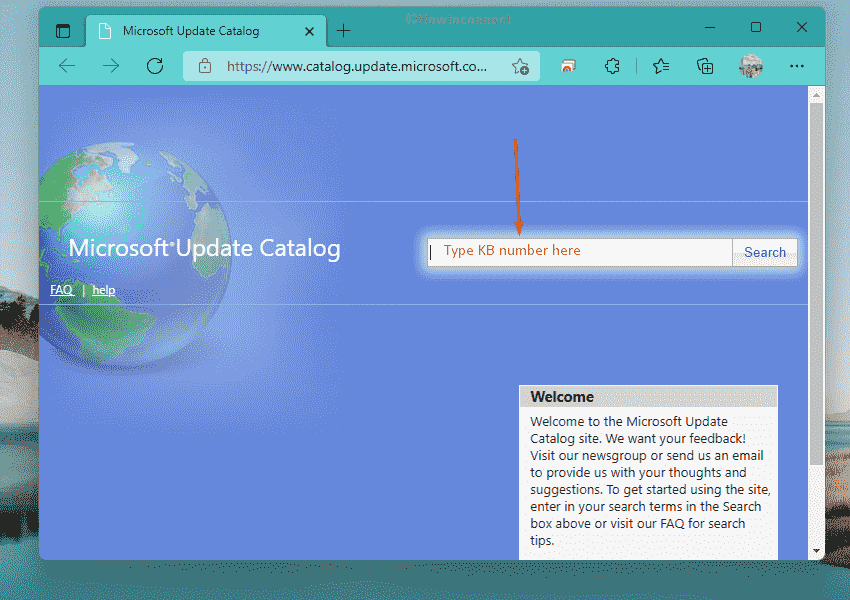
- Press – Enter.
- Look for the version that suits your system configuration and click – Download.
- Click on the link located on the prompted page.
- Once the MSU file is downloaded, double click on it.
- When User Account Control prompts, click – Yes.
- Follow the onscreen instructions until the update is installed.
Way-5: Reset Windows Update component
In an updating process, Windows update components control everything, therefore any glitches in the files will bring up unusual error codes like update error 0x80010105. While having this problem, try resetting dedicated components right away. The process will also reset the SoftwareDistribution folder where the system usually saves the associated files of an update. Furthermore, it will rectify the internet connection issues if persist with the device. To carry out resetting Windows Update component, follow the below guidelines –
- Press – Windows key.
- Type – cmd.
- Press – Ctrl + Shift + Enter.
- To allow User Account Control, click – Yes.
- In the Command Prompt, insert the following commands one after another and hit Enter after each –
net stop wuauserv
net stop bits
net stop appidsvc
ren %systemroot%\SoftwareDistribution SoftwareDistribution.bak
ren %systemroot%\system32\catroot2 catroot2.bak
Once executed, all update-related services will be stopped moreover SoftwareDistribution folder and Catroot2 folder will get replaced with fresh ones. After that, you will have to start all the disabled services again by running the below commands –
net start wuauserv
net start bits
net start appidsvc
net start cryptsvc
- Close Command Prompt.
- Restart Windows PC and check for updates.
Way-6: Run System File Checker
System files are the critical components in Windows without which the OS cannot operate smoothly. Often they are the parts of the Operating System itself while the same can also be a part of other resources like device drivers. However, these components may get into trouble by a conflict between software or attack by bug or malware. Corruption in the system file can cause a wide range of troubles in the system.
Update error 0x80010105 in Windows 10 or 11 often occurs if there are corrupted system files present in your system. To fix them, Windows has a default utility called System File checker which is intended to detect lost or misplaced components and eventually fix them. Some system files can be abruptly removed from the device due to a sudden power surge or outage will also be recovered once this utility runs. To carry out this workaround, follow the below instructions –
- Open Command Prompt as administrator.
- When the app opens up, type –
sfc /scannow. - Hit – Enter.
- Wait until the process reaches 100%.
- Check the report to find out whether the System file checker repaired the found corruption.
- If not, execute –
dism /online /cleanup-image /restorehealthcommand. - Reboot your system once the execution is over.
- When the system powers up, run sfc /scannow once again in the elevated command prompt.
Way-7: Check Date & Time Settings
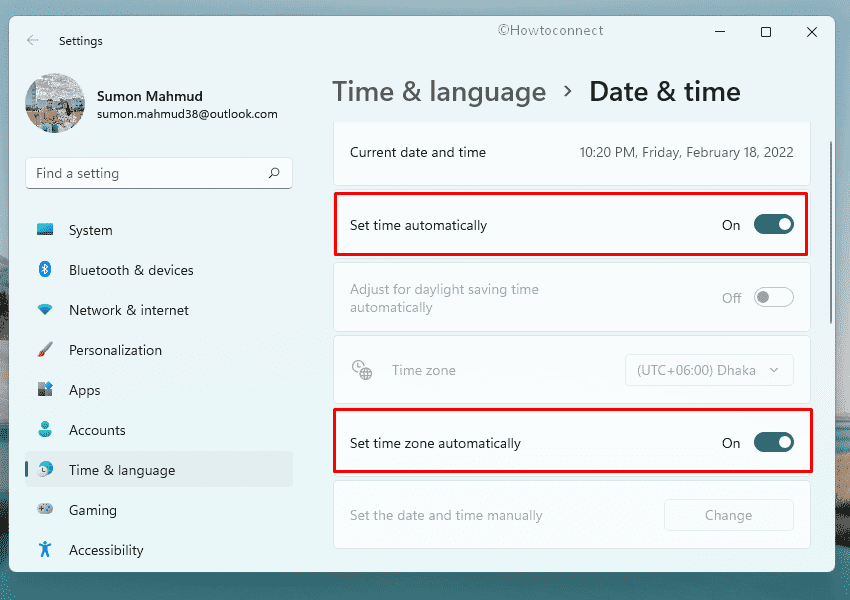
Incorrect time zone is one of the most prominent causes of giveaway update error 0x80010105 in Windows 10 or 11. Therefore this really important to ensure the correct date and time in the device for performing Windows update. Follow the below steps –
- Right-click the clock present on the taskbar.
- Choose – Adjust date and time.
- If you are using Windows 10, opt for – Adjust Date/time.
- From right pane, switch on the toggle button of Set time automatically.
- Also, enable – Set time zone automatically.
After that, go through the below process –
- Press – Windows+R.
- In Run command, type – control.exe.
- Click – OK.
- Make sure the View by option is set to Category.
- Click – Clock and Region.
- From the right-hand side, hit – Date and Time.
- Shift to Internet Time tab.
- Click – Change settings.
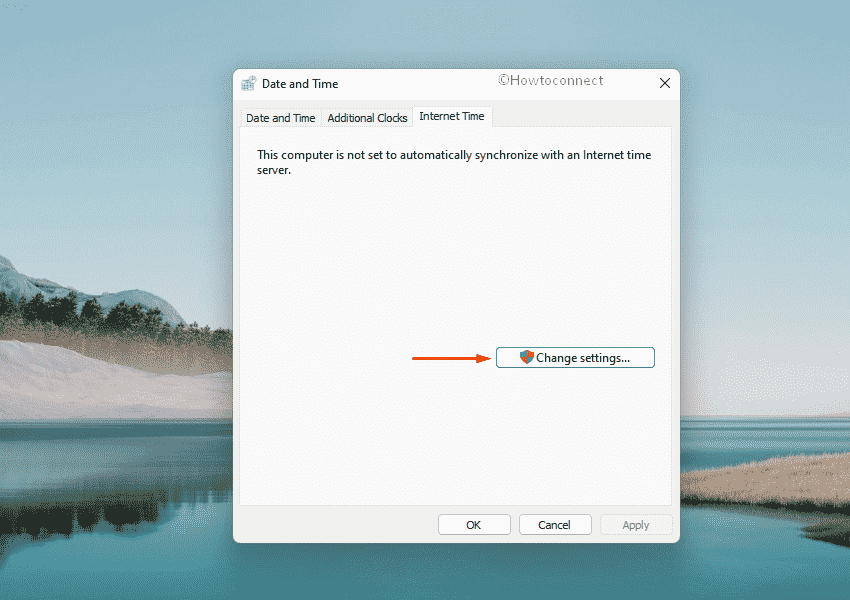
- Check the box present before Synchronize with an Internet time server.
- Click – Update now.
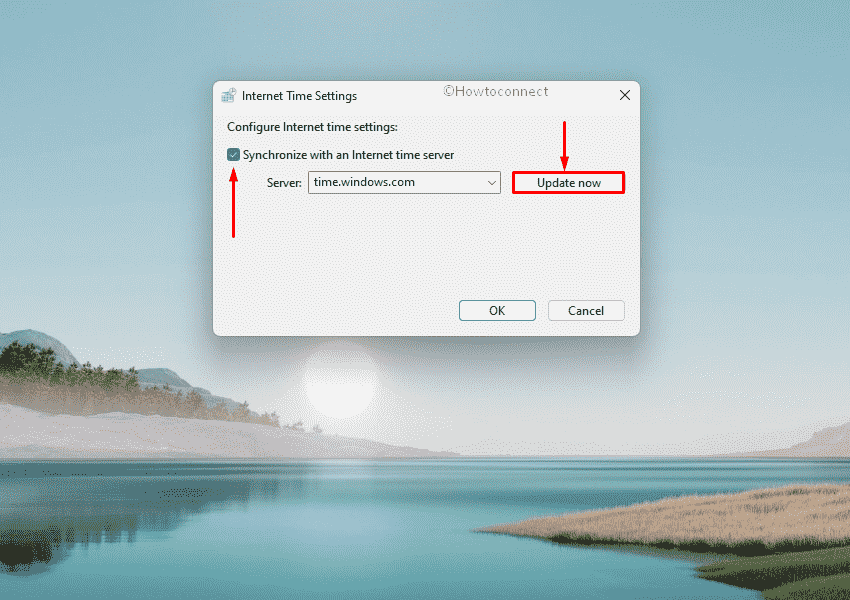
- To save the changes, hit – OK.
Way-8: Turn off the antivirus program
Malwares are always in a hunt to fuse the security layer of the OS and steal sensitive information in order to harm the users. Internet service being so available with the devices, it’s really easy for the strongly coded bugs to dodge the security interface. However, Windows 10 or 11 has the strongest malware protection by default which can significantly block everything suspicious. But the problem arises when this blocks the update patch misinterpreting as unrecognized.
Malware causes severe in the device and we never recommend turning off the anti-virus program whether it is default Windows Security or a third-party one by your choice. However, for the sake of smooth Windows updates, you can disable them temporarily and turn them on again after completing the installation successfully.
Disable Windows Firewall
- Press Windows key.
- Type – security.
- Hit – Enter.
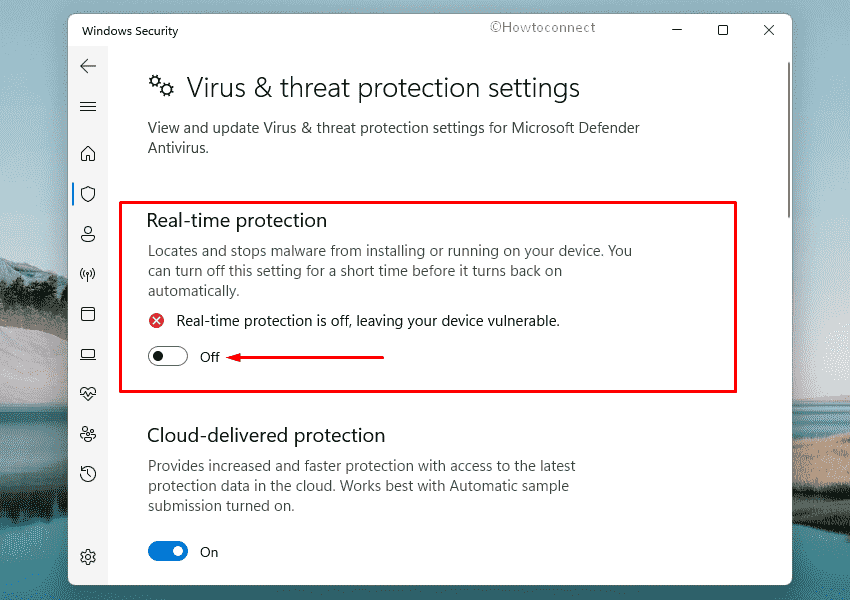
- Click – Virus & threat protection.
- From the right, hit the link – Manage settings.
- Switch off the toggle button of Real-time protection.
- To confirm the process, click – Yes.
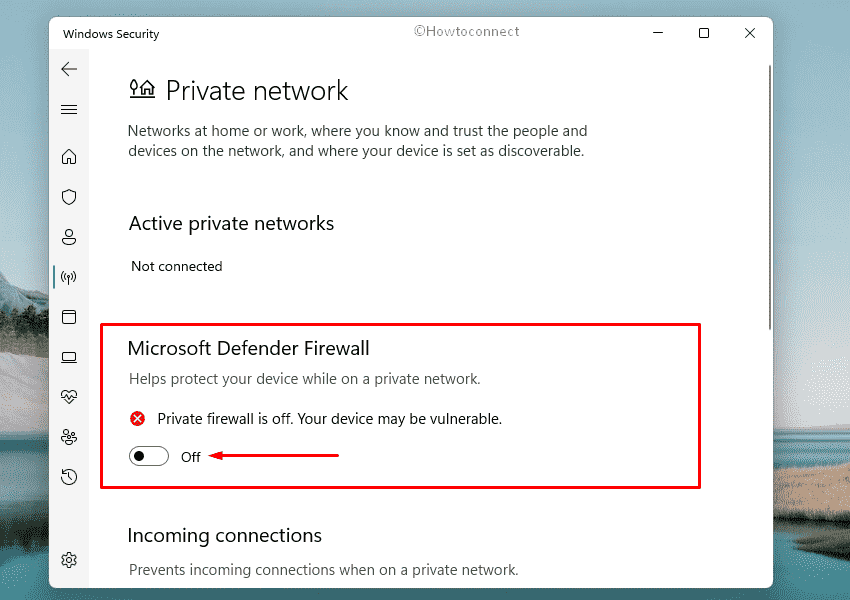
- From left sidebar of the app, choose – Firewall & network protection.
- Click – Private network.
- Disable the switch present under Microsoft Defender Firewall.
- Give your final consent when asked.
- Click the Back arrow from the top left corner.
- Select – Public network.
- Turn off the toggle button of Microsoft Defender Firewall for this network as well.
Disable third-party antivirus
- Hover the mouse pointer to the toolbar.
- Right-click on the third-party antimalware software icon.
- If it’s not there, click on Show hidden icons (up arrow symbol) to get the same.
- Choose – Disable.
- You can disable the tool permanently or for a specific period of time.
Note – The above-mentioned method may vary depending upon the software installed in your PC but more or less it will be similar.
Way-9: Free up disk space
In the System drive, a lot of junk files get accumulated every day like temporary files, unnecessary Downloads items, browser cache, shader caches. These files are safe to be removed without making any harm to the system and you can make some space eventually. However, the real killer is the previous Windows update files which usually occupy a few gigabytes of space. These are mostly unnecessary unless you have to perform a system restore and require a previously saved point.
Update patches require a specific amount of free space in the disk drive and that varies from one to another based on build. Usually, the requirement asked by Microsoft is a minimum of 16 GB free storage for installing 32-bit and 20 GB for 64-bit. If the device runs out of free space while downloading or installing a patch, there is a chance of getting update error 0x80010105 in Windows 10 or 11. Windows has disk cleanup tool to free up space altogether and the process is way too simple. To use the utility eventually make additional space in the disk, follow the below guidelines –
- Click the search icon from the taskbar.
- Type – cleanmgr.
- Hit – Enter.
- When a small pop-up appears where (C:) drive is pre-selected, click – OK. If C: is not your System drive, choose the correct one.
- From the bottom left of the next wizard, click – Clean up system files.
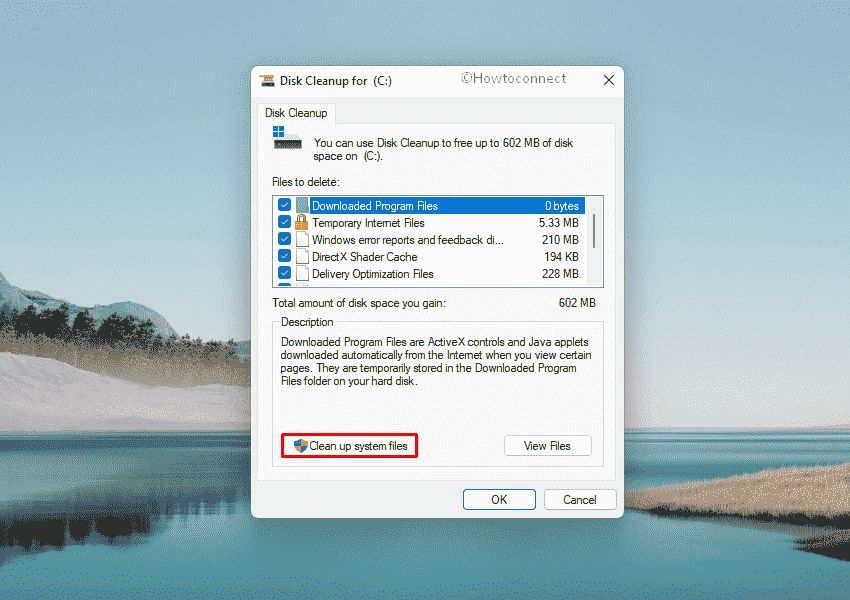
- Check whether your system drive is selected in the appearing pop-up. If yes, hit – OK.
- Once again, click – OK.
- To give final consent, hit – Delete files button.
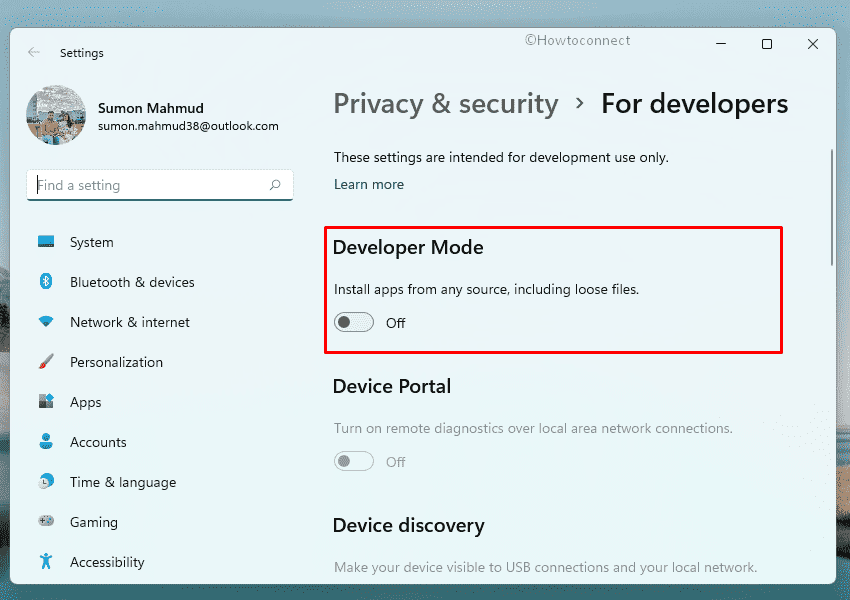
Way-10: Disable Developer mode
Targeting the users intended to develop applications, use visual studio, Microsoft has introduced Developer Mode starting from Windows 10 Anniversary update. The usual setting of this feature supports Windows Subsystem for Linux, Bash shell, Device Portal, Device Discovery, and many more. According to some reports, many users experienced update error 0x80010105 in Windows 10 or 11 when this feature remain enabled in the system. Therefore, disable the mode before proceeding with a Windows Update using the below guidelines –
- Press – Windows + S.
- Type – Developer mode.
- Press – Enter.
- When the dedicated Settings page opens up, switch off the toggle button of Developer mode.
Way-11: Perform a Clean Boot
Installing too many programs unnecessarily in Windows doesn’t come out helpful every time, rather it causes severe trouble. In Windows 10 or 11, we have a great number of default programs for performing all the tasks you need for regular operation even a bit advanced. However, you may need some others too which is completely fine and should not bother the performance.
Some of us may install a lot of programs for no particular reason mostly from untrusted sources which will occupy a large space in the disk, cause the system to act abnormally. A few of these run at the startup, and many similar ones engage in conflicts quite often. As a result, you may experience the update error 0x80010105 in Windows 10 or 11. To resume the installation without any issue, perform Clean Boot in Windows. This will let the OS run with basic programs only and it will be easier to determine which programs are causing the issue. To carry out this process, follow the below guidelines –
- Open Run Dialog box (Win+R).
- In the text field, type – msconfig.
- Hit – Enter.
- When in the General tab, click the checkbox set before – Selective startup.
- Also, select – Load startup items.
- Shift to Services tab.
- Check the box present alongside Hide all Microsoft services.
- Click – Disable all.
- Go to Startup tab.
- Click – Open Task Manager.
- When the app opens up in a separate window, select a startup program.
- Click – Disable.
- Disable all startup items in a similar way.
- Close Task Manager.
- After returning back to the System Configuration window, click on Apply followed by OK.
Way-12: Perform In-place upgrade
As an alternative to automatic Windows Update, this method can upgrade the Operating System to the most recent build. Of course, you can avoid any sort of error code or glitch coming in the way. To do in-place upgrade in Windows, follow the below guidelines –
- Navigate to – Microsoft website.
- Click – Download tool now.
- Go to the directory where the system stores downloaded items.
- Double-click the setup file you got.
- To allow the User Account Control, hit – Yes.
- When the setup wizard becomes ready, click – Accept.
- Click the radio button set before – Upgrade this PC now.
- Hit – Next.
- Update error 0x80010105 should not arise this time.
Methods list:
Way-1: Check internet connection
Way-2: Unplug external peripherals
Way-3: Run Windows Update Troubleshooter
Way-4: Download problematic patch manually
Way-5: Reset Windows Update component
Way-6: Run System File Checker
Way-7: Check Date & Time Settings
Way-8: Turn off the antivirus program
Way-9: Free up disk space
Way-10: Disable Developer mode
Way-11: Perform a Clean Boot
Way-12: Perform In-place upgrade
That’s all!!!