Did your desktop unexpectedly restart and display VHD_BOOT_INITIALIZATION_FAILED error in the screen? If the same occurs it means you encounter BSOD which commonly also leads to frequent freezing of Windows 10. This is one of the most vulnerable issues and Microsoft identified it with respective bug check value. Like many others, the code for this one is 0x0000012F. Experts are with a view that it represents the phenomena of initialization failure when a user performs boot from VHD.
VHD_BOOT_INITIALIZATION_FAILED BSOD error is evolved primarily when you have some old, outdated and problematic device drivers. But reality shows that it is not confined within this single cause only. Rather, missing system resources, corrupted OS files, DLL components, virus removing necessary data from Disk storage, conflict of few similar applications will cause this issue as well. From the Hardware side, if there is any defective portion detected in the volume or if it runs in a very low space due to junk accumulation, you might receive this error. The issue is found to cause permanent damage to Windows and hence, it needs immediate treatment. Therefore, we are here today to elaborate some workarounds resolving this annoying issue. Let’s begin to resolve –
VHD_BOOT_INITIALIZATION_FAILED in Windows 10 Solutions
Here is how to fix VHD_BOOT_INITIALIZATION_FAILED Error BSOD in Windows 10 –
Cease the Automatic Restarting of Windows and make the environment first
Windows 10 reportedly found to perform the automatic restart once the user discovers the symptom of VHD BOOT INITIALIZATION FAILED Error. So our first task is to heal this wound and let’s block this rebooting automatically.
- Save and close if have any in-progress programs, press Win+D.
- Once on the desktop, do a right click on “This PC icon” and select Properties from the menu.
- When System shows up, hit on Advanced system settings.
- From the appearing wizard, shift to the Advanced tab.
- Head to its Startup and Recovery section, do a click on Settings button from this area.
- On the upcoming popup, reach to System failure part. Remove the check mark from the box before “Automatically Restart“.
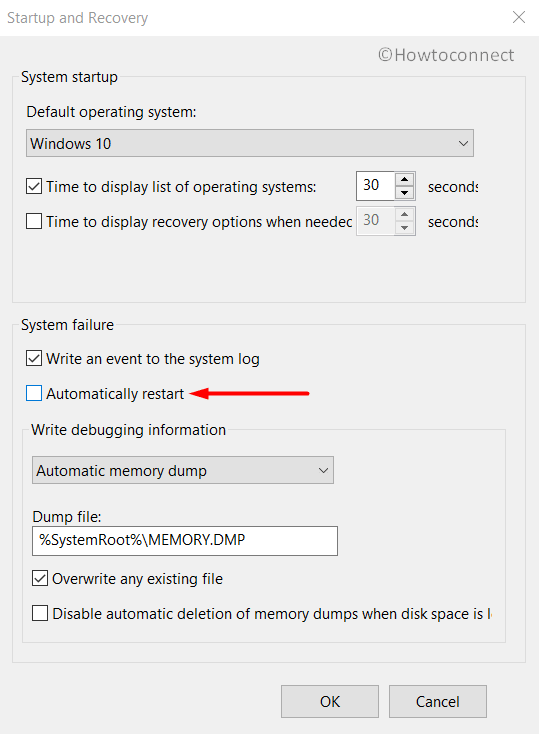
- Move ahead to make a click on OK to save changes. Leave wizard and the device will not restart automatically afterward.
Don’t ignore any Driver with Yellow indication mark in Device Manager
Soon after people started seeing this VHD BOOT INITIALIZATION FAILED issues, the case study revealed outdated, old drivers are responsible mostly behind that. All drivers need to be up to date and it might be little hectic for you without any indication. Here comes the Device Manager as rescuer. In the wizard, you can update only those drivers marked with a yellow warning.
- Move the pointer to Start menu and do a right click on it eventually.
- Select Run and welcome the dialog on display.
- Type “devmgmt.msc” in the given area and then press the Enter Key.
- Soon after that, you will find the Device Manager on display. Now, check carefully if there is an exclamation mark on a device in the whole console.
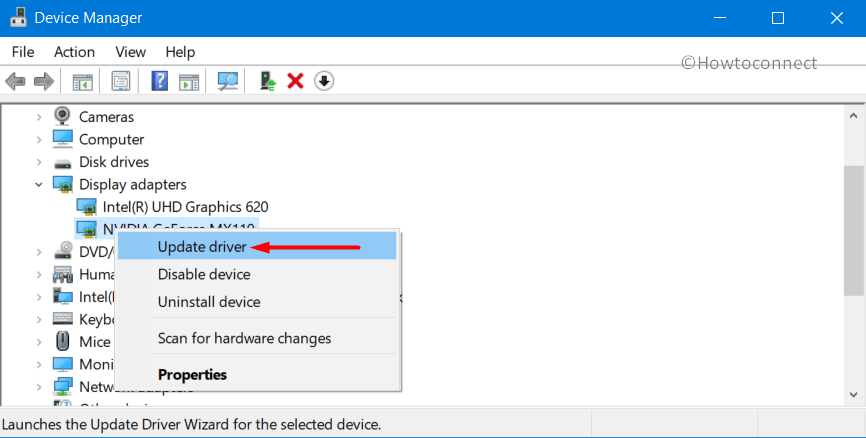
- If positive, expand that very device by clicking on it. Once spread, make a right click on the driver having yellow mark only.
- Choose the option Update driver and the rest will be assured by the system itself. Later on, follow the instructions coming on display and make all the drivers up to date in this way.
Use the Default Tool- Windows Blue Screen Troubleshooter
Being the consistent error in Windows 10, Microsoft came forward with a built-in utility in the name of Windows Blue Screen Troubleshooter. This is a perfect tool to deal with the most annoying VHD BOOT INITIALIZATION FAILED stop error. The only big job is, the device needs to have Windows 10 “Fall Creators Update” version. When upgraded, perform these steps to utilize the tool.
Step-1: Open the Start menu and once show up the menu, do a click on the Settings icon and let it be launched.
Step-2: When headed to the interface, select Update & Security tile in the process to explore more settings.
Step-3: Moving ahead to the consequent page, choose Troubleshoot from the left side.
Step-4: Jump on to the right and reach to Blue Screen option.
Step-5: Select it and hit Run the Troubleshooter.
This tool after getting the confirmation of task will automatically resolve if there is any stop error present in the system.
Beat Off the Malware removing Necessary OS elements
We all know that viruses and malware attack are the worst enemies these days and when they enter into the system, drive away from the most important data required for Windows. It’s really hard to afford and the easiest solution is to treat them in Windows Security.
- Perform a conjugal press of Windows and S keys and let Taskbar Search come up.
- Type Security in the text typing area and load the results.
- Select Windows Security and let the app open.
- When the app is displayed, choose Virus and threat protection located at the left wing.
- Moving ahead to its corresponding side, make a click on Scan options.
- Upon opening all the criteria, select the radio button ahead of Full scan option. Moving ahead, hit the Scan now button and initiate the detection.
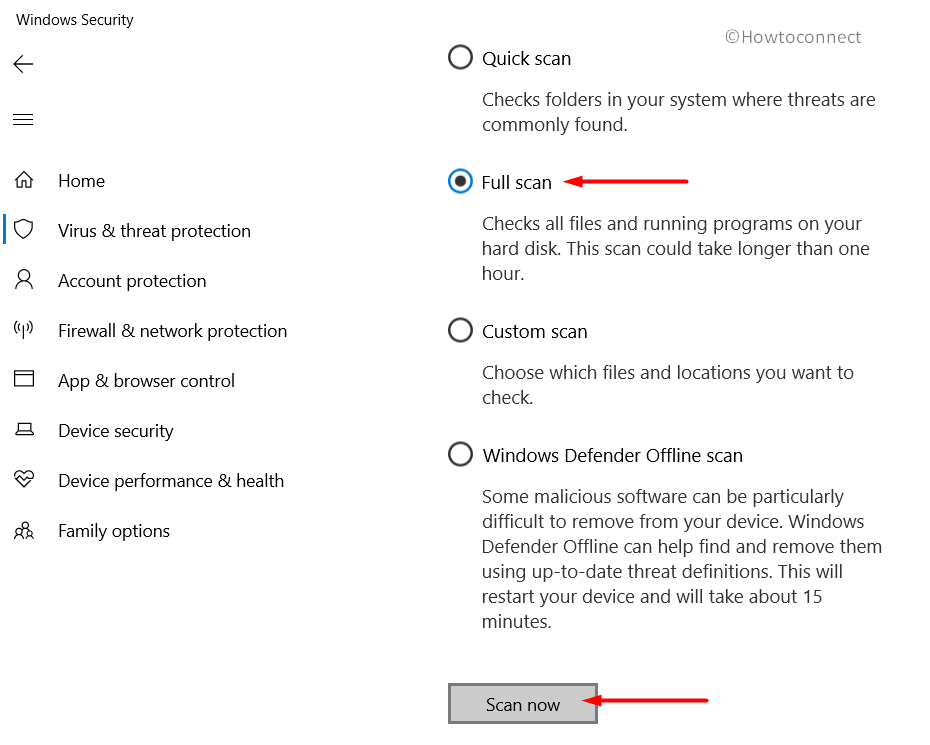
- The utility will search for viruses in every file in the system. It might take several minutes and when the process ends, you will the result on the screen.
- If any malware is discovered in searching, choose Clean threats and dismiss those.
- From the following page, select Remove first and then hit Start actions to wipe out all the virus components.
Windows Update is the key in most cases
All the patches that Microsoft releases at a fixed interval carry bug fixes and offer more strength to Operating System. Updating the OS often found to fix the BSOD errors like VHD_BOOT_INITIALIZATION_FAILED Error. The process is also very handy only proceeding ahead with the Settings app. Here is how to install the available patches-
- Manage to open the Windows Settings app by pressing Win+I hotkeys together.
- Once moved to app area, roll the cursor to Update & Security region and eventually perform a click on it.
- Choose Windows Update present in the left pane of the following page.
- Shifting on to the right side, make a click on Check for updates button.
- Upon searching, when all the patches are visible, select the Download button.
- After downloading is finished, the installation will take place immediately.
- Attend the restarting of Windows when required and finish updating.
Important- This workaround must be done in the presence of internet connection preferably an Ethernet or Wi-Fi. In absence of that, you can try using Mobile data but make sure you have disabled “Metered Connection” first.
Recent Changes Might be an issue, revert to the previous point
Any modifications in the system like installing or even removing certain programs will leave footstep in the Registry. Often these changes came out wrongly and cause VHD_BOOT_INITIALIZATION_FAILED Error. Therefore, if you have a previously created point, can perform System Restore.
- Hover the cursor to the left bottom corner and make a click on the Search sign.
- Taskbar Search once opened, start typing rstrui in the blank text area.
- Select the app from the result and when the wizard spot on the display, hit Next to continue.
- After the following page cuts your view, do a click on Show more restore points. This action will preview all the points you have created in the past.
- Now, choose the recent one in the list and select the Next button available at the bottom.
- When the consequent page is visible, hit a click on Finish and let windows to initiate the restoring.
Cut Off similar programs staying in the system
Two similar programs staying together be in a collision and delete some necessary data. In the process, VHD_BOOT_INITIALIZATION_FAILED Error comes ahead to cause damage. The best way to stop this act is to delete one of them and keep another. You can remove a program using these instructions.
Step#-1: First of all, get access to Windows Settings app by using any of the methods discussed above.
Step#-2: From the homepage, select Apps tile and allow the system to unroll its additional settings page.
Step#-3: Hit on Apps & features located at the left side and jump forward to the corresponding pane.
Step#-4: Here, after all the installed apps being loaded finally, reach out to the programs responsible for VHD_BOOT_INITIALIZATION_FAILED Error.
Step#-5: Select one after another and hit the Uninstall option from expanded pane for each application.
Step#-6: If UAC prompts for permission, give access by selecting Yes.
Step-#7: Move along with the next steps as provided on display to remove these programs.
Step#-8: After removing successfully, Restart Windows 10 PC.
Step#-9: Once the rebooting cycle gets over and if there is no issue present, download and install those programs again.
Bring on Windows Memory Diagnostic and fix the RAM issues
“Windows Memory Diagnostic” is a default tool that can easily resolve the issues in RAM, incorrect allocation of memory as well as similar problems. In the below steps, we will show you how to move with this workarounds.
- Open the Start menu and keep typing “memory” from Keyboard.
- Once the Windows Memory Diagnostic is seen in the result, select it.
- After the wizard unrolls, choose “Restart now and check for problems (recommended)”.
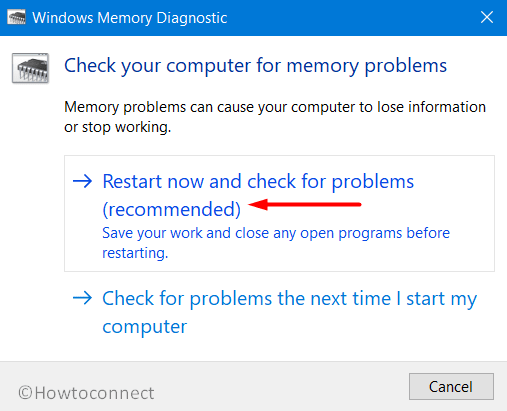
- As a consequence of this selection, Windows will attend the first cycle of restarting.
- After it comes again in operation, there will a blue colored page detecting memory issues in the system.
- For the sake of facilitation, the progress rate will be visible in percentage and when it hits 100%, the device will restart again automatically.
- The results of this diagnosis will be available in the System tray- Notification area when Windows powers up next.
Power the Windows in Safe Boot Mode to load basic processes
Most of the critical issues in Windows resolve easily when you boot the device in Safe Mode. This is a pretty basic workaround but brought great reputation overages.
- Open the Run dialog on screen by pressing Windows and R keys combined.
- After the empty search field comes in your view, type msconfig and select OK located below the box.
- The System Configuration window will open sharply in the display. You need to travel to the Boot tab.
- Come down to lower half of this wizard where Boot options are visible and check the box beside Safe Boot.
- After all the options become active, hit the radio button for Minimal and proceed forward.
- Choose the Apply button primarily and then Ok to save these changes.
- Now, leave the wizard and press Windows key.
- Restart the device and on the next startup screen, keep pressing F8 key.
- After the next page is visible, select Safe Mode.
- On the next step, straightway enter in Safe Mode.
Offer the External Hard Disk a break and resolve VHD_BOOT_INITIALIZATION_FAILED Error
Users repeatedly saying that they are facing the BSOD issues just after connecting an external Hard Disk with the system. As this perform versatile tasks, we cannot really live without. However, the issue fixes just after disconnecting the HDD. Reconnect once the issues go away using the below method.
- Terminate usage of any item from External Hard drive and save if have any unfinished task.
- Remove the plug from Device port and keep it separate in a safe place.
- Reboot the device in the usual method (Start menu- Power cog- Restart)
- Once return back to the desktop afterward, do a check for the VHD_BOOT_INITIALIZATION_FAILED Error in the system.
- If it resolves successfully, open the Edge browser.
- Do a visit to manufacture website for that particular HDD.
- Download and install the latest driver to use safely.
Dissipate Windows Update Files fall into disruption
It’s quite unusual that the Windows Update procedure falls into the malfunction. But in some cases, they do and finally call in VHD_BOOT_INITIALIZATION_FAILED Error. The best deal we can offer to them is to throw out of the system. Perform the below steps to uninstall these patches.
- Launch the Windows Setting app using any method you like.
- From the interface, move ahead to Update & Security tile and select it.
- Choose Windows Update from the left-hand side.
- Jumping on the corresponding pane, select the View update history link.
- After the consequent page hits on display, do a click on Uninstall updates option.
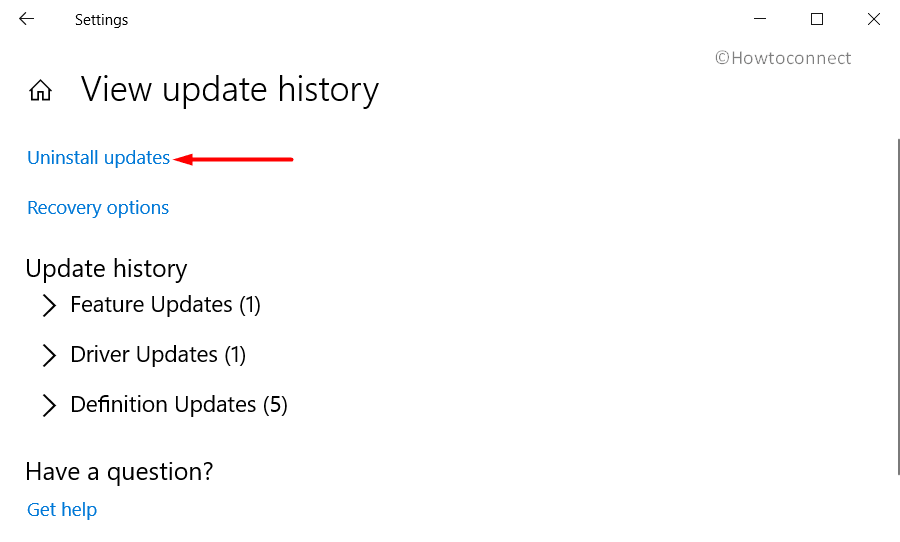
- Immediately a new window will hang on in the name of Installed Updates.
- Reach out to the recently received patch in the list and perform a right click on it.
- Hit Uninstall option once available to proceed. Follow the upcoming guidelines available in the display to completely remove these files.
Fix up the corrupted System Files in Elevated Command Prompt
System files fall into corruption sometimes or DLL files go missing. In the process, you can experience the naughty VHD_BOOT_INITIALIZATION_FAILED Error in the system. The System File Checker comes handy in fixing these mentioned issues in a simpler form.
- Open the Task Manager by making a right click on Taskbar followed by selecting it from the menu.
- Once in layout, hit the File option from top left end and select Run new task option.
- A dialog after being seen, type cmd in the empty space.
- Put a checkmark in the box saying “Create this task with administrative privileges”.
- When you press the Enter button from keyboard, you will be straightway directed to Elevated Command Prompt.
- In the dark window, type the following command at the place where a cursor is winking.
sfc /scannow
- Hit Enter key to execute System File Checker.
This handy utility will fix the DLL files, system components corruptions automatically and you might get rid of the BSOD error.
Uninstall all third Party Anti-virus programs from the system
The default Windows Security tool deals with malware issues with the utmost consideration. There is really no need of using any third party tool in this purpose though it might be a free one. You can remove the tool from the system without any second thought.
- Manage access to the Run dialog using any method stated above.
- In the empty text box, type appwiz.cpl and hit enter.
- Program and Features window will be powered and displayed.n
- Reach out to the said anti-malware solution program and select it anyway.
- Hit Uninstall option visible in the displayed ribbon.
- Give authentication by tapping Yes when UAC prompts.
- Follow the further guidelines until it uninstalls completely.
Repair Windows Image files using DISM tool
Corrupted Windows Image Files plays an important role in causing VHD_BOOT_INITIALIZATION_FAILED Error very often. Deployment Image Servicing and Management (DISM) tool will, therefore, can stand by your side being executed in Elevated Command Prompt.
- Open the Taskbar search using Win+S keys pressing together.
- Type cmd.exe in the blank space provided for typing.
- After Command Prompt is visible in the list, do a right click on it.
- Select “Run as Administrator” and once “User Account Control” prompts, hit Yes to give consent.
- Being headed to the Elevated Command Prompt black panel, type the following command at the blinking cursor.
- When you press the Enter button, the tool will be detecting and fixing defective Windows image files. This process may take about more than 10 minutes, so hold on patience and wait.
DISM.exe /Online /Cleanup-image /Restorehealth
After the process is finished, restart the device and upon powering up again, check if the error resolved.
Clean up the Disk Storage from Temporary Junk files
Junk files are created for the facilitation of task completion and come in no use afterward. Unnecessarily they occupy disk storage and in the process, the Drive runs in low space. Meanwhile, slow operation and BSOD error are imminent. However, free up disk space is quite easy if you follow the below guidelines –
- Invoke Run dialog and in the search box, type cleanmgr.
- Once you make a click on the Ok button located right at the below, a small popup window will peek in and ask for choosing the drive where you want to start fee up.
- Select C: by hitting a click on the dropdown menu and tap Enter key.
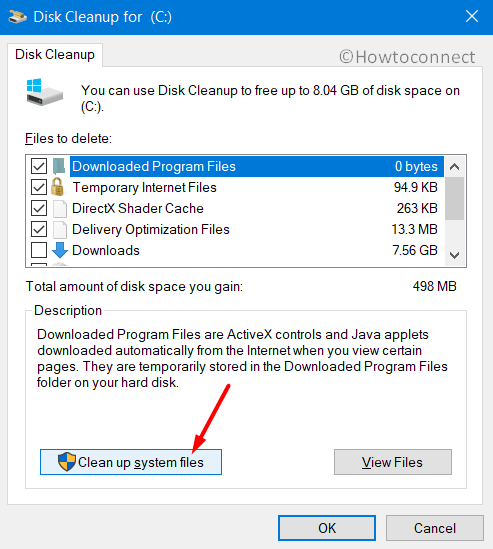
- Firstly, Disk Cleanup Utility will calculate the retrievable space in the volume and then flash up the wizard.
- Slide down in wizard and select Clean up system files located at the bottom left.
- Once more time choose C: drive when the small popup appears.
- When Disk Cleanup for C: will come up, check all the boxes in Files to delete area except Downloads.
- Hit the Ok button and initiate the freeing up.
- Note- Before starting the process, make sure there is nothing left in the Recycle bin.
- This process might take a while. Wait patiently and when accomplished, perform a restart to PC.
Let the Disk Checking Utility fix all the poor areas in Volume
Using the same device for a prolonged period will sometime cause bad areas in Hard Disk and in the process, the VHD_BOOT_INITIALIZATION_FAILED Error gets its flow. The Disk Checking Utility when powers up, can potentially fix this issue and give you relief. Here are the steps you need to move on-
- Get the Access to the Command Prompt with Administrative privileges using any of the above guidelines.
- After the black window becomes visible, type the command in below format-
chkdsk C: /f /r /x
- Usually, the initial command line tool is CSKDSK only but if you press the Enter button, it will show the disk status only. Since the purpose is to fix the issues as well, we have added these extra characters representing below purposes-
C: – The disk drive where we have installed the Operating System. This is flexible, you can change with E:. F: or any depending upon where you have installed the OS.
f- represents fixing of the brought out issues upon searching.
r- Initiate detecting of issues present in the volume.
x- Divide the disk volume into pieces and helps in diagnosis.
- After adding all these notations, we have completed the final Command as
chkdsk C: /f /r /x - Now, call the Disk Checking Tool by pressing Enter and let it resolve the poor sectors in the Disk volume.
- Like all the other processes, it might take a long time. Be patient as it demands to be.
- Once the process ends normally, perform a restarting to windows.
- After performing the full rebooting cycle, perform a check to the existence of this issue.
After coming to this point, we have elaborated all the workarounds those can effectively resolve VHD_BOOT_INITIALIZATION_FAILED Error BSOD in Windows 10. If you have successfully resolved the issue, can work smoothly from now on. There might be a case as well that, you have failed to succeed. In that case, without being frustrated, you can perform the Clean installation of Windows 10 as a last resort.
After coming to a decision to do reinstallation to OS, manage few things first. Connect the device with an Internet connection. Save a backup for all the items in C: drive or you can also accumulate them in an external drive like USB or Hard Disk. In case of being a little nervous, we recommend you to seek help from professionals. This will save you from many issues including VHD_BOOT_INITIALIZATION_FAILED Error.
That’s all!!