VIDEO_MINIPORT_FAILED_LIVEDUMP is a BSOD error in Windows 10 found to cause series of problems in the system. The issue has a bug check value of 0x000001B0. Basically, stop errors like this is a result of outdated device drivers and faulty system files. But the causes are not confined to these two. Infection from malware deleting system components, corruption in DLL files and necessary elements of OS, even sometimes two similar types of programs colliding with one another can cause the same. This is just one side of a coin, it’s not only the Software issues responsible but Hardware accessories like external HDD, poor sectors in drive, accumulation of junk in the volume will be accused of.
The major problem one will face if infected that, Restarting of Windows without any reason and that too leaving to warning. This annoying thing will leave no room for saving unfinished works, sorting out what’s the problem or solving the error. Another big trouble caused by VIDEO MINIPORT FAILED LIVEDUMP BSOD error is, it will make desktop area inaccessible as it freezes. Besides, you cannot really work with relaxation as error messages keep on haunting. All we want in such scenario is an end to all. Therefore, we are here today for discussing some great ways to Fix VIDEO_MINIPORT_FAILED_LIVEDUMP Blue Screen Windows 10 using workarounds. So, no more wasting time, let’s start-
VIDEO_MINIPORT_FAILED_LIVEDUMP Windows 10
In the below section, we are presenting a good number of effective workarounds that can potentially eliminate VIDEO_MINIPORT_FAILED_LIVEDUMP error from windows. All of these are proved to be effective but for your case, will not be the same obviously. So, keep on following each and deploy to the device until it gets fix completely. Moving to the ways –
Turn Off Automatic Restarting of Windows
We told above that the issue VIDEO_MINIPORT_FAILED_LIVEDUMP can cause Windows to force restart. As a consequence of that, you can’t work on the system. So, taking it as a top priority, let’s block this Automatic Restarting. This may not be a resolution but you can have desired workplace to deploy the next. Steps are as follows –
Step-1: Close the Ongoing Process and Press Win+D to reach Desktop area.
Step-2: Once moved, perform a right click on This PC and choose Properties from options.
Step-3: System window will open up from Control Panel and from the left pane here, choose Advanced system settings.
Step-4: When System properties wizard opens, Move on to the Advanced tab.
Step-5: Once in there, reach out to Startup and Recovery segment and hit Settings.
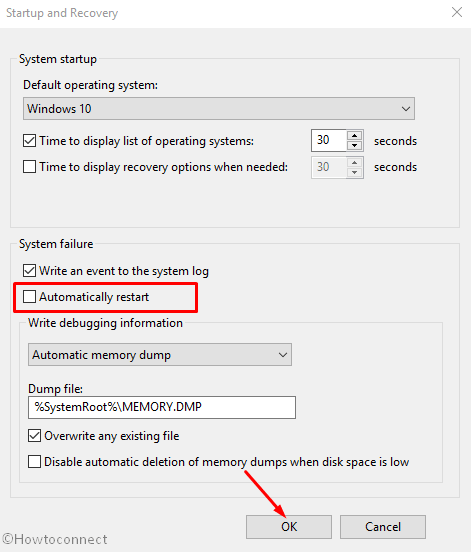
Step-6: From the new Startup and Recovery popup, rush to System failure area and uncheck the box beside Automatically restart.
Step-7: Select Ok from bottom of the window and save the changes into system.
Primitive method- Boot in Safe Mode
Booting in Safe mode loads the Windows with only basic programs and hence most of the critical problems leave away. This is a very effective resolution prevalent from long before. As VIDEO_MINIPORT_FAILED_LIVEDUMP Blue Screen Windows 10 is prominent, we will try booting the device in Safe mode and check what happens afterward.
- Press the Windows button from keyboard to open Start menu.
- Now, Hold the Shift key down and in that condition, hit the Power cog then choose Restart option.
- After Windows Restarts initially and come to startup, you will see a blue screen showing a few options on this page. From there, select Troubleshoot.
- Once Next window hits the screen, choose Advanced options followed by hitting a click on the Startup Settings.
- Proceeding on, perform a click on the Power button located at the extreme bottom right end and chose Restart again.
- After signing in for the second time, there will be a bunch of options for you including Enable Safe Mode.
- Start Pressing F4 key continuously since you have to work with keyboard only. This will Boot your PC in Safe Mode.
Make the proper use of Windows Blue Screen Troubleshooter
When Microsoft saw BSOD errors haunting Windows 10 continuously, they introduced the Blue Screen Troubleshooter. Going through Settings app, you can use the tool and fix VIDEO_MINIPORT_FAILED_LIVEDUMP Blue Screen automatically.
- Roll the cursor over Taskbar area and make a click on Start.
- Once opened, choose Gear cog. And let Windows Settings app to launch.
- When in the App area, hover cursor to Update & Security region and eventually do a click on it.
- After moving on to the next screen, select Troubleshoot from left layout and pass to alongside right.
- Come little down and choose Blue screen option and when expanded, hit Run the Troubleshooter from the pane.
The utility will automatically detect and fix problems in the system and VIDEO_MINIPORT_FAILED_LIVEDUMP error will dismiss.
Rectify the Corrupted System Files with sfc /scannow command tool
Corruption in the system files can occur in many ways and end up with BSOD error like VIDEO_MINIPORT_FAILED_LIVEDUMP Blue Screen Windows 10. Microsoft offers handy tools to deal with these kinds of issues. System File Checker (SFC /Scannow) is among those that can fix System including missing DLL files.
- Slide the mouse pointer to Taskbar area and finally select Search icon.
- When opens up, type cmd in the gap and once results appear, do a right click on Command Prompt.
- Hit Run as Administrator option and when UAC asks for permission, choose Yes to give permission.
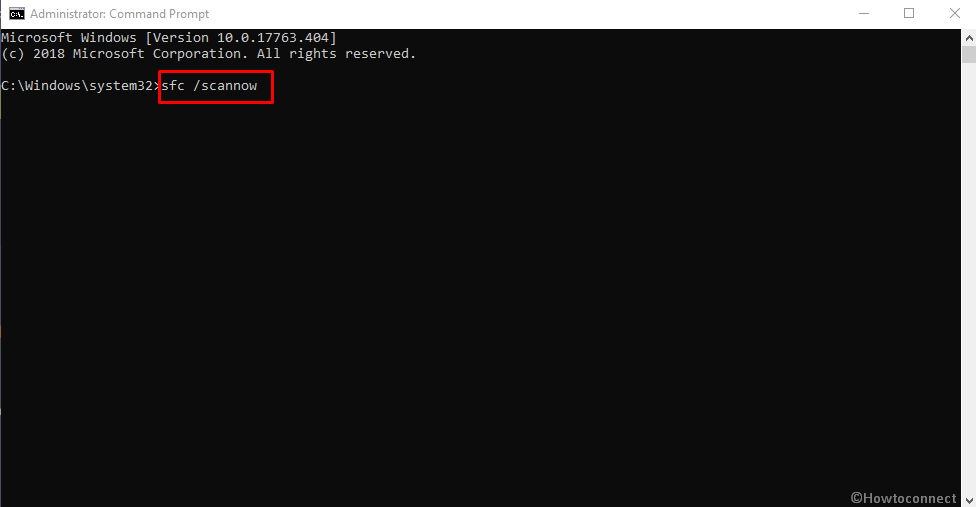
- On the Black window next, type
sfc /scannowcommand and Hit Enter button from keyboard. - System File Checker once activated will detect the issues in files and also fix them automatically. In the process, the said BSOD error will leave away.
Get the Windows 10 Up to date by installing available updates
Windows 10 after coming to market for indulged in quite a good number of bugs. The Industry was dedicated enough to diminish those by releasing fixes with cumulative patches, major updates regularly. It may happen so, VIDEO_MINIPORT_FAILED_LIVEDUMP error in your device is occurring due to outdated Windows 10. It’s better to install all the available updates going through following way –
- Press the Start button from the keyboard and when the menu showed up, make a click on the settings cog.
- Move directly to Update & Security and do a click on it.
- When shifted to the next page, choose Windows Update from the left wing and jump the corresponding pane.
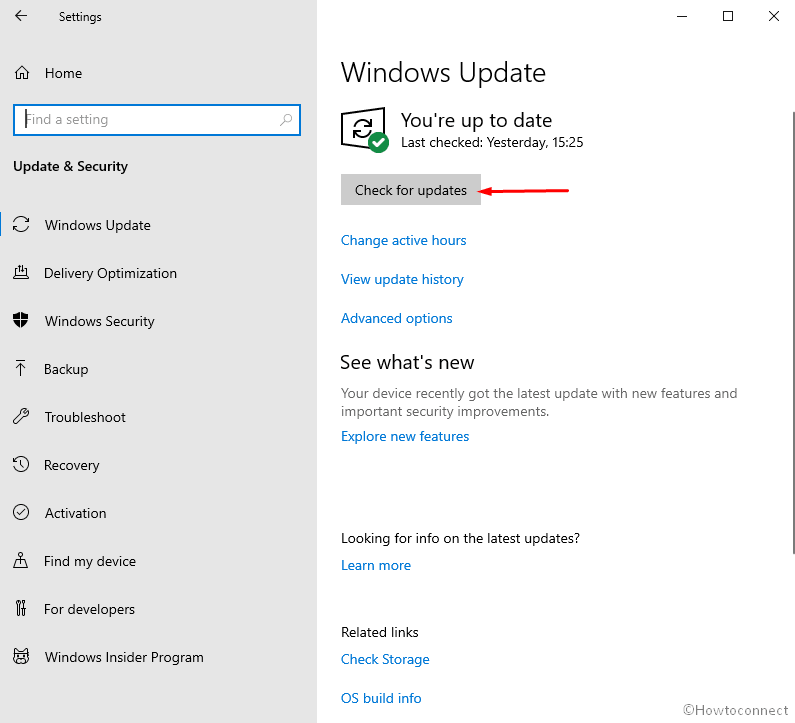
- On the right, as windows carry out checks regularly you might come across the dialog “You’re up to date”. Don’t bother and straightway hit a click on the link Check for updates.
Important – Make sure the device is connected with internet connection before proceeding for Download.
- Once Downloading finishes, installation will start automatically. The process might require multiple Restating. So, do not leave the device unmanned and wait for instructions.
Once the Windows is up to date, you might say goodbye to the VIDEO_MINIPORT_FAILED_LIVEDUMP Blue Screen Windows 10.
Separate the Hardware components away from Windows and Reconnect in order
We have observed the reports from people saying they have VIDEO MINIPORT FAILED LIVEDUMP error in the system after connecting Hardware devices such as external Hard Drive. At present, an additional peripheral is necessary for carrying loads of files and entertainment materials. So, we recommend to disconnect all of those and again reconnect using correct guidelines as follows –
- Disconnect all the Hardware Accessories and leave them in a safe place with cables.
- Hit a click on the Start menu and when it opens, select Power icon.
- From Power options, select Restart and let the Windows to reboot normally.
- Once sign back again, carry out a thorough check for the error in the full system. If nothing present, connect all of the separated Hardware items one after another.
- Launch a web browser and visit manufacturer’s website for each item separately.
- Download the drivers and eventually install them again.
- Start using them as you were doing before.
Remove Potential Virus from device using Windows Security
When we are living in the age of tech revolution and using the most modern accessories every day. Yet, no one is well secured from Viruses and anytime we can be pray. When this malware enters in the system, the first thing they do is make a mess with the necessary components of OS. Therefore, VIDEO_MINIPORT_FAILED_LIVEDUMP Blue Screen Windows 10 occurs. We will now dismiss all these threats using below method –
- Hover the pointer to the right bottom end of Desktop and select the Show hidden icon up arrow from notification area on the taskbar.
- When expanded, click on the Shield icon and allow Windows Security app to open.
- When in UI, choose Virus & threat protection from the left side and move on to alongside pane.
- Moving ahead to the right, select the link entitled with Scan options and let it open all methods.
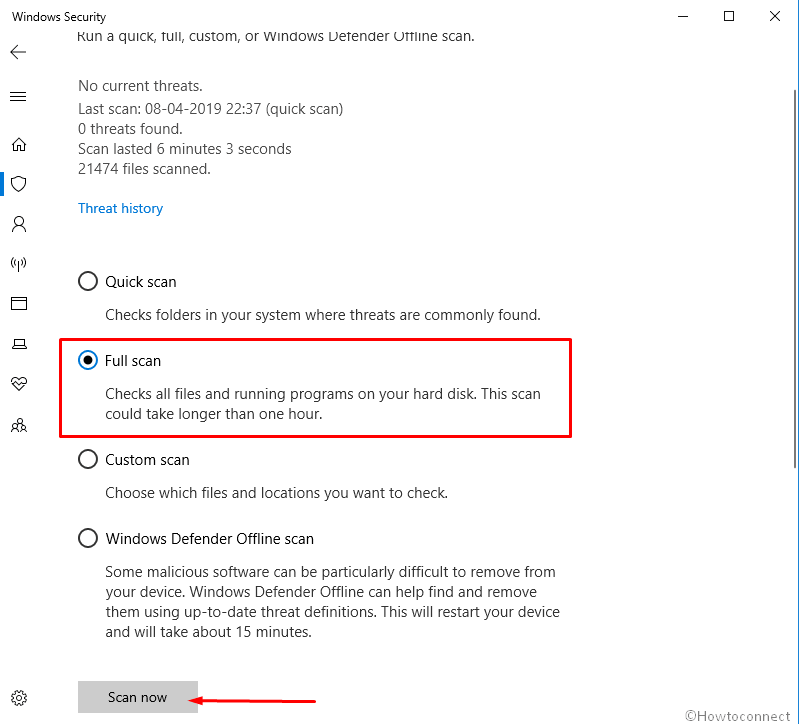
- Check the radio button before Full scan and also hit a click on Scan now.
- Detection will start immediately and once the process ends, you will come across the result. If there is any virus present, choose Clean threats option and get them dismissed.
- There will be three more options left for you. Select Remove and then hit the Start actions button to eliminate all the threats.
Return back to previous Restore point reverting all recent changes
Some changes done on computer go either way and make the system unstable. Uninstall or install of a program may also call VIDEO_MINIPORT_FAILED_LIVEDUMP Blue Screen Windows 10. Therefore, reverting of all the changes goes at the top while resolving a case. We call it a System Restore and the ways are as follows –
- Type rstrui in the empty text field on the Taskbar search and hit Enter key.
- From the System Restore wizard once visible, hit Next button to move ahead.
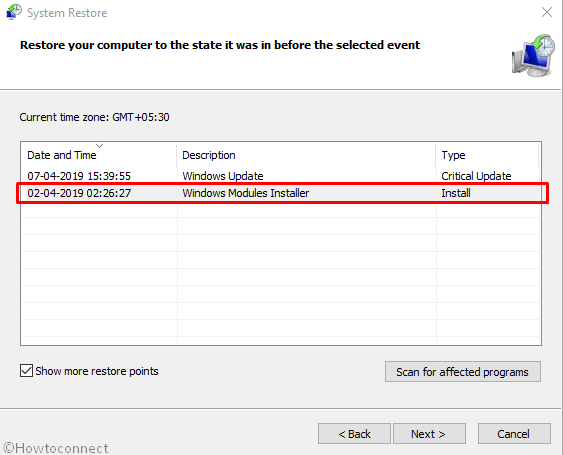
- On the consequent page, choose option Show more restore points to see all available times and dates.
- Select the last created one and eventually hit Next.
- After the following screen comes in, scroll down to bottom and choose Finish to Start the process.
Remove all similar programs causing VIDEO_MINIPORT_FAILED_LIVEDUMP error
Since two or more similar programs might clash with one another and delete important files leading to VIDEO MINIPORT FAILED LIVEDUMP error. You can come to a decision to uninstall them for the time being. Once the error is fixed, you may install them again.
Step#-1: Do a combined press of Win+I hotkeys and invoke the Windows Settings app.
Step#-2: On app UI, click Apps and shift to more settings page.
Step#-3: Hit the Apps & features option from the left pane and jump over to corresponding right.
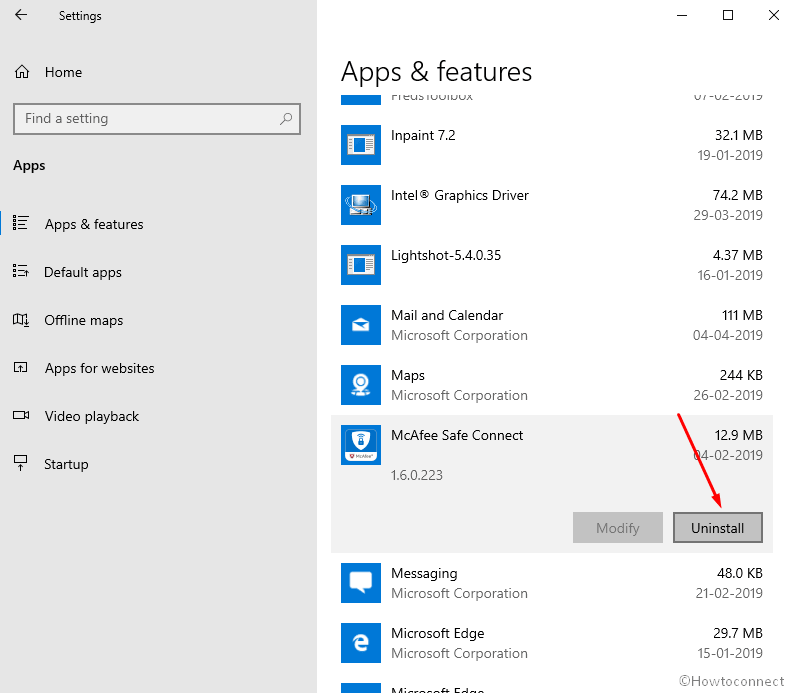
Step#-4: from the list of installed apps, reach out to programs causing VIDEO_MINIPORT_FAILED_LIVEDUMP error.
Step#-5: Select each of them one after another and choose Uninstall option from the extended pane.
Step#-6: Wait until installation finishes completely and follow on-screen guidelines.
Step#-7: Reboot the windows to save the changes and then come back to operation; check if there is a trace of error or not.
Uninstall the problematic update files to resolve VIDEO_MINIPORT_FAILED_LIVEDUMP BSOD
Usually, this is quite uncommon for a Windows update progress to terminate abnormally at midway. But if happen so, will definitely cause VIDEO MINIPORT FAILED LIVEDUMP error. To resolve the case, we have to uninstall the problematic update files from the system using the below instructions –
- Open Start menu.
- Hit a click on Gear cog to Open Settings app.
- Move to Update & Security and perform a click on this category.
- On the following page, choose Windows Update from the left pane.
- Navigate to the adjacent right column, hit a click on the link saying View update history.
- When the list of latest installs cuts view, select Uninstall updates option from the top.
- Program and Features window will be visible on screen by default shortly. Select the recently received patch.
- Lastly, hit the Uninstall option once show up.

Update the drivers having warning sign to fix VIDEO MINIPORT FAILED LIVEDUMP
Outdated drivers left in the same condition for a long time is the prime culprit for occurring BSOD errors like VIDEO_MINIPORT_FAILED_LIVEDUMP. This is not fair to let the device drivers stay outdated. The solution is quite simple, we need to step out for updating them.
- Open Device Manager and have a close look on the console for any exclamation marks on devices.
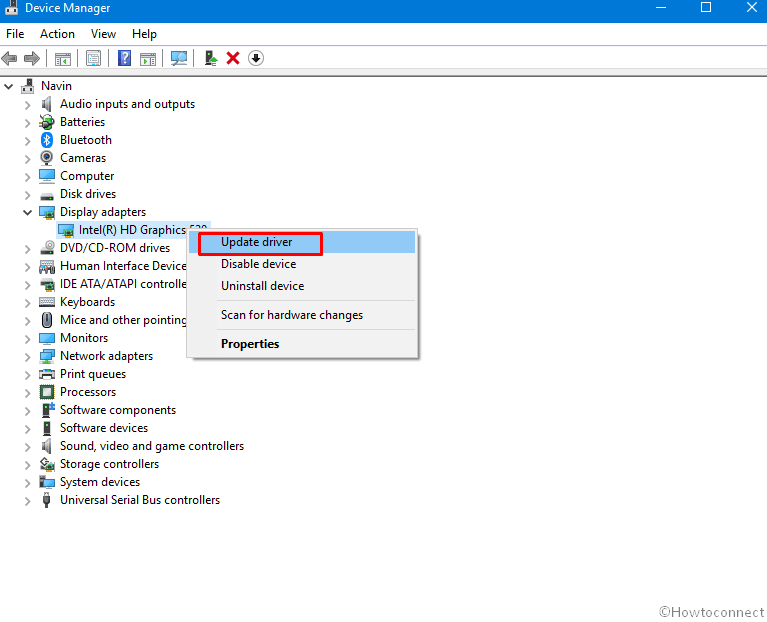
- If you find, click to expand and make a right click on those drivers having Yellow warning successively.
- Choose Update driver from the list of options and follow the instructions windows show on screen.
- Once all the drivers are updated finally, Restart the computer to make changes effective.
- After getting back to Start again, see if the error is there or not.
Resolve the problems with Windows Memory and RAM
Memory issues along corruption RAM also cause VIDEO MINIPORT FAILED LIVEDUMP BSOD error to occur and hence we need to go through the Memory Diagnostic tool.
- Primarily, save and close all the progress you are working on.
- In the empty space of Taskbar search, write Windows Memory.
- Once results start appearing, hit a click on Windows Memory Diagnostic to open.
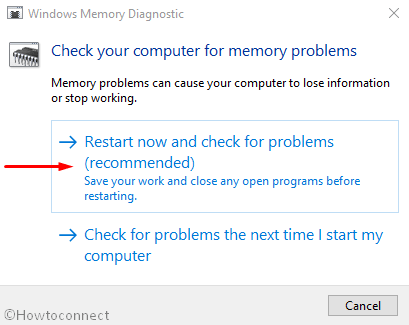
- Moving ahead to the popup visible on screen, select Restart now and check for problems (recommended) option.
- With the choice, a blue screen will appear and start detecting memory issues of the system. When the progress reaches 100%, Windows will restart automatically.
- Upon startup, results of diagnosis will be available in the notification area of the system tray.
After fixing this trouble, hopefully, VIDEO_MINIPORT_FAILED_LIVEDUMP Blue Screen will go to end.
Clean all the unnecessary files from Hard Disk occupying space
Every day, Windows produces lots of temporary files in the name of junks for completing specific processes. When they get big in amount, occupy space in the disk drive and make system to slow down. VIDEO MINIPORT FAILED LIVEDUMP error is also a result of this piling up. So clean those using Disk Cleanup tool.
- Invoke Run dialog on screen using Win+R hotkeys.
- Type cleanmgr in the box.
- Select Ok button under the box.
- When a small popup asks to choose a drive to wipe junk, select C: clicking dropdown menu.
- Disk Celanup utility will calculate the recoverable space in the volume first and then in a minute, a wizard will be visible.
- Moving on to the popup window, scroll to the bottom and choose the option Clean up system files.
- The small popup will again ask to choose drive. In the same way, select C:.
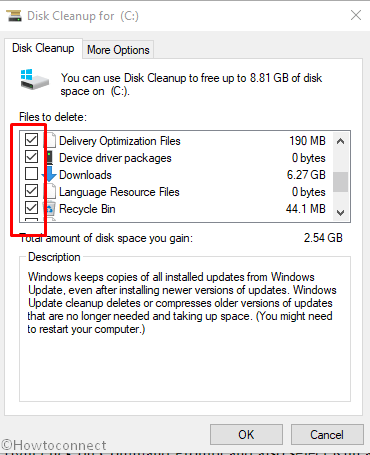
- When the Disk Cleanup for (C:) will appear, move ahead to Files to delete area.
- Check all the boxes against items and keep the Downloads unmarked.
- In this point, check the Recycle Bin once for any important thing as everything will be deleted. If have any, restore in safe place.
- Finally, select Ok button from the bottom of the window and let the cleanup begin.
- Restart the computer upon finishing and once head back to display, perform a check for errors.
Run DISM Tool in the Elevated Command Prompt and repair dreadful image files
Deployment Image Servicing and Management tool comes super handy for repairing defective Windows image files. We need to deploy this in elevated command prompt as these troublesome images can also cause VIDEO_MINIPORT_FAILED_LIVEDUMP Blue Screen error.
- Open the Taskbar Search and type cmd.exe in the box.
- When the results appear, do a right click on Command Prompt and also select Run as Administrator.
- User Account Control will ask for permission and hit Yes from there to give consent.
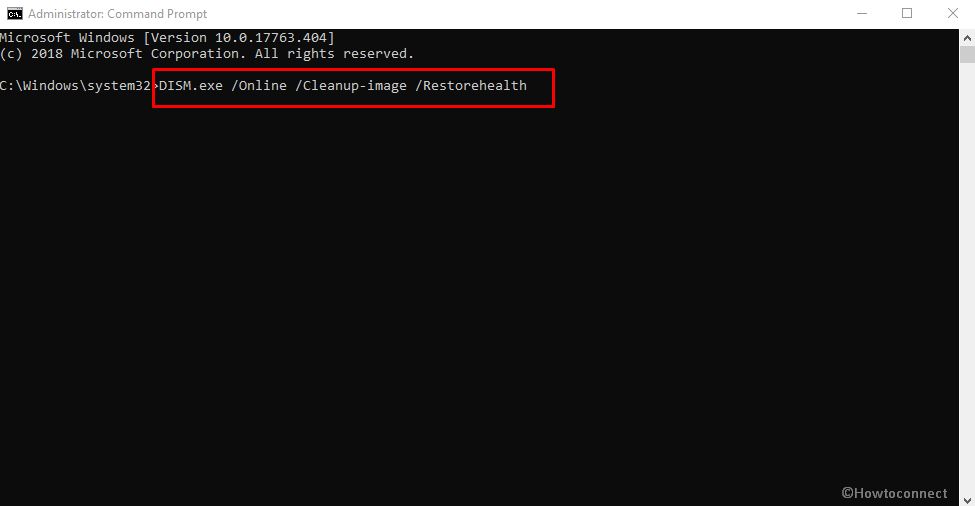
- On the black display, type the following command followed by tapping Enter key-
DISM.exe /Online /Cleanup-image /Restorehealth
- The process will start in a moment and it may take about 10 minutes. When completed, perform a restart to windows and after coming back to operation, see if VIDEO MINIPORT FAILED LIVEDUMP error persists.
Uninstall third party anti-malware tool if present
We have seen people suffering from VIDEO MINIPORT FAILED LIVEDUMP Blue Screen error due to having a third-party anti-virus program in the system. Since Microsoft provided Windows security to serve this sector, we can remove others from the system following the below steps-
- Do a combined press of Win+R keys and open the Run dialog on screen.
- Type appwiz.cpl in the box and also hit Enter button from keyboard.
- When Programs and Features window opens up from Control Panel, move ahead to the program in the list.
- Once found, select it and also hit Uninstall option form top overlay pane.
- Follow the on screen instructions to completely uninstall the program.
Repair the worse segments in the Hard Disk in Elevated Command Prompt
Sometimes, bad sectors in the Hard Disk can cause VIDEO MINIPORT FAILED LIVEDUMP and we can easily get rid of that by using the Disk checking utility. CHKDSK will check and repair those segments once you arrange the command properly.
- Open the Elevated Command Prompt using the above guidelines.
- When in the black window, type the command in following way at the base of winking cursor-
chkdsk [Drive:] [parameters]
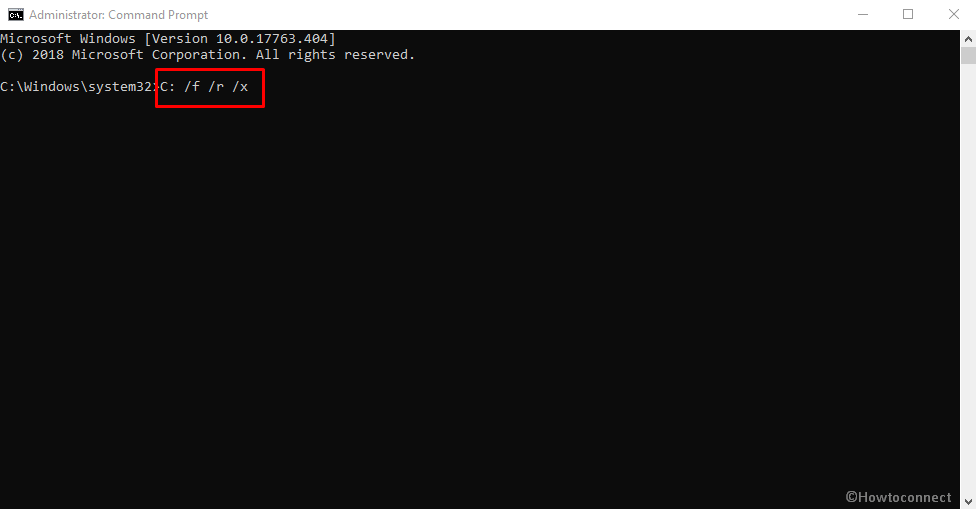
- After Hitting Enter key, the disk status will be shown. But for fixing the issues, arrange the commands in a way like below-
/f /r /x
Representation-
f for fixing the bad sectors present in volume.
r for detecting bad areas in the volume.
x for dismounting the Disk before process starts operation.
With all the representation, the complete command appears as- chkdsk C: /f /r /x
We have used C: as installed OS in this Drive. You can use others as D:. E: based on the installation of the Operating System.
- Now, Hit Enter button and start the process. This might take quite a long time and once finished checking, the worse segments will be automatically fixed.
This is all about resolving VIDEO_MINIPORT_FAILED_LIVEDUMP Blue Screen in Windows 10. If you cannot win over the error and fail to fix, can still perform Clean installation to recover the device from all issues. Before proceeding, ensure saving all necessary items in back up USB. If you feel nervous or being immature, seek help from skillful people.
How to Clean Install Windows 10 May 2019 Update Version 1903