What failed: wfplwfs.sys is a prefix of a Blue Screen of Death error that indicates that the issue has occurred because the system failed to handle this file. The bug check code might be Driver_Irql_Not_Less_Or_Equal, Page_Fault_In_Nonpaged_Area, Kmode_Exception_Not_Handled, and other. When this BSOD appears, system crashes and starts a bug checking followed by a restart. After the reboot, the stop code appears which tells what has actually happened with the Windows PC.
wfplwfs.sys is a built-in driver in Windows whose process is as WFP NDIS (version 6.30 Lightweight Filter Driver). This is a compressed file so there is nothing to worry about trustworthiness and security concerns. This blue screen error commonly occurs because of obsolete drivers, corrupted registry, conflict between components and files, threats, and attacks, flaws in disk drive, and outdated BIOS firmware.
Blue Screen error wfplwfs.sys BSOD in Windows 10 or 11
Here is how to fix wfplwfs.sys BSOD Blue Screen Error in Windows 10 or 11 –
Way-1: Update driver
wfplwfs.sys is an integral part of Windows 10 Education N x86 device. When the driver is not updated on time this file can create the bug check you are encountering. So, when the BSOD appears you need to give attention to the drivers. We are blessed that Windows provides Device Manager that works to manage the drivers to update, uninstall, roll back, and many more. Therefore, first of all, update all the obsolete drivers and see if this task makes a difference –
- Press Windows and R.
- Type – devmgmt.msc.
- Hit Enter to launch the Device Manager.
- On the Windows tool, double click on each of the items in the list successively. Check if any of them is showing a warning sign as Yellow exclamation mark. This mark will determine that the driver is outdated.
- If you come across the warning sign right click on the driver that is showing.
- Select – Update driver.
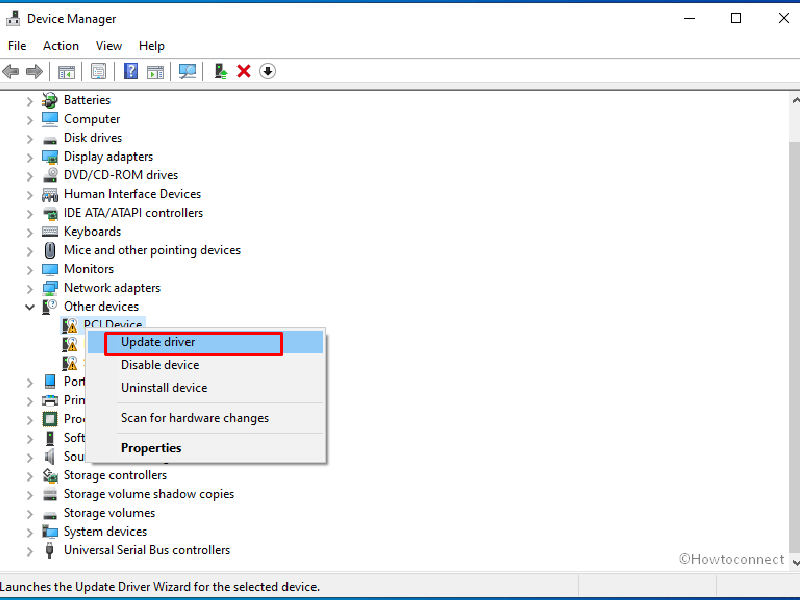
- Once a separate window opens, select – Install the best driver automatically.
- At last, reboot the device and see if the error is fixed.
- In case, the Blue screen still persists, again open the Device Manager and reach the driver you have updated.
- Right-click on the driver.
- Select – Update driver.
- This time click – Browse my computer for drivers.
- Choose – Let me pick from a list of available drivers on my computer.
- On the next window you will find a list of compatible drivers out of which one is selected; select Next.
- In the end, restart your computer.
See – How to update drivers in Windows 11 (Best ways).
Way-2: Disconnect the externally connected devices
Several times, only peripherals such as USB, external keyboard, mouse, etc connected to the Windows computer through ports can cause a blue screen error to occur. This is again due to outdated drivers of the devices. So, when you get the BSOD, disconnect the devices one by one and restart your PC every time. Whenever the bluescreen doesn’t show up the device is the culprit and you need to update driver of that one. Follow the guidelines –
- Pull out the cable of a device from port of the Windows computer and place in a nearby safe place.
- Restart the PC.
- If blue screen still appears, then pull out the next device.
- Restart system. If the blue screen does appear then this device is the culprit for the error.
- Go to the manufacturer’s website and download the latest driver.
- Install it by running the setup.
Way-3: Uninstall third-party programs
Windows incorporates sufficient programs by default to run the operating system appropriately. Some users require an extra bit of tasks that can be only performed by third-party applications. In this case, they might install a less trustworthy program culprit to bring up this Blue screen error. This problem might come up due to conflict between low coded programs and Windows system files. Solution to the error coming this way is removal of the program. So, follow the steps –
For Windows 10 –
- Hold down Winkey and press R.
- Type – appwiz.cpl.
- Hit Enter to open Programs and Features window.
- Find the program installed from third-party source.
- Right click on the program and select – Uninstall.
- Click Yes if prompted.
- In case, any uninstallation wizard appears, follow the instructions on that.
- Reboot the PC and check the error.
For Windows 11 –
- Follow the first two steps from above to reach Installed apps settings page.
- Find the third party program and click on 3-dots menu.
- Select Uninstall.
- On pop up, click on ‘Uninstall’.
Follow – How to uninstall apps on Windows 11 (Easy methods)
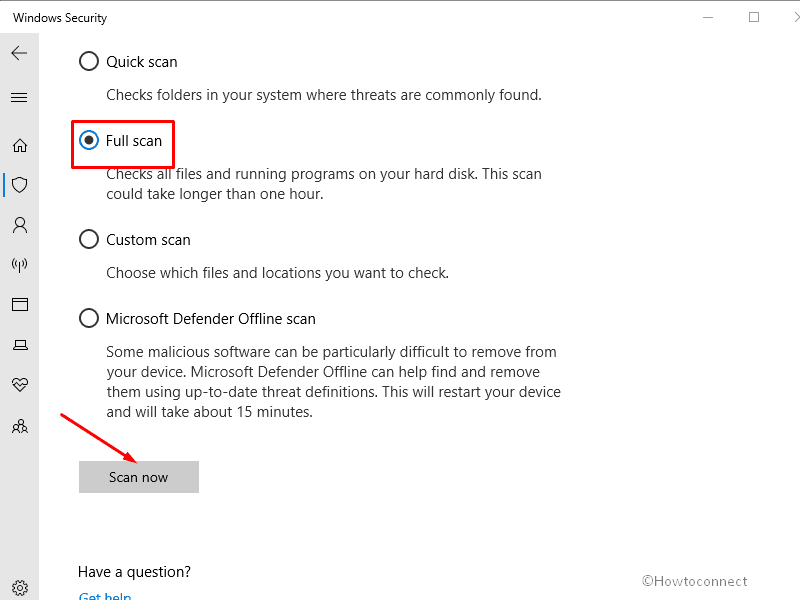
Way-4: Perform a full scan of Windows Defender
What is BSOD and which factors cause this error is a general question people want to know. Malware infection is one of the most common reasons that generate blue screen error. Once entered into the Windows, threats overpower the whole operating system taking administrator’s rights and soon they mess up the whole system, corrupt registry, and manipulate the file structure. Consequently, the computer restarts with BSOD. Solution to this problem is to quarantine the threats, so follow the guidelines –
For Windows 10 –
- Press Win + I.
- Select Update & Security.
- Now, click Windows Security from the left pane of the Settings.
- Go to the right and click on Virus & threat protection.
- From the next window, select Scan options.
- Check – Full Scan.
- Click – Scan now.
- Once the scanning is completed, you will receive a notification. Follow the instructions in order to clean threats.
- Sometimes, threats still exist; in this case, choose Offline scan
- Click on ‘Scan now’ and allow the system to restart.
For Windows 11 –
- Click on Start from the Taskbar.
- Type – ‘Virus & threat protection’.
- Press “Enter”.
- Click on ‘Scan options’.
- Select – ‘Full scan’.
- Click ‘Scan now’.
Way-5: Remove recent Windows update
The update is yet the most significant element of Windows sometimes it behaves in adverse way and ultimately becomes disastrous. The Windows update occasionally carries bugs and treats abnormally after being installed. The files can cause What failed: wfplwfs.sys in Windows 10 or 11. So remove the Update you have installed recently going with the below steps –
For Windows 10 –
- Press Winkey and R.
- Type appwiz.cpl.
- Press the Enter.
- Once on the Programs and Features window, click the link – View installed updates.
- Right-click on the update recently installed.
- Select – Uninstall.
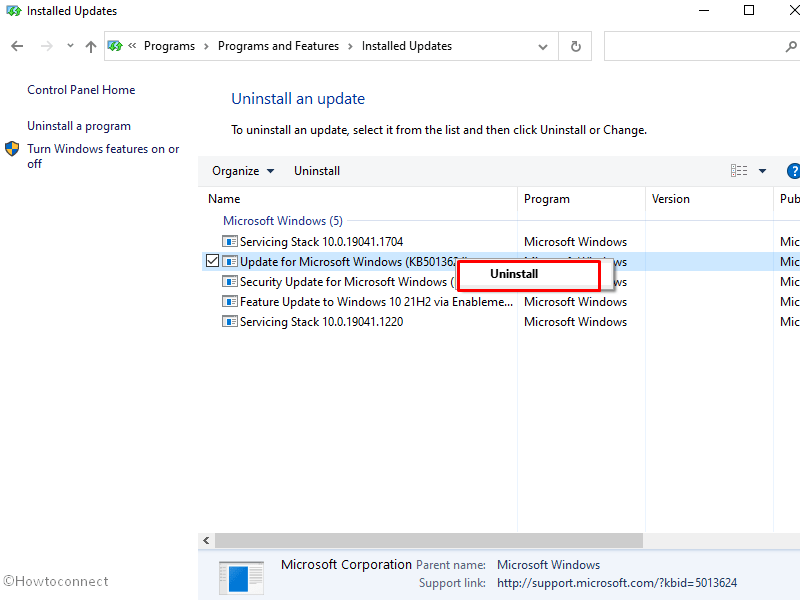
- Click on Yes.
For Windows 11 –
- Open Settings (Winkey+I) and Select Windows update.
- From the right side, click on Update history.
- Go down and click on Uninstall updates.
- Select ‘Uninstall’ and confirm.
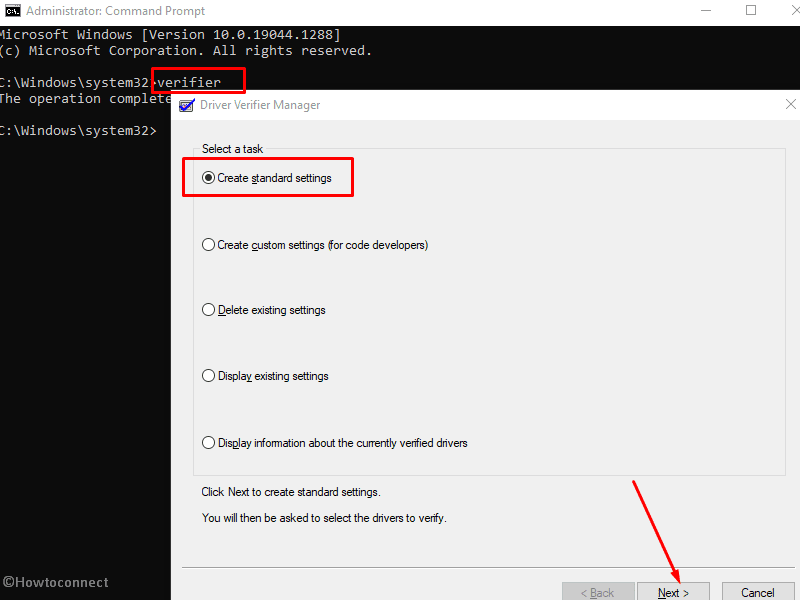
Way-6: Run driver verifier
Everyone knows Blue screen’s most prominent reason is drivers which might be outdated or buggy. Verifier will check all of the drivers and show you the malfunctioning one when used through command line. Further, you will have to install the latest version of the same to deal with this problem. So move forward with the steps –
- Click on – Start.
- Type – cmd.exe.
- Right click on – Command prompt.
- Select – Run as administrator.
- Type – verifier.
- Hit Enter to launch Driver Verifier Manager.
- Select – Create standard settings.
- Click – Next.
- Now choose – Automatically select all drivers installed on this computer.
- Click on Finish.
- Restart the machine.
- Once the result is shown, check which driver is causing problem.
- You can also use the Bluescreenview to check which driver is helping to trigger the error.
- Once found, update the driver.
- The best option will be to download the driver from the manufacturer’s website and install it manually.
Way-7: Update BIOS
This method will guide you to update the BIOS firmware in order to solve wfplwfs.sys bsod in Windows 11 and 10. This firmware refers to Basic Input/Output System that allows you to load Windows operating system on your machine. Once BIOS is outdated this may throw blue screen of death issue. So, when getting the error, install the current version of firmware using below instructions –
- Go to the official website of your laptop or PC.
- Complete the formalities to access the software download page.
- Find the BIOS and download it.
- After downloading is completed, install the same.
Way-8: Clean boot the PC
Since the most common reason behind wfplwfs.sys BSOD in Windows 11 and 10 is drivers, we should think about a way that may allow the least drivers when running the operating system. This method will minimize the risk of bug checking or other issues. Clean boot is such a method which loads a minimal number of services and drivers in order to save Windows from any error. The process is much easy so go ahead with the steps –
- Click on Search from the taskbar.
- Type – MSconfig.
- Press – Enter to launch the System Configuration window.
- Go to the Services.
- Check the box for Hide all Microsoft services.
- Click the button Disable all.
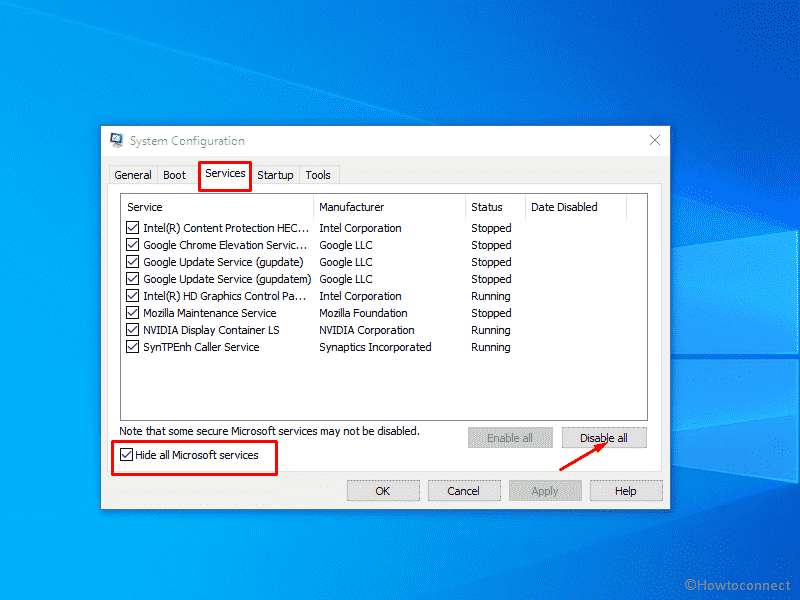
- Now navigate to Startup.
- Click the link – Open Task Manager.
- On the Manager, right-click on each item and select Disable.
- Close the Task Manager and come back to System Configuration.
- Click on Apply and OK.
- Select Restart.
- Once restarted check for the error.
Way-9: Run System file checker and DISM Tools
wfplwfs.sys Windows 10 or 11 error is the bug check issue that mostly appears when system files get corrupted. This corruption might start because of obsolete drivers, third-party programs, malware, buggy Windows update, and so on. However, you can remediate the problem with a built-in tool System File Checker. This utility checks the files in depth and if find corrupted, replace them with the fresh files from the cache folder. This method will also include running Deployment Image Servicing and Management tool that can correct the Windows image. See how can you run both tools –
- Press Windows and R keys simultaneously.
- Type – cmd.
- Now press – Ctrl + Shift + Enter.
- Click Yes on confirmation prompt.
- Once the command prompt appears, type
SFC /Scannow.
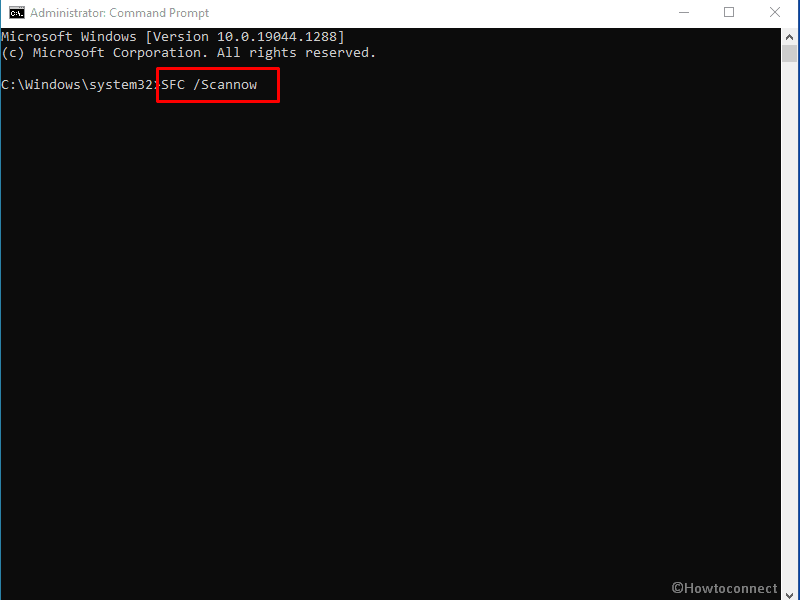
- Hit – Enter.
- SFC scan will take some minutes to complete. At last, restart your computer.
- After the reboot if you notice that the blue screen wfplwfs.sys continues to occur then again open the elevated command prompt as done in the previous steps.
- Type –
DISM /Online /Cleanup-Image /RestoreHealth. - Hit the Enter
- The DISM tool will start working and finish the execution in a few minutes.
- Reboot the system and check for the error code.
Way-10: Run System Restore
This method will tell you how to fix wfplwfs.sys BSOD or Blue Screen Error in Windows 10 or 11 using System restore. Windows provides an arrangement to revert back the operating system to any date and time when any trouble occurs. So once the problem is troubling you have the opportunity to restore the system to an earlier date anytime using the tool –
- Click on – Search.
- Type – rstrui.
- Press – Enter to launch the System Restore window.
- Select – Choose another date and time.
- Click – Next.
- One on the coming window, choose your preferable date & time.
- If you need additional entries in the list, click on Show more restore points.
- Now highlight a point by clicking on it.
- Select – Next.
- Finally, click on – Finish.
- If a verification dialog appears select – Yes.
Way-11: Use Disk checking tool
Oftentimes, flaws in disk cause the blue screen error wfplwfs.sys in Windows 11 or 10. Fortunately, Windows offers a built-in command line utility to fix the system crash generated due to the bad drive. Follow the method to run the tool –
- Launch Elevated command prompt.
- Type –
chkdsk C: /f /r /x. - Hit Enter.
- The command will start checking disk and restart the device.
- Wait to complete the process.
Way-12: Perform in-place upgrade
When you find blue screen error like wfplwfs.sys in-place upgrade might be of use for you. The process is different from the normal upgrade because this is a type of clean install that upgrades the system directly to the most recent version of Windows. As a result, there is no chance of any error or bug. Here are the steps for an In-place upgrade –
- Go to this page.
- Click on Download tool now under Create installation media.
- Launch the Setup.
- When the terms and conditions page appears, select Accept.
- Check the option – Upgrade this PC now.
- Click Next.
Methods list:
Way-1: Update driver
Way-2: Disconnect the externally connected devices
Way-3: Uninstall third-party programs
Way-4: Perform a full scan of Windows Defender
Way-5: Remove recent Windows update
Way-6: Run driver verifier
Way-7: Update BIOS
Way-8: Clean boot the PC
Way-9: Run System file checker and DISM Tools
Way-10: Run System Restore
Way-11: Use Disk checking tool
Way-12: Perform in-place upgrade
That’s all!!