Regardless of using a laptop or a desktop, the worst problem that will come after you is a network issue. Netizens nowadays cannot wait longer without proper internet connections in their devices for obvious reasons. This is the era of internet revolutions and all your scheduled tasks will be ruined in a minute after coming across a question mark on your Wi-Fi icon in Taskbar. Hence, WiFi not working in Windows 11 is a buzzing issue to date and it needs to be fixed immediately.
You might wonder why my laptop is not connecting to wifi Wi-Fi. The answer is WiFi may create issues in plenty of forms and all of them render only one problem, restricting network access. The most common causes responsible for such network problems are misconfigured settings and the faulty driver in Network adapters. Moreover, there might be numerous scenarios such as Wi-Fi switch, a software conflict, ISP problems, router trouble, and so on. Sometimes, it’s pretty easier to resolve and re-establish the WiFi network using very basic tips but the same can be really hard to get fixed in few cases. See solutions to a similar issue – How to fix Windows 11 Microphone not working (Solved!).
WiFi not working in Windows 11
Here is how to fix WiFi not working in Windows 11 –
Way-1: Perform a reboot
Restating the computer is one of the most basic troubleshooting ideas and it is proven to be effective. No matter what problem arises in your PC, simply reboot the machine and let it load the system to fix an issue. If WiFi not working in Windows 11, give the system a break and reload the associated programs, services by rebooting the device in the usual way. It’s worth trying since the network issue has got fixed so many times with this simple trick.
If the network issue doesn’t get fixed with restart, shut down the PC and check whether it helps. Whichever you want to perform, the process is almost similar. Here are the steps to follow –
- Save all ongoing tasks you were working with.
- Once on the desktop screen, press – Ctrl + alt + f4.
- When a new wizard shows up, either select – Restart from the drop-down list or Shut down.
- Click – OK.
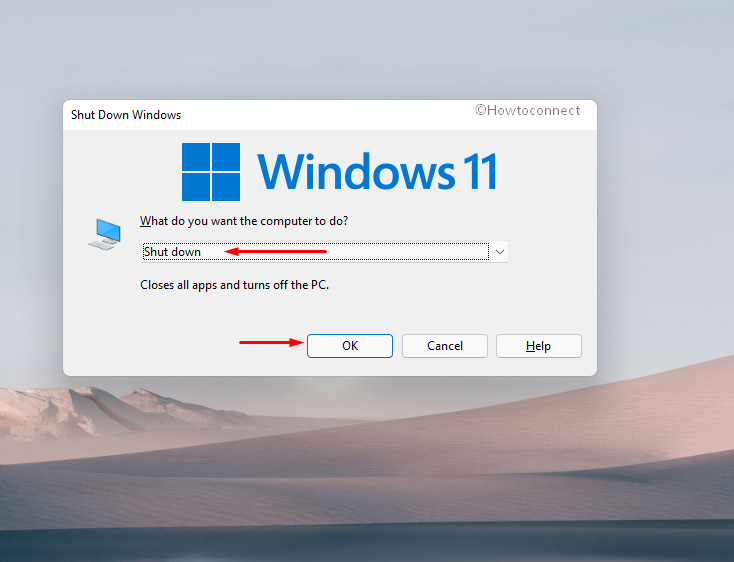
- If you opted for shut down, let the system power off completely.
- Wait for few minutes and then press the power button to turn on the device.
- When the system powers up, check if the WiFi is working fine.
Way-2: Restart the Router
Another most important step to take to fix wifi connection on laptop is to switch off the router for the time being. Usually what we do is, calling the network service provider helpline or send them an email. They come up with the same solution always, restart the router. To do so, follow the below steps precisely –
- Switch Off the router by pressing the power button.
- Unplug the socket from the router power connection.
- Leave in this state for some seconds preferably a minute.
- Plug the socket back and establish the power connection.
- Switch on the router now.
- Connect your Windows 11 device with the WiFi to check if the network is established now.
Way-3: Check the connection with router
If the cable is broken or the connection to the router is loose, you cannot expect the Wi-Fi to be there obviously. There are multiple points that help to establish a proper link between the router and modem. To make WiFi work perfectly, you have to ensure all of the plugs are closely fitted. Start with the connection of Ethernet cable with the modem or the router. Ensure it is not loose, firmly inserted into the ports, and securely snugged. Check the wiring for any physical damage like broken or torn apart.
If you are using a laptop, oftentimes there are shortcut keys for enabling and disabling the Wi-Fi connection. Those may be pressed by mistake and you can lose the internet connection. In some reputed brands, fn+f5 or fn+f2 keys are provided to turn on or off the Wi-Fi. Press them together once and check if the network connection is established now. Some laptops are provided with a special key with WiFi icon printed on it, try pressing that too. Furthermore, click the Action Center icon in the Taskbar and check if the WiFi tile is not grayed out. Click the same and choose the network if it was disabled.
Move the router from its usual position
Some devices cannot catch signal when located a bit far from the router or the modem. Suppose this is the case, try moving closer and check if the network connection is there now. Furthermore, household devices like a cordless phone, microwave oven, Bluetooth speaker, or home theatre are often found to interfere with the Wi-Fi signals. The reason is they have the same frequencies, i.e. 2.4 GHz or 5 GHz. For that, follow the below guidelines –
- Turn off the household devices mentioned earlier.
- Try connecting the Wi-Fi network with the computer.
- If it shows the network bar, move the router away from that household device and vice versa. Keep them apart so that they cannot block each other’s frequencies.
Way-4: Forget the specific Wi-Fi network and reconnect
Another revolutionary resolution that comes really effective in regards to fix WiFi issues is to forget a known network. When you do this, the WiFi will start from a clean slate after reconnecting. The reason behind it is, saved details from a known network can often be a bit tweaked and the connection gets lost or delayed. Corrupted information that you have entered at the beginning of choosing the network will restrict the internet from being connected.
When you choose to forget the known network and re-add, there will be an opportunity to re-enter SSID and the password that was changed in some ways. To accomplish this task, follow the below guidelines –
- Press – Windows key and I.
- Click – Network & Internet.
- Select – Wi-Fi located at the right pane.
- Next, click – Manage known networks.
- Look for the problematic WiFi network and click – Forget.
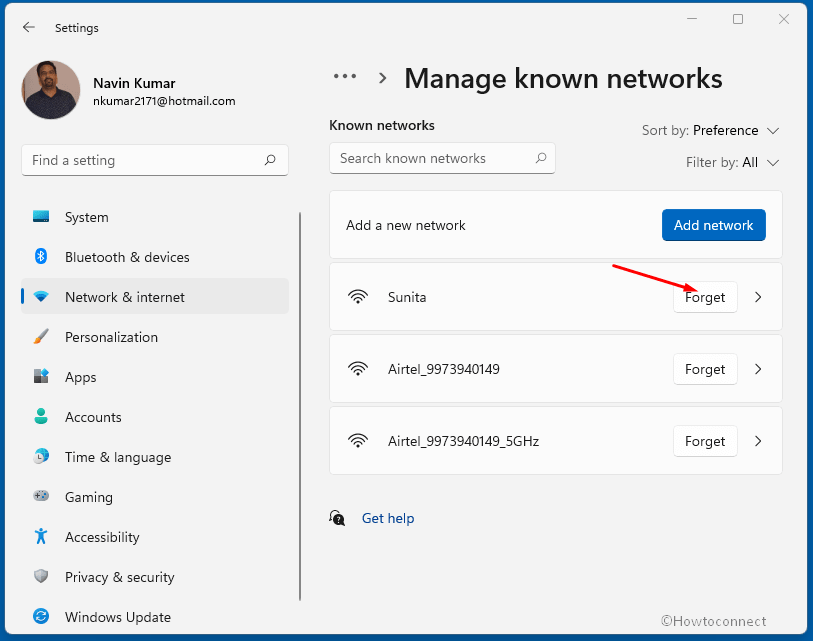
- Hit the back icon from the top left corner of the settings page.
- When you are back on the Wi-Fi settings page, click – Show available network.
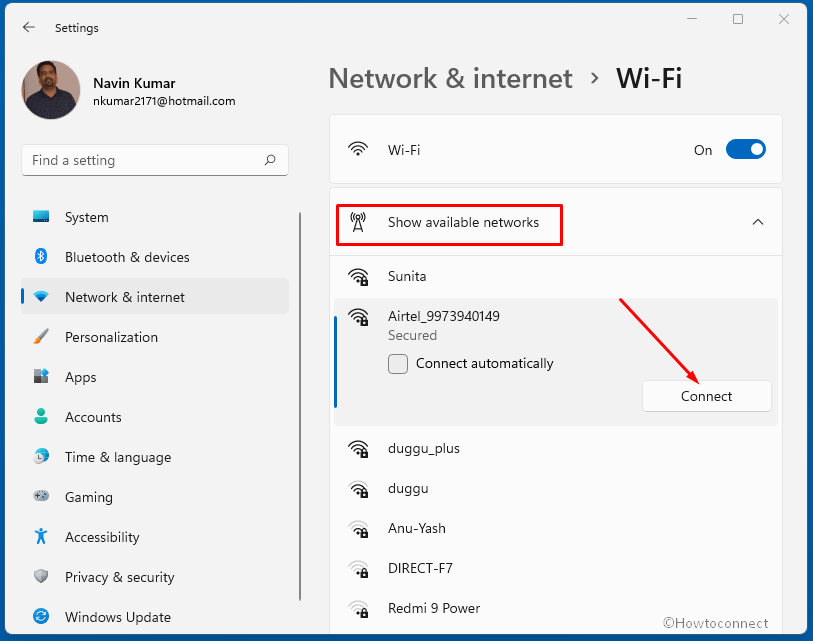
- Select the connection you removed earlier.
- Check the box that says Connect automatically.
- Enter the password and click – Next.
- Hopefully, the Wi-Fi network will be re-established now.
Way-5: Switch over Wi-Fi and Flight modes
While starting to troubleshoot a critical problem, you must start with the very basics. Switching over the WiFi and Flight mode is an extremely important solution for any network issue. Take the device to flight mode for a while and then turn off it, the internet connection might be re-established with this. To turn on the state, here are the steps to follow –
- Press – Windows + I.
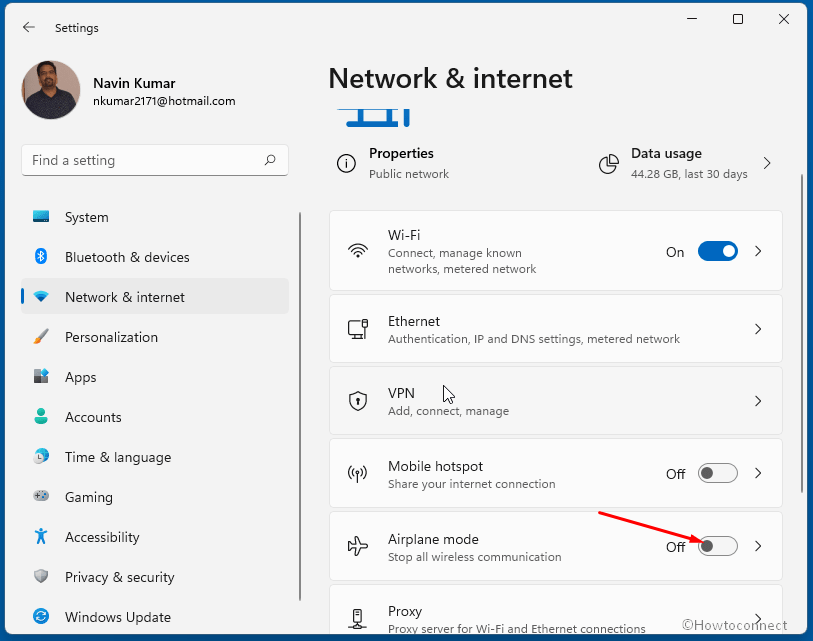
- Click – Network & Internet.
- From the right pane, turn on Airplane Mode.
- Now turn off the same and try to connect to the network through WiFi.
- Wait for one or two minutes.
- Turn off Airplane mode by switching off the toggle button in the same way.
- Connect the device with your Wi-Fi and check if it worked to fix the issue.
Way-6: Reset Wi-Fi adapter
Resetting the Wi-Fi adapter is another awesome troubleshooting idea for fixing network issues like wifi option not showing in Windows 11 or not working. With this, any recent and abnormal change happened to the WiFi adapter will be solved and it will be set afresh. This method will also work when WiFi is connected but internet is not working in windows 11. You can take help of this article for this – How to Network Reset Settings and Adapter in Windows 11. Furthermore, you can follow the below steps –
- Press – Windows+X.
- From Power User menu, select – Network Connections.
- Scroll down to reach the bottom section of the Settings page.
- Click – Advanced network settings.
- Select Network reset.
- Click Reset now.
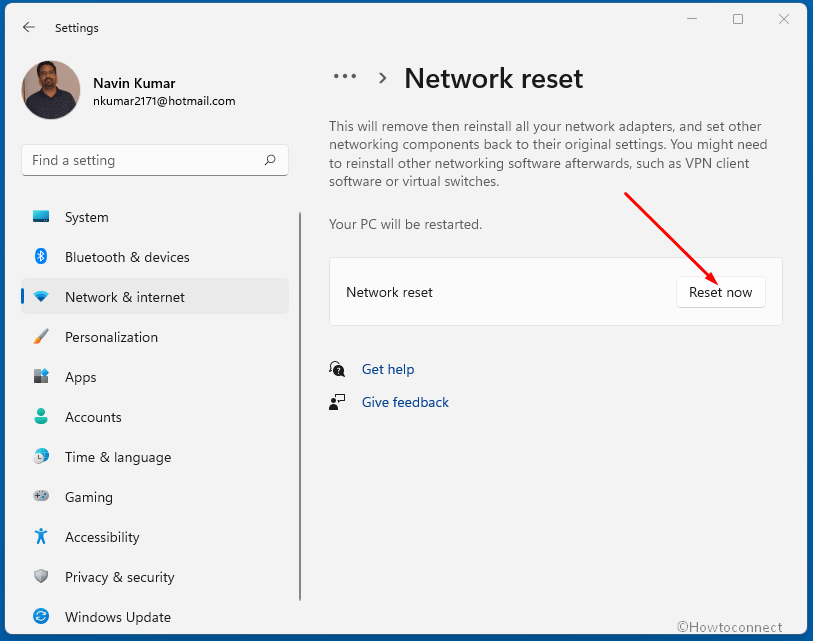
- For final consent, hit – ‘Reset now’.
- Click Yes when the confirmation prompt appears.
- Once the task ends, restart the device and check if the Wi-Fi is okay now.
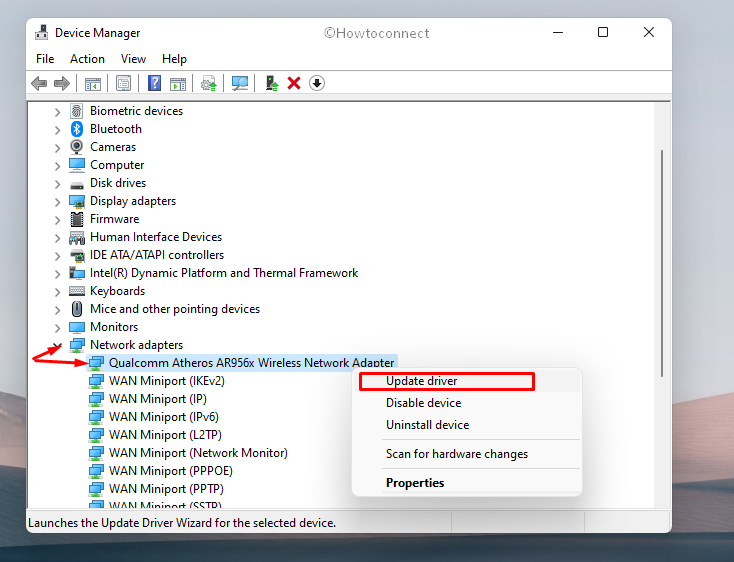
Way-7: Update the Network Adapter
Wi-Fi connectivity issue in most of the Windows 11 PC occurs only when the driver is obsolete. Drivers are the mediator between the hardware and software controlling them for their interaction. When the dedicated one gets outdated or becomes incompatible, data transfer does not take place smoothly leading to cause various trouble including WiFi adapter is not working in Windows 11.
However, you can carry out updating the drivers easily from the Windows Device Manager. For that, all you need is an active internet network. Since the WiFi is not working, manually connect the Ethernet cable to the device or make use of a modem. After ensuring network connectivity, pursue the below guidelines to update the drivers easily –
- Press – Windows key.
- Type – devmgmt.msc.
- Hit – Enter.
- Look for – Network adapters.
- Double-click the same to view its driver list.
- Right-click your Wi-Fi driver from the list.
- Select – Update driver.
- Opt for – Search automatically for drivers.
- Keep following on-screen guidelines until the task is finished successfully.
- After updating the driver, restart your Windows 11.
- Reconnect the ethernet cable to the router.
- Try connecting to the network and check if the issue is resolved.
Read – How to update drivers in Windows 11 (Best ways).
Note – If the system fails to find any latest version of wifi driver for Windows 11, search for the updated one manually by visiting the manufactures website.
Way-8: Reinstall Network adapter
If you have updated the network adapter driver using the above method, WiFi not working in Windows 11 problem should have been solved by now. You are here means, the problem is still there. For ensuring the smooth functioning of a device or hardware, what you actually need is a compatible driver that matches your system configuration. Since the updated version of wifi driver for windows 11 couldn’t fix the associated issue, re-installing the driver may help at this point.
Also, the driver update is received automatically in Windows 11, there is always a chance of installing defective or buggy software. If that happens, the system will be more unstable until you carry out rolling back the update or re-install the driver. Both of these tasks can be done with the help of the Device Manager. For that, follow the below guidelines –
- Right-click on Start button and choose – Device Manager.
- When it turns up, locate – Network adapters.
- Double-click the same to expand the driver list.
- Right-click your Wi-Fi driver and select – Properties.
- Go to the Driver tab.
- Click – Roll Back Driver.
- Doing so will bring back the previous WiFi driver.
- Reboot Windows and check for Wi-Fi issues.
If rolling back doesn’t work, try uninstalling the driver to get the default version of the same. For that –
- Open Device Manager.
- Expand the driver lists of Network adapters.
- Right-click on WiFi driver and choose – Uninstall device.
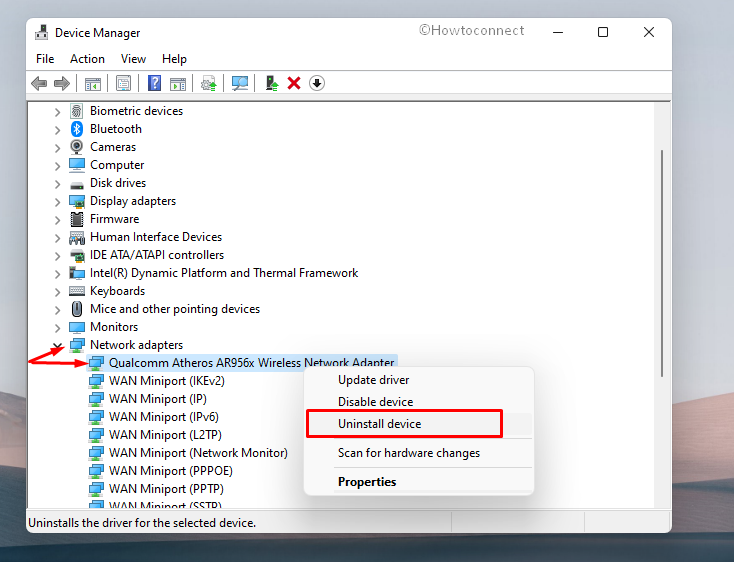
- To confirm the action, again click – Uninstall.
- Perform a reboot.
- When the system powers up, the default version of the removed driver will get installed automatically.
Way-9: Run the default Network troubleshooter
Troubleshooters are the most useful utilities in Windows Operating system as they can trace out any problem easily. Using such default resources is comparatively easygoing since the diagnosing tool goes through files and finds out what is actually causing the network problem. Moreover, the troubleshooter suggests an automatic fix depending on the scenario that helps to solve the issue on its own.
If Windows 11 WiFi not working occurred and you couldn’t fix it yet, run the dedicated troubleshooter right away. To do this, follow the below guidelines –
- Click the Start and select Settings.
- On the Settings app, go to the right side and scroll down and select Troubleshoot.
- From the next page, click – Other troubleshooters.
- Now find Network adapter and click on Run.
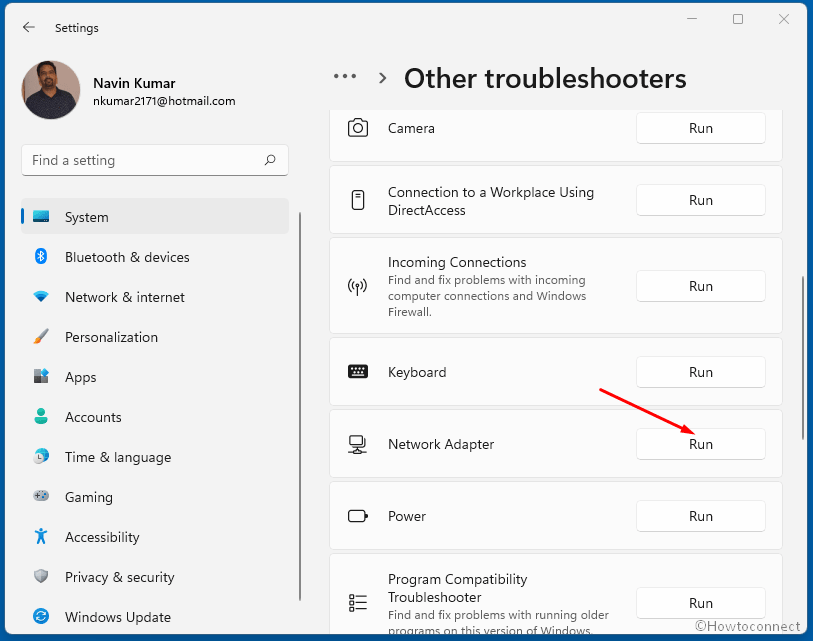
- When the utility is prepared, select the radio button set before WiFi.
- Click – Next.
- System will detect the issue and thereafter fix the found abnormality automatically.
- Once the utility confirms that the problem is fixed, click – Close.
Way-10: Flush the current domain name and Renew DNS
In order to fix WiFi issues in Windows 11, you can also flush the domain in use and ask the system to renew another one for use. This will be a very effective workaround as DNS cache can pile up and some of them can be corrupted somehow which causes the interruption in internet connectivity. For performing the flushing to the current domain and renewing DNS, follow the below guidelines –
- Press – Windows + S.
- Type – cmd.
- Right-click on Command Prompt appearing in the result and select – Run as Administrator.
- When User Account Control prompts, click – Yes to give consent.
- Insert the below command in the black window –
ipconfig /release
- Press – Enter key.
- This command will let the system release the currently stored DNS.
- Now, execute below commands one after another to reset the network IP Address, flush the current DNS and renew the DNS –
netsh int ip reset
ipconfig /flushdns
ipconfig /renew
- Close Command Prompt.
- Restart your computer to make the changes effective.
Way-11: Re-Enable Network Adapter Drivers
When WiFi not working in Windows 11, disable the Network adapter driver for a while and then again enable the same. Re-enabling will help the driver start afresh fixing unwanted glitches and may bring relief. To do that, follow the way –
- Press – Windows + R.
- In the command box, insert – device manager.
- Click – OK.
- Being moved Device Manager, locate – Network adapters
- Expand the device by double-clicking.
- Right-click your Wi-Fi driver from the list.
- Select – Disable device.

- Wait for a minute to give recovery time.
- In the same way before, enable WiFi driver.
- Restart Windows so that the changes can take place.
Way-12: Adjust the Power Management Settings
Power Management Settings in Network adapter can also hinder the WiFi connectivity in Windows 11 machines. There is an option called Allows the computer to turn off the device to save power that decides the way of handling network cards when the device enters into sleep mode. Suppose this functionality is turned on, Windows will put the network adapter to sleep when it will remain inactive for a specific period of time. Contrarily, the OS will always halt the network connectivity and re-initialize the network adapter when the option is disabled.
Therefore, make sure whether the discussed option of Power Management Settings is enabled in the computer and system is disconnecting the network due to inactivity. If you find it enabled, disable the same in order to fix WiFi not working in Windows 11 issue. Here are the guidelines –
- Right-click on the Start button.
- Choose – Device Manager.
- Find – Network adapters and double-click the same.
- Now, right-click on the Wi-Fi adapter and select – Properties.
- From the new popup window, click – Power Management tab.
- Make sure that the checkbox set before Allow the computer to turn off this device to save power is unchecked.
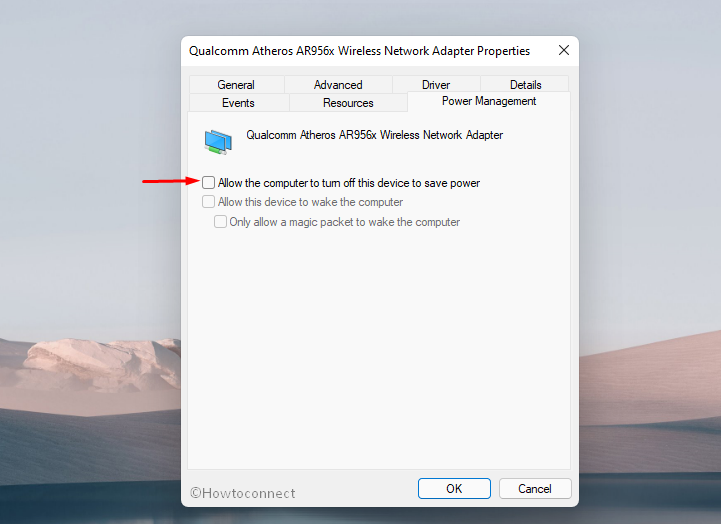
- Click – OK button to save the changes.
- Once done, restart your PC and see if it fixes the WiFi issue.
Tweak registry if Power Management tab is missing
In some computers, the Power Management tab is absent for a network adapter driver. In such a situation, go through the below steps –
- Press – Windows key and R.
- In the Run dialog box, type – regedit.
- Click – OK.
- Allow User Account Control by clicking Yes.
- When Registry Editor appears, navigate to the below path –
HKEY_LOCAL_MACHINE\SYSTEM\CurrentControlSet\Control\Power
- Find CsEnabled DWORD in the right column.
- If it’s not there, right-click on an empty area.
- Select – New =>DWORD (32-bit) value.
- Name the key – CsEnabled.
- Double-click the DWORD and change the value data to 0.
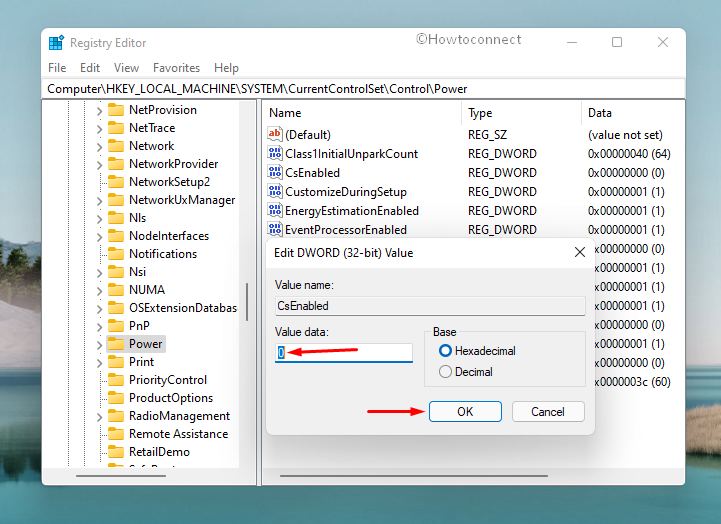
- Close the Registry Editor.
- This time you will get the Power Management tab for the driver properties.
- Now, disable Allow the computer to turn off this device to save power option as described above.
Way-13: Carry out Windows update
Oftentimes, Windows 11 renders some annoying trouble which is really intolerable whenever you are in the middle of important work. WiFi problems are such complications and you cannot proceed on from where you are stuck. Surprisingly, the root cause stays unknown in most cases and you won’t find a better way out. Checking for Updates and installing them at that moment came out to be effective.
Usually, the operating system carries out checks automatically and installs them if there is an internet connection with the device. But, this may not take place if there are WiFi connectivity issues of course. In such a case, you have to check for updates manually now and install them. As there is no internet connection, for instance, connect the Ethernet cable directly with the device. Having done that, follow the below guidelines to accomplish this task –
- Click Start.
- Type – updates.
- Press – Enter.
- Move to the right on appearing Windows update Settings page.
- Click – Check for updates.
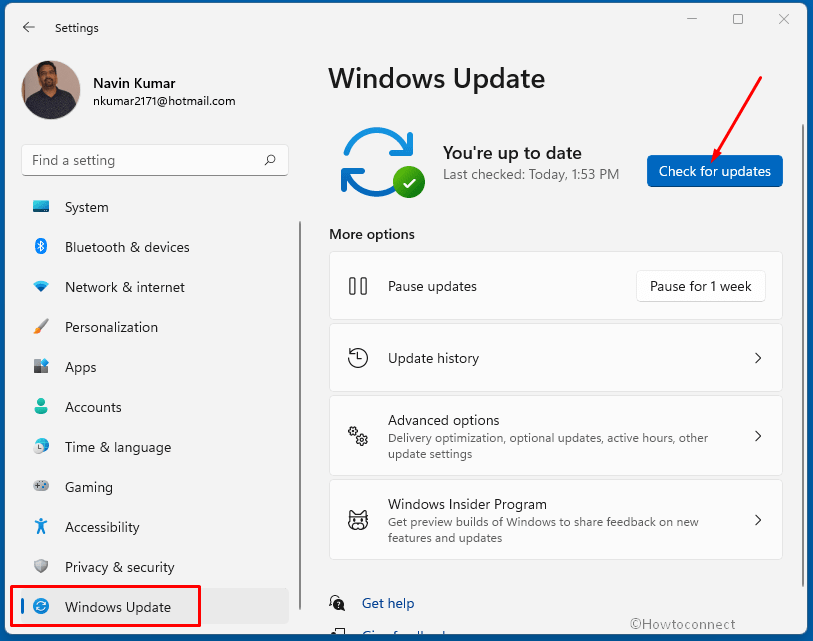
- If any patch is found, that will be downloaded and installed automatically.
- You might manually Restart the device to successfully finish the installation.
Way-14: Temporarily disable Windows Firewall
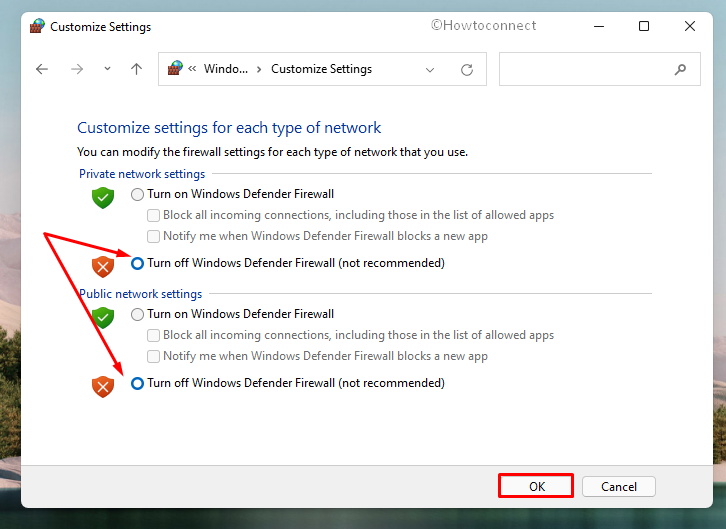
Windows Defender Firewall is an advanced security system that comes with MMC snap-in making it more flexible. It has a bit more functionality furthermore user-friendly as it can be accessed from the Control panel. However, the security suite can be a bit overprotective to the system oftentimes and block even some trustworthy sites. This is not a WiFi issue actually but we assume so.
Therefore, disable the Windows Firewall temporarily when WiFi not working in Windows 11 issue or the network is preventing some of the necessary websites from being accessed.
- Press – Windows + X.
- Choose – Run.
- In the command box, insert – control firewall.cpl.
- Click – OK.
- From the left column of the window, click – Turn Windows Defender Firewall On or Off link.
- Select radio button present before Turn off Windows Defender Firewall.
- Do the same for both Public and Private networks.
- Hit – OK to save the changes.
Way-15: Uninstall the troublesome patch
Some of the patches rolled out have been causing a few issues. Several users have encountered WiFi not working in Windows 11 just after installing update. It can happen so as there are previous records of such trouble in the past too.
The patches contain security improvement in them and there might be a chance that some of the files conflicted with the network adapter driver. For this reason, there is no internet connectivity or the desired Wi-Fi is missing in the list. To re-establish the network again, uninstall the recently installed patch from the computer. In Windows 11, you can do that pretty easily without making any abnormal changes to the system. Here are the guidelines –
- Press – Windows + S.
- In the search bar, type – appwiz.cpl.
- Hit – Enter key.
- Once on the Programs and Features window, click – View installed updates from the left.
- Scroll down through the update lists to reach Microsoft Windows section.
- Right-click the KB version you installed lately.
- Select – Uninstall.
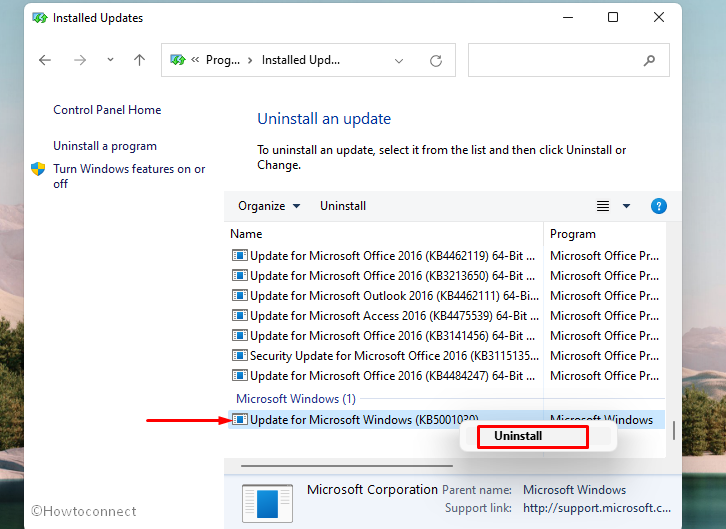
- To give final consent, again click – Uninstall.
- Follow further instructions that will come on the screen.
- After removing the patch, reboot Windows.
Way-16: Disable proxy server
Proxy server in a local computer acts as a negotiator between a solo user and the internet. The purpose is to make sure the utmost security, better-caching service, and improved administrative control. If you are using a proxy server for bypassing the beleaguerment and accessing the geo-restricted contents, there might be conflicts with the network adapter. Hence, disable the proxy server while WiiFi not working in Windows 11 and check if this helps.
- Right-click on Start button and choose – Run.
- Type – inetcpl.cpl.
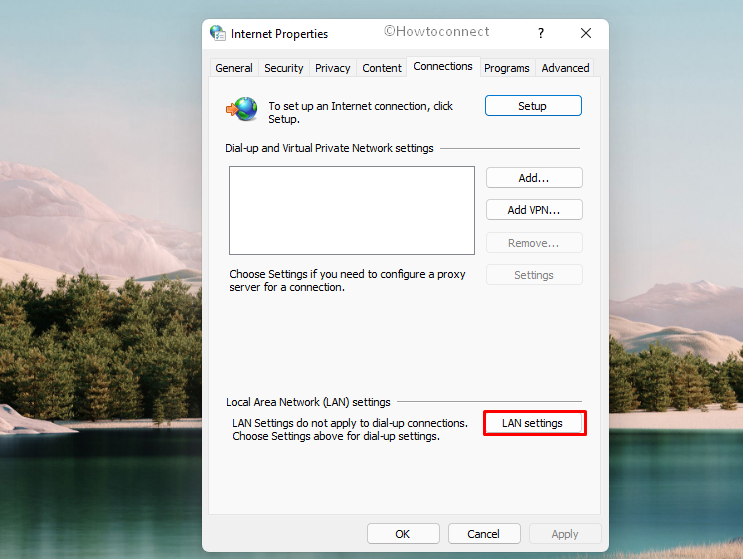
- After being moved to the Internet Properties popup, jump into – Connections tab.
- Click – LAN settings present under Local Area Network (LAN) settings area.
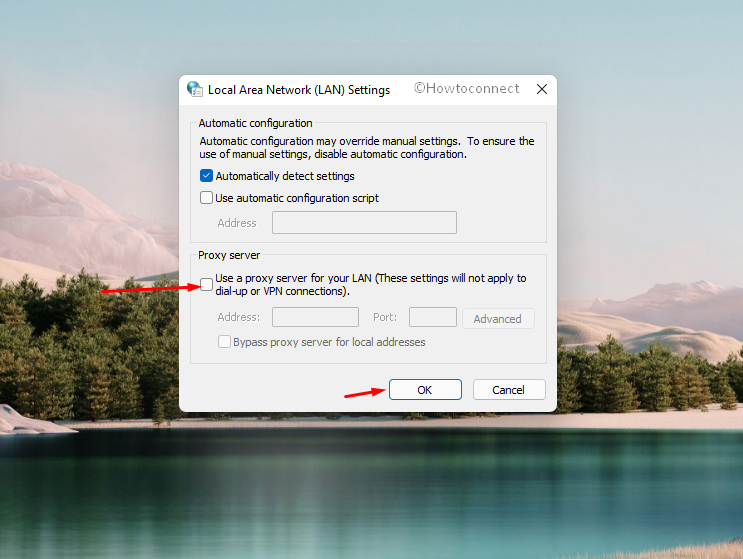
- When another pop-up prompt, uncheck the box set before – Use a proxy server for your LAN.
- Click – OK.
- After coming back to Internet Properties wizard, hit – Apply and then OK button to save the changes.
- Restart Windows 11 and check if the network issue is solved.
Way-17: Enable WLAN AutoConfig service
WLAN AutoConfig service is responsible to set up wireless networks including WiFi and other connectivity Settings. After enabling this service, it gets applied to installed IEEE802.11 wireless network adapter in the computer. The other benefit is, Windows will connect to the preferred network automatically when the internet is available. If your system is failing to make a connection with the WiFi or bringing forth any other related issue, enable WLAN AutoConfig service as troubleshooting.
- Press – Windows key.
- Type in – services.msc.
- Hit – Enter.
- When Services window shows up, go through the list and locate – WLAN AutoConfig.
- Right-click the same and select – Properties.
- Set the Startup type to Automatic.
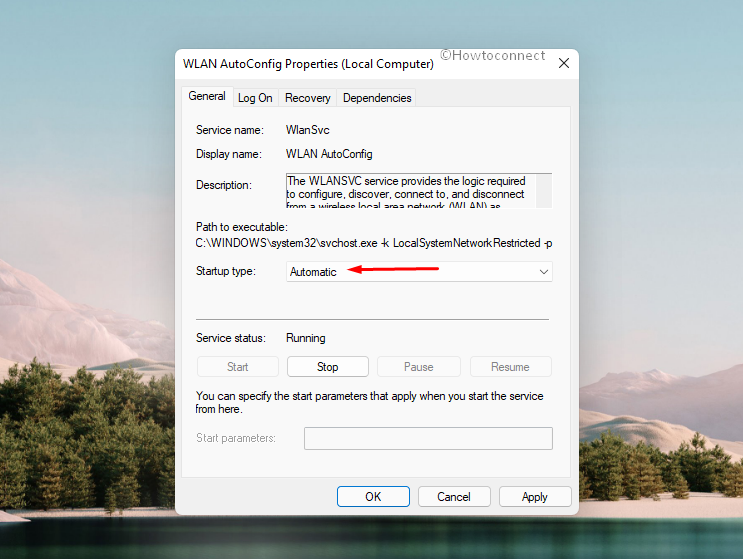
- If the service is not running already, click – Start button.
- Hit Apply followed by OK.
- Restart the computer and reconnect to the Wi-Fi network.
Way-18: Turn On SSID Broadcast for Wi-Fi network
SSID or Service Set Identifier broadcast makes the wireless network discoverable to the dedicated adapter. If this SSID is disabled for some reason, the specific Wi-Fi network will not show up in the list. Some people disable the SSID for security concerns so that others cannot find their networks and connect using VPN. If you have done this, your WiFi connection will not show in the list and the system will fail to connect.
What you can do in such a scenario is enabling the SSID for the first time at least to connect to that network. Initially, you have to configure the profile settings manually, provide a network name and change the Security type. Also, you will have to select the option that allows the system to connect with the saved network automatically. Once the changes are made, you don’t need to specify the configuration anymore. In order to enable the SSID broadcast for your Wi-Fi network, follow the below guidelines –
- Check the specifications of your wireless router and note down the IP address, username and password.
- Connect the internet to the computer using Ethernet cable directly.
- Access the browser and type the IP address in the address bar.
- Press – Enter key to proceed.
- When asked, provide the username and password.
- Click – Login.
- From the left column of the next page, select – Wireless => Wireless Settings.
- Move to the adjacent right side and check the box next to – Enable SSID broadcast.
- Click – Save.
- Restart the Windows.
- Once the device starts, reconnect to this network.
- Hopefully, the WiFi not working in Windows 11 issue will be resolved.
Methods list:
Way-1: Perform a reboot
Way-2: Restart the Router
Way-3: Check the connection with router
Way-4: Forget the specific Wi-Fi network and reconnect
Way-5: Switch over Wi-Fi and Flight modes
Way-6: Reset Wi-Fi adapter
Way-7: Re-Enable Network Adapter Drivers
Way-8: Flush the current domain name and Renew DNS
Way-9: Run the default Network troubleshooter
Way-10: Update the Network Adapter
Way-11: Reinstall Network adapter
Way-12: Adjust the Power Management Settings
Way-13: Carry out Windows update
Way-14: Temporarily disable Windows Firewall
Way-15: Uninstall the troublesome patch
Way-16: Disable proxy server
Way-17: Enable WLAN AutoConfig service
Way-18: Turn On SSID Broadcast for WI-Fi network
That’s all!!