Blue screen error is an astonishing issue because it appears all of a sudden without any hint. When the issue occurs, the system starts bug check showing its percentage and restarts in the end. Then a stop code appears on the BSOD from where you can not access the desktop or login screen. We are here talking about WIN32K_CRITICAL_FAILURE blue screen of death and going to provide its solutions. Bug check of this error has value 0x00000164 or 0x164.
Commonly Blue Screen of Death, known as BSOD, is generated because of malfunctioning, faulty, and obsolete device drivers. The stop code can also occur due to broken OS components or the missing system files such as .exe., .dll, .sys.
WIN32K_CRITICAL_FAILURE
Here is how to fix WIN32K_CRITICAL_FAILURE error in Windows 10 or 11 –
Way-1: Uninstall Windows Update patch
Unfortunately, a Windows Update patch may also trigger the WIN32K_CRITICAL_FAILURE BSOD error. Despite the patches being much important for the health of Windows sometimes they behave oppositely and cause problems. As a solution, you must uninstall the update immediately –
- Press Win+I to launch Settings.
- Click on Updates & Security.
- On the next window, select “View update history“.
- When the following window appears, click the Uninstall updates.
- The installed updates window will appear shortly.
- Please navigate to the last cumulative update in the list and right-click on it.
- Select Uninstall.
- Click Yes on the verification dialog.
Way-2: Update driver
We have already mentioned in the beginning that BSOD error is occurring just because of the defective and outdated device drivers. Not just in this one, but in different other system errors, drivers have a significant role to play.
All the system drivers in the Windows 10 or 11 get regular updates once Microsoft or OEM prepares the release. At times, some of them are left alone and can cause bug check issues.
One best utility to consider is the Device Manager to update them. It will display some problematic drivers with yellow warning marks. Here are a few steps you need to follow:
- Press Win + X.
- Select “Device Manager”.
- Look for the warning mark beside any device drivers.
- Once it is found, right-click on the one and select “Update driver.”

- On the window that appears, click on Search automatically for drivers.
- Restart the computer and check whether the BSOD still appears.
Way-3: Use Blue Screen Troubleshooter
No doubt that the occurrence of the BSOD error can bring some severe damage to the whole system. And if it is not resolved at the right time, this error can cause considerable damage.
To cut down the issue, Microsoft technicians offer a Fixit tool. This tool is known as Windows Blue Screen Troubleshooter and you can use this by visiting the official website page of Microsoft. Here are a few steps you need to follow –
- Visit the official website of Walkthrough Windows update troubleshooter.
- You can see a question – “When did you get the error”. Select the correct one from 2 choices.
- The next step will appear with a page on which a few instructions are mentioned to follow carefully for resolving the issue.
This is how you can detect the BSOD and resolve it in just a few minutes. It might take a longer time, but the results are incredible.
Way-4: Roll back Display driver
Default configurations in Windows 11 or 10 manage auto update for drivers and the same thing is applicable to the display adapters. However, it might happen that the latest version is buggy and a reason for the BSOD error.
You have to roll back the display driver to deal with this situation and this is how the BSOD error will be resolved. Here are the steps you need to follow –
- Click Start from the Taskbar.
- Type devmgmt.msc.
- Select OK.
- Double click on Display Adaptors.
- Search for the display driver and right-click on that.
- Now click “Properties.”
- Go to the Driver tab.
- Click “Rollback driver,”
- If warning pop-up prompts, click on Yes.
- Once done, restart the system.
- After restarting the device, you have to see whether the error persists.
Way-5: Update Intel HD Graphics driver
Most of the time, issue with the Intel HD Graphics driver often makes your system fall into the WIN32K_CRITICAL_FAILURE BSOD Error. If the same occurs with you, update the driver using Device Manager.
- Press – “Win+Q”.
- Type “devmgmt. msc”.
- Press “Enter,”.
- When Device Manager is open, step ahead to the section Display Adapters. Double click on it.
- Right-click the option of “Intel HD Graphics driver.”
- Select – Update driver.
- A window will prompt, click on – Browse my computer for drivers.
- Select – Let me pick from a list of available drivers on my computer.
- On the next window you will find 2 drivers in the Compatible drivers’ list – Intel (R) HD Graphics Family and Microsoft Basic Display Adapter. Click on Intel (R) HD Graphics Family and select Next.
- Once installed, restart your computer and see if the BSOD still persists.
- If the blue screen again occurs then go to the Device Manager > Display Adapters > Update driver > Browse my computer for drivers > Let me pick from a list of available drivers on my computer and select Microsoft Basic Display Adapter.
- Click on Next.
- After completing, reboot the PC.
Way-6: Run SFC and DISM
Corrupt system resources and missing DLL files will likely cause a BSOD WIN32K_CRITICAL_FAILURE error. Presence of low-code third-party apps, malware, or bugs might lead to corruption and break the files. Luckily, the System File Checker tool is available for you to resolve this right away. Here’s how you can fix the issue –
- Click the Windows key.
- Now type the command “cmd.exe.”
- Select – “Run as administrator”.
- Click Yes.
- After going to the command prompt window with elevated privileges, enter the following line “Sfc /scannow” without quotes.
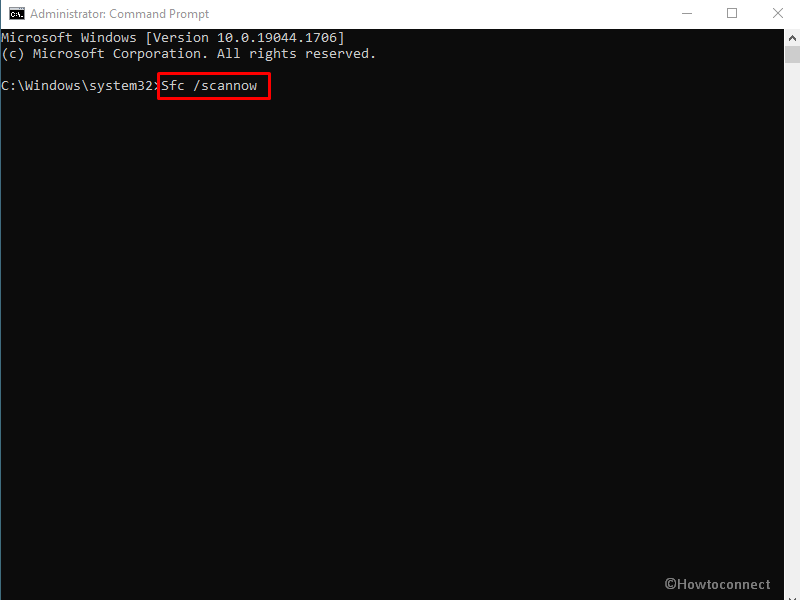
- Press Enter to start the System File Checker.
- The tool will repair all system components after implementation. Restart the Windows after this task.
- If the error still occurs after restarting the PC open command prompt as administrator.
- Type –
DISM /Online /Cleanup-Image /RestoreHealth. - Hit – Enter.
- Give it a few minutes to complete and reboot the computer in the end.
When the desktop restarts, check to see if the error is resolved!
Way-7: Uninstall third-party antivirus or app
Previously, more people were accustomed to free antivirus solutions to get rid of the malware. However, Windows security is now the most effective and efficient tool to deal with such problems which can be a reason for the blue screen error. It is not at all essential to make use of a third-party program in this whole respect.
Additionally, most of these programs can cause BSOD errors like WIN32K_CRITICAL_FAILURE. Therefore, if you have such applications, uninstall them immediately using the following instructions –
- Press Windows + R.
- Type appwiz.cpl.
- Select OK here to open Programs and Features.
- Locate the third-party antivirus or another app.
- Select by clicking on it.
- Click Uninstall.
- Follow steps on the display until it is completely cleared.
Way-8: Downgrade Nvidia driver
Sometimes, it might happen that the uninstallation of the display driver will not show significant results. Therefore, after the uninstallation of the driver, you have to downgrade it.
- Visit the official website of NVIDIA to download the driver’s setup. You need to search for the earlier version of the driver from the website.
- After downloading is completed, double click on the NVIDIA Driver setup and follow the on-screen instructions.
Way-9: Disable Automatic Restart
Once the BSOD Blue Screen Error starts to appear on your Windows 10 and 11, the system will eventually get into the propensity to reboot it automatically due to the default settings under System failure. Absence of a warning sign before the restart of computer will make it difficult for the user to handle things efficiently.
Modification in the default settings of the windows would help you deal with this action in just a few seconds. So, follow the steps –
- Press Win+S.
- Type advanced system properties.
- Press – Enter.
- As the window pops up, reach the Startup and Recovery region.
- Click Settings.
- Go to System failure part and then uncheck the box located before “Automatically restart.”
- Select “OK”.
Way-10: Run Full Scan using Windows Security
If you access any malicious site or click the spam mail links, threats can instantly enter your system. This might even cause the system files to go missing including DLL and EXE ones. And in the middle of everything, BSOD WIN32K CRITICAL FAILURE error might also occur.
To Prevent any threats, Windows security plays a significant role. Here are a few steps you need to follow:
- Press – Windows+S.
- Type – Windows security.
- Hit “Enter.”
- On the Windows security spp, you have to click “Virus & threat protection,”.
- Select – Scan options.
- Check Full scan.
- Click the “scan now”.
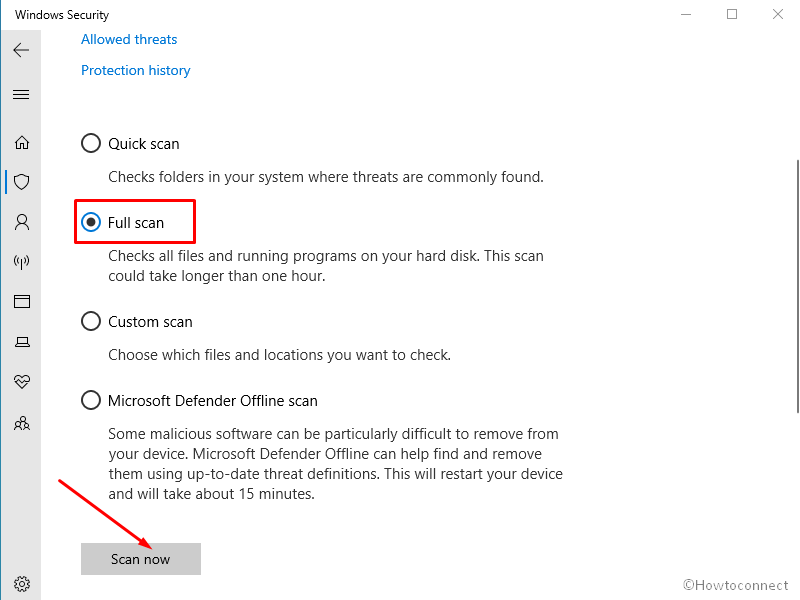
- System will thoroughly detect threats and after the scanning ends, result will arrive through notification.
- Follow the instructions in the notification to clean the threats.
Way-11: Disconnect the external Hard Drive temporarily
Several users complain that BSOD error is generated after they have connected the additional Hard Drive to laptop.
In most of the cases, the issue is solved after they disconnect the devices only. Are you ready to try it once? If yes then follow –
- Pull out the cables of external drives or peripherals from your computer.
- Restart the Windows 10 or 11 PC.
- Check if no error appears after the restarting.
- Check which device was causing the BSOD by connecting the device one by one after restarting every time. This way you will be able to find which device was the culprit.
- Go to the official website of the manufacturer of that device and download the latest driver.
- Install it and then restart your PC.
Way-12: Fix bad areas of the hard disk
If you are using any hard disk for a longer time, it might be possible that it can face some bad areas that can cause issues in its functionality. These sectors are a prominent cause to generate bug checking and Blue screen.
You can quickly fix this error by using the Disk Checking tool. For accessing the tool, follow the below-mentioned steps carefully:
- Click – ‘Search’.
- Type – ‘cmd’.
- Press – ‘Ctrl + Shift + Enter’.
- Select ‘Yes’ on the prompt.
- Once Elevated Command Prompt appears; type “chkdsk C: /f /r /x” (Remove quotes).
- Press the ‘Enter’.
- In just a few minutes, the process will come to an end.
- Once the process is over, restart the device.
Way-13: Remove unwanted junk
We all know that junk files are the ones that are constantly being generated in your system. Windows are using the junk files for executing different tasks. Junk files usually are stored on a hard disk, due to which extra storage can take up the hard disk a lot. This will allow the storage to run in the low space, and thus the operation speed gets hugely affected.
In the continuation, BSOD errors such as WIN32K_CRITICAL_FAILURE can also arrive. Using the Disk Cleanup tool, you can quickly delete or remove the junk files from your system. To fix the error, follow the below-mentioned steps –
- Press Win+Q.
- Type cleanmgr.
- Press Enter.
- Select (C:) from the dropdown menu on the small pop up
- Press ‘Enter.’
- On the Disk Cleanup wizard, click on “Clean up system files”.
- Again select (C:) and hit Enter.
- On the next window, go to the Files to delete area.
- Check all the boxes.
- Click the “OK”.
- Select Delete files to start the cleanup process.
Way-14: Start Windows in safe mode
When WIN32K_CRITICAL_FAILURE occurs on your computer safe mode can be a rescuer. This option will restart the system into the state where third-party apps and drivers have no place moreover least number of built-in programs work. This mode will minimize the chances of conflicts and corruption resulting in solving the BSOD.
This is a unique boot method in which the device only starts loading basic processes. So, follow the instructions –
- Press Win + S.
- Type msconfig.
- Press Enter.
- Click on Boot tab.
- Check Safe Boot.
- Ensure that Minimal is selected.
- Click Apply and OK.
- Select – Restart.
- Once booted in Safe mode continue your work.
So these have been a few effective methods that you can follow for fixing the WIN32K_CRITICAL_FAILUREBSOD Blue Screen Error In Windows 10 or 11. We are sure that you can resolve the error and run your device smoothly over the system with almost every method. If it doesn’t succeed, you can try to do a clean installation of Windows 11 or 10.
Methods list:
Way-1: Uninstall Windows Update patch
Way-2: Update driver
Way-3: Use Blue Screen Troubleshooter
Way-4: Roll back Display driver
Way-5: Update Intel HD Graphics driver
Way-6: Run SFC and DISM
Way-7: Uninstall third-party antivirus or app
Way-8: Downgrade Nvidia driver
Way-9: Disable Automatic Restart
Way-10: Run Full Scan using Windows Security
Way-11: Disconnect the external Hard Drive temporarily
Way-12: Fix bad areas of the hard disk
Way-13: Remove unwanted junk
Way-14: Start Windows in safe mode
That’s all!!