Windows update is pretty significant for the OS as it comes with security patches that keep you safe online and offline as well. Such updates not only ensure safety but also let you experience additional feature enhancements moreover improve PC performance. The process of getting an update in Windows 11 and 10 is independent if you haven’t changed the related default settings earlier. But oftentimes, the procedure gets stuck in the middle due to some error codes.
Error 0x80070003 generally occurs when the Windows update fails to install. Though the exact reason behind this Windows issue is yet to be known, there are some potential causes that are often found to be culprit. In most cases, the incorrect status of update related services causes such an error. Additionally, missing update files, malware infection, corrupted system components, old Spupdsvc.exe file, and incorrect time zone can prompt the same issue.
Windows 11 and 10 update Error 0x80070003
Here is how to fix Windows 11 or 10 update Error 0x80070003 –
1] Download Servicing Stack Update manually
For any update to install successfully Windows 10 and 11 requires having SSU already installed. So before proceeding ahead to the next methods install the Servicing stack update and check if the error is fixed.
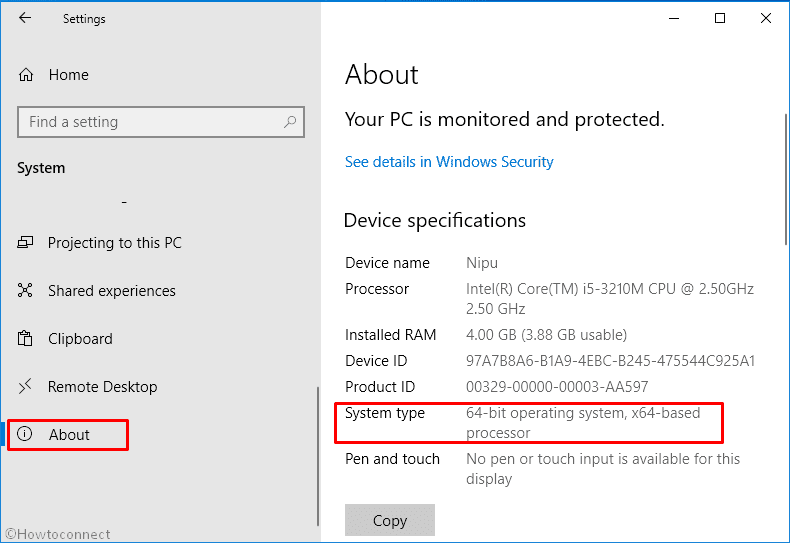
- Press – Windows + I.
- Click – System.
- From the left, select – About.
- Note down the System type present on the right-hand side.
Windows 11 users, open Settings=> Choose About from left to check System type.
- After that, visit the official webpage of update catalog.
- Click the search bar and type in the KB number of the Servicing Stack update.
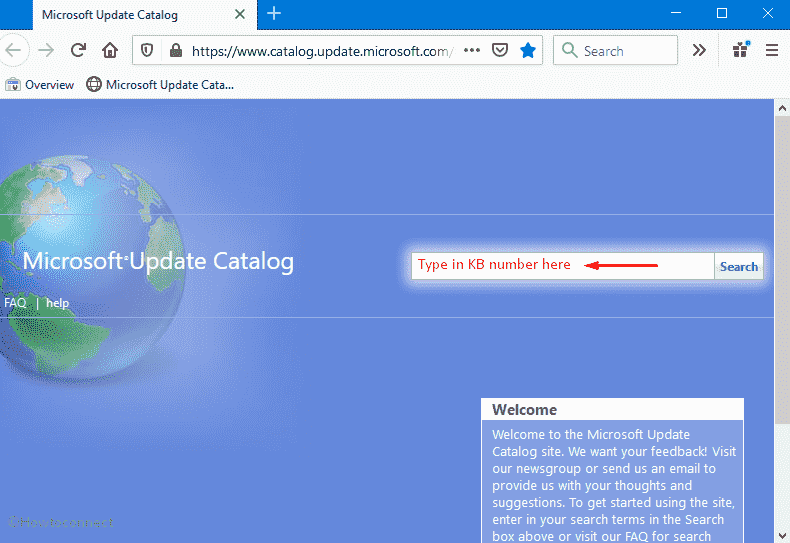
- Hit – Enter.
- Look for the Servicing Stack Update that matches the system type you noted.
- Click Download present next to the desired KB number.
- Double-click the downloaded item and install it following on-screen instructions.
- Restart Windows and check if the error still exists.
2] Run Windows Update troubleshooter to fix 0x80070003
To fix any kind of update error, Microsoft offers a troubleshooter that scans the full system to diagnose the real cause. Furthermore, it put forward automatic fix to resolve the error that you are getting while downloading or installing the new patch. Before running the troubleshooter, make sure you are connected with an active internet connection and then go through the below steps –
For Windows 10
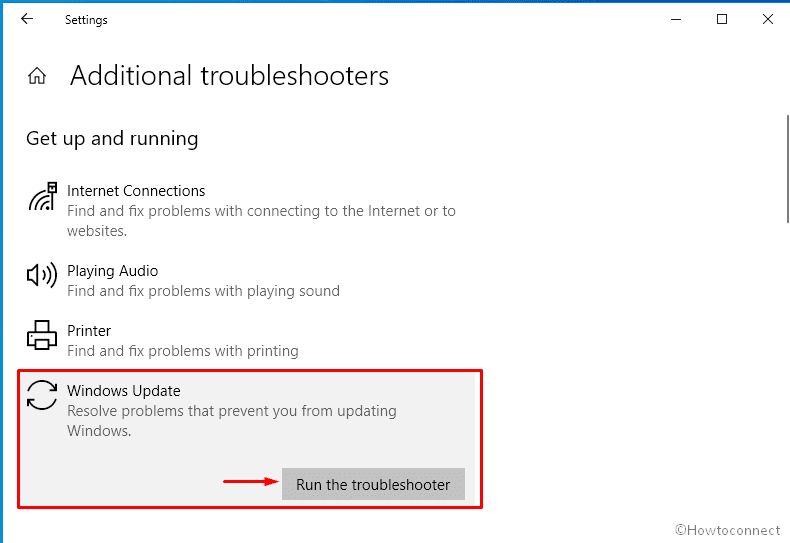
- Press – Windows + S.
- Type in – troubleshoot.
- Hit – Enter.
- From the right-pane, click – Additional troubleshooters.
- Select – Windows update.
- Click – Run the troubleshooter.
- Follow on-screen guidelines if any.
- When the utility suggests a resolution, click – Apply this fix.
- Close the troubleshooter and check for update error 0x80070003.
For Windows 11
- Press – Windows + I.
- Move to the right of appearing Settings page.
- Scroll down to find – Troubleshoot.
- Once you get it, select the same.
- From next page, click – Other troubleshooters.
- Hit – Run set beside Windows update.
3] Check the Windows update related services
Windows update service runs in the background and allows the system to download and install new patches automatically. Some other services like BITS, RPC helps in this procedure too. To get any update error-free, these services must run properly. Here are the steps to check the same –
- Press – Windows key.
- Type – services.
- Hit – Enter.
- From Services window, double-click – Windows Update.
- Set the Startup type to Automatic.
- If the service is not running, click – Start.
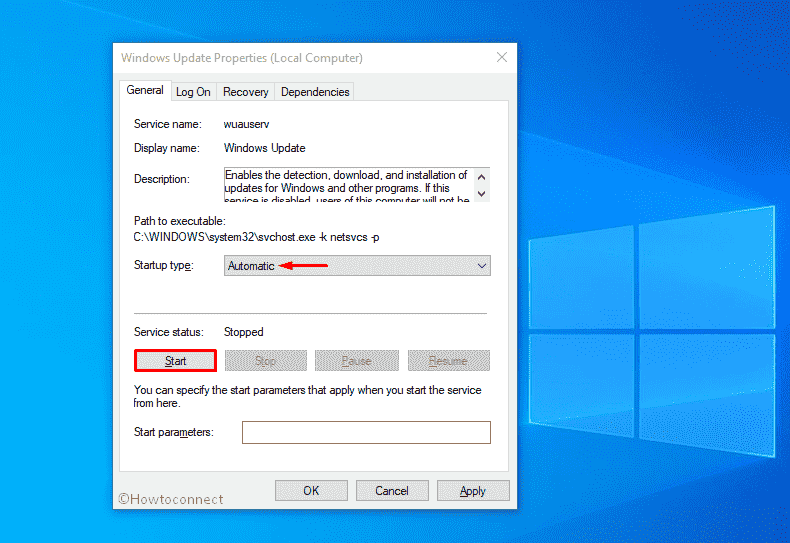
- Shift to – Log on tab.
- Click the radio button set before Local System account.
- Make sure the checkbox of Allow service to interact with desktop is unchecked.

- Click Apply and then OK.
- Do the exact same for Background Intelligent Transfer Service, Event Log, and Remote Procedure Call (RPC) services too.
4] Reset Spupdsvc.exe folder
Spupdsvc.exe is a genuine executable file from Microsoft and a part of RunOnce service. When a new patch becomes available, another process gets a notification and the system adds a RunOnce entry to the registry for spupdsvc.exe. This happens to perform necessary updates to Windows PC. The process is executed when the device restarts and the user logs on. If the system finds anything unusual with Spupdsvc.exe folder, update error 0x80070003 may appear. To fix it out –
- Click – Start icon.
- Type – cmd.
- Press – Ctrl + Shift + Enter.
- When a User Account Control shows up, click – Yes.
- In the elevated Command Prompt, insert the following –
cmd /c ren %systemroot%\System32\Spupdsvc.exe Spupdsvc.old
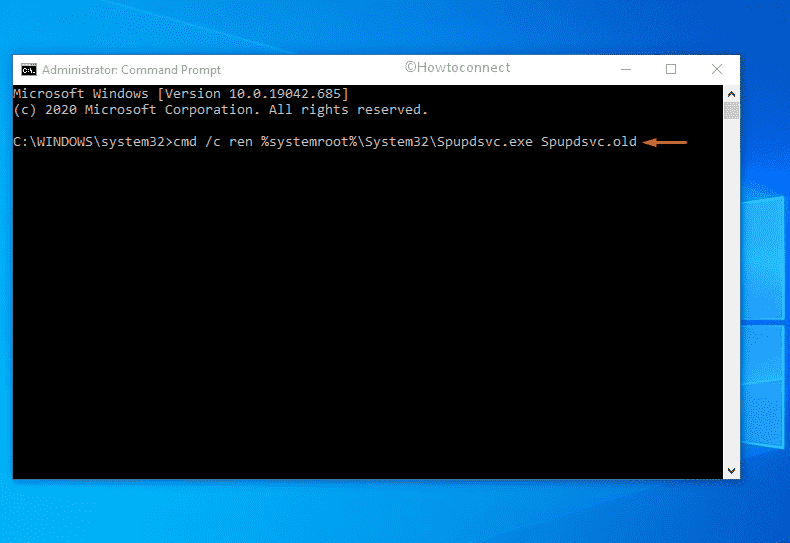
- Hit – Enter.
- Restart the device.
5] Restart Windows update services to fix error 0x80070003
As we said earlier, Windows update service is pretty crucial as it ensures the smooth functioning of the update process. After downloading an update, those files are being saved in the Software distribution folder for the time being. Sometimes if something wrong happens during the installation of update files, many of us try to download the same file again and again. As a result, they conflict with the existing one and end up causing update error 0x80070003. In order to fix the issue, you will have to restart Windows update service moreover replace the current Software Distribution folder with a fresh one. Here is how to proceed –
- Open Command Prompt as admin.
- In the prompt, insert the bellow command one after another and hit Enter after each one –
net stop wuauserv
ren c:\windows\SoftwareDistribution softwaredistribution.old
net start wuauserv
exit
- Reboot the system and check for update error 0x80070003.
6] Resolve existing system corruption
System File checker resolves the existing corruption as well as recover missing components. On the other hand, DISM is used to repair and make Windows image including Windows RE, Windows Setup, and Windows PE ready. Many people reported that, after running this utility, error 0x80070003 didn’t occur anymore and they were able to install the update without a hitch.
- Press – Windows + S.
- Type in – cmd.exe.
- Opt for – Run as administrator.
- To grant access, click – Yes.
- Type in – sfc /scannow.
- Hit – Enter.
- Once the procedure hits 100%, check the report thoroughly.
- If the corruption is fixed, restart the PC.
- Else, run DISM /Online /Cleanup-Image /RestoreHealth command in the same console.
- After completion of the scanning process, close Command Prompt.
- Reboot Windows PC.
7] Ensure correct Time and Date settings to resolve 0x80070003
Incorrect time zone many times gives rise to error 0x80070003 while installing a new patch. Therefore, it’s necessary to check if your current settings reflect the correct time zone. For that –
- Open Control Panel.
- Set the View by option to Category.
- Click – Clock and Region.
- From the right pane, hit – Date and Time.
- Shift to Internet Time tab.
- Click – Change settings.
- Check the box present before Synchronize with an Internet time server.
- Click – Update now.
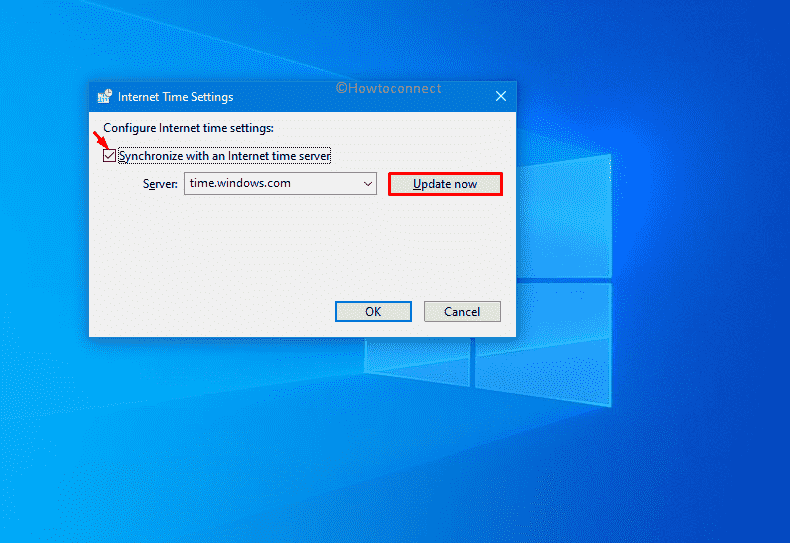
- Hit – OK to save the changes.
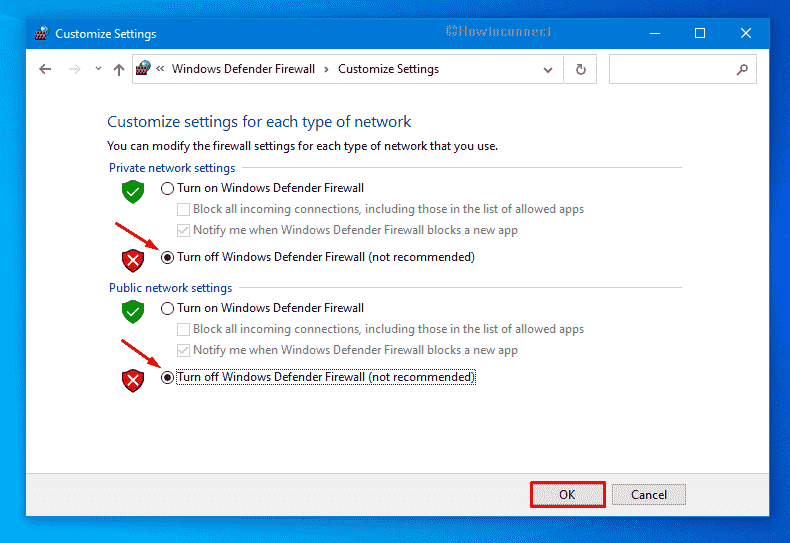
8] Disable the running antivirus program
On many occasions, the antimalware program you are using get a wrong idea about the update files and consider them as a threat. For that reason, the utility blocks the updates from being downloaded. To settle down the issue, you can put the antivirus program out of action. However, don’t forget to turn it on after installing the updates successfully.
Turn Windows Defender Firewall off
- Press – Windows + S.
- Type in – firewall.cpl.
- Hit – Enter.
- From the left column, click – Turn Windows Defender Firewall on or off.
- Select – Turn off Windows Defender Firewall (not recommended) for both Private network settings and Public network settings.
- Click – OK.
Disable third-party antimalware program
- Click the up arrow icon from the notification bar.
- Right-click on the icon of your antivirus software.
- Choose – Disable.
- Set a period of time that decides how long the tool will remain disabled.
9] Clean boot Windows to install updates without 0x80070003
All third-party software and services are not trustworthy and often create problems on Windows 11 and 10. When we end up installing too many similar programs, they conflict with each other which gives rise to several fatal codes. Update error 0x80070003 can be a result of the same. Clean boot lets the system start with basic programs and services, as a result, you will get to know if any third-party component really causing the issue. To clean boot –
- Click – Start icon.
- Type in – MSConfig.
- Hit – Enter.
- Select the radio button set for Selective startup.
- Uncheck – Load startup items.
- Shift to – Services tab
- Check the box present next to Hide all Microsoft services.
- Select – Disable all.
- Go to the Startup tab.
- Click – Open Task Manager.
- Right-click on each program that exists there and choose – Disable.
- Close Task Manager and go back to the System Configuration window.
- Click Apply first and then OK.
- Restart the PC.
Methods list
1] Download Servicing Stack Update manually
2] Run Windows Update troubleshooter
3] Check the Windows update related services
4] Reset Spupdsvc.exe folder
5] Restart Windows update services
6] Resolve existing system corruption
7] Ensure correct Time and Date settings
8] Disable the running antivirus program
9] Clean boot Windows
That’s all!!
I had same problem and solved with this way: I found ESD folder in C:\ drive that contains a Windows folder in it. So executed C:\ESD\Windows\setup.exe and setup downloaded updates then I upgraded windows with this setup (i did not lose any data including junctions to another drive if you don’t change default selected don’t touch my files option your files would be safe). I hope this solution fixes your problem too.