The simple process of Windows update might end up in complications making your system insecure and deprived of important improvements. The reason is error 0x800f0801 that obstructs the downloaded files to be installed on the PC.
Like most other update errors, this bug has the same characters but it usually doesn’t trouble to download the patches, preparing to install an early stage of installation. Surprisingly the installing fails at 60-70% progress bar. It could happen if there is a required file missing in the system or the installed files have a higher file version. Sometimes, it is an intermittent download because of an unstable internet connection as well.
Windows update Error 0x800f0801
Here is how to fix Windows update error 0x800f0801 –
1] Check the compatibility of system files using SFC scan
System component corruption can turn into the most notorious issue while installing the latest update in Windows 10. In the end, the system will terminate installing process followed by showing update error 0x800f0801. If this is the case, System File Checker is the only tool to obliterate corrupted components at the same time, will also recover missing elements. To run the utility, follow the below instructions –
- Press – Windows + R.
- In the Run command, type – cmd.
- Press – Ctrl + Shift + Enter.
- To allow User Account Control, click – Yes.
- When elevated Command Prompt turns up, insert –
sfc /scannowat the base of the blinking cursor. - Hit – Enter.
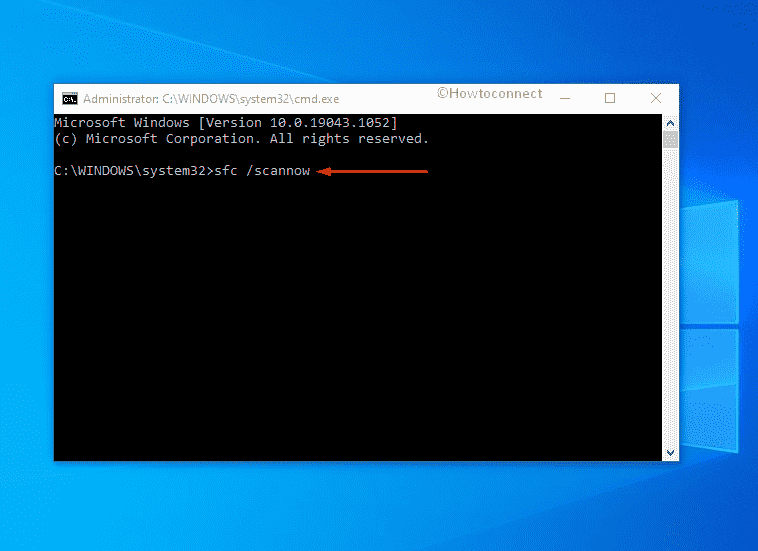
- Wait until the scanning process ends successfully.
- If the found corruption gets fixed, close Command Prompt and reboot the PC.
- Or else, do what the report says.
2] Check the device’s internet connectivity
For obvious reason, unstable network connectivity will never allow starting to download the update files. Oftentimes it might happen that, you may see the connectivity sign but there is no internet connection. In such cases, you will encounter the Windows update Error 0x800f0801 in the beginning. Therefore, it’s a dire need to check the proper connection before starting to check for updates.
To start preparing for the update, disconnect the device from the Wi-Fi network and reconnect to ensure the best functionality. In the case of Ethernet cable, perform unplug/ re-plug and check for new updates.
3] Re-adjust Date & Time Settings
Incorrect Date & Time setting in the device blocks installing the new updates sometimes even you manage to download those files somehow. Windows Update Error 0x800f0801 may occur even at the time of searching for updates as well due to invalid time settings. In most Windows 10 devices, time is adjusted automatically when the Sync option is enabled. However, if you have changed it to the manual, re-adjust the settings and try to install the update.
- Press – Windows key.
- Type – control.
- Opt for Control Panel.
- Make sure the View by option is set to Category.
- Click – Clock and Region.
- From the right pane of the appearing page, hit – Date and Time.
- Move to Internet Time tab.
- Click – Change settings.
- Check the box present alongside Synchronize with an Internet time server.
- Click – Update now.
- To save the changes, hit – OK.
4] Run DISM scan to repair image files
Some corruption in the Windows image files may occur at the time of saving them to the computer. The usual reasons are power surge or sudden crash of the device. However, these corrupted files are one of the greatest sources for causing Windows update Error 0x800f0801.
To repair these Windows images, Deployment Image Servicing and Management (DISM) tool is only the option. You can run the DISM scan in the system going through following steps –
- Click – Windows key.
- Type – cmd.
- When Command Prompt at the top of result flyout, click – Run as administrator.
- Give consent to User Account Control by hitting – Yes.
- Insert following commands in the black pane one after another and don’t forget to hit Enter after each–
dism /online /cleanup-image /scanhealth
dism /online /cleanup-image /checkhealth
dism /online /cleanup-image /restorehealth
- When the scanning process ends, reboot Windows 10.
5] Ensure you have utilized Windows Update Troubleshooter
Update error in Windows 10 is nothing new and it has come up from time to time with newer rollouts with different codes. Microsoft Tech team has come up with a default troubleshooter in the Operating System so that people can easily eliminate the issues and thereby continue installing update files.
If you have encountered error 0x800f0801, make sure to utilize the Windows Update Troubleshooter from the Settings app. It’s one of the most convenient ways to settle down the error. To proceed with the troubleshooter, follow the below guidelines –
- Open Windows Settings.
- Click – Update & Security.
- From the left sidebar of the imminent page, choose – Troubleshoot.
- Move to the right-hand side.
- Click – Additional troubleshooters.
- Opt for Windows update followed by clicking – Run the troubleshooter.
- Keep following on-screen instructions to continue.
- If the utility suggests an automatic resolution, click – Apply this fix.
6] Configure your Group Policy
Oftentimes invalid settings in your Group Policy affect the Windows Update process which leads to error 0x800f0801. To avoid such troubles, configure the Group Policy using below steps –
- Click search icon from the taskbar.
- Type – gpedit.msc.
- Hit – Enter.
- From Local Group Policy Editor window, navigate to => Computer Configuration > Administrative Templates > System.
- Find the entry labeled Specify settings for optional component installation and component repair.
- Double-click the same to open related settings.
- Select the radio button set next to Enabled and then click – OK.
7] Reinstall Microsoft .NET Framework 3.5
One of the most prominent reasons that will call upon error 0x800f0801 in Windows 10 eventually block the installing update files is an incompatibility in Microsoft .NET Framework 3.5. In search of resolving this trouble, reinstalling the same works effectively. To do that, follow the below instructions –
- Press – Windows + S.
- Type in – appwiz.cpl.
- Hit – Enter.
- When Programs and Features window appears, click – Turn Windows features on or off from the left sidebar.
- Put a tick on the checkbox resembling .NET Framework 3.5 (includes .NET 2.0 and 3.0).
- If another version is available, select that too.
- Click – OK.
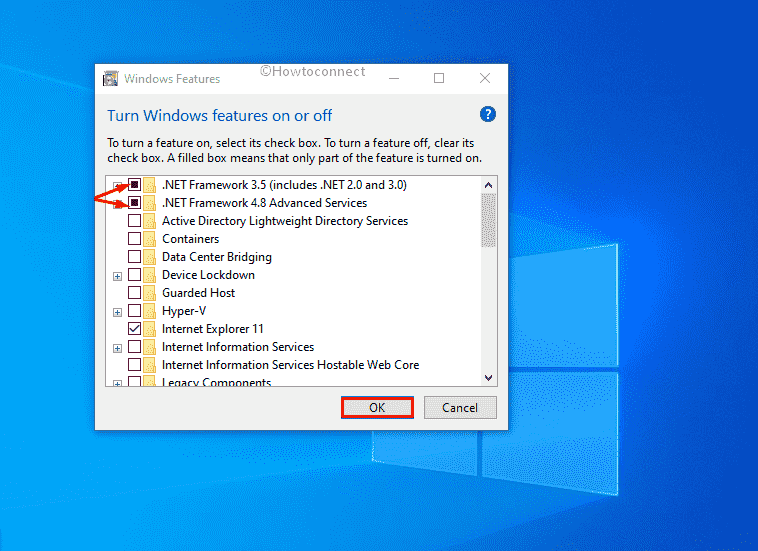
- After enabling .Net Framework successfully, try to update your Windows 10 machine.
8] Reset Windows Update components
A good number of services are necessary to function the Windows Update utility properly. When one or more of these services are unavailable by any chance or disabled, you might have complications in updating rollouts. Windows update Error 0x800f0801 is triggered sometimes due to invalid Windows Update components as well. Restarting the Services and resetting components will settle down the error hopefully and for that, follow the below instructions –
- Open Command Prompt as administrator.
- Copy the below command lines successively and paste them into the appearing black pane. Also, press Enter after each line –
net stop wuauserv

net stop cryptSvc

net stop bits

net stop msiserver

ren C:\Windows\SoftwareDistribution SoftwareDistribution.old

ren C:\Windows\System32\catroot2 Catroot2.old

net start wuauserv

net start cryptSvc

net start bits

net start msiserver
- Close Command Prompt and thereafter restart your Windows 10 device.
9] Temporarily disable Windows Firewall
Windows Firewall provides the safety of the system and we don’t really recommend this to be disabled usually. However, it may misconstrue some update files as malware and block the installation process. That’s how users come across Windows update Error 0x800f0801. Therefore, disable the feature for the time being until the installing takes place smoothly.
- In the Windows search, type – firewall.cpl.
- Hit – Enter.
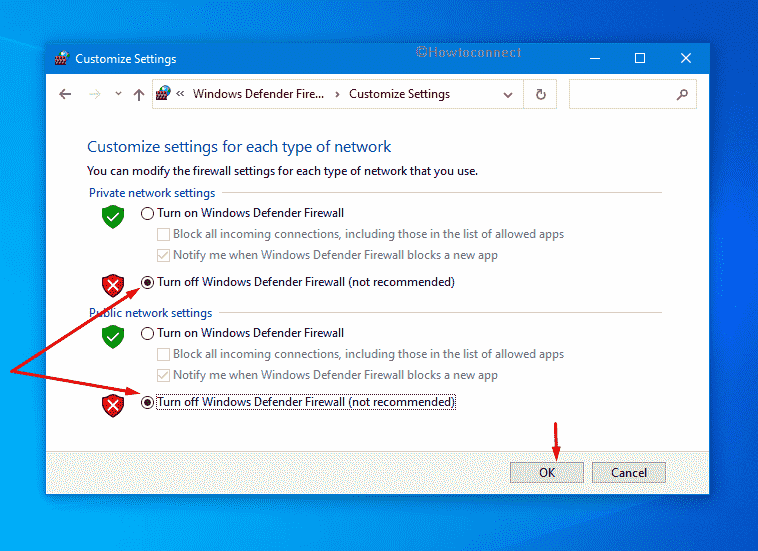
- When the dedicated window turns up, click – Turn Windows Defender Firewall on or off from left column.
- Select the checkboxes set before turn off Windows Defender Firewall (not recommended).
- Do the same for both Private network settings and Public network settings.
- To save the changes, click – OK.
10] Get rid of Problematic USB peripheral’s
Some USB devices like mouse, printer, and scanner often found to have a conflict with Windows updating process. There is no definite reason for which this happens and Microsoft also didn’t yet come up with an explanation. However, the easiest way to bypass this trouble is to unplug them if the Windows update Error 0x800f0801 comes in the way.
After finishing the installation process, restart the Windows 10 and plug back in the peripherals in the same order as before.
11] Install update in Safe mode
In some Windows 10 operated devices, error 0x800f0801 shows up due to third-party applications and services. In that case, the best way to continue installing updates is to Boot Windows in Safe Mode.
This is a special type of startup method where Windows leave out all the third-party programs, services, and settings. Windows starts with loading only basic as well as default features and that will aid in installing the latest patches smoothly. To boot Windows in Safe Mode, follow the below guidelines –
- Press – Windows key.
- Type – advanced startup.
- Hit – Enter.
- From the right pane of the dedicated settings page, click – Restart now.
- When the system powers up, select Troubleshoot => Advanced options => Startup Settings in turn.
- Once in the next window, click – Restart.
- Press either 5 or f5 key when the PC starts.
- Doing so will let your system boot Safe Mode with Networking.
- When the PC starts, check for updates to check whether the issue still persists.
12] Uninstall Third-party anti-virus suite
Third-party anti-malware suits in Windows 10 are not so necessary as for having Windows Security by default. However, some user wants to have additional security and install them. These often conflict with the built-in suite and cause havoc in the system. Some necessary files can be removed, corrupted leading to encounter error 0x800f0801 while updating to new rollouts. To stay out of unnecessary trouble, you can uninstall such anti-malware programs following the below steps –
- Right-click Start button and choose – Run.
- In the dialog box, insert – appwiz.cpl.
- Click – OK.
- When Programs and Features window prompts, look for the third-party antivirus program installed on your PC.
- Right-click the same and then choose – Uninstall.
- Comply with on-screen instructions to remove all associated settings completely.
13] Download the latest Windows Update Manually
Windows 10 usually receives updates automatically but there are times when the system ends up downloading broken or corrupted setup files. That is why you conflict errors like 0x800f0801 while trying to install the same. In such a case, you can download the standalone package manually and install the same without error if the package is not problematic itself.
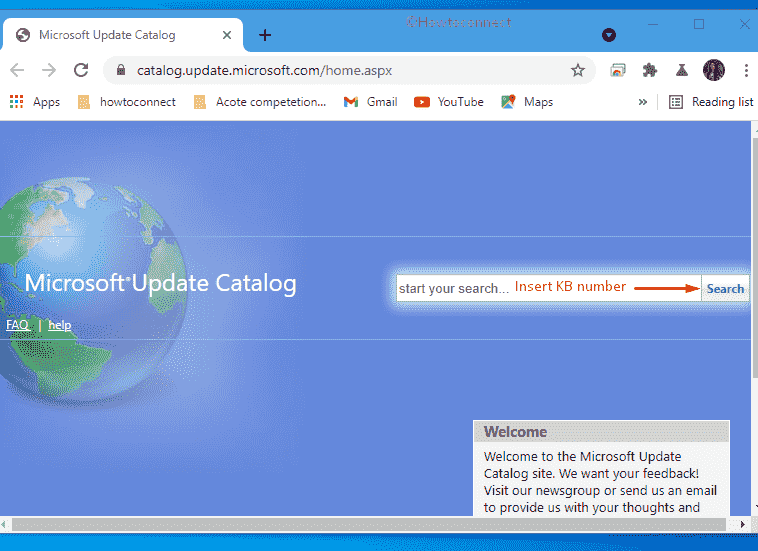
- Visit the webpage of Microsoft Update Catalog.
- Click the search bar of the website.
- Type the KB number you want to install.
- Click – Search.
- Look for the compatible setup file that goes with your PC specs.
- Click Download present next to suited version.
- From newly appeared window, click the link that ends with msu.
- If prompted, choose Save File and then click – OK.
- Visit the directory where the system saves downloaded items.
- Double-click the msu file you got.
- To approve User Account Control, click – Yes.
- Comply with on-screen instructions to complete installation process.
Methods list:
1] Check the compatibility of system files using SFC scan
2] Check the device’s internet connectivity
3] Re-adjust Date & Time Settings
4] Run DISM scan to repair image files
5] Ensure you have utilized Windows Update Troubleshooter
6] Configure your Group Policy
7] Reinstall Microsoft .NET Framework 3.5
8] Reset Windows Update components
9] Temporarily disable Windows Firewall
10] Get rid of Problematic USB peripheral’s
11] Install update in Safe mode
12] Uninstall Third-party anti-virus suite
13] Download the latest Windows Update Manually using Update Assistant
That’s all!!!