Users all around are little anxious about the high CPU usage from WUDFCompanionHost.exe in Windows 10. Tech nerds have tried few methods like updating all drivers, deleting temporary files and so on. Unfortunately, nothing worked meanwhile Windows Driver Foundation is taking over a huge amount of CPU utilization.
Windows Driver Foundation in short WUDFHost is indeed a group of libraries helping users to reduce the complication in case of Writing Drivers for Windows. It is the old name of Windows Driver Framework that pushes all the drivers to the User mode. In the process, the service is a must for maintaining the Overall stability of the whole system. Out of luck, if you are having issues with WUDFCompanionHost.exe, CPU usage shoots up and sometimes reaches 100%. Once it happens, you cannot even terminate the process through Task Manager. However, we are presenting a few quick-fix solutions to WUDFCompanionHost.exe in Windows 10 in the following segment. Read –
WUDFCompanionHost.exe in Windows 10
Here is How to Fix: WUDFCompanionHost.exe in Windows 10 –
Before jump into the workarounds, let’s check out some basic info.
WUDFCompanionHost.exe in Windows 10 is a Virus or not?
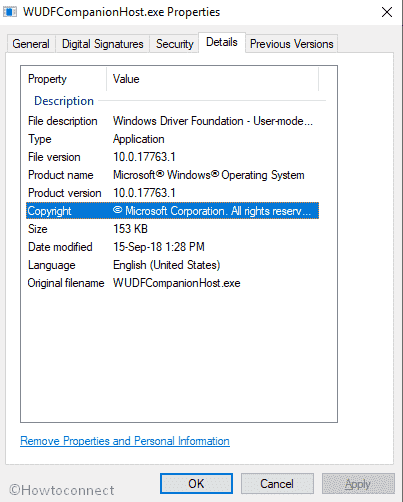
Executable files or EXE files are indeed necessary Windows elements and contains the formulae to open an application as designed by the developer. Being so important, Virus developers nowadays using this weakest chain to push Malware in PC. The intention is pretty much clear to steal important data and making trouble in the system. However, it’s not so complicated to distinguish between a .EXE file and a Virus as a disguise if you follow the below procedure –
- Open the Task Manager by pressing Ctrl+Alt+Del keys simultaneously.
- After it opens in a new Window, move forward to Processes tab and find out WUDFCompanionHost.exe in there.
- Once reached to it, perform a right click on it and select Open file location from options.
If the file is located in C:\Windows\System32\, this is a simple Windows component and essential for the operating system. For all other cases, the exe extension you are having is a malicious invader waiting to cause harm to the system. In this regard, you need to move through the following resolution processes and get your system back to normal functionality.
How to check a process getting high CPU Usage?
You can easily check whether wudfsvc.dll or Windows Driver Foundation is taking High CPU Usage. To know the exact percentage, follow the below procedure –
- Move the mouse cursor and do a right click on Taskbar.
- From the options, Choose Task Manager to launch it.
- Once opened in a new Window, hit the Processes tab and reach out to dll. This can also be there in the name of User-mode Driver Framework (UMDF) or sometimes wudfhost.exe alternatively.
If you find it consuming large CPU space, you need to put the resolutions from the Workaround section on immediate effect.
Workaround to fix WUDFCompanionHost.exe in Windows 10
Resolution-1: End task of WUDFCompanionHost.exe
This is not at all a permanent solution to this problem; however, can stop the issue from going further and restricts the error temporarily. Here is how to do it –
Step-1: Do a combined press to Ctrl+shift+esc Keys from the keyboard to open Task Manager.
Step-2: move on to Details tab in the page from the newly opened Window.
Step-3: Locate WUDFCompanionHost.exe in the visible list.
Step-4: Perform a right click on it once found in the list and Select End task from options to terminate the ongoing task.
Resolution-2: Perform a Full scan for Malware
Infection of Virus is one of the major reasons to cause the issue. Therefore, a full scan to the PC will resolve the error and you can get your computer back to error-free condition. You can put lots of third party Anti-Virus software into consideration but the best-suited one for this case is Windows Security Center developed by Microsoft for Windows 10. Follow the below steps to imply the resolution –
- Hover the cursor to the bottom left corner of the screen and do a Click on the Taskbar search.
- In the empty box, type full scan and wait for the result to load in.
- Once you see Virus & threat protection in the result, hit Enter on your keyboard.
- As a further step, choose the Scan options from the right pane.
- On the following window, select the radio button of Full scan and click on Scan now option to begin the scanning process.
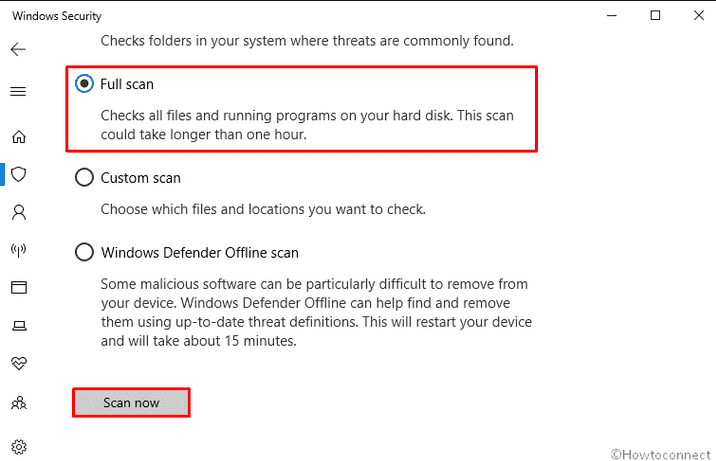
When the scanning process finishes, the system will notify you about the result. If there is any Virus found, you can also resolve them by following the on-screen instructions.
Resolution-3: Reinstall Wi-Fi driver from Windows 10
As we mentioned before, you can try updating all your Drivers to fix the issue and most cases people failed to resolve in this way. But, reports received from several corners that Re-installing the Wi-Fi driver have worked successfully. To do so –
- Press Win+X keys from the keyboard at a time and select Device Manager from the list.
- Once it opened in a separate window, reach out to your Network adapters.
- Make a right click on the desired Wi-Fi adapter and Select Uninstall device option from there.
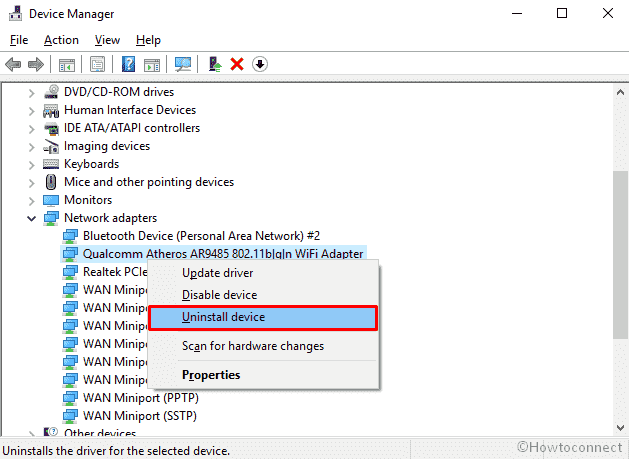
- Also, choose Uninstall once UAC popup floats up on the screen.
- Reboot the Windows after uninstalling the driver completely complying with on screen instruction.
Hopefully, the fix will work and you can retrieve your CPU space in the process.
Resolution-4: Disabling SDO Sensor along with other problematic devices
In case of a Touch screen device, WUDFCompanionHost.exe in Windows 10 error can occur due to SDO sensor. Therefore, disabling this will be legit to resolve the issue. Follow the below procedure for that –
- Move the cursor to the Taskbar search box and do a click on it to edit.
- Type Device Manager in the box and select it once visible in the result.
- When it comes into the view, try locating the SDO sensor from the list.
- Once found, do a right click on it and select Disable device option.
- While Confirmation dialog hangs on the screen, select Yes to proceed.
Note- This is a Gentle admission that, once you have disabled the SDO sensor, you might not be able to run it again in your device. But the issue with high CPU usage will completely resolve as reported from various users and tech experts for Intel Wireless Gigabit 17265.
Resolution-5: Run System Performance Troubleshooter
Running Troubleshooter through elevated Command Prompt is a handy option to resolve the error too. To do this –
- Press of Win+R hotkeys to invoke Run dialog on screen.
- In the empty box there, type cmd and hit Enter button.
- When the Command Prompt opens, type
msdt.exe /id PerformanceDiagnosticat the base of blinking cursor and press Enter.
Troubleshooting will start immediately and it will boost the speed as well performance of the machine by adjusting the necessary settings.
Resolution-6: Disabling NFC Feature
Though NFC is a handy feature you a device, it has some issues with Windows Driver Framework. Therefore, as a resolution, you can disable this feature only using the Settings app. the steps are as follows –
- Open the Windows Settings app by tapping Win+I keys.
- Once the app hangs on the screen, move along to Network & Internet section and make a click on the tile once highlighted.
- After proceeding forward to the next page, choose Airplane Mode from the left and jump up to the alongside right side pane.
- Disable NFC from there by toggling the switch.
If this process doesn’t work in your case; you can go through the Device Manager and disable it too. For that-
- Open the Device manager as shown earlier.
- Reach out to Proximity devices section and disable Disable the proximity device.
With this act, NFC will be disabled automatically and resolve the issue entirely.
Resolution-7: Troubleshoot in Clean Boot State
Clean Boot is a great utility to resolve the problem. You need to log in as Admin for this case. The process is as follows –
- Press Windows + R to open the Run window.
- Enter the command ‘msconfig’ and press Enter in the void text field located next to Open.
- Once the System Configuration window appears, stay in General tab and then click Selective Startup.
- Clear the Load startup items check box.
- Make sure that you have checked Load system services.
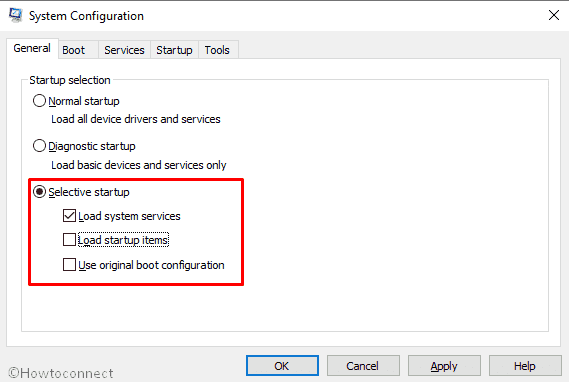
- Now under Services tab, choose the option that says Hide all Microsoft services and then click on Disable all.
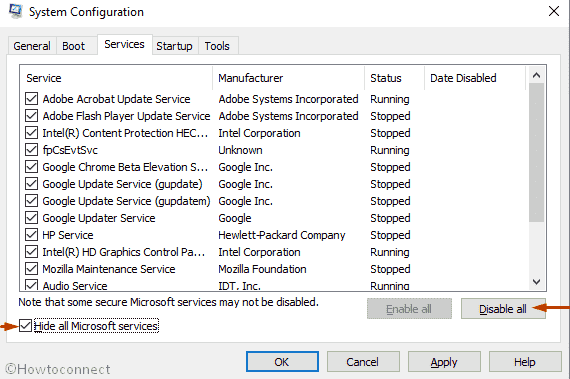
- Hit the Apply Button and restart the Windows.
The main reason for which we perform a Clean Boot is to isolate software that is causing the error. This utility resolves the High CPU Usage too. Once the issue is resolved, try finding the software that is responsible for the associated issue and disable it to safeguard the Computer.
Resolution-8: Use System Restore
If your machine is having the WUDFCompanionHost.exe in Windows 10 issues, using a System restore will be a perfect solution. This will only work if you have created a restore point earlier.
- Press Win+S hotkeys at the same time and Cortana Search will hang on.
- In the null box, type system restore and select Create a restore point once visible in the result.
- When the System Properties Window flashes up, select the System Restore button.
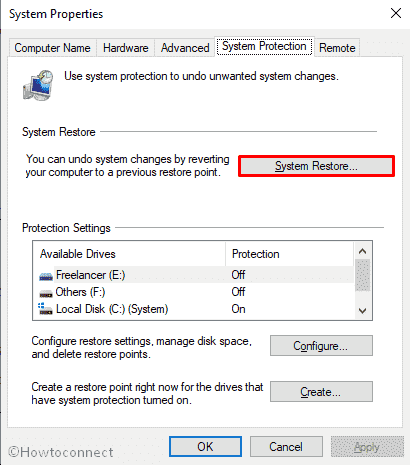
- From the Bottom of the next page, hit Next to proceed.
- Check Show more restore points if available in there and select the desired Restore Point and then hit the Next button.
- Follow the On-screen instruction to complete the process.
- When the procedure finished, reboot the Windows.
Check if the error persists. Hopefully, the issue will be resolved completely.
Resolution-9: Install all available Windows Update
Often Update also set all the issue occurring because of WUDFCompanionHost.exe. To check the updates and install them, follow the below simple steps –
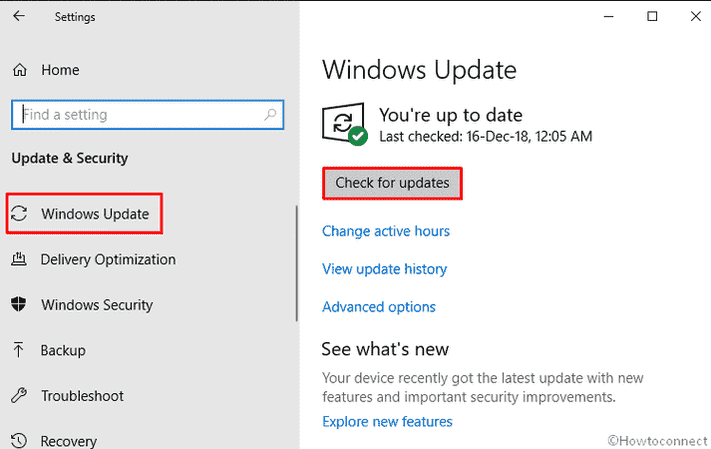
Step-1: Hit the Windows button from the keyboard and choose the Gear cog.
Step-2: Once the Windows Settings app opens, proceed to Update & Security tile and do a click on it.
Step-3: When reaching to the additional settings page, select Windows Update from the left pane and move aside to adjacent right.
Step-4: You will be able to see if any update is available.
Step-5: Hit the Check for Updates button.
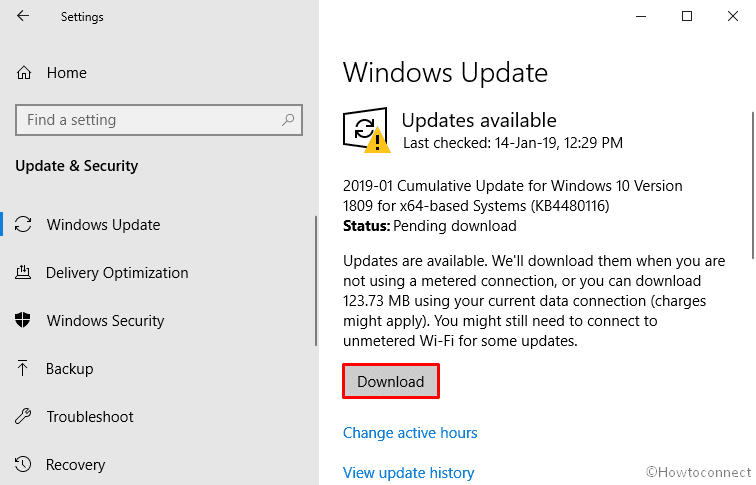
Step-6: Once found, click on the Download to initiate the process.
Resolution-10: Remove unnecessary USB peripherals
Very often, USB drivers are too responsible for causing errors with Windows Drive Framework and results in High CPU usage. These few devices can have a conflict with the Windows system and evolve the issue eventually. Therefore, disabling and disconnecting unnecessary USB drivers can be a great relief in this regard.
You can keep only the needed peripherals connected like a mouse and a Keyboard. Rest all can be removed and check for the persistence of error straightway. If the error doesn’t resolve, try connecting all the USB devices one after another and check which one is entirely responsible. After finding the dreadful one, uninstall that driver and install in again from correct manufacturer. Hopefully, the issue will not cause harm anymore.
Above resolutions, processes are tested and successful by the users. So, don’t waste your time and put them into action.
That’s all!!!!