Windows comes up with the default setting of right click option. When you right click anywhere on your screen, the context menu appears on the left side of the mouse. To some users, this setting is welcomed but users like me, who are attached to the right side of the mouse faces bit difficulty in working.
So here in this article, I will show you Get Context Menu on Right Side of Mouse after Right Click on Windows PC Screen. You can make this change through Registry Editor. Make sure to follow the steps in the below-given tips carefully.
Get Context Menu on Right Side of Mouse after Right Click on Windows PC Screen
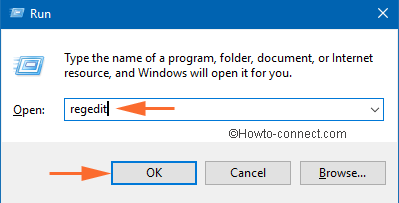
- Hit Windows +R keys at the same time on the keyboard.
- A Run dialog box will prompt on the screen.
- Write regedit at the appropriate field.
- Click Ok to proceed.
- A UAC window will pop asking your authorization.
- Hit Yes.
- Registry Editor is now launched.
- Navigate this below path.
HKEY_CURRENT_USER\Software\Microsoft\Windows NT\Currentversion\Windows
- You can see a key MenuDropAlignment on the right panel of the window. You have to update its value.
- So double click on the key.
- An Edit String window will appear on the screen.
- Enter the value as 0.
- Click Ok.

- Restart your system and see when you right click the mouse, the context menu appears on the right side of the mouse.
Worked for me after restart. Thank you very much!