Windows 10 allows to Disable and Enable Handwriting Panel. This is a new feature that you can open from touch keyboard and type with your fingertips or Stylus (pen). In fact, tapping on the Handwriting Input panel icon on OSK turns it into a text editor area. When you scribble an alphabet or character here it recognizes precisely and converts into its correct form. If you want to turn on or off this pane Windows 10 the Settings application includes an option. In addition, you are able to do the same with a simple registry tweak. Let’s jump towards both ways:
How to Disable Enable Handwriting Panel on Windows 10
1. From Settings App
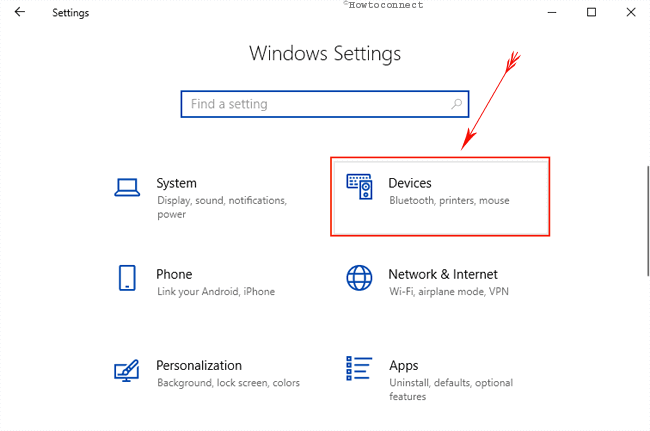
Step-1: Open Settings application using Windows logo key and I hotkey. Click on the Devices from different setting categories present on this page.
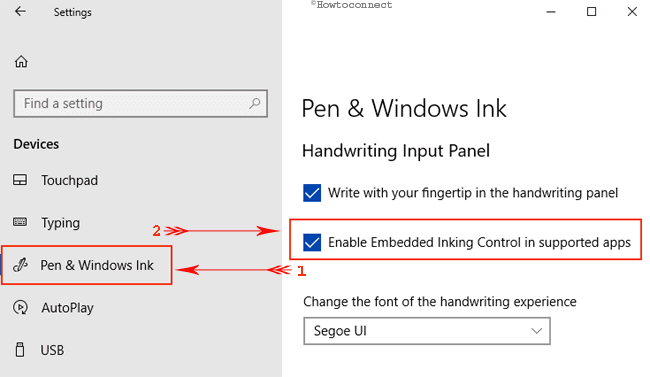
Step-2: Choose Pen & Windows Ink from the left pane. Quickly go to Handwriting Input panel section and check the box with dialog Enable Embedded linking Control in supported apps. To disable uncheck the same and done.
At present, this feature will be available for all XAML text fields. You cannot use the same for Cortana, address bar for Microsoft edge, entry for calendar app an Email. However, Microsoft’s technical squad is trying hard to implement this feature everywhere in coming releases.
Yet you have another way to enjoy this feature.
Enable Handwriting Panel on Windows 10 using Registry Editor
Involving little registry tweak, we can easily implement this excellent feature. Here are the steps to do so:
Step-1: Go to the search box beside Start button and type regedit here.
Step-2: Pressing the Enter button from the keyboard will invoke the Registry Editor window on the screen.
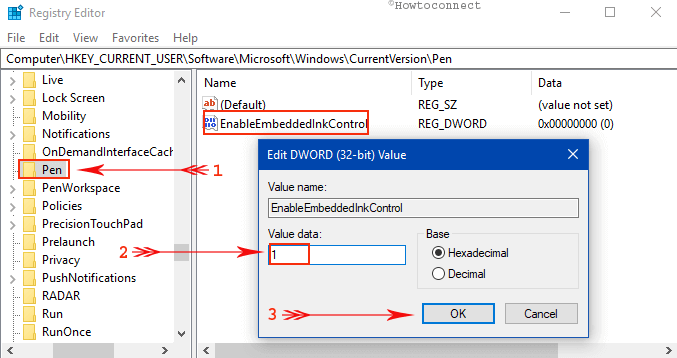
Step-3: Navigate to the following path in the left pane:
HKEY_CURRENT_USER\Software\Microsoft\Windows\CurrentVersion\Pen
Step-4: After reaching the target key, locate DWORD EnableEmbeddedInkControl. Make a double click and enter the Value data 0 to disable and 1 to enable Handwriting panel on Windows 10. Select OK.
Note at the End
With the introduction of Windows 10 build 17074, Microsoft made revolutionary changes in features for touchscreen devices. You can now Disable Enable, Handwriting Panel on Windows 10. This is an opportunity for the users who don’t like to have this in touch devices. Microsoft is involved in making things easier and in future and you will see the text field on the classic handwriting panel only on a touch of the pen. Till then follow this easy way and enjoy.