After Windows 10 boot up, many of you find a nagging BSOD error that is often not easily recoverable. IOMap64.sys BSOD is one such issue that strangely emerges after the first startup of the day. As you boot the system a second time, the blue screen of death disappears moreover the device starts functioning correctly. People who use Asus laptops are more likely to get affected by this particular blue screen because IOMap64.sys is a software program from Asus PC Probe.
On Asus PC, IOMap64.sys is used to supervise the device manager by establishing communication between hardware and device drivers. But this component is not essential for Windows 10 at all furthermore causes issues every now and then. The error may occur with Page Fault in NonPaged Area or some other stop code.
IOMap64.sys BSOD or Blue Screen Error in Windows 10
Here is how to fix IOMap64.sys BSOD or Blue Screen Error in Windows 10 –
1] Uninstall AI suite along with all Asus programs
Asus AI suite offers some features such as fan control, overclocking moreover enhanceS small aspects of computing for various tasks like gaming. It’s only useful when you decide to use it. As the suite is not needed for Windows 10 PC, uninstalling it will not make any impact.
- Press – Windows + X.
- Select – Apps and Features.
- From the right side of the Settings page, find – AI Suite.
- Select the same and hit – Uninstall.
- When a window asks to select items you want to uninstall, click – Select all.
- Hit – Uninstall.
- Comply with on-screen guidelines if any.
- In the end, reboot the Windows device.
- In the same way, uninstall other Asus related programs found on the Apps & Features page.
2] Unplug external peripheral devices
Many Windows 10 users reported that they get IOMap64.sys BSOD when some peripherals like Bluetooth devices, scanners, and printers are connected. Therefore, it’s pretty much clear that the USB adapter is responsible for the issue. In such a case, pull the plug of all accessories one after another to disjoin the connection from the laptop. You can keep the keyboard and mouse connected.
After unplugging all peripherals, plug them in again but obviously one at a time. The only rule to follow is plugging the accessories in different ports than the previous one.
3] Reinstall Nvidia display driver to resolve IOMap64.sys BSOD
How the graphics driver is related to IOMap64.sys is yet to be known but many people claimed that reinstalling the driver worked to solve the BSOD. So, you can give it a try. Steps are as followed –
- Press – Windows + S.
- Type in – devmgmt.msc.
- Hit – Enter.
- From the Device Manager window, double-click – Display adapters.
- Right-click on NVIDIA graphics card and select – Uninstall device.
- When a dialog box appears, click the checkbox set before Delete the driver software for this device.
- Hit – Uninstall.
- After completion of the uninstalling process, visit NVIDIA Driver Downloads webpage.
- Provide correct information it asks for.
- Click – Search.
- When the desired driver shows up, hit – Download.
- Once the downloading process ends, double-click the setup file you got.
- Follow the on-screen instructions to finish the installation.
4] Check for memory issues
RAM can be damaged in several ways and once it forms bad sectors in it, the system ends up crashing with numerous blue screen errors. IOMap64.sys BSOD can be a result of the same. Generally, memory stick gets damaged due to sudden power surge, excessive heat, and the accidental restart of any computer part. Before you think of changing the RAM with a new one, run Windows Memory Diagnostic to know if you really need to change it. Here are the steps to follow –
- Click the search icon from taskbar.
- Insert – mdsched.exe.
- Hit – Enter.
- From the next pop-up, select – Restart now and check for problems (Recommended).

- Within a few seconds, the system will restart and you will see a blue screen detecting RAM issues.
- Once the process ends, Windows 10 will reboot again.
- After logging in, check the System tray to get the diagnostic report.
- Review the outcome precisely and do what the utility suggests.
5] Change Paging file size to fix IOMap64.sys BSOD
Page file basically works as secondary RAM that reduces the workload of existing memories in order to make the Windows 10 PC function smoothly. The pagefile accommodates the program when the RAM stick can not cope up with. The produce is known as Paging.
Though Windows 10 automatically manages paging file size, often it goes wrong and ends up causing Blue screen error IOMap64.sys. To manually set the pagefile, go through the below steps –
- Press – Windows key.
- Type – advanced system.
- Hit – Enter.
- Click Settings present under the Performance section.
- Shift to – Advanced tab.
- Hit Change located under Virtual Memory segment.
- Uncheck the box set before – Automatically manage paging file for all drives.
- Hit the radio button of – Custom size.
- Put the desired size and click – Set.
Note – Put the minimum and maximum size to 1.5 times and 4 times of the physical memory that your PC has, respectively.
Additionally, you can see the detail here – How to Tweak Paging File for better Windows 10 Performance.
6] Use Driver verifier to find out which driver causing IOMap64.sys BSOD
Besides the graphics driver, some other drivers can give rise to IOMap64.sys BSOD too. To manually find out which driver is causing the issue is nearly impossible as there is no clue you can go with. Driver Verifier is a built-in utility that allows you to track the driver that is the prime cause of the blue screen error you are getting. Using the tool is not so complicated if you follow the below steps correctly –
- Press – Windows + Q.
- Insert – verifier.
- Hit – Enter.
- To give consent, click – Yes.
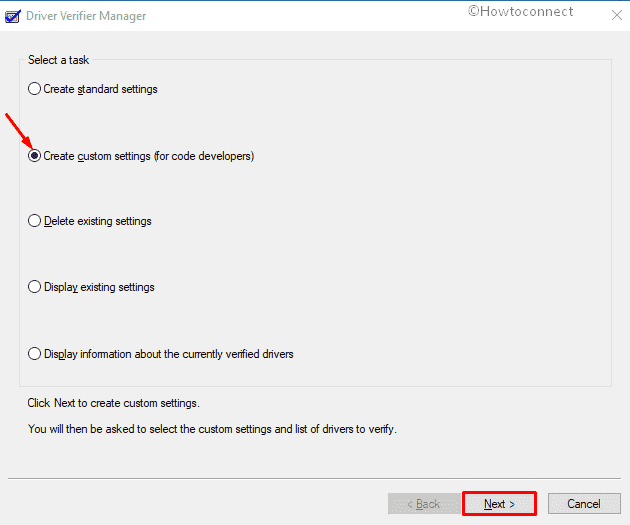
- When Driver Verifier Manager appears, click the radio button saying – Create custom settings (for code developers).
- Hit – Next.
- Put tickmark on every checkbox except – DDI compliance checking and Randomized low resources simulation.
- Click – Next.
- Select the radio button present before – Select driver names from a list.
- Hit – Next.
- From the next window, select all drivers that are not by Microsoft.
- Lastly, click – Finish.
- To make sure that Driver Verifier is running, open Command Prompt as administrator.
- Insert verifier /querysettings and hit – Enter.
- If the command-line returns a list of drivers, it means the utility is running.
- In case it’s not running, you will have to perform the above steps again.
- After making sure Driver Verifier is working, reboot the system.
- Wait until the system crashes and blue screen error appears.
- Meanwhile, use the system normally.
- If you know which particular action brings forth IOMap64.sys BSOD, do the same repeatedly.
- When the device crashes, you will see something similar to DRIVER_VERIFIED_DETECTED_VIOLATION (abcdef.sys) where abcdef.sys is the name of the faulty driver.
- In case you fail to force the system to crash, wait at least 36 hours and then see if the Driver verifier does its job.
- Once you know the culprit driver, reinstall the same.
7] Resolve system corruption to fix IOMap64.sys BSOD
Missing and corrupted system elements are largely responsible for any kind of crash that Windows 10 encounters. To resolve as well as recover the items, here are the steps to follow –
- Press Start button and type – cmd.exe.
- Hit – Ctrl + Shift + Enter.
- When a User Account Control shows up, click – Yes.
- On the black panel, put – SFC /Scacnow.
- Hit – Enter.
- Once the scanning process ends, reboot the Windows PC.
8] Execute DISM command
DISM Restorehealth command-line scans the full system for corruption on top of that repair any issues that it finds out. To run the utility –
- Press – Windows + R.
- In the text field, insert – cmd.
- Press – Ctrl + Shift + Enter.
- When a User Account Control turns up, click – Yes.
- Put – DISM /Online /Cleanup-Image /RestoreHealth.
- Hit – Enter.
9] Uninstall unnecessary programs
Some software programs that are used to perform the same tasks, often clash with each other. During the conflict, some Windows system files might go missing or become faulty.
- On Windows search, put appwiz.cpl.
- Hit – Enter.
- Find the apps that you hardly use and also unnecessary. Don’t ignore the third-party antimalware program.
- Select one and click Uninstall from the top ribbon.
- Follow on-screen instructions if any.
10] Clean boot Windows 10 to get rid of IOMap64.sys BSOD
Oftentimes, some software programs, services, or device drivers obstruct the system from functioning properly furthermore cause IOMap64.sys BSOD error. Clean boot is a special startup that allows the system to start with minimal set of drivers and applications. This way, you can avoid any crash including BSOD caused by third-party or external programs. Steps are as followed –
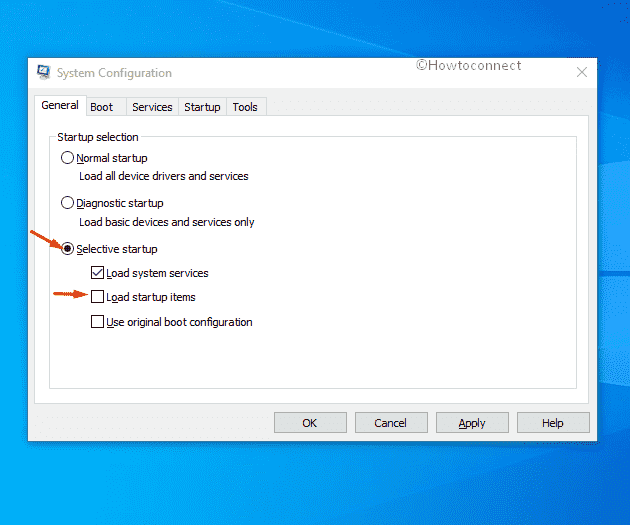
- Press – Windows key.
- Type in – msconfig.
- Hit – Enter.
- Select the radio button set for Selective startup.
- Uncheck – Load startup items.
- Shift to Services tab.
- Click the checkbox that says Hide all Microsoft services.
- Hit – Disable all.
- Move to Startup tab.
- Click – Open Task Manager.
- Right-click on each program one after another and select – Disable.
- Return back to the System Configuration window.
- Click Apply and then OK.
- Restart the device clean boot Windows 10.
See the solution to one more issue – Fix: Asus Touchpad Not Working in Windows 10.
Methods list
1] Uninstall AI suite along with all Asus programs
2] Unplug external peripheral devices
3] Reinstall Nvidia display driver
4] Check for memory issues
5] Change Paging file size
6] Use Driver verifier
7] Resolve system corruption
8] Execute DISM command
9] Uninstall unnecessary programs
10] Clean boot Windows 10
That’s all!!