BSOD KERNEL_STACK_LOCKED_AT_EXIT error causes your system to restart time and again. This Blue Screen of Death issue refers to the kernel-mode driver and attempts to crashes the active program window. Continuous boot failure makes difficult to access memory and shows bug check value 0x00000094. On the affected devices, errors messages keep on striking the desktop while trying to start a program or ending it. Commonly, you will encounter this issue when you install new hardware or software.
KERNEL_STACK_LOCKED_AT_EXIT BSOD error in Windows 10 mainly occurs when an outdated and defective driver exists. In addition to this, malware or virus attacks, removal of system resources, missing DLL files, and unreliable allocation of memory might also be the culprit. The issue also appears just after using an external Hard Disk or having bad areas in primary HDD and if it runs in low space. Hence, necessary measures should be taken immediately to resolve the error. Here in this article, we are providing a wide range of effective workarounds intending to fix this annoying Blue Screen error in Windows 10. Following is the list of workarounds –
KERNEL_STACK_LOCKED_AT_EXIT Windows 10 Solutions
Here is how to fix KERNEL_STACK_LOCKED_AT_EXIT Error in Windows 10 –
1] Boot Windows 10 to Safe Mode
Plenty of wicked bugs were following Windows soon after Microsoft developed it. However, Safe Mode is one of the common remedy considered for most of the BSOD error code including KERNEL_STACK_LOCKED_AT_EXIT. This is how to Boot Windows 10 into Safe Mode –
- Press the Windows + I hotkeys and let Windows Settings appear.
- Click on Update & Security icon.
- On the subsequent page, select Recovery from the left pane
- Go along to right side and locate Advanced startup section
- Click the button Restart now in this section.
- As your Windows restarts, it will ask you to choose the next step.
- Choose Troubleshoot from Startup Screen.
- Now click Advanced Options.
- Subsequently, select the Startup Settings.
- At this time, you will get notified that the computer can be re-started with the use of additional settings one of which is “Enable Safe Mode”. Press Restart.
- Finally, choose Enable Safe Mode by pressing F4.
Once deployed, the OS will be launched with default apps and services only. For that reason, there is a little possibility of recurrence the error again. Unfortunately, if the issue arises again, it is pretty sure that any third-party application or Hardware problem is the culprit for the vulnerability.
2] Resolve the issues associated with RAM
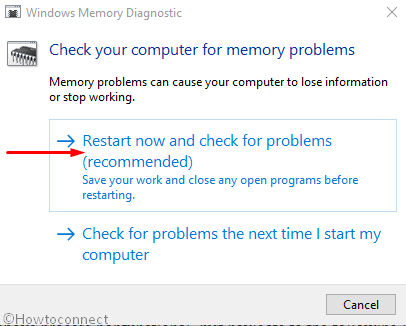
An incorrect memory, defective RAM, the wrong allocation may call up KERNEL_STACK_LOCKED_AT_EXIT error in Windows 10. Therefore, a perfect solution is mandatory to rectify these issues. Since scanning the stick is a little confusing and complicated, hence, you should go for the Memory Diagnostic tool. In this way, your problematic sectors will be identified and you can resolve it afterward. Move through the following steps –
- Before starting the procedure, make sure that you have saved and closed all the in-progress apps on the device.
- Press Win+S and allow Taskbar Search to appear.
- In the text field, type “Windows Memory Diagnostic” and press the Enter key.
- At this time, a pop-up menu will appear.
- Click on Restart now and check for problems (recommended) from the appeared Pop up menu.
- When the system starts, you will come to experience a blue screen window.
- It will detect the memory issues. After the process reaches 100%, Windows will restart automatically.
- Once it starts up again, you can see the results in the notification area of the taskbar.
- Alternatively, if you find the above process nonfunctional, just navigate to the following path – Do a right-click on Start Menu and go to Event Viewer => Windows Log => System.
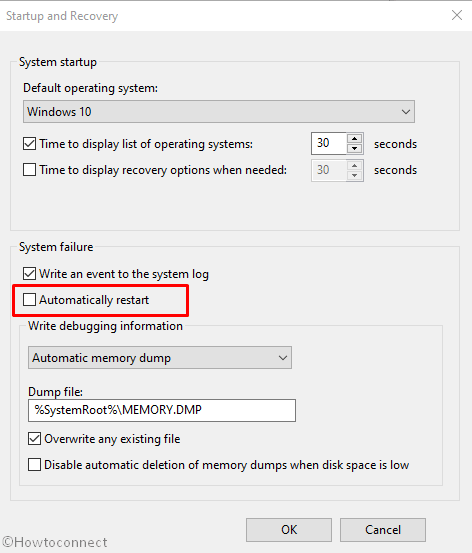
3] Disable Automatic Restart to fix KERNEL_STACK_LOCKED_AT_EXIT Error
Automatic Restart setting is rated as number one causing result for flashing KERNEL_STACK_LOCKED_AT_EXIT error in Windows 10. This is a basic resolution and will not probably resolve the issue completely. Although, you would surely have enough scope to fix the error. You may proceed with the following steps given below –
Step-1: Press Win+S hotkey and let the Windows search bar prompt.
Step-2: In the search bar, type control and press the Enter key.
Step-3: Select the view of control panel either into a small or large icon. You can take help from here – How to Make Windows 10 Control Panel Icon Size Bigger.
Step-4: From the available options, locate System and do a click on it.
Step-5: In the left pane of the following page, select Advanced system settings.
Step-6: When a new wizard appears, move to the Advanced tab.
Step-7: Scroll and click on Settings located under the Startup and Recovery section.
Step-8: Go to the System failure and uncheck the box of Automatically restart option.
Step-8: Finally, click on the OK button to process ahead.
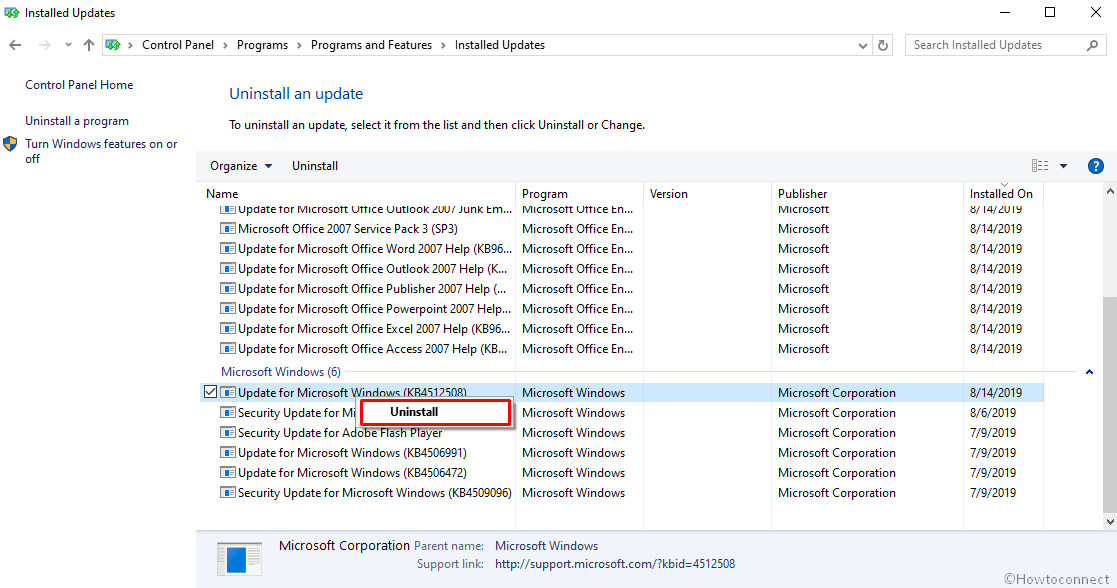
4] Eradicate the faulty Windows update files
Microsoft releases Windows updates after a certain period comprising updated features and bug fixes. Tech Giant urges its users to download them using the Settings application. In fact, they do not indulge into difficulties in the midway but if the installation process stops abnormally, you will have KERNEL_STACK_LOCKED_AT_EXIT BSOD error in the device. All these problematic files need quick elimination in this respect. Follow these below steps to do so –
- Press Win+I and allow the Windows Settings to appear.
- Select Update & Security icon.
- This will by default open Windows Update page.
- Move to the adjacent right and Select View update history link.
- On the following page, click on Uninstall updates in order to remove the faulty files.
5] Reconnect the External Hardware Devices
Often KERNEL_STACK_LOCKED_AT_EXIT BSOD error comes in after connecting an additional hard drive with the device. In that case, you have to remove the accessory and reconnect it again following correct procedures. The guidelines are as follows –
- Detach all the plugged accessories from the device and Restart it.
- When Windows 10 boots successfully, attach the accessories again with your PC successively and check which one is causing KERNEL_STACK_LOCKED_AT_EXIT.
- Thereafter, Download the updated drivers for that specific hardware from the manufacturer website and then install them.
6] Run Blue Screen Troubleshooter to fix KERNEL_STACK_LOCKED_AT_EXIT
Microsoft with each update for Windows 10 rolls out something big and remarkable. As a series of this, the team has introduced Blue Screen Troubleshooter in the Settings app. The reason was completely clear as BSOD error codes are found to be ruled out in the OS. If you are using any version greater than Fall Creators update, can use this tool to eliminate error KERNEL_STACK_LOCKED_AT_EXIT. Follow the below procedures to use the fix –
- Right-click on the Start button and select Settings from the appeared menu.
- On the following page, click on Update & Security icon.
- From the left pane, select Troubleshoot and then switch to the corresponding right.
- Scroll and locate Blue Screen option from there
- Once you find, click on it and select Run the troubleshooter.
Upon executing the tool properly, Windows 10 will fix Bsod error code KERNEL_STACK_LOCKED_AT_EXIT automatically.
7] Uninstall Faulty Application
If you have two or more similar programs in the same device, they can create conflict with each other resulting in erasing important files. For this reason, KERNEL_STACK_LOCKED_AT_EXIT BSOD error occurs. In those circumstances, you can uninstall similar programs if they are not so relevant. If necessary, go for reinstalling them again later on. Here are the instructions to proceed on –
Step#1: First of all, tap Win+I hotkey and launch Windows Settings.
Step#2: Click on Apps category.
Step#3: On to the next page, go alongside right from the left pane.
Step#4: Locate the program may cause issues KERNEL_STACK_LOCKED_AT_EXIT or you have recently installed.
Step#5: Once found, make a click on it and select the Uninstall option from the extended pane.
Step#6: When a small pop-up appears, again click on Uninstall to confirm the process.
Step#7: After complete the Un-installation, visit the official maker website to Download and reinstall them again in PC.

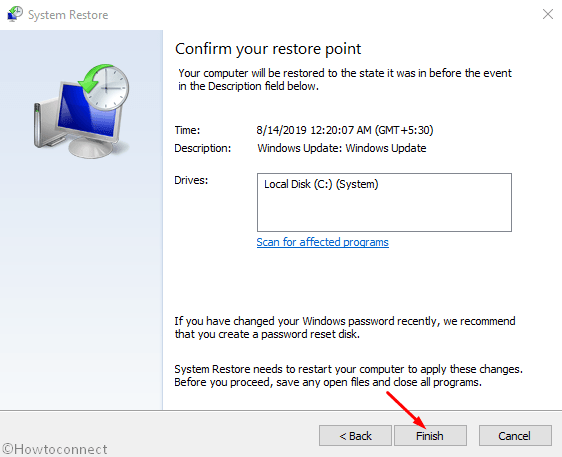
8] Use Previous System Restore Point
This procedure requires a previously created Restore Point, therefore, it is optional for you. On applying this resolution, the OS will roll back to a point of no error. Here is the detail of the method –
- Press Win+R keys and invoke Run dialog box.
- Type ‘rstrui’ and hit the Enter key.
- This action will call in System Restore wizard on the screen.
- Click on the Next option allowing the device to show your PC’s Restore points.
- To see more of the restore points, hit the boxes Show more restore points option.
- Afterward, choose the most recent Restore Point you have created on the machine.
- Click on the Next option.
- Finally, click on the Finish button to start.
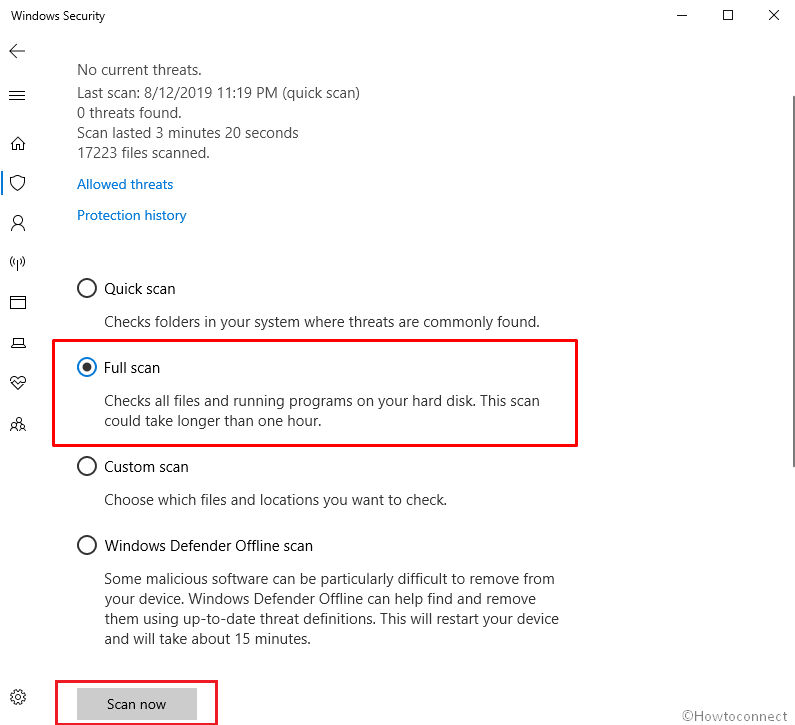
9] Scan your full system in Windows Security
In this tech-based world, Virus comes at the top if we talk about the threats. People can be stuck anytime anywhere while browsing or clicking a suspicious link in the Spam mail. When they get the entrance, remove system components potentially which are definitely mandatory for the OS. Accordingly, KERNEL_STACK_LOCKED_AT_EXIT BSOD error in Windows 10 is more likely to happen. Performing a Full Scan can save you in this regard. You can accomplish the task using “Windows Security”, a default program of Windows 10. Following guidelines will help you to do so –
- Click on the Action Center icon from the Taskbar and select All Settings.
- Once it opens up, click the Update & Security icon.
- Select Windows Security from the left column.
- In the right side select Virus & threat protection option.
- On the following window, select Scan options link.
- Select the radio button of Full scan and then click Scan now to initiate the process.
10] Remove Third-Party Antivirus Program
Third-party antivirus programs are not trusted every time and quite often they create issues. Sometimes, KERNEL_STACK_LOCKED_AT_EXIT BSOD error in Windows 10 is also a result of using them. With the Internet spread all over, Malware gets easy entrance to the system and cause destruction. Microsoft introduced the best Utility ever for Malware issue and Windows Security is a complete solution. Therefore, you can easily go for uninstalling them to escape hassles. For example, we are showing the standard way to uninstall Avast Antivirus from your computer –
- Press Win+R at a time to launch the Run dialog box.
- Type appwiz.cpl and select the OK button.
- On the following page, locate Avast Free Antivirus from the appearing list and do a click on the same.
- Hit the Uninstall button from the top menu.
- Subsequent to this window, select the Uninstall tab at the bottom and then click on Next.
- At this time, once a UAC prompts; give your consent by choosing the Yes option.
- A confirmation message will prompt on the screen as – Uninstall finished.
- Upon completion, select the Restart button and then click on Finish.
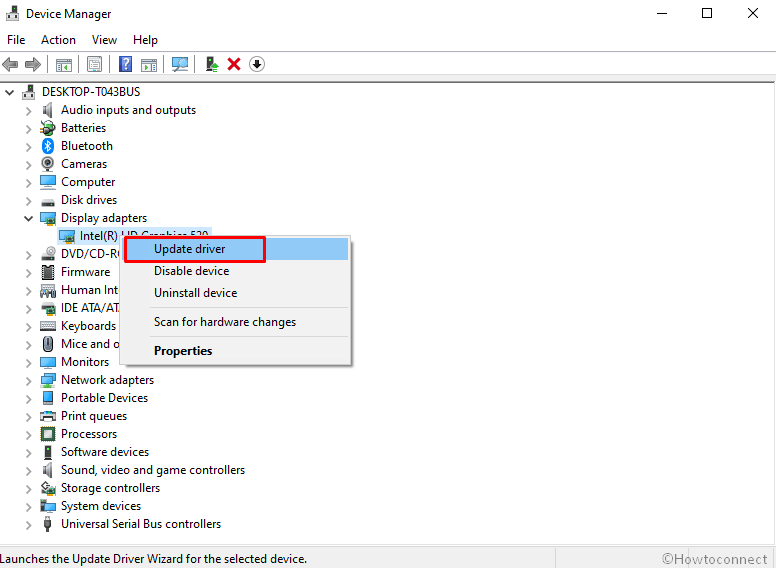
11] Update corrupted Drivers with Device Manager
An outdated or incompatible device driver is the major reason for which KERNEL_STACK_LOCKED_AT_EXIT Windows 10 BSOD error shows up in Users device. Sometimes, people notice the same issue just after installing a new Hard Drive and by using a corrupted USB stick as well. Installing their drivers using the DVD from the delivery package or downloading from unofficial websites found the culprit. Accordingly, simply you need to update all drivers going through Device Manager. This is how you can move on –
- Do a right-click on the Start button and select Device Manager from the Windows 10 Power user menu.
- On the next page, find the devices having exclamation mark beside them and expand by double-clicking.
- Right-click on the driver that has a yellow caution and select Update driver option to initiate the process.
- Now the system will preview two options; Choose Search automatically for updated driver software.
- When you are done, Restart the Windows to make the changes effective.
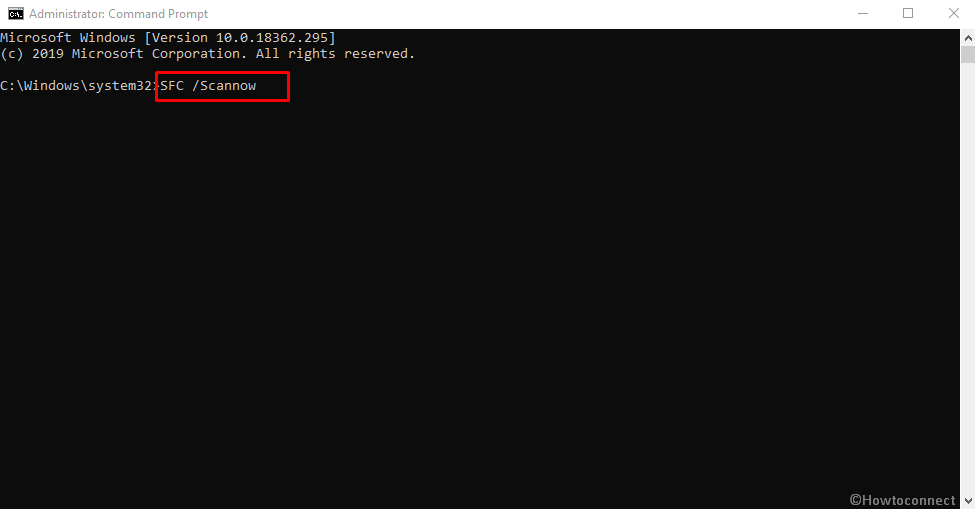
12] Run Windows System File Checker (“SFC /Scannow”)
Windows soon after came in the field, indulged in so many unknown bugs including error KERNEL_STACK_LOCKED_AT_EXIT. Corrupted and outdated System File is one of the major reason which can cause BSOD errors frequently. As a workaround, the company has worked on a new application named as System File Checker. This is one of the best resolutions deployed in the Command Prompt. This is how you need to proceed –
- Right-click on the Windows logo residing at the extreme left of the taskbar.
- When the Power user menu appears, find out Run and do a click on it.
- Type cmd.exe in the text bar located next to Open.
- Now, press and hold Ctrl +Shift and then hit the Enter key.
- This will open command prompt as administrator.
- On the following page, type SFC /Scannow and hit Enter key.
13] Use Deployment Image Servicing and Management (DISM) tool
Windows image files, in many cases, become damaged and cause KERNEL_STACK_LOCKED_AT_EXIT BSOD error in Windows 10. Microsoft has a built-in application for resolving this issue and that is Deployment Image Servicing and Management (DISM) tool. To execute the workaround follow the instruction –
- Press Win+S hotkey and let Taskbar search appear.
- Type cmd in the given bar.
- When Command prompt appears under Best match, go to the right flyout and click on Run as administrator.
- If a UAC prompts up, click on Yes to give consent.
- Subsequently, type the following parameter and hit Enter –
DISM.exe /Online /Cleanup-image /Restorehealth
Note – Usually the process gets stuck at 20%. If this happens with you too, don’t get stress as it normal phenomena.
- When the DISM scan gets over, reboot your PC to make the changes effective.
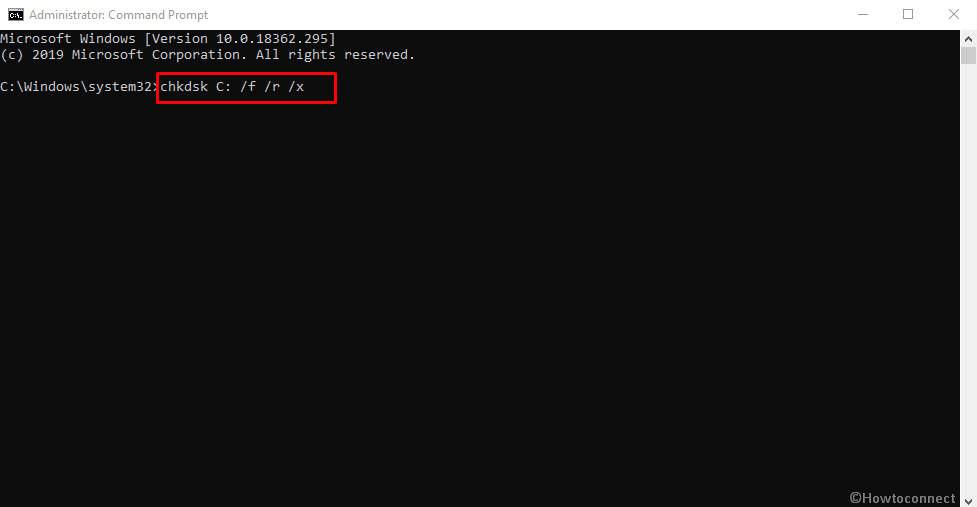
14] Run CHKDSK Utility to solve KERNEL_STACK_LOCKED_AT_EXIT
Sometimes, Bad segments in the Hard Disk causes KERNEL_STACK_LOCKED_AT_EXIT BSOD error in Windows 10 error. We need to identify these segments and Microsoft has a new tool for this purpose also. This utility significantly recognizes the harmful sections and then rectify accordingly. Proceed with the following guidelines –
- Press Win+S keys together and call up Taskbar Search on the screen.
- Type cmd.exe in the Search box.
- When Command Prompt appears in the list, right-click on it.
- From the context menu, select Run as Administrator.
- Once UAC prompts, click on the Yes button.
- Thereafter, type the following command –
chkdsk C: /f /r /xand hit Enter.
Important – C: is the drive letter where the OS is installed. If you have used other drivers to do the same task, replace the letter with D:, E: and so on.
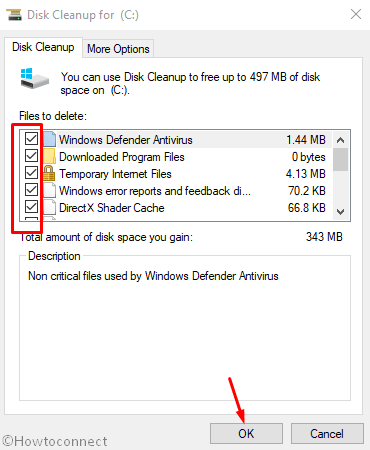
15] Clean Junk from the system using Disk Cleanup utility
As the work progresses each day, Operating System produces huge unnecessary items, files, caches in it and stores them in Hard Disk Drives. Once it gets in bigger volume, the stack of these files takes a large space and Drive runs in a shortage of free space. Ultimately, the computer will be slower and also cause KERNEL_STACK_LOCKED_AT_EXIT BSOD errors. So, cleaning these junk files and folders is a considerable requirements to sustain a healthy working system. Disk Cleanup utility is designed for freeing up space in Hard Drive. The tool will search and analyze each and every component and remove the unnecessary ones.
- Open the Run dialog by pressing Win+R shortcut combination.
- When it opens, type cleanmgr in the text field and click on the OK button.
- From the result, do a click on the dropdown menu to select Drive letter C: and then hit the OK button.
- Disk Cleanup utility will appear on the screen to analyze the amount of space it can recover from the volume.
- At this time, a wizard will prompt, select the Clean up system files from the bottom.
- Again, choose the same drive letter.
- Before continuing with this method, ensure you have restored all the important items from Recycle Bin if present.
- Check all the options except Download.
- Finally, hit the OK button.
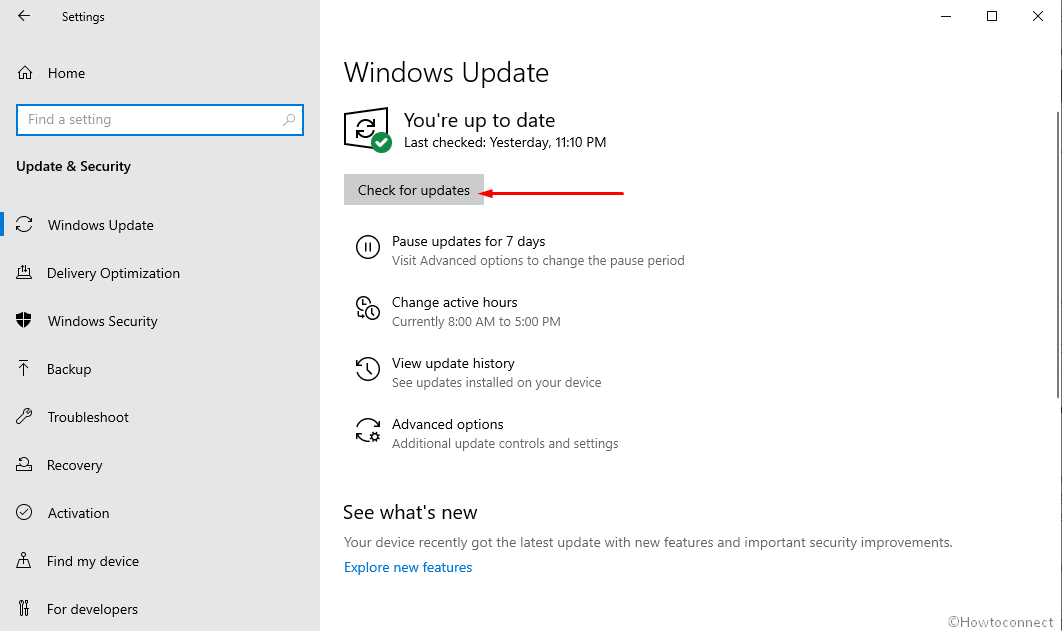
16] Install all possible Windows Updates
Microsoft team are offering the utmost sincerity to grant the maximum benefits to the users every time. As a part of this, Updates are available after every definite period of time and they always have bug fixes inside. Obsolete Windows Operating System is more likely to cause KERNEL_STACK_LOCKED_AT_EXIT BSOD error. Therefore, Update Windows 10 using the below instructions –
- Press Win+I and permit the Windows Settings to appear.
- Click on Update & Security category.
- On the following screen, move along the right side of the Windows Update.
- You might see “You’re up to date” dialog here with the last checked date mentioned.
- Nevertheless, hit Check for updates option
- At this time, the system will look for available updates for your windows.
- After finishing the searching process, you will see the updates on the screen. Choose Download option under updates are ready to download.
17] Perform a clean install
This will be really pathetic at the same time frustrating if you could not fix error KERNEL_STACK_LOCKED_AT_EXIT using any of the above workarounds. However, we believe that no problems come without a solution. Yet we have one more resolution to apply for fixing error code 0x00000094. This is a completely clean install Windows 10. The final resolution if implemented with absolute perfection will possibly remove all the bugs. Eventually, there will be no chance of any error or issue further.
It is wiser to save all the necessary files and data in a safe place as Backup. Since this is a professional Workaround, you might seek help from skilled people to accomplish.
Methods:
1] Boot Windows 10 to Safe Mode
2] Resolve the issues associated with RAM
3] Disable Automatic Restart
4] Eradicate the faulty Windows update files
5] Reconnect the External Hardware Devices
6] Run Blue Screen Troubleshooter
7] Uninstall Faulty Application
8] Use Previous System Restore Point
9] Scan your full system in Windows Security
10] Remove Third-Party Antivirus Program
11] Update corrupted Drivers with Device Manager
12] Run Windows System File Checker (“SFC /Scannow”)
13] Use Deployment Image Servicing and Management (DISM) tool
14] Run CHKDSK Utility
15] Clean Junk from the system using Disk Cleanup utility
16] Install all possible Windows Updates
17 Perform a clean install
That’s all!!