Windows 10 is undoubtedly the most efficient operating system to be ever released from Microsoft. It demands numerous system resources owing to the vast number of features offered along with it. Despite all the updates and features, this OS tends to slow down over time as they get bloated with files and programs. It is possible to Optimize Windows 10 Performance through hardware upgrades, but you may not like to spend more to buy new hardware. So, in this article, we will discuss a wide range of Windows 10 performance tweaks.
Basically, you need to turn off unused special effects, defrag HDD, do away with the unwanted files, programs and more in order to speed up Windows 10 laptop. There are several ways of deriving the best performance from Windows 10. However, the latest iteration of the operating system is renowned for a ton of highly useful built-in features that ensure a boost in the overall efficiency of the system.
Best Ways to Optimize Windows 10 Performance
Here are the steps that you can follow to witness a surge in the speed of your computer when you correctly Optimize Windows 10 Performance.
1. Restart your device regularly
This may seem like an obvious workaround but there are several users who run their Windows 10 machines for weeks on a stretch. Doing so compels the operating system to put the display to sleep during which your computer slows down. You can boost Windows 10 performance if you make it a habit to shutdown the device each day after completing all your tasks. Just ensure to hit the Power button only once you save your work and close all the running tasks. If your PC has slowed down considerably and you are unable to access Start Menu, then you need to manually press the Power button on your laptop/desktop CPU until the device shuts down completely.
This small tip can make Windows 10 PC run faster. Restarting helps you wipe out the memory and also confirms shutdown of troublesome services and processes. Furthermore, rebooting ends all the software active on the system. It covers the programs active on the taskbar as well as the apps that have been accessed numerous times and have never been terminated. This simple act boosts Windows 10 performance that had otherwise been functioning poorly. As a result of a regular restart, you may highly Optimize Windows 10 Performance.
2. Do not underestimate the power of updates
Microsoft strives continually to provide a better experience to you all. It addresses all the key concerns reported by you in order to make sure that updates fix the flaws being encountered. The Windows 10 updates are designed to eliminate common bugs that are known to reduce system performance. Some of these are just minor fixes but they do make a massive difference which will eventually Optimize Windows 10 Performance.
If you think your machine is not delivering the performance it should be, then follow these instructions.
Step-1: Press “Win + I” hotkeys in one go in order to open the Windows Settings application.
Step-2: Select Update & Security category from the main interface of the app.
Step-3: By default, Windows Update section will be selected on the left pane. Switch to the right side and do a hit on the Check for Updates button (see snapshot).
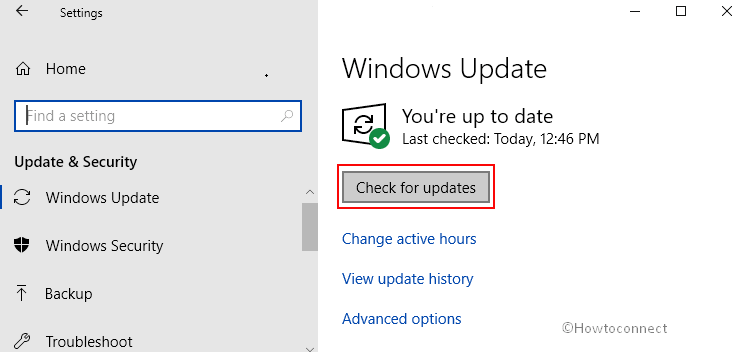
Step-4: If you receive the message – “You’re up to date” then you already have the latest updates installed.
Step-5: But if you encounter the message – “Updates are available” click on Install now. However, you can selectively pick the updates that you want to install from the list of updates available. Once the selection is done, just click on Install.
Step-6: If there is any major update available, then before proceeding ensure to make sure that you save and take a backup of your personal data. Your system may restart several times during an update.
Step-7: Finally, again check for updates after restarting just to make sure that there are no updates available. This is essential in case you have not updated your system for a long time.
3. Check for Startup Apps
Personal computers tend to bog down by the sheer number of processes that run continuously. This is because several users instruct their operating system to run the programs immediately after logging in to the device. It slows your Windows 10 device’s speed considerably. The best thing to do is to disable unwanted programs which startup every time the system boots up.
First, open Task Manager and to do so, press “Cltr+Alt+Del” hotkeys at the same time.
Then click on the Startup tab being displayed. Here, check the ‘Startup Impact’ values displayed for each program that runs as soon as you log in.
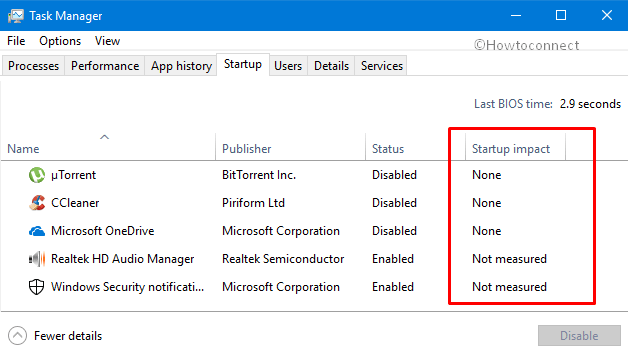
If the value is High for a particular program, then it signifies that the particular program is responsible for the slow down of the system. You may prevent this program from launching soon after you log in. To do so, select the program and click Disable option at the bottom-right of the window.
4. Scan for malware
A malware may often be the cause of several issues being faced by you while using your device along with the possible security threats. You must carry out a full scan of the PC either with a reliable antivirus program or by using the built-in Windows Security app. This will help you to identify the threats and remove them from your device.
Go through the below sequence of steps to detect malware or virus attack via Windows Security.
Click the shield icon that shows up on the right corner of the taskbar.
This launches Windows Security on the PC screen. Click Virus & threat protection on the left pane.
Switch to the right pane and go to the Virus & threat protection updates section. Here, click on Check for updates.
Once you finish with the update scan, head back to the Virus & threat protection page and click Scan options.
On the following page, choose the dot against the option namely Full scan. Next, click Scan now button.
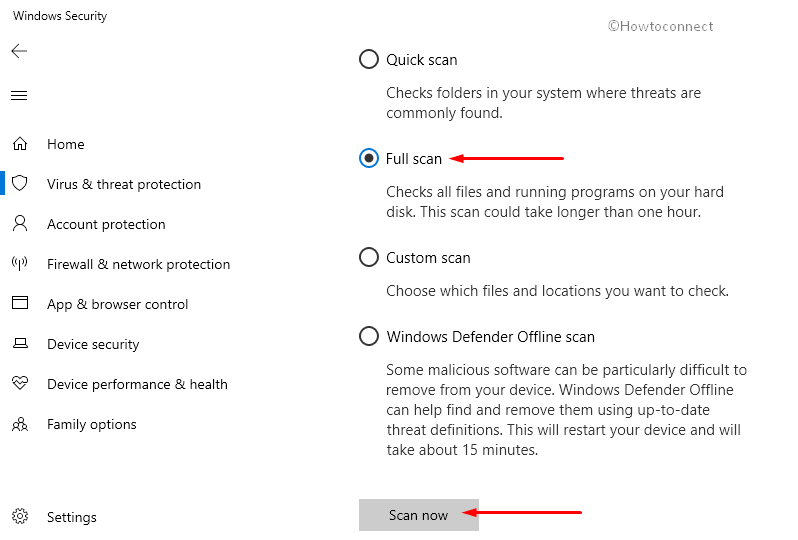
Wait till Windows Security finish the scan. Then if the program finds a threat, you can choose to quarantine or remove it completely from your system. Hence, it’s advisable to scan the PC pretty frequently in order to Optimize Windows 10 Performance and keep the system from being affected by malicious programs.
5. Choose High-Performance Power Plan
Your PC presents you with numerous Power Options when it comes to Optimize Windows 10 Performance. You need to choose the high-performance power scheme in order to maximize the responsiveness of your device. However, if the battery is drained out, you will not be able to use this power scheme. You will have to change the power setting accordingly as per your requirements.
On the Cortana Search bar on the Taskbar, type “cp” to see the Control Panel Desktop App. Click on it.
Select Hardware and Sound => Power Options. Click Create a Power Plan on the left sidebar (see snapshot).
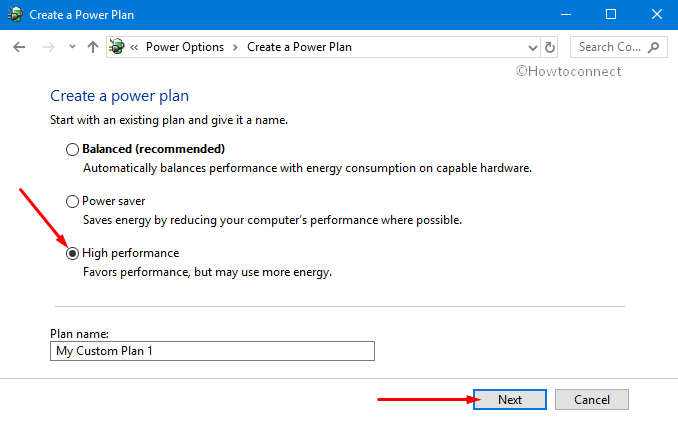
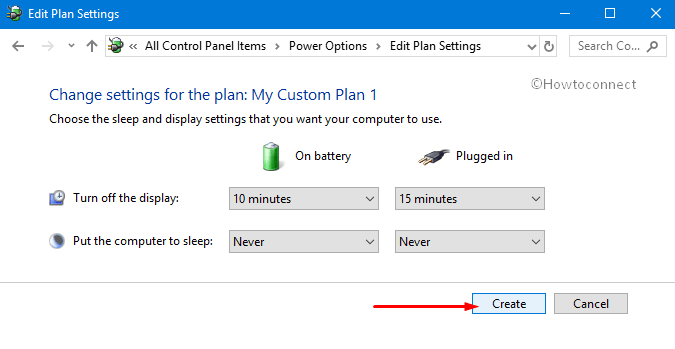
Select High Performance and provide a name to the plan followed by a hit on the Next button.
Moving ahead, choose the timeouts for display, sleep moreover adjust the brightness slider that you prefer. Click Create.
6. Clean up your disk
Disk Cleanup is an extraordinary feature that is integrated into the Windows operating system. This built-in tool lets you eradicate temporary files that accumulate on your device such as offline web pages, downloaded program files, image thumbnails and a lot more.
Hit “Win + R” hotkeys jointly in order to open Run dialog box. Type cleanmgr and click OK.
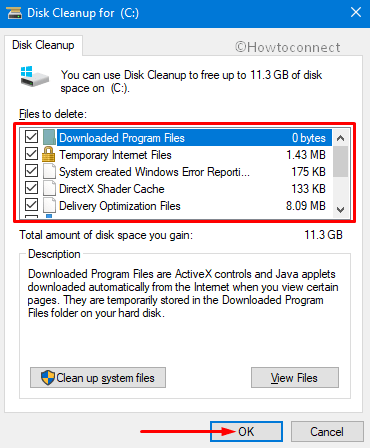
Next, you will be presented with the option to select the drive that you prefer to clean up. Windows 10 is usually installed on the C: drive. Select the desired drive and click on OK.
The cleanup wizard will show you all the different files which you need to delete. So select them and click OK.
Also, click the “Clean up system files” button to delete unwanted system files.
This will help you eliminate all the files on your hard drive that no longer serve you any purpose and thereby Optimize Windows 10 Performance.
7. Remove unused software
Personal computers are often loaded with third-party software by the vendors. You may or may not utilize them to your advantage over time. If the size of such files is large and is not beneficial to you in any manner, then it can be regarded as ‘bloatware’. Several users have this habit of installing software for a specific purpose and never use it again.
For instance, you installed a tool for designing a newsletter and never used it again. You could have also installed a game that looked promising and did not appeal to you after installation. These files consume a lot of space on your device and reduce its performance. To get rid of any software you no longer continue to use, follow these instructions.
Perform a right-click on Start icon and select Apps and Features from the Win+X Menu.
This will immediately launch the Apps category on the screen. Shift to the right pane and select the program that you prefer to remove. Click Uninstall.
You can easily get rid of a program you no longer wish to use. Simply select the desired program and execute a click on Uninstall button.
The specific app will ask for permission to completely remove it from the device. Just click on Yes to get rid of obsolete programs.
8. Disable Special Effects
Windows 10 greatly hinder the capabilities of your device when you have turned on special effects. Those features fade in and fade out by default on the Windows operating system. Other resource-intensive features that hinder the performance of your device include animations and translucency. To do this –
Type advanced system settings in the Cortana search box. When the Best match displays View advanced system settings Control Panel, click on it.
You will see the “System Properties” window, switch to the Advanced tab. Click on Settings button under Performance segment.
This will access the Performance Options wizard. Under the Visual Effects tab, you need to click on the Custom radio button in order to change some of the default visual effects. You need to unselect these options below to improve computer performance Windows 10.
“Animate controls and elements inside windows”,
“Fade or slide menus into view”,
“Animate windows when minimizing and maximizing”.
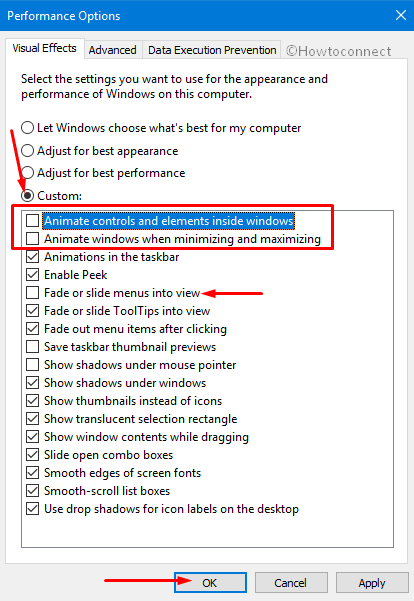
You may also select a few more options based on your preferences. However, some options like Smooth edges of screen fonts are better left selected to have a better visual appeal.
Do not forget to click ‘Apply’ in order to confirm all the changes made by you. These changes will surely Optimize Windows 10 Performance by a great deal.
9. Disable Transparency Effects
Apart from display features like animations and other special effects that tend to slow down the system, Windows 10 also offers transparency effects. This simple and light effect is quite complicated to implement as the system needs to perform intense calculations for the process. To disable the same –
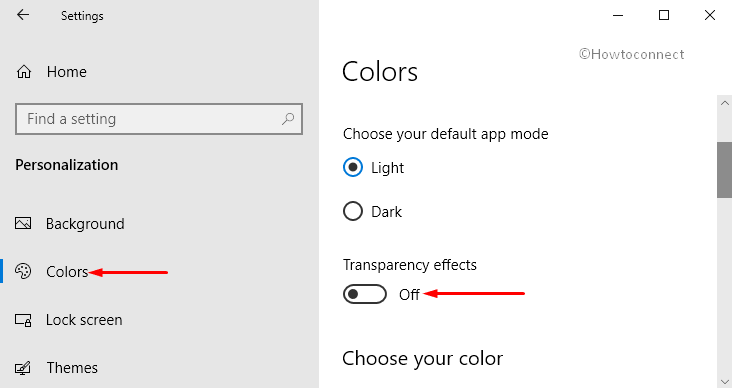
Go to Start Menu and click the cog icon to launch Settings app. Select Personalization category.
Choose the Colors section on the left pane. Switch to the adjacent right pane and toggle OFF the Transparency effects button.
10. Upgrade your RAM
You can dramatically improve the speed for your PC by increasing the amount of RAM. Windows requires a minimum of 4GB RAM for ensuring smooth operation. This, however, would not be the case if you are an avid gamer and have installed resource-hungry gaming applications on your device. In this case, you must opt for installing more RAM on your device.
Basically, the PC comes with a certain number of slots dedicated for RAM where you need to insert its modules.
Perform a right-click on the taskbar and choose Task Manager. It will determine the kind of memory that your machine uses.
Click on the Performance tab. This will display how many memory slots are in use as well as the type being used on your device, the speed of RAM moreover the form factor.
Installation of new RAM modules is not a complicated process. You can do it yourself by using an anti-static wrist strap. This is essential to prevent damage to delicate components of your system. You can also get the hardware upgrade done by a professional and thereby Optimize Windows 10 Performance.
11. Automatic sign-in to user account during startup
If it is just you who uses your laptop or home PC, then you can “automatically sign-in” to your user account during startup. This saves the time consumed during the manual sign-in process. It can speed up the process and Optimize Windows 10 Performance. However, you must be careful enough to prevent others from accessing your device as they will get “automatically signed in”.
To enable automatic sign-in –
Press Win+R to access the Run command and type “netplwiz”.
In the User Accounts window, uncheck the option namely Users must enter a username and password to use this computer. Then click the Apply button.
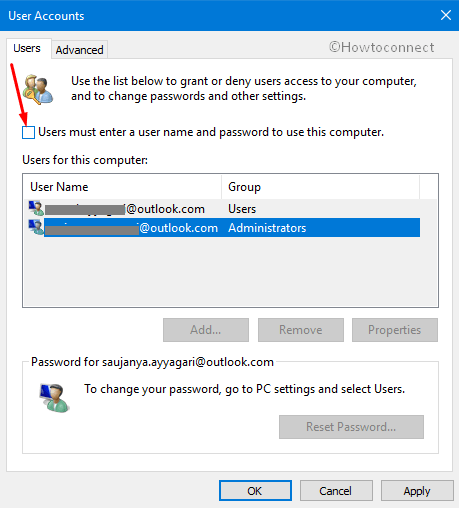
The next time when you restart your computer, it won’t ask you to enter the username & password to access the desktop.
12. Use an SSD Instead of a Mechanical Hard Drive
Solid State Drives or SSDs utilize Flash memory which can also be seen in USB sticks. These permit quicker access when compared to mechanical hard drives which employ magnetized disks. Although these are expensive when compared to regular hard drives. You will experience a massive improvement in boot time with these devices and Optimize Windows 10 Performance. These also improve the overall responsiveness of the system along with file access times. However, ensure to look for the correct size for your device if you intend to purchase an SSD moreover are willing to install it yourself. You can get an SSD in standard sizes such as 64, 128, 256, 512 GB and more.
13. Run System Maintenance
Windows 10 is equipped with powerful features that can significantly enhance the overall performance of your device. The built-in utility in the operating system permits the users to carry out routine system maintenance tasks such as malware check, update scan and defragment of the hard disk drive. These tasks run in the background which does not interrupt your tasks or slows them down.
If you sense there is something not right with your device performance, then you carry out maintenance tasks manually.
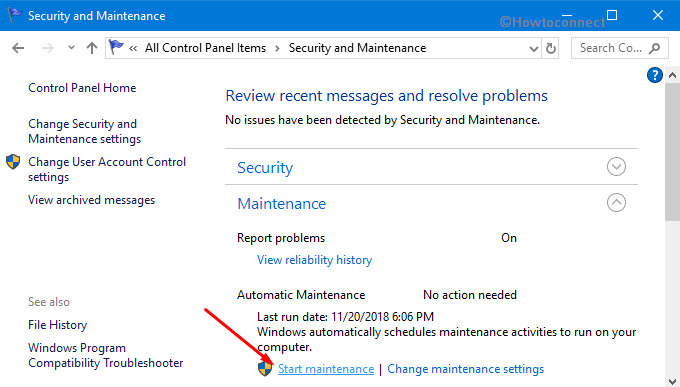
Open Control Panel and navigate to Security and Maintenance.
Click the arrow next to the Maintenance to explore its options.
Under Automatic Maintenance, click on “Start Maintenance” in order to run the task. Do not forget to close and save any open files before you proceed with the task.
14. Set Active Hours
You would obviously not want the OS to reboot the device and force an update while you are in the middle of a presentation. To lose your ongoing work, make sure to set active hours and also restart options. Do not let your device control you when you can instruct it to act as per your commands. Active Hours informs the operating system when it is not fine to restart automatically without prior warning. Restart Options let you decide when exactly the device should be rebooted when there are updates pending.
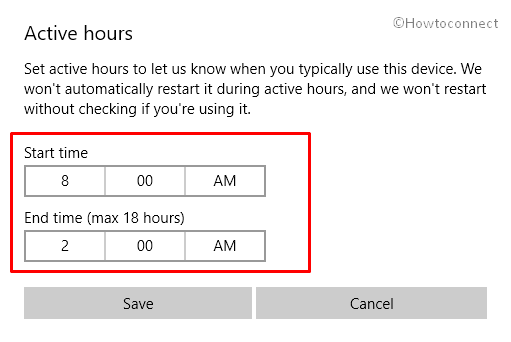
Navigate to the Settings app and choose “Update & Security” category.
Click Change active hours on the right side of the following pane.
Set the Start and End times appropriately and click the Save button.
This will help you to provide all the necessary instructions to your operating system. So, check for updates and install whenever you don’t run important tasks. This will not just keep the system up to date but will also prevent unnecessary reboots and Optimize Windows 10 Performance.
15. Keep Drivers up-to-date
Drivers are bits of software that permit the operating system to have smooth communication with the hardware. They form an integral part of the computer from keyboard and mouse to the basic functionality of the motherboard, moreover graphics card of the device. A majority of drivers enable proper motherboard functions such as networking, audio, correct USB support and more. These drivers enable you to utilize discrete graphics cards to their fullest potential.
Without these, you are likely to experience reduced framerates and some games may refuse to open as well. Drivers are basically tailored for your operating system based on your model. You need to identify if there are any drivers missing from the device. You need to access Device Manager for this purpose.
Right-click on Start and click Device Manager from the power user menu.
You may then view a list of devices without drivers in the “Other Devices” section. You’ll have to download the respective drivers from the device manufacturer’s website.
Once you are done with the installation of drivers, the speed-related problems should not occur anymore.
16. Upgrade your Video Graphics Card
If you are an avid gamer, try to upgrade the video card to make Windows 10 run faster. It will provide a huge benefit and does not slow down other applications. If your motherboard and current card support, then consider adding a second card to improve computer performance Windows 10.
17. Install the latest available version of BIOS
You must make sure to have the latest available BIOS version for your motherboard in order to Optimize Windows 10 Performance. This is because the latest version is free from bugs that deteriorated the functioning of the previous versions. The latest ones promise increased performance and may as well consist of new features. You can find the latest version on the official website of your motherboard manufacturer. So, you need to make sure to install the correct version of BIOS for your 64-bit or 32-bit Windows 10 accordingly.
18. Use a quicker DNS Server
There are several Internet Service Providers who love to brag about the bandwidth they have to offer. They do not lay special focus on maintaining their infrastructure and quality of service. DNS servers may be the biggest offenders if you feel applications take forever to load on your device. Hence you need to add a fast DNS server as your primary server under the settings to deal with the performance issues you experience on your device. It will boost as well as Optimize Windows 10 Performance to another level.
Perform a right-click on Ethernet or Wifi icon on the taskbar. Select Open Internet & Network settings.
This will launch the Network & Internet settings page. On the right pane, scroll down and do a hit on Network and Sharing Center.
Select “Change adapter settings” from the left sidebar of the following page.
Proceeding ahead, perform a right-click on the WiFi or Ethernet connection and click Properties.
In the Properties dialog, click on Internet Protocol Version 4 (TCP/IPv4) followed by a hit on Properties button at the bottom left.
When the next window pops up, you must select the radio button “Use the following DNS server addresses“.
You must enter the preferred moreover alternate DNS server addresses in their respective fields. If your Internet service provider hasn’t provided you with one, then Google Public DNS: 8.8.8.8 and 8.8.4.4.
Click on OK and Close to apply the settings.
19. Turn on Fast Startup
Fast Startup or Hybrid Boot is activated in Windows 10 by default. This setting helps your device to turn on quickly after a shutdown. The OS does this by saving an image of loaded drivers and kernel to hiberfile while shutting down. This enables you to “restart Windows 10 PC” quickly as the operating system simply loads the hiberfile in the memory instead of restarting it. To do this –
Press Win + X hotkeys altogether and choose Power Options from the menu that shows up.
Click Additional power settings.
On the left pane of the following window, do a hit on “Choose what the power buttons does“.
Next, choose “Change Settings that are currently unavailable“. If the User Account Control asks for your permission, choose Yes.
Under Shutdown settings, ensure to select the box next to the option Turn on fast startup (recommended).
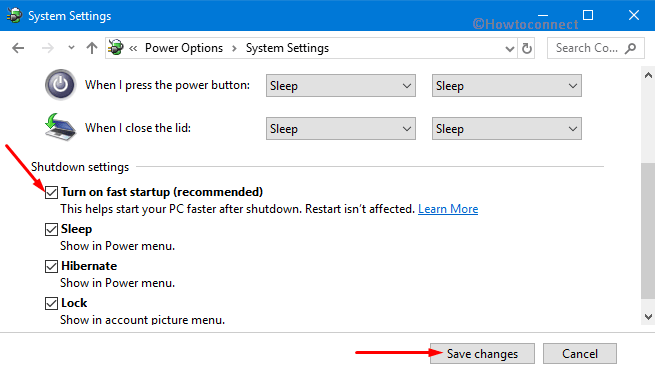
Lastly, do a click on the Save changes button.
20. Disable Hibernate feature if not used
If you do not make use of “Fast Startup” or “Hibernate” feature, then disabling it will free a lot of space on your hard drive. The shutdown time of your device is going to be shorter when hibernate feature is disabled. You need to specify to the system if you prefer to use the Fast Startup feature and not hibernate option. This will significantly reduce the file size on your memory drive thereby speed up Windows 10 laptop or PC.
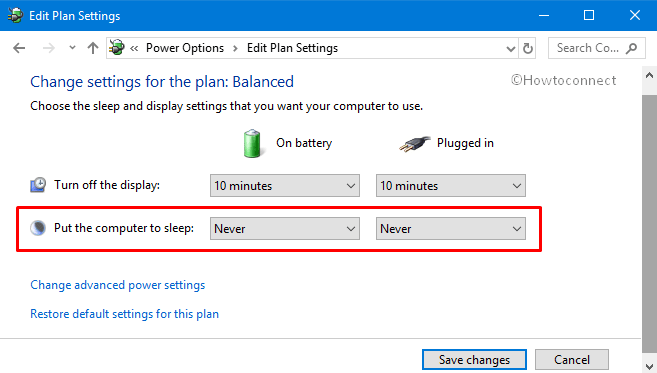
Open Power Options through Control Panel. With the selected plan, click on “Change plan settings“.
For the option “Put the computer to sleep“, select Never for On battery as well as Plugged in. Then click Save changes.
21. Enable Write Caching for Storage Devices
This option may prove to be immensely beneficial if the problem that you experience is because of storage devices. Enable Disk Write Caching will eventually help in deriving the highest possible performance from your hard disk drives (HDDs).
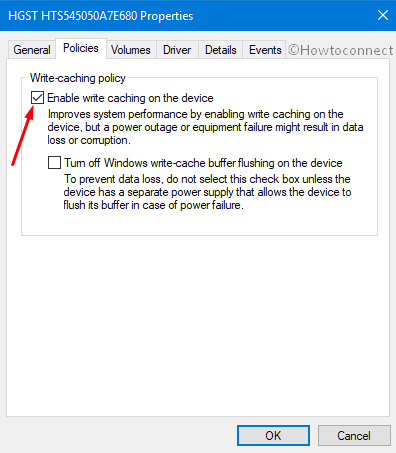
Press Win+X and then select “Device Manager“. Click the arrow next to “Disk drives” to show the exact disk drive installed on your computer. Right-click and select Properties.
Under Policies tab, select the option namely Enable write caching on the device to turn on. Select OK.
22. Move page files to separate hard disk
Moving page files to a secondary hard drive instead of C: drive can help in dramatically speed up Windows 10 laptop or computer. Doing this will help to keep the page file in peak execution and condition and also Optimize Windows 10 Performance.
Press “Win+R” keys in order to access the Run dialog box. Then type SystemPropertiesAdvanced and click OK.
Stay into the Advanced tab and underneath Performance section, click on Settings.
Go to the Advanced tab and click on the Change button.
Now the Virtual Memory window pops up. You need to keep the option “Automatically manage paging file size for all drives” unchecked.
Next, for C: drive, you must select the Paging file size as “No paging file“. Then press the Set button.

Moving forward, then select a new page file on another drive location. Select any other drives listed with sufficient space and then select the Custom size.
Set the “Initial and Maximum paging file sizes” as per the recommended sizes are shown.
Finally, make a click on Set and then OK. You need to restart your PC for the changes to take effect.
For reference, also read Tweak Paging File for better Windows 10 Performance.
23. Uninstall or disable Internet Explorer toolbars and add-ons
If you experience issues while accessing the web from your device, then there may be chances that add-ons and toolbars may be hindering the speed. You may choose to disable the “toolbars” moreover “add-ons” that do not serve you in any way to boost Windows 10 performance including your web browser.
24. Remove unnecessary gadgets from desktop
You may have this habit to make your desktop appear more lavish by using different types of gadgets. You love to load your desktop with mini-programs as they provide information within a glance and also provide easy access to tools used on an everyday basis. When you load the desktop with numerous gadgets, then it has a tendency to slow down your computer. Remove unnecessary gadgets help you to make the PC load quickly and thus Optimize Windows 10 Performance.
Type features on Cortana search. From the Best match, do a click on Turn Windows features on or off.
Locate “Windows Gadget Platform” and uncheck the box beside it to turn off gadgets. Restart your computer.
25. Empty the Recycle Bin
Whenever you delete any file from the computer, it usually moves to the “Recycle Bin” and can be recovered later anytime. If you prefer to do away with these files permanently, then you need to frequently clear out the Recycle Bin as well.
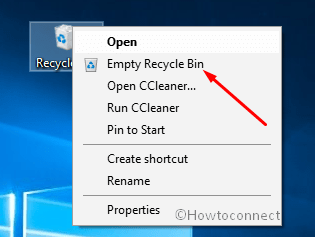
Just do a right-click on the Recycle Bin icon present on the desktop.
Select “Empty the Recycle Bin” option. Click Yes to confirm the removal.
26. Delete files that you no longer need
Instead of piling files that you no longer need, simply remove them in order to speed up Windows 10 laptop. This is because unnecessary files consume extra space on the drive and result in a lag.
27. Remove temporary files
Almost all tasks you perform on your device are stored in the form of a copy. Retaining these temporary files implies consumption of extra space on your drive. Your computer tends to slow down if you do not clear these files off. In order to make the PC perform efficiently, make it a habit to remove temporary files quite frequently. You just need to follow these simple steps for eradicating temporary files from with a view to Optimize Windows 10 Performance.
Right-click Start and click the Run option.
First, type temp and click OK to access the temp folder.
Select all the files using Ctrl+A. Clear off all the items by pressing the Del button.
Again get access to Run and write %temp% and hit Enter. Delete all the stuff. Likewise, again launch Recent folder and delete all the items from there.
28. Remove any adware, if present
There are times when you unknowingly install adware on your system when you install any software or third-party tool from the web. This adware not just pose hindrance when it comes to performance but also acts as a threat of infection. If you cannot remove them manually, then you can utilize Adware Removal tools for the purpose.
Follow our article to Remove Browser Toolbar, Adware, Spyware using AdwCleaner tool.
29. Disable all unnecessary features using Folder options
You can significantly customize the functionality of the File Explorer with simple steps overall to Optimize Windows 10 Performance. The Folder Options in Windows 10 File Explorer has numerous features enabled by default configuration that can be disabled to boost the speed.
- Open File Explorer simply by pressing Windows logo key + E.
- Click on File and subsequently Change folders and search options.
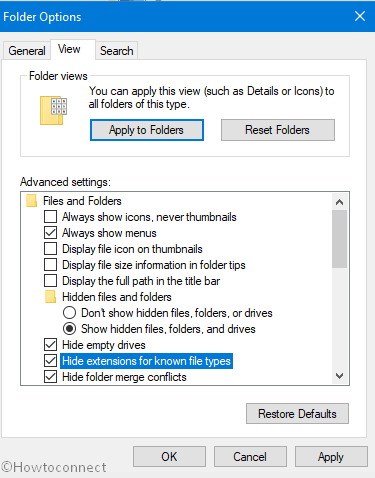
- Under the View tab, you can find several checked options implying that they are enabled. You have to uncheck the options that do not serve you in any manner. Note that if you have disabled all, you will be unable to perform certain important actions. For instance, if you deselect the option ‘Show hidden files, folders or drives’, you would be unable to take a glimpse of them anymore. Make sure what you require and what you do not before disabling the options that are of no use to you. Here are some recommendations on what you can disable:
a) “Display file size information in folder tips”,
b) “Hide extensions for known file types”,
c) “Show pop-up description for folder and desktop items”,
d) “Show encrypted or compressed NTFS files in color”,
30. Remove Sound Notifications of System events
You might have been hearing several sound notifications during various events. This option is set as default mode by the Windows and different buzzer are played during an error message display such as disconnection and connection of USB devices, battery status, success of command and a lot more. These notifications may pose a hurdle to the flawless performance by Windows 10. Turning them off may help you optimize your system further. Here are the simple steps you can follow for disabling sound notifications –
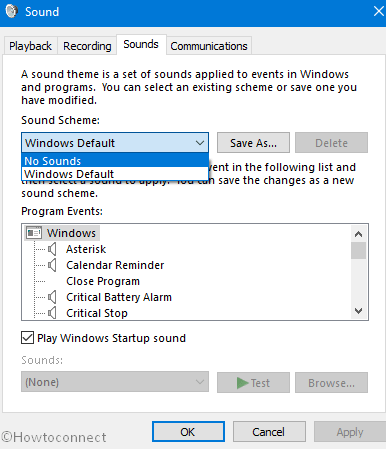
- Right click on Speaker icon from the Taskbar and select open Sound Settings. If you get Settings application, click on Sound control panel link.
- Look under the Sounds tab. You will experience several sound items listed under the Program Events section. Click on the event you choose to retain the notification for and disable the rest.
- If you want to turn off notifications for entire events, then prefer No Sounds in the dropdown within Sound Scheme section. Do not forget to save the changes by clicking Apply followed by Ok button.
31. Turn off App Notifications
If you want to Optimize Windows 10 Performance anyhow, then you can choose to disable app notifications. Your system tends to notify you with a pop-up message whenever there is a small change takes place in an application. If numerous tasks are running simultaneously, then it can badly affect system speed and make the entire process annoying. You can turn off notifications by accessing the Settings app and turning off notifications all at once.
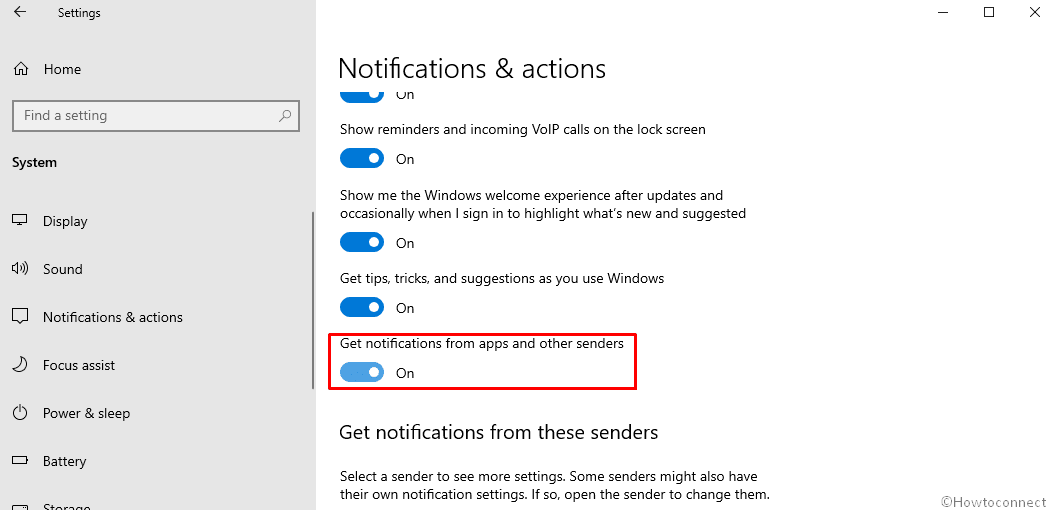
- Click on Settings and then access the System category.
- Click on the Notifications & Actions from the left column.
- Use the toggle slider to turn off the Get notification from apps and other senders option.
32. Disable unused Hardware
All the drivers that have been installed are loaded during Windows Startup. Disabling them that you no longer use will lessen the time that your computer takes to boot. You can perform this by accessing the Device Manager. Here are the simple steps that that will help you to Optimize Windows 10 Performance –
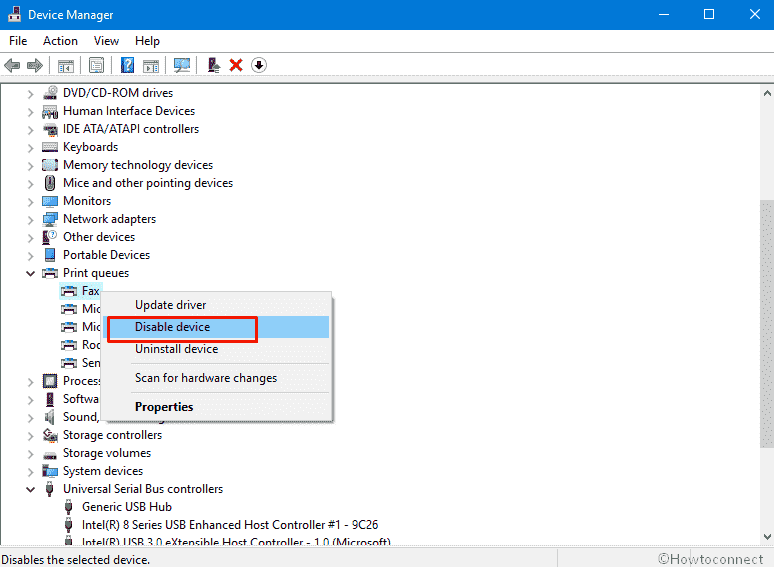
- Choose Device Manager on the list of power menu after right clicking on the Start button.
- You can locate the drivers that are no longer use when the Device Manager window shows up. For instance, those who do not use Fax Driver can disable it with just a right click.
33. Set unwanted services to manual mode
You can stop unwanted services on your Windows 10 device from bothering you by setting some services to manual mode. Here are the simple steps that you can follow to perform the action desired and also Optimize Windows 10 Performance.
- Open the Run command (Win+R) and type “services.msc”. Click Ok.
- Look for services you do not wish to let start automatically.
- So, right click on the service and then choose Properties. Select the Manual option from the drop-down menu under the Startup type category.
- Click Apply and then Ok for saving the changes made to the system.
34. Hide Extra Items from the Navigation Pane of the File Explorer
As you launch File Explorer, you will find numerous items crowded in the navigation pane such as Recycle Bin, Control Panel, Network, Library, and others. Instead of cluttering you can choose to optimize your Windows 10 by retaining only the useful items here.
- Open File Explorer by pressing Win+E and then click on View tab from the menu bar.
- Click on Options icon from the right part of the ribbon
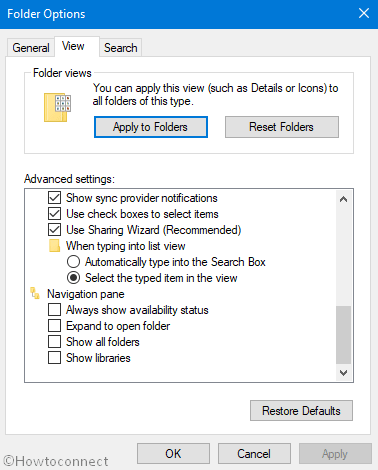
- Switch to View tab on the Folder options wizard and go to Advanced settings box.
- Scroll down to Navigation pane and uncheck all the options.
- At last, click on Apply and OK.
35. Disable low disk checking
If you are running short of space as your disks are full, your device performance would obviously be sluggish. You are warned by your operating system whenever you run short of the disk. Even when there is enough room is available, Windows continues with the checking process. Disabling the process will make your device run fast and Optimize Windows 10 Performance.
- Press Win+R button to initiate Run dialog and then type regedit.exe.
- Then navigate to the following directory – “
HKEY_CURRENT_USER / Software / Microsoft / Windows / CurrentVersion / Policies" - Under the Policies key, look for Explorer. If you cannot find it, then you can go to the right pane and right click on the vacant space. Choose New followed by Key and name it as “Explorer”.
- Go to the left pane and select Explorer. Again return back to the right pane, right click on an empty space and choose DWORD (32-bit) Value.
- Name it as NoLowDiskSpaceChecks.
- Perform a right-click on the newly created DWORD and then choose Modify.
- Set Value data as 1 and then press Ok.
36. Set CPU Priority Level
Windows 10 shares the processor time between all the processes that are depending on the priority level. This configuration consumes more resources of a machine. You need to manually define the priority of application or process to Optimize Windows 10 Performance. If you give a high priority level to a task, then it will be finished faster as opposed to a task with low priority level. Make sure to review the settings to prioritize the tasks as per your requirements.
- Right-click on the Start button and select Task Manager. Click on More details at the bottom.
- Go to Details tab to observe the list of processes.
- Right-click on the preferable process and select Set Priority from the list context menu. Choose the desired value.
- When a dialog box opens up, confirm the option by clicking on Change priority.
37. Defrag your hard drive to Optimize Windows 10 Performance
You can consider better defragmenters that can boost the performance of your device overall. You must not use a defrag tool if your device is running on SSD. If your device is running on a mechanical hard disk, then you should run Defraggler on just the hard disk.
- Type defrag in the taskbar search box and click on Defrag and Optimize drives app from the right flyout.
- Select the desired hard drive and click on Analyze.
- From the results, check the fragmentation level. Then just click on Optimize.
38. Reinstall Windows 10
When all methods mentioned going unsuccessful, then the final resort may be to reinstall Windows 10. This removes all the unnecessary software that is slowing down your system. It also erases malware and adware along with junk files.
39. Helpful Software to Optimize Windows 10 Performance
It is quite easy these days to Optimize Windows 10 Performance using 3rd party software. You can extend the base functionality of your device with incredible applications designed to serve the specific purpose. Here are some vital software that you must have on your device –
CCleaner
As mentioned earlier, CCleaner serves two purposes: It evacuates disk space and erases all the temporary files from your internet cache, browsing history and clipboard. This is a great tool to Optimize Windows 10 Performance.
CPUID Suite
CPUID offers a suite of software that are indispensable for gathering information about your device. HWMonitor and CPU-Z are the most commonly referred recommendations. CPU-Z informs everything you need to know about your CPU. HWMonitor offers information about various sensors of the computer such as fan speed and the temperature. These tools can be utilized for troubleshooting problems within the device to Optimize Windows 10 Performance to Get Ultra-Fast Speed. If you are not doing any kind of troubleshooting, then these tools will help you understand the specific problems being faced by your system.
7zip
This is an open source software that can be utilized for archiving and unarchiving files present in any format. 7zip is an indispensable tool that helps you pack and unpack files by compressing them.
Summary
There are numerous ways in which you can Optimize Windows 10 Performance to Get Ultra-Fast Speed. Some steps can be easily followed even if you are not a pro when it comes to computer terminologies. Then there are some steps where you may need to take professional help if you are not confident enough. However, no matter what the case is, following certain simple tips can dramatically boost the performance of your Windows 10 system.