Overscan in Windows 10 When Connect TV via HDMI Cable – When you connect a Television to Laptop to broadcast a Picture, it doesn’t always fit into the screen. Sometimes, you could see the Picture shown on TV taking up a smaller area than it should be. At the edge of the screen, spare black spaces replace the Picture. This is Overscan issue and Windows 10 creates such annoyances while casting a screen to TV through HDMI Cable.
First of all, you should adjust the display and resolution meeting with the Television. In this concern, you can read How to Fix 4K Scaling Issues in Windows 10 Minuscule Icons, Fuzzy Texts. If the Overscan is not going anyhow on your TV here is a trick to help.
Overscan in Windows 10 When Connect TV via HDMI Cable
Step 1 – Click Start button in the corner of the taskbar, write regedit, and press Enter.
Step 2 – After the registry editor appears, go to the subsequent path –
HKEY_LOCAL_MACHINE\SYSTEM\CurrentControlSet\Control\Video
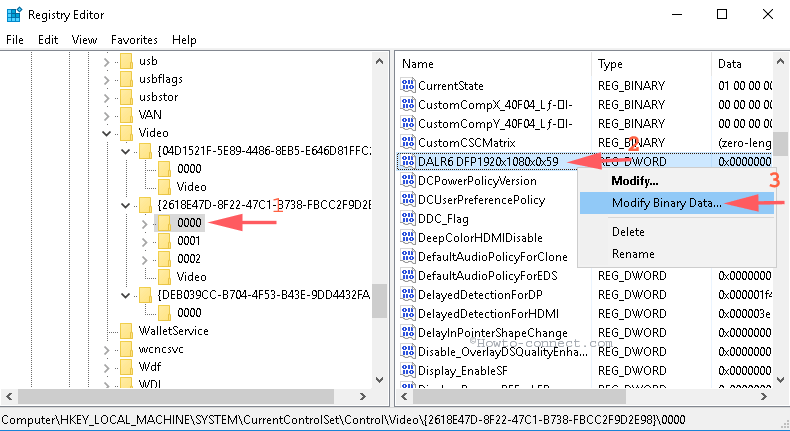
Step – 3 – Here you see a few registry keys. These keys represent the video card available on your computer. In my computer, 3 keys are around HKEY_LOCAL_MACHINE\SYSTEM\CurrentControlSet\Control\Video.
Expand all the registry keys here and locate the key that has 0000 and 0001, 0002, and video subkeys together.
Step – 4 – Take backup of 0000, 0001, and 0002 keys.
Step 5 – Select the Key named 0000 and search HDMI resolution in the right pane. The key will in the shape like 1366×768 or 1280×720.
Step 6 – So select the key that is matching your resolution, right click on it and select Modify binary data.
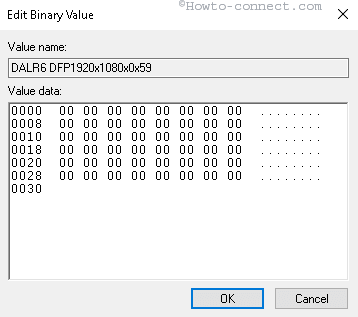
Step 8 – You can see a lot of binary value data on this dialog box. Change everything to zero and click OK.
Step 9 – Do the similar operations with the corresponding 0001 and 0002 subkeys. Right click on them one by one and change its binary data to zero too.
Change Monitor Resolution
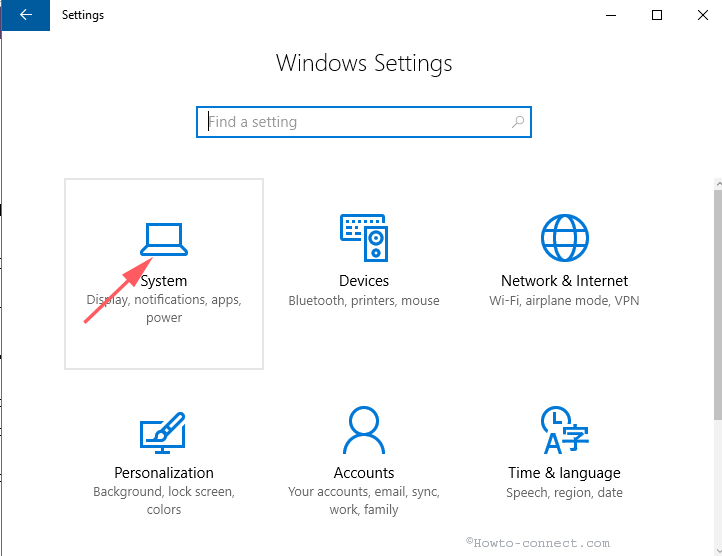
Step 10 – Return back to the desktop and click the combination Win+I. This will access the Settings program.
Step 11– Click on System the first category.
Step 12 – Click the option Advanced display settings in the right pane.
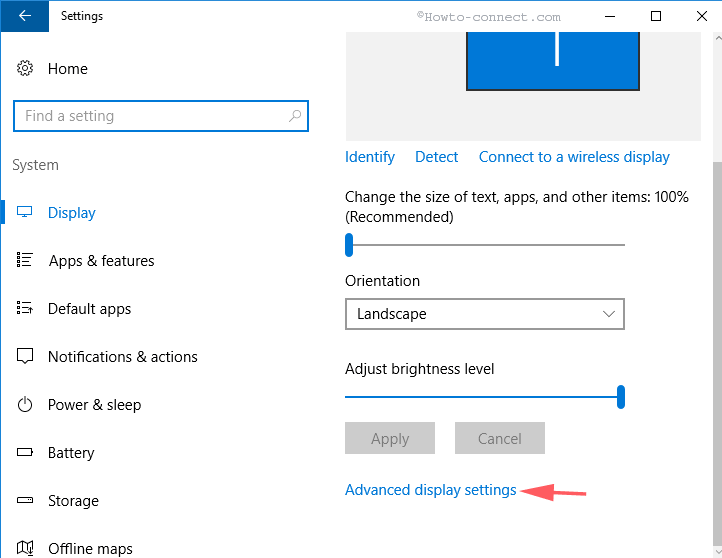
Step 13 – In the Resolution drop-down, at first change a resolution other than 1920×1080. And change it back to 1920×1080 again.
Start the TV and check if Overscan in Windows 10 When Connect TV via HDMI cable is fixed.
Conclusion
In fact, through this method, you set the resolution back default and delete the old data. Once you change it back 1920×1080 the TV adopts the new one. I Hope, this tip to Fix Overscan in Windows 10 will be helpful for you.
Thanks a lot for this hint. It works for me perfect.
I had the issue, that after Windows 1903 Update my second display didn’t show anymore the full picture and I can’t run AMD Catalyst anymore on my sstem (too old and no longer supported in catalyst). This “reset” helps, the monitor has a perfect picture again.