Here, in this article, we are going to discuss ways to Register DLL File in Windows 11 or 10 64 and 32 bit. Many users come across a situation where they face a Windows problem and need to register a DLL file. Usually, this task is effective to fix startup issues for certain programs and optimize PC performance by loading and running different applications.
DLL stands for Dynamic link library. Its working principle is similar to that of executable files in Windows which contains a combination of codes and data. A DLL file includes a combination of multiple files and it is very helpful when an application is running on the PC. It also carries files for remote access and memory space in the system.
Register DLL File in Windows 11 and 10
Here are how to register DLL File in Windows 10 64 and 32 bit
Way-1: Using Run command
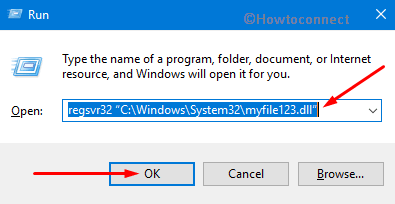
Step-1: Press Win + R.
Step-2: Now type the command as shown below in the Run dialog.
regsvr32 “C:\Windows\System32\myfile123.dll”
Note: Replace myfile123 with the exact file name.
Here “regsvr” signifies to register the file and 32 shows using the 32-bit version. Next, the extending command indicates the specific location of your PC where you are going to install the DLL file.
Step 3: Click the OK.
Step-4: You will get a confirmation message like DLL file is successfully registered on the system. Restart the Windows 11/10 PC. This will Register DLL File in Windows 11 or 10 whether it is 64-bit or 32-bit and the same will be added to the registry right away.
Important: In the 64-bit Windows version, 32-bit DLL files exist in Windows\SysWOW64 whereas 64-bit DLL files are in Windows\System32. But in 32-bit Windows version, the DLL files only stay in Windows\System32 folder. Here, there will be no SysWOW64 folder.
Way-2: Through Command Prompt
First of all, launch an elevated Command Prompt by using any of your preferable procedures. However, you can follow this easy method –
- Click – Start.
- Type – cmd.
- Select – ‘Run as administrator’.
- If UAC prompts up, click Yes.
For 32-bit Windows
- Type cd\ and hit Enter key.
- Next, type in or copy-paste the given line of command and hit Enter –
regSvr32 fileName.dll
Note: Replace fileName with the actual name of the DLL that you wish to register.
To Register 32-bit DLL in 64-bit Windows
- Copy-paste or type the following command and press Enter.
cd \Windows\SysWOW64
- Next, input this command and ensure to press Enter to continue.
regSvr32 fileName.dll
Note: Substitute fileName in the above command with the original name of the DLL file.
How to register DLLs File in 64-bit Windows
If you are using a 64-bit system and want to register a DLL file which is 32 bit, you can follow the below written steps –
Step-1: At first, open File Explorer and navigate to the given location.
%systemroot%\System32
Step-2: Once you have reached System32 folder, copy the DLL file and then paste it to the folder –
%systemroot%\SysWoW64
Step-3: Moving ahead, launch Run using the shortcut key i.e. “Win+R”. Now type the command –
C:\Windows\SysWOW64\REGSVR32
Step-4: Lastly, click on the OK button and reboot your system.
Note: If you skip the first two steps and start from the third step instead you might get an error like this:
• The module failed to load
• The specified module could not be found.
In case the DLL file is not registered in the PC and giving an error “The attempt to register dll file failed”, you need to disable the User Account Control (or in short UAC) in Windows 10.
For reference, read How to Stop User Account Control / UAC on Windows 10.
For a substantial number of users, turning off this feature usually fixes the register error of 32-bit DLL files in the system.
So, that’s all about the ways to Register DLL File in Windows 11 and 10 64 and 32 bit.