In recent days, users rely on remote desktop for various purposes especially to interact with a workplace computer from home or where they are. Basically, when you make a connection to your PC by using this feature, all you need is to straight away access the host computer. Oppositely while connecting to your system from outside network, you will have to enable related access. And for all this to happen, setting up Remote Desktop Port Forwarding on home network becomes compulsory.
Remote Desktop Port Forwarding mainly maps the port of your router’s IP to the port and IP of the Windows 10 desktop you want to interact with. Once you set Port Forwarding properly, it lets you carry out whatever you want to do remotely on the computer as same as you are using the PC.
Remote Desktop Port Forwarding
Here is How to Set up Remote Desktop Port Forwarding Windows 10 –
There are thousands of points to which a computer, a process, or an application connects, and these are known as port. Mainly, they are in control of Windows RDP service 3389, therefore, you will have to set the default port as 3389 for using the feature securely. Let’s see how to configure it –
1] Configure RDP through Windows Firewall
When you want to make RDP accessible within LAN, you need to “allow the port through Windows Firewall”. Here’s how –
- Press Win and I together to open Windows Settings app.
- Click on Update & Security.
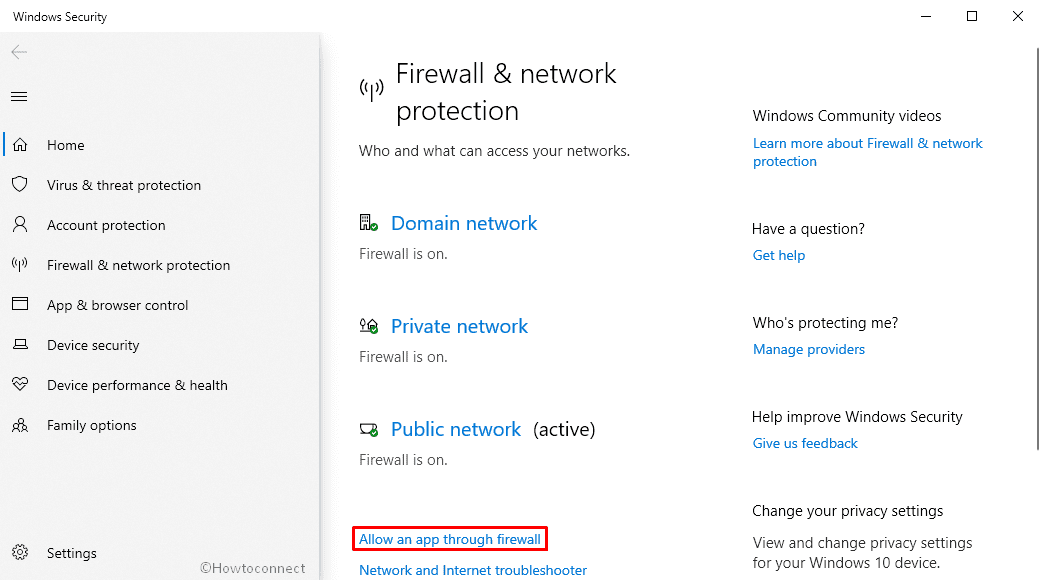
- Select Windows Security from the left sidebar.
- Move to right-pane and click on Firewall & network protection.
- Click the link Allow an app through firewall present in the right-hand listing of when Windows Security shows up.
- A window from Control Panel will prompt, click Change settings button.
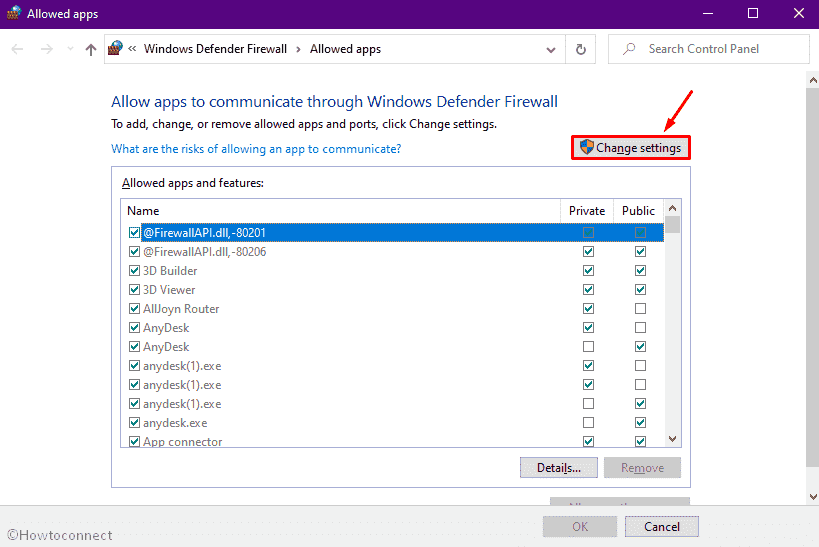
- Doing so will give you the ability to allow apps to communicate through Windows Firewall.
- Scroll down to reach Remote Desktop.
- If you want to allow Remote Desktop on the local network only, make sure the checkbox assigned for Private is ticked.
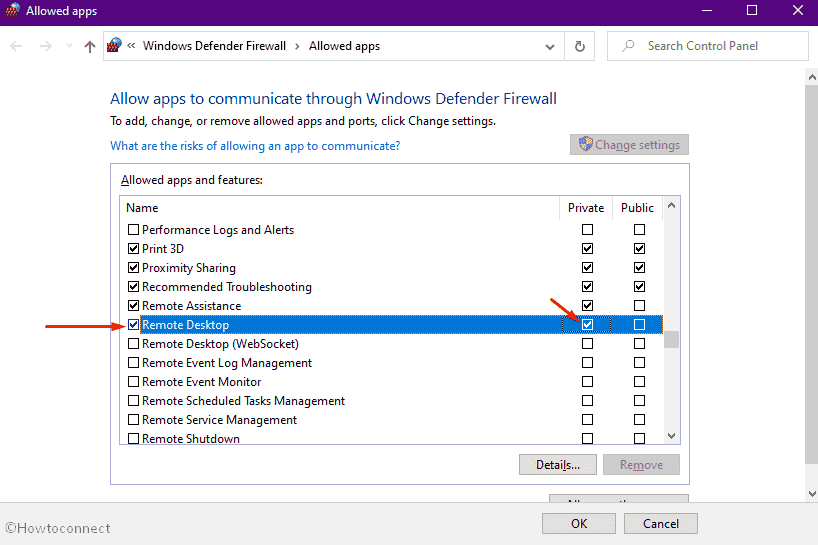
- Similarly, you can allow RDP for the public network by clicking on the checkbox of Public option. However, it’s not safe.
- Thereafter, click OK button to save the changes.
Important – If you don’t get Remote Desktop in the list, click on Allow another app button from the bottom and navigate to the following directory to add the same –
C:\Windows\System32\mstsc.exe
2] Set up Remote Desktop Port Forwarding through Router
If you want to use RDP over the internet, the Remote Desktop Port Forwarding is requisite through the main router. Here is how to proceed –
Check IP address of the computer
First of all, you need to find out the IP address of the computer you’re forwarding the port to. For that –
- Click on the search icon located in the taskbar.
- Type in cmd.exe and hit Enter key.
- In the black panel, insert
ipconfig / alland to execute the command-line, press Enter. - Look for IP Address label and note down the number.
Log into your home internet router
To enter into the router’s web-accessible control panel, all you need to do is open a web browser and surf IP address of router. In most cases, the address is 192.168.1.1 but it may differ depending on which manufacture’s router you are using. To be sure about the IP address, you can check the user manual that comes with the packaging.
You can also get the router’s IP address using Command Prompt. To do so –
- Press Win+R to bring run Dialog box.
- Type cmd in the command box and click OK button.
- Put
ipconfig / allafter blinking cursor and hit Enter. - Look for the Default Gateway IP address and note it down.
After getting the router’s IP, insert it into the address bar of a web browser, and press Enter key. Thereafter, provide credentials to log in to the dedicated control panel.
Modify the router settings
- Enter the control panel of the router, locate either of Applications and Games, Port Forwarding, or NAT (Network Address Translation), and click on it. The name of this section can vary depending on the router.
- In the text entry boxes, put IP address and port numbers.
Note – Set the forwarding port to 3389 and the IP address of your local PC.
- Save the settings and restart the router.
1] How to Disable, Enable Remote Desktop From Windows 10 Settings App
2] How to Connect to PC Using RDP / Remote Desktop Preview on Windows 10
3] Windows 10 – How to Establish Remote Desktop Connection
4] How to View Remote Desktop on Network and Capture Screenshots
5] How to access Remote Desktop with Ammyy Admin
Methods list:
1] Configure RDP through Windows Firewall
2] Set up Remote Desktop Port Forwarding through Router
That’s all!!