Startup repair in Windows 10 is a slight bit complex process but you will get here all the troubleshooting procedures with simplification. In a few cases, the computer hangs during the startup and does not load to the login screen. There are various reasons why Windows-based PCs stuck into the boot. For every reason, the workaround is a little different.
But before you advance to the troubleshooting procedures, you should determine that on which situation does the system gets stuck. Basically, you may experience startup issues in any of the three phases – BIOS, Boot Loader and Kernel. Moreover, some also face several stop codes that occurs late in the boot process. Ensuring the phase is very important in order to solve Windows 10 Startup issue effectively.
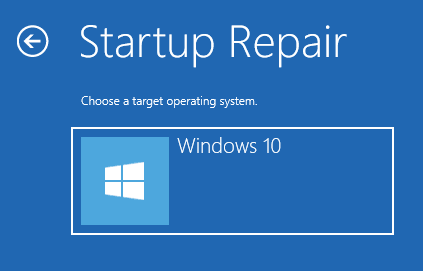
Repair Startup in Windows 10 – All Solutions
Here is how to Repair Startup in Windows 10 –
Devices running Windows 10 may hang up during the startup for various reasons. So, in order to troubleshoot startup issues, decide the phase in which the PC actually stuck.
1. “BIOS – Basic Input/Output System”
2. “Boot loader”
3. “Kernel”
All these phases have a different approach to troubleshoot the problem. So, here, in this article, you will see the troubleshooting methods for the three phases.
Important: Several users complain that they cannot begin the Repair Startup in Windows 10 because the system frequently starts up to the recovery option. In this case, you need to access the Command Prompt from the Advanced Options and type in or copy/paste this command to break the cycle.
Bcdedit /set {default} recoveryenabled no
If this does not work, you can try this following command:
Bcdedit /set {default} bootmenupolicy
Now, depending on which phase your computer gets stuck, follow the troubleshooting techniques for the same.
PHASE-1: BIOS – Basic Input/Output System
To begin the process, you must ensure to detach all the peripherals from the device. Now, you can determine did your PC pass the BIOS phase or is stuck in this by these sequence of steps.
Step 1: Power on the computer and then check whether the “hard disk drive” light is functional or not. If that fails to work, it means the startup process is stuck at the BIOS phase.
Step 2: Now, check again by pressing the Num Lock button to see if the indicator light toggles on or off. If not, be sure that its stucks in the ‘BIOS phase’ or may be due to a hardware problem.
PHASE-2: Boot Loader
Many experienced programmers said that a computer might be hung if the startup process is stuck in the Boot Loader Phase. In this situation, the screen will display one of these error codes:
Boot Configuration Data (BCD) missing or corrupted
Boot file or MBR corrupted
Bootmgr missing or corrupted
Unable to boot due to system hive missing or corrupted
Operating system Missing
Boot sector missing or corrupted
Actually, it is not much difficult to troubleshoot this issue. Begin with starting your machine using “Windows Installation Media”. Next, press ‘Shift + F10‘ to launch the Command Prompt. When you finish, following one of these methods to Repair Startup in Windows 10.
Procedure-1: Repair The Boot Sector
Step 1: First, type in or copy/paste this command and hit Enter to repair the boot code.
BOOTREC / FIXMBR
Step 2: Subsequently, you are going to repair the boot sector with the below-given command.
BOOTREC /FIXBOOT
You are recommended to not run BOOTREC with Fixmbr in this issue because this might not work. If you applied method 1 and it does not show anything, you can try the second one.
Procedure-2: Scanning All Disks For Windows Installations
If the PC receives any errors related to ‘BCD’, follow these sequence of steps to resolve the particular issue.
Type the command Bootrec /ScanOS to start scanning for all the systems that are installed.
In the end, restart Windows 10 PC and check whether the startup trouble no longer occurs. In case, the error persists, start Command Prompt again and type Bootrec /rebuildbcd.
Now, you will notice one of these two below information.
If you come across “Total identified Windows Installations” is 1, type Y.
However, if you receive “Total identified Windows Installations” is 0, you must run these commands one after the other.
bcdedit /export c: \bcdbackup
attrib c:\boot\bcd –h –r –s
ren c:\boot\bcd\bcd.old
bootrec / rebuildbcd
When the process completes, reboot the PC and see how it works.
Procedure-3: Replace The Bootmgr file from C Drive to the System Reserved Partition
If the two above procedures do not help you fix the trouble, you need to replace the Bootmgr file. Hence, go along with the below-mentioned guidelines to replace the Bootmgr file from C to the System Reserved Partition.
Open Command Prompt as you will need to change the directory to the System Reserved Partition.
Moving further, run the attrib command to unhide the file.
attrib-s -h -r
Once again execute the same attrib command on the Windows (system drive).
attrib-s -h –r
When you finish, rename the Bootmgr file to Bootmgr.old by inserting the given command line.
ren c:\bootmgr bootmgr.old
Now, start a Notepad and then navigate to the system drive.
Lastly, copy the Bootmgr file, paste it to the System Reserved Partition and restart your PC.
Procedure-4: Restore The System Hive
If the 3 above fails to resolve, begin the Repair Startup in Windows 10 by restoring the system hive. Multiple programmers believe that users must restore the system hive when Windows fails to load it into the ‘memory’. Now, follow these provided steps to start the process.
To start the process, make sure you occupy an “Emergency Repair Disk” or “Windows Recovery Environment“.
Insert the disk drive and copy the files from “C:\\Windows\Systèm\config\RegBack to C:\\Windows\System32\config”
If the issue still persists, you can continue the process by restoring the system state backup to an alternative location. Then, retrieve the registry hive to solve the error.
If the startup process is not stuck in BIOS or Boot Loader Phase, further, you should think about the Kernel Phase.
PHASE-3: Kernel
In fact, if your computer is stuck in this phrase, you will receive multiple error messages. Based on the experienced users, the common messages are:
- A specific error code is displayed like “0x00000C2,” “0x0000007B or ” “inaccessible boot device”.
- The screen is stuck at the “spinning wheel” “system busy” icon.
- A black screen appears/a stop error shows up after the splash screen.
If your system displays either of the aforesaid messages, you will begin the Repair Startup in Windows 10 by one of these 2 options.
Option-1: Start Your Computer In Safe Mode/Last Know Good Configuration
Initiate with starting the PC in “Safe Mode” or “Safe Mode with Networking” via the ‘Advanced Boot Options’. If one of these options works, use Event Viewer in identifying and diagnosing the causes. Now, following these step to view the events which are recorded in the event logs.
Access Event Viewer by pressing Win + X hotkeys and select the same from the menu that appears.
Now, expand the tool and click on the log that you want to view. Once again, perform a double-click on the specific event that you necessitate to view in the details pane.
After that, click Copy on the Edit menu. Open a new document in the program, for example, MS Word, and click Paste.
Finally, use the Up and Down Arrow Key to view the description of a previous or next event.
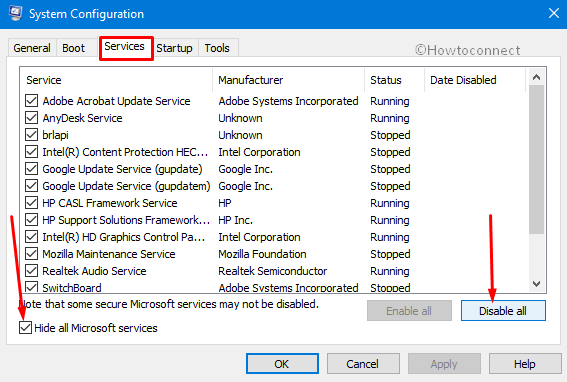
Option-2: Clean Boot
In order to bypass the issues which affect the Services, do a clean restart for the PC by using the System Configuration (msconfig). Go through the below series of steps to perform a clean boot for your computer.
Open System Configuration by using any of your preferred methods. However, the quickest one is to type msconfig on Cortana search and press Enter.
Next, switch to the Services tab on the dialog box that appears and then check the box “Hide All Microsoft services“. Moving ahead, hit the Disable All button and shift to the Startup tab.
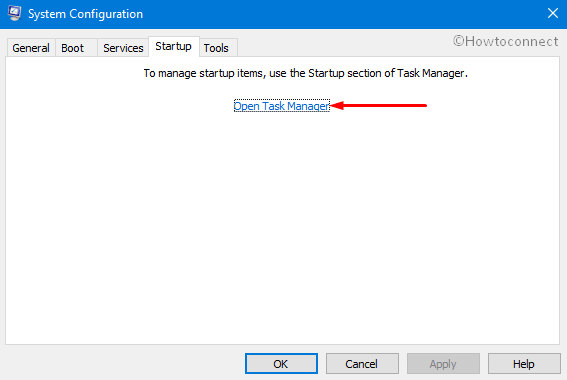
Go to the “Startup” tab, perform a hit on Open Task Manager link.
When the list appears, simply select startup items followed by a click on the Disable button.
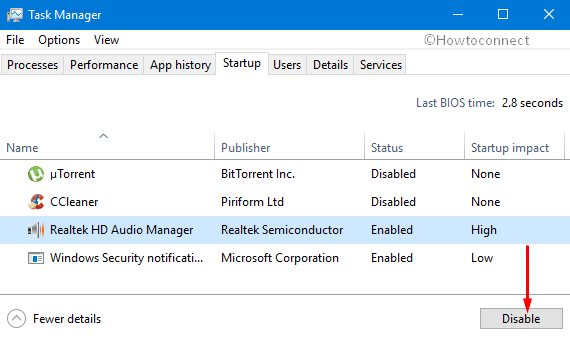
After finishing, close the Task Manager and click OK on the Startup tab and reboot the device.
Option-3: Disable Driver Signature Mode
Many experienced programmers said if you start the computer in the “Disable Driver Signature Mode“, you must determine which drivers and files require the Driver Signature Enforcement. To settle down the Boot Issues which are generally caused by missing “Driver Signature”, go through the below steps.
First of all, restart the computer and press “F8” key to access the ‘Advanced Boot Options‘ screen.
Next, navigate to “Disable Driver Signature Enforcement” with the help of the Arrow Keys and hit Enter. After choosing this mode, if the server starts booting, it indicates that there are some unsigned drivers or modules.
Proceeding forward, open Event Viewer and go to the Applications and Services logs then Microsoft. Continue the process by choosing Windows => CodeIntegrity => Operational.
Note: Once you reach Operational log, check when you see events like the ones depicted below on the middle pane.
If you come across “access denied” while opening the “operational” log, generate a folder on the root of the C drive. Assign full rights to ‘Everyone‘. Next, redirect the ETL file path to the new folder that you just created. Disable and enable the logging again.
After logging is enabled, you will have the unsigned driver name.
Verify the unsigned driver by simply copying and pasting the following command to start the process.
After identifying the unsigned driver, you are going to get the signed driver from a working server.
When it finishes, use Sigcheck tool to ensure the identified files are signed and display the catalog name.
Other Errors
Many experienced users who stuck in the Repair Startup in Windows 10, took their PC to the programmers. After checking, they find out that the Error code INACCESSIBLE_BOOT_DEVICE (“STOP 0X7B”) is the reason which causes to the stop error.
Error code INACCESSIBLE_BOOT_DEVICE
For those who want to repair this issue, follow the below steps to filter the drivers.
First and foremost, insert the ISO disk of the system in the disk drive to open Windows Recovery Environment (WinRE).
Note: The users must use the ISO which has the same or later version of Windows.
Get access to the Registry Editor, load the system hive and name is as “test”.
Navigate to the below subkey and check the lower filter and upper filter items for Non-Microsoft Drivers.
HKEY_LOCAL_MACHINE\SYSTEM\ControlSet001\Control\Class
When you locate the third-party driver, make a click on the upper or lower filter. Delete the value data.
Search through the whole registry for a similar item. Once you finish the process and unload the registry hive, restart the server in the Normal Mode.
Windows Update Issue
In case, if the trouble occurs after you install “Windows Updates”, look for the pending updates and fix it.
Launch Command Prompt screen in WinRE and execute the below-mentioned command.
dism /image:c:\ /get-packages
If it shows certain pending updates, “uninstall” them by these commands.
Dism /image:c\ /remove-package /packagename: name of the package
Dism /image:c:\ /cleanup-image /revertpendingactions
Once finishes, ‘restart’ your PC. In case, your computer cannot start, open a ‘Command Prompt’ window in WinRe again and then start a text editor.
Advance to the System Drive and search for windows\winsxs\pending.xml. If the result shows and found “Pending.xml” file, rename it as Pending.xml.old.
After renaming, open the registry and load the component hive in HKEY_LOCAL_MACHINE as a test. Highlight the loaded test hive and search “pendingxmlidentifier” value.
If it shows pendingxmlidentifier value, delete that and unload the test hive.
Unload the test file. Then load the system hive and name it as “test”.
Navigate to this subkey change the Start value from 1 to 4.
HKEY_LOCAL_MACHINE\SYSTEM\ControlSet001\Services\TrustedInstaller
Finally, unload the hive and restart the computer to check how the Repair Startup in Windows 10 works.
Memory Dumps Error
In case, you experience the stop error in the late of the startup process, you can check the memory dump. When the dump file shows an error which relates to a driver, you can start fixing with the below instruction.
Before starting the process, ensure to check the functionality which is provided by the Driver. If you notice the driver is a third-party boot driver, make sure you understand what it is. Furthermore, if the driver has no dependencies or not important, try loading the system hive and then disable the driver.
However, when the issue shows the system file corruption, run SFC scan in an ‘offline mode’. Now, let’s follow the steps to complete the Repair Startup in Windows 10.
To start the process, access Command Prompt in WinRE. On the Command Prompt window, you will type this command.
SFC /Scannow /OffbootDir=C: \ /IffWinDir=E:\Windows
If it shows there is a disk corruption, continue the process by this command.
chkdsk /f /r
If you find the issue is from the General Registry Corruption or it might be because the new drivers or service were installed, start WinRE again.
Once WinRe opens, again get access to Command Prompt and start a Notepad.
Navigate to “C\Windows\System32\Config\” and then rename all the hives by adding “.old” after each name.
When you finish, move all the hives from ‘Regback’ to ‘Config’ folder then restart your PC in the “Normal Mode” to check the trouble.
That is all!