We will explore here the ways to secure Windows 10 using the Built-in tools and settings like Windows Defender, Firewall, SmartScreen filter, Encryption, etc. This OS version offers so many powerful utilities that a user might never need to look for a 3rd party Antivirus. So all you need to do is customize them in order to get the best result.
Windows Defender is a foolproof built-in antivirus competent to fight and defeat malware and Virus attack. SmartScreen filters harmful software and prevents them from inflicting damage. Windows Firewall allows and strictly blocks applications that may mess up System in either Private or Public network as per your need. In addition, few other settings like Network Sharing Center, Windows update, UAC can appease your appetite for searching how to secure Windows 10. A few so called less significant ways can play big roles to enhance the security standard of your PC. We will also touch these points so that nothing lapse is left.
How to Secure Windows 10 Using Built-in Tools and Settings
You will find here the steps for the workaround with every tool and setting one by one. So follow with care and patience.
Enable Automatic Updates
Microsoft’s developers research on the up-to-date security situation in the cyber world and then develop update files to fight with them. So you shouldn’t miss Windows update as it can be hazardous for your system.
Windows update is automatically enabled in Windows 10 and there is no toggle or switch anywhere that allows to directly disable it. The only button is Check for updates in the Update & Security category Windows update section. But few users do this by manipulating Policy Settings and Registry entries. We have also written an article for this purpose – How to Stop Windows 10 Update in Progress. If you stand among those users who have made changes then revert it back.
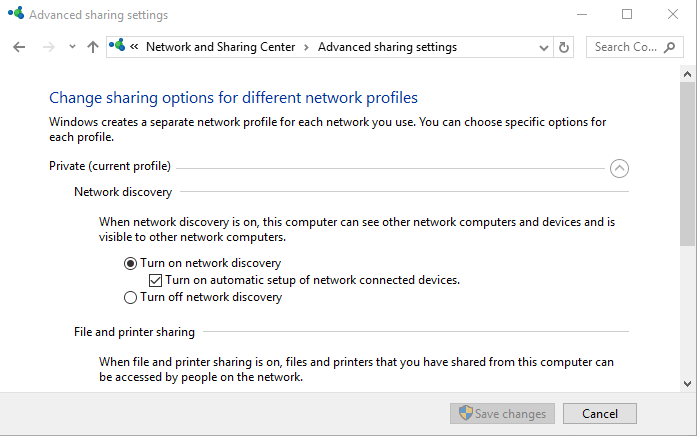
Advanced Sharing Settings
Advanced Sharing Settings play an important role to secure Windows 10. You find 3 network profiles here for each network you use. In the first two profiles, “File and Printer Sharing” and “Network discovery” options are given. So turn on these options if it becomes quite necessary. On the 3rd one, All networks, turn off the public sharing in common situations or use “Encryption” or “Password protected sharing“.
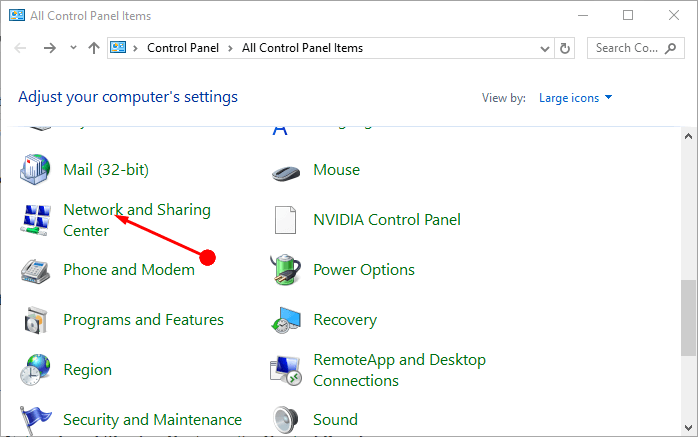
Step 1 – Press Windows logo key on the keyboard, type cp and Enter. Once All Control Panel Items appear, locate Network and Sharing Centre and select it.
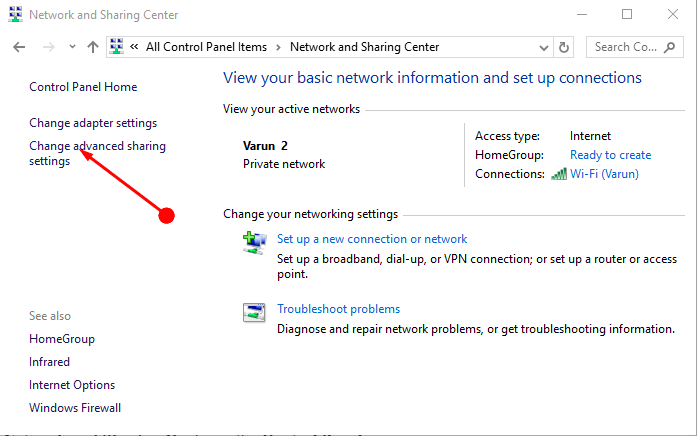
Step 2 – Network and Sharing Centre screen comes into view. Select the “Change Advanced Sharing Settings” option from the left pane.
Step 3 – Here, make the necessary changes as per your need and requirements to maintain the privacy of your data and secure Windows 10.
Customize the Protection tools on Windows Defender Security Center
Windows Defender Security Center is a hub for all the tools whether it is Virus & threat protection or SmartScreen Settings or Firewall. If you are looking for the ways for how to secure Windows 10, this built-in application is the real solution. Pay attention to every setting here one by one –
Open Windows Defender Security Center
Step 1 – Press Win+I, the shortcut combination for Settings application. Click Update & Security.
Step 2 – Then press Windows Defender on the left pane of the Update & Security interface. Now, After navigating to the right side, you notice Windows Defender Security Centre on the top. Click the button.

Step 3 – Here check if Your device is being protected. Also, make sure that 4 icons for Virus & threat protection, Device performance & health, Firewall & network protection, and App & browser control are checked with green tick marks.
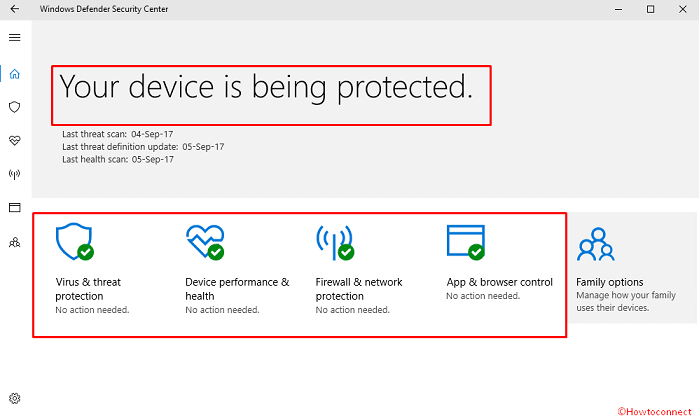
In case you find a cross mark in either of these, click Turn on.
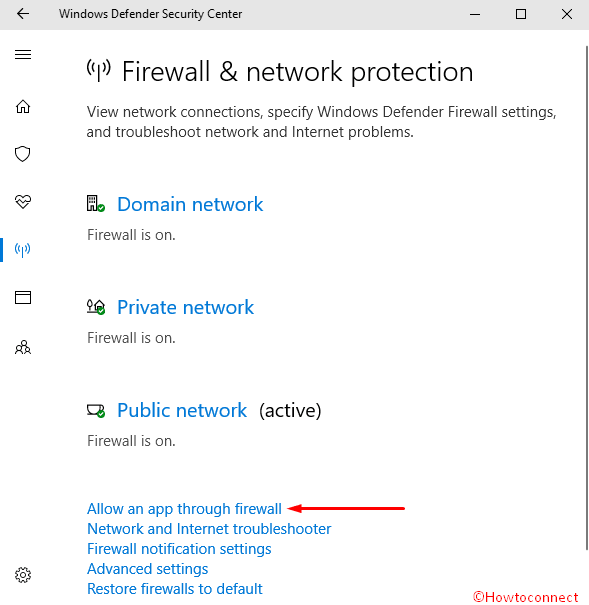
Allow an app through Windows Firewall
Step 4 -Click on Firewall & network protection from the homepage of Windows Defender Security Center. Select “Allow Allow an app through Firewall” from the lower part.
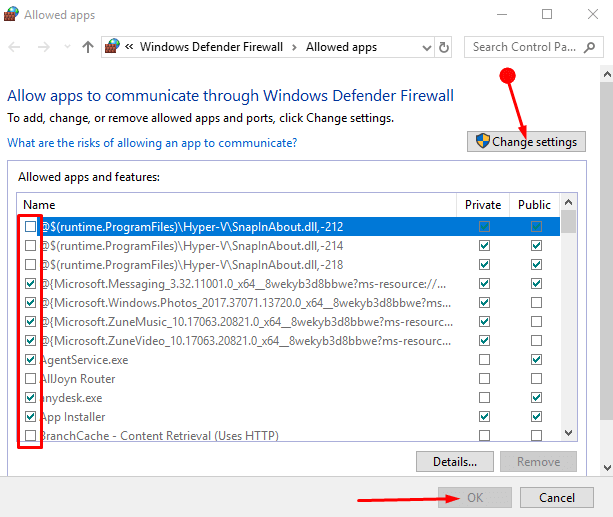
Step 5 – Click on “Change Settings” from the Allowed app window. We suggest you uncheck all the apps which work automatically or has a prefix Remote. In addition, you should manually choose which app deserves attention and may affect the security of Windows 10. Lastly, Click on OK.
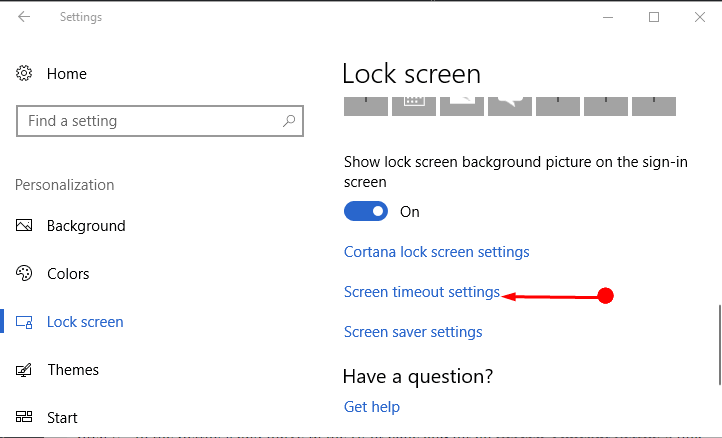
Set least time for Lock Screen time out setting
Lock screen also helps to increase the safety of the device as it protects from others reach while you are not around the corner. So we recommend choosing the minimum time balancing with your convenience for its appearance.
Step 1 – Press Start, type Lock screen settings, and Enter. In the Settings box, scroll down to the bottom in the right pane and select Screen timeout settings.
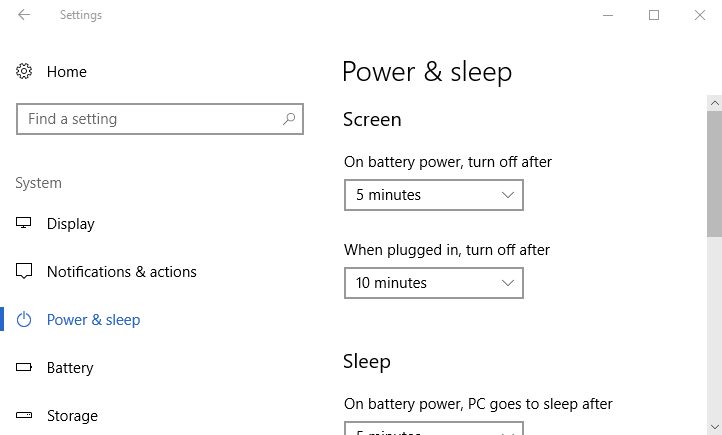
Step 2 – You reach the Power & sleep settings interface directly. Here set the suitable time in both drop down below Screen as per the nature of your work. This will lock your screen after your chosen time.
Secure Boot
In case of a new Windows 10 computer, ensure a secure boot and UEFI instead of legacy BIOS. For the changes follow this guide How to Access UEFI (BIOS) Settings on Windows 10. Now enable the settings. The point worth noting is that the device may or may not have the option for safe boot.
If you are in doubt then confirm with this article – How to Find if Secure Boot is Turned on or Off in Windows 10.
Turn off Flash and Java
It is always good to disable Flash and Java for a secure Windows 10 as they are always prone to something security threat. Many of the users even don’t install these two as the preference since they haven’t need to continue with them. They are very vulnerable and may at times affect the health of your system. You can get appropriate help for the process from here – JAVA threats to computer system, How to uninstall it.
Encrypt Hard Drive
For the maximum of security, you may encrypt the entire hard drive. No one except the person who has enabled the encryption can read his disk. For this reading, another user would need to have the proper access to the appropriate key or password. For methods, follow the guidelines from here Windows 10: How to Encrypt Drive Partition using Bitlocker.
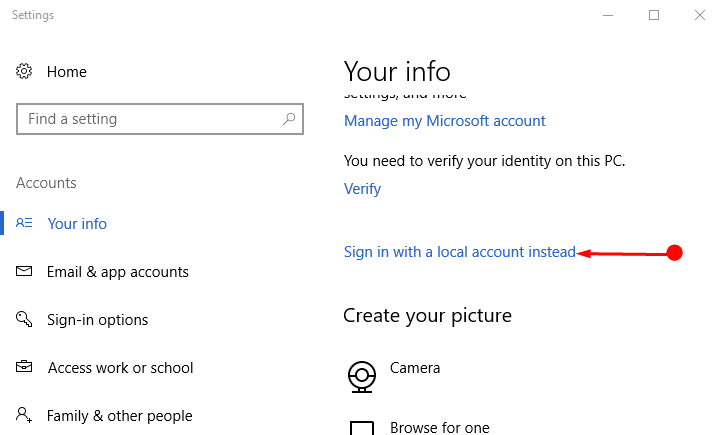
Use Local User Account instead
Local User Account is a very good means to not let the entire PC get hacked. Its Setting separates the main Administrator Account from the Local accounts. Therefore even when the local account gets hacked the access to the entire computer is simply blocked. In this condition, you are pretty capable of accessing your PC with the Administrator account. To use a local user account these steps might help –
Step 1 – Click on Start icon type Accounts and press the Enter key on the Keyboard.
Step 2 – Shift to the right panel and select “Sign in with a local account instead”. After that follow the onscreen guideline to complete the process.
Here it is worth noting that in this process your computer may show you some warning signs. But you may ignore and move forward as such makes no harm to the PC.
Privacy Settings
Microsoft provides you an array of settings for a better experience but you don’t need to use them always rather need. In this case, it is always advisable to turn off those options especially the ones in the privacy arena. This will again help you in maintaining the health of the system and Secure Windows 10.
Step 1 – Press Win and I keys altogether and select Privacy from Settings app.
Step 2 – Here, under the General tab, go to the right pane, check out the list, and turn off the ones that are not required.

Usually, it is good to turn off all the options since they are not in daily use. Whenever you need to reach out turn on. You can access the instructions for more information – How to Avoid Privacy Issues on Windows 10.
Concluding Remark
Above are the few ways for how to secure Windows 10 using built-in tools and settings. The safety and the health of the system come under the priority list for all the users. Hence, this write up will definitely help you to cope up with the modern world of threats and attacks.