Way to Set up Plex Media Server in Windows 10. – Several times you don’t get enough flexibility in choosing a device to stream your favorite video. Because moving media files to other consoles and devices is a very time-consuming process (except a few cases when you own powerful hardware or processor). Also, accessing these files from varied devices is not at all easy. Well, Plex Media Server is designed to specially take care of this problem.
Plex has everything that takes to stream your PC contents over any screen size or Operating system, everything on a few taps/clicks. You need to only Set up Plex Media Server on Windows 10 and broadcast everything on your tablets, PCs, consoles, Macs with zero hassle involved. It is, in fact, a tool (what I found) which is amazing in managing a bulk of media files together in the same space.
See a similar type of guide – How to Cast Websites Using Microsoft Edge to TV.
The Ultra-Flexible Plex
Plex Media Server is highly responsive as far as adapting to different operating systems is concerned. These operating systems involve Windows, Linux, Macs, Android, and iOS, while the devices it is compatible to involve gaming consoles like Play station, Xbox and also the Smart TVs that you own. It is thereby an all-rounder through which you can easily cast your media files.
Follow an article for How to Start Broadcast PC Games Using Beam in Windows 10.
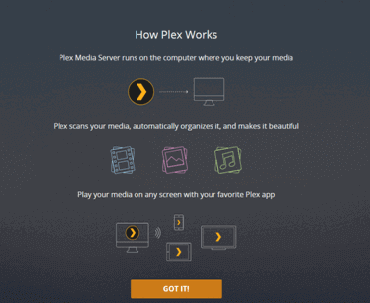
It works in the following format:
So let’s just follow through simple and sure-shot steps to Set up Plex Media Server on Windows 10.
The Prerequisites
Before moving on to how to actually set it up, let’s just know the prerequisites to quickly hit the nail.
Things that you’ll need:
- A good network speed to initialize downloads,
- A Plex account (sign up), and
- Plex Media Server setup file (for installation) on your PCs.
Let’s get started.
Procedure to Set up Plex Media Server on Windows 10
1. Install Plex
Once you’ve downloaded the Plex media server file (see the link mentioned above), open it and you’ll be taken through the actual installation process. The steps that are needed to be followed include:
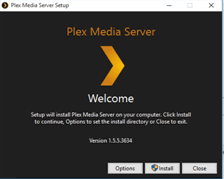
1. Click the “Install” button (on the welcome page), and click “Yes” after obtaining User Account Control Prompt on your screens.
2. Wait for a few minutes (have a cup of tea) and you’ll see the message saying “Setup Successful” by the time you finish your tea.
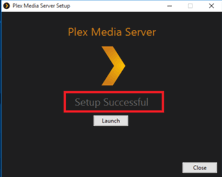
3. Click the “Launch button” and wait till the setup process ends completely.
You are now successful to installed Plex on your PC and it’s time to power it more. How? Just set it up.
Keep Reading.
2. How to Set up Plex Media Server on Windows 10: Add all the Relevant Media
Although, Plex itself starts automatically once the Launch button is pressed, but in case it doesn’t, just launch it from the Start menu. It needs to set itself on your system before doing anything else, for which it’ll take you through the following steps:
1. Agree to the terms of its service (on the front page).
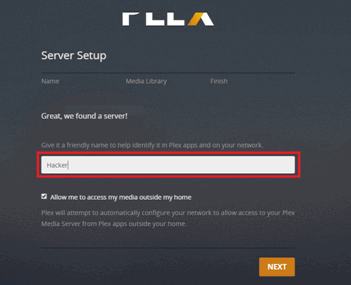
2. Provide a name of your choice (E.g. The hacker, IronMan, etc.) to the server and click Next.
Before explaining step 3, just have your media file locations sorted so as to quickly add them to the server.
3. Click “Add Library” option (at the top) and select the type of media files (Movies, TV Shows, music, photos, etc.) that you want to add and stream.
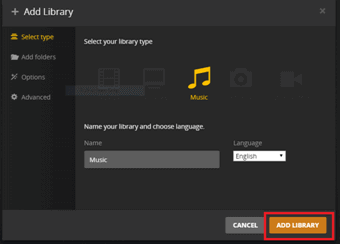
4. Name your library and click Next.
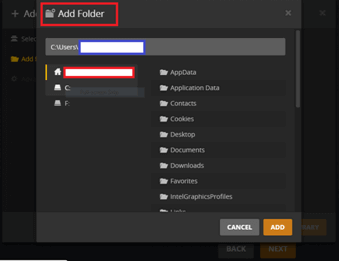
5. For browsing and adding other media files, click “Browse for media folder” and add your desired folder to the Plex simply by clicking Add.
6. Opt for Premium features if you want them or else skip this step for most standard installations.
7. Once all the media files are selected, click “Add library” option to add them to the server. This’ll take a few seconds to complete.
8. On reaching to the final screen, click Done to complete the setup process.
An automatic cataloging will start in Plex to organize everything that you’ve added in the most appropriate format.
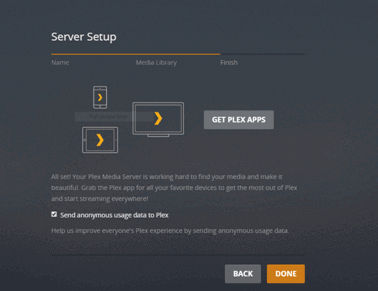
That’s it, you’ve successfully installed and Set up Plex Media Server on Windows 10 powered machine. It’s now running and ready to stream your media content to other devices.
Post-Requirements
There are certain post-requisites also that you should consider and take care of before starting to stream your media content. These are:
- Your PC must be turned on 24×7 if you want to communicate with your media files anytime.
- Moreover, a powerful hardware (i3 or above) is a necessity as a lot of users and devices could connect at the same time thereby increasing the load on the PC along with the power consumption.
- At last, you must have a lot of free storage space to add and smoothly run your favorite media files on any device.
3. The Final Showdown: Stream Media on your Device
All the requirements have been fulfilled by now and it’s time to stream your favorite content (media files) on the device that you want. Now your PC will act like a central server. Other devices like branches of a tree, will stay connected to it unless the connections are cut down by the administrator itself.
How? Don’t worry we’ve no plans of leaving you halfway because below provided are the steps and guidelines which will successfully let you stream your media files being anywhere, anytime.
So have a look.
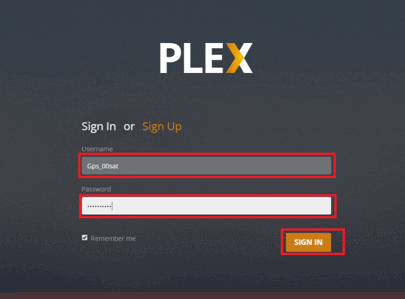
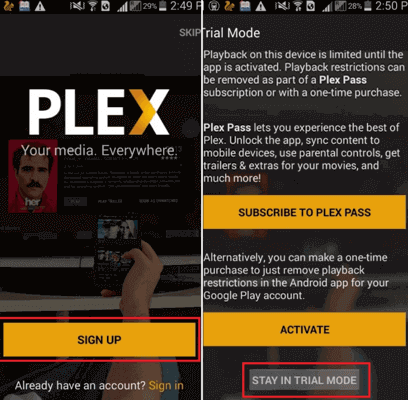
1. Visit the play store of the desired console and type “Plex” in the search box. Hit Enter and install Plex from there.
2. Click the “Sign In” option (after launching it) and enter the same credentials that you used to set Plex on your PC (same as what you signed up with, at the official website of Plex before downloading the file).
Tadaa! You are in. There on the screen, you’ll see all the recently added media files
. Simply Tap them and enjoy the experience being anywhere anytime in just a few seconds.
At the bottom of your screens, you’ll see two options namely Discover and Browse. Click Discover to see the recently added items at one place and Click Browse to check all the categories of the available media files.
Final Words
Select any of the added categories (like Music, Movies, etc.) to access your media files. The format will be the same as how you arranged and organized those files on your PC. Click any of the items/files from there. For example, Tap the movie that you want to see and boom,
It’ll start streaming on your device as shown below.
Also, the system will automatically save and update the progress (of where you left the movie) to its catalog. You thus can easily resume your file at the same time.
So that was all about it. If you are looking for any similar application, Plex Media Server is definitely the best thing for you. Installation and setting up Plex is easy, so you don’t need any “expert” to get it running. So have a nice time streaming. Good luck and Stay tuned.
sure shot