SFC full form is System File checker and the deployment of its command refers to starts scanning promptly to rescue Windows from issues. DISM or Deployment Image Servicing and Management remediates Windows PE Environment and for this, it takes the help of various kinds of files.
CHKDSK is also a tool that investigates flaws on a disk and its meaning is Check Disk. Let’s explain each of the three System troubleshooting tools and how to use them one by one in the subsequent paragraphs. See: What is SFC (System File Checker) and How to Run in Windows 11 or 10?
SFC /Scannow, DISM.Exe, CHKDSK Windows 10 and 11
Here is how to run SFC /Scannow, DISM.Exe, and CHKDSK in Windows 11 and 10
SFC /Scannow Windows 11 or 10
The first utility of SFC /Scannow, DISM.Exe, CHKDSK Windows 10 or 11 is sfc /scannow. It is a significant built-in tool that digs out the messed up files and traces out faulty changes in files.
The main function of this utility is to Scan thoroughly and confirm the system file’s edition.
SFC identifies the system file if anyone tampers and brings back the file’s appropriate version from %systemroot%\system32\dllcache. This original file supersedes the corrupt one with the help of SFC.
When you encounter any type of error on your System, the first universal suggestion is to run SFC /scannow. The mess up may be buggy Windows system, for instance, BSOD, or application crashing, etc.
How to Run SFC Command
Step 1 – Press Windows and S keys.
Step 2 – Type cmd.exe.
Step 3 – Select “Run as administrator”.
Step 4 – Write the following code and hit Enter.
sfc /scannow

Step 5 – The command will start working and show the status in real time so here you need to wait patiently.
SFC Report
After the verification is 100% complete, you may witness one of the below notes –
1. Windows Resource Protection did not find any integrity violations
This note indicates that there are no lost or distorted files detected on your system.
2. Windows Resource Protection could not perform the requested operation
If you witness this error, run SFC in safe mode, and confirm that underneath %WinDir%\WinSxS\Temp, PendingDeletes, and PendingRenames folders exist.
3. Windows Resource Protection found corrupt files and successfully repaired them. Details are included in the CBS.Log %WinDir%\Logs\CBS\CBS.log.
All the necessary actions are taken into account and thus, all the issues are solved.
4. Windows Resource Protection found corrupt files but was unable to fix some of them. Details are included in the CBS.Log %WinDir%\Logs\CBS\CBS.log.
Many times SFC repairs and handles the mess up, but all the time it is not possible. In these cases, you should proceed according to the SFC report.
How to Run SFC /SCANNOW from Desktop in Windows 11 or 10
DISM or Deployment Image Servicing and Management
The second tool of SFC /Scannow, DISM.Exe, CHKDSK Windows 10 or 11 is DISM. Whenever you come across flaws like BSOD or applications crashing, it refers to the corruption of files. Under those circumstances, two functions can settle down the mess and one you regularly use is SFC command. However, in some severe cases, SFC fails to resolve the issues, and this is when DISM comes into the scenario.
Deployment Image & Servicing Management or commonly known as DISM is the tool that settles down component store falsification. This falsification intercepts SFC from operating accurately.
However, this utility is also capable of rectifying issues and handling Windows image. In addition, it can also manage Windows Recovery Environment, Windows Setup, and Windows PE.
DISM takes the assistance of three main options to rectify the Windows Image troubles on your machine. These equipment are entitled as CheckHealth, ScanHealth, and RestoreHealth respectively.
Use DISM with CheckHealth Option
In order to detect the presence of corruption, /CheckHealth switch is used along with DISM. It will only see if corruption exists, but it does not rectify it.
Step 1 – First of all, click on Start.
Step 2 – Type cmd.
Step 3 – Then press Ctrl + Shift + Enter on the keyboard.
Step 4 – Input this piece of code and to execute its duty hit Enter –
DISM /Online /Cleanup-Image /CheckHealth
Use DISM with ScanHealth
To examine the Windows Image for any glitcches, execute DISM command with the /ScanHealth switch. Well, this command line might take a few minutes to complete the process.
Step 1 – Click on Search.
Step 2 – Type cmd and select Run as administrator.
Step 3 – Write down the following code and press Enter –
DISM /Online /Cleanup-Image /ScanHealth
Use DISM with RestoreHealth
To examine with Windows Image for existing sufferings and rectify it, you should employ DISM command with the /RestoreHealth switch.
Step 1 – Open command prompt as administrator.
Step 2 – Copy this command, paste it, and press “Enter” to execute –
DISM /Online /Cleanup-Image /RestoreHealth
Step 3 – Allow it to perform the scan accurately and completely and it may take more than 10 minutes to finish. And if you see that the scan got stuck at around 20%, don’t worry as it is a normal phenomenon.
Step 4 – Once the DISM scan is over, reboot the machine.
What is DISM in Windows 10 (Deployment Image Servicing and Management)?
CHKDSK Command
The third and final pillar of SFC /Scannow, DISM.Exe, CHKDSK Windows 11 or 10 is DISM. This is another repair utility that Microsoft contributes for hard disk scanning and repairing. Users popularly know it as Chkdsk aka Check Disk. People commonly run this tool to inspect their faulty drives and rectify the issues in them if required.
How to Use CHKDSK Command
Step 1 – First of all, launch the Elevated Command prompt using either of the ways.
Step 2 –If you see a UAC prompt, agree by clicking on Yes.
Step 3 – The format of the command line is similar to – chkdsk [Drive:] [parameters]
Step 4 –chkdsk command exhibits the disk’s status but doesn’t rectify errors from a volume. Hence, after the drive letter, write the following parameters – /f /r /x
The parameter f directs CHKDSK to fix the errors that it will discover on the volume.
The parameter r instructs CHKDSK to trace out the poor sections in the volume and retrieve the readable data.
The parameter x compels the volume to dismount before the commencement of the process.
Step 5 – So, the entire command will be like this – chkdsk [Drive:] [parameters]. After input of the drive letter and parameters, the command will look like this
chkdsk C: /f /r /x
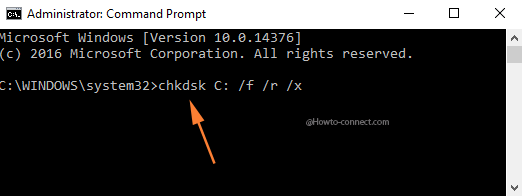
Step 6 – So type this command and press ‘Enter’.
How to Check Faulty Drives with Chkdsk in Windows 10
Note – Noteworthy is CHKDSK requires to lock the drive if the drive holds the System files. If the drive doesn’t contain an operating system or it’s external, then command starts to execute within no time. When you type the command and execute it will ask to scan the disk before the boot of the machine. Hence, write y aka yes, and reboot the machine. The command will begin its impact prior to the Operating System loads.
In this manner, SFC /Scannow, DISM.Exe, CHKDSK Windows 11 or 10 play a significant role to troubleshoot mess up.
Methods:
SFC /Scannow Windows 11 or 10
DISM or Deployment Image Servicing and Management
CHKDSK Command
That’s all!!
Thanks. That worked well in two cases.