Today, in this article, we will discuss how to turn on Reserved Storage in Windows 10. Earlier Windows update fails to download new update packages when the disk storage was completely filled. To solve this problem, Microsoft has bought a new trait. This will be an inbuilt feature of Windows Devices that come pre-installed with May Update i.e. 1903. It is even applicable if you execute a clean installation of Windows 10 to your system.
With Reserved Storage, 7 GB of disk storage is retained only to solve the System Update issue, cache accumulation and apps related trouble. When a new Windows Update is available, existing files will be removed on the reserved storage thus allowing updates to occur instantly. For those who do want to have this attribute without setting their PC anew, there is a way to enable Reserved Storage on existing versions. Here is how to turn on or off this feature.
Way to Turn on Reserved Storage in Windows 10
Here is how to Turn on Reserved Storage in Windows 10-
Step-1: Press Windows logo and R hotkey to open Run dialog box.
Step-2: Here, in the text field, type regedit and hit Enter to access Registry Editor.
Step-3: If the UAC prompt appears up, click Yes to proceed ahead.
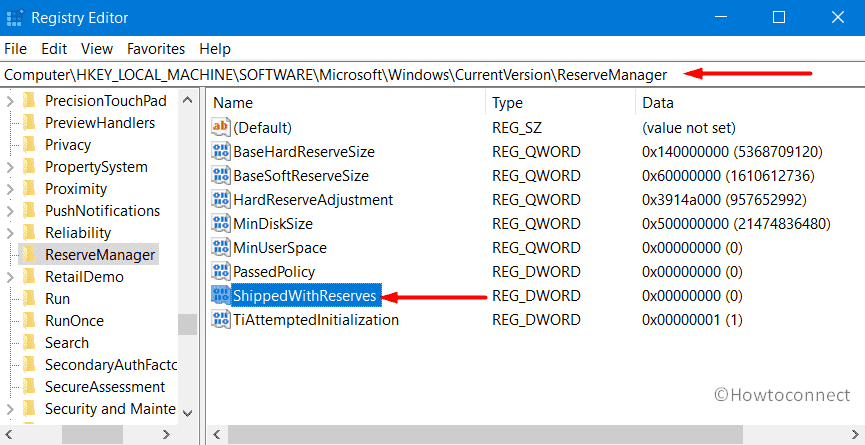
Step-4: On the succeeding window, navigate to the path written below on the left pane.
HKEY_LOCAL_MACHINE\SOFTWARE\Microsoft\Windows\CurrentVersion\ReserveManager
Step-5: Now switch to the right-hand side and double-click on ShippedWithReserves key to edit its DWORD Value.
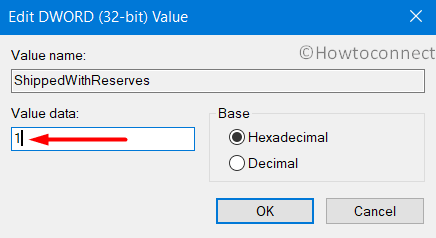
Step-6: Thereafter change its value from 0 to 1 on the pop-up box. Finally, hit OK to save the changes.
Step-7: Once you successfully edit the DWORD, restart Windows 10 PC. Windows 10 will allocate separate “hard disk” storage for updates only in the upcoming releases.
Note: If you don’t perform the modifications correctly in Registry Editor, then it can cause unexpected issues on the system. Sometimes it may even corrupt the operating system. So you must do the changes carefully. Hence, it is better to create a full backup of your system before performing the changes.
Turn off Reserved Storage
To turn off the Reserved Storage feature on your system, use these steps –
- Go to windows search and type Registry Editor. Click the Best match result Registry Editor (Desktop app).
- To authorize the access, click Yes on the UAC prompt
- Under Registry Editor navigate to the below path.
"HKEY_LOCAL_MACHINE\SOFTWARE\Microsoft\Windows\CurrentVersion\ReserveManager"
- Shift to the adjacent right side and double-click on ShippedWithReserves DWORD. Modify its value from 1 to 0. Henceforth click OK to implement the changes.
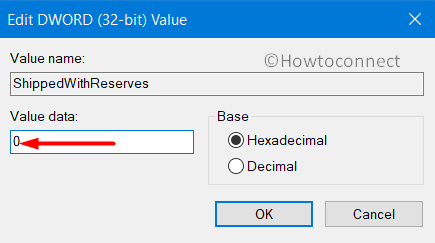
Note – Even for 64-Bit running Windows, it would be a 32-bit DWORD value.
- Once you save the changes, Reboot your PC. Now with the next OS update (build) release, the Reserved Storage will turn off on your device.
Note: The Reserve Storage is accessible starting from build 18298 and later. This to avail this feature on your existing PC, upgrade your OS to its latest version.
That’s it!!!
I am not clear about how this will affect my ‘small storage’ 2-in-1 Tablet PC after the April update. Will Reserved Storage be implemented automatically? What will happen if there is less than 7 GB spare? Is the Reserve kept empty until it is required, or can files be saved to it and if so will they be overwritten by future updates, temporarily or permanently. In which case they need to be expendable – yes? Does Reserve Storage have to be on the C drive or can it be on an external drive and if so how will this be arranged. If it can then it does not present a major issue, instead of a can of worms.