BSOD WHEA_INTERNAL_ERROR indicates a mishappening in the Windows Hardware Error Architecture (WHEA). The issue is mostly caused by a bug in the implementation of a “Platform-Specific Hardware Error Driver” (PSHED) plug-in supplied by a vendor. Having bugcheck value 0x00000122 the message on Blues screen appears up while opening or closing a program.
WHEA INTERNAL ERROR occurs because of missing DLL files as for the software conflict or virus infection. Obviously, like most of the similar BSOD error codes, this issue originates from corrupted drivers of the device, low disk space, and bad sector in Hard Disk or insufficient system resources. Symptoms to confirm the problem is, the PC restarts automatically without warning the users. Blue colored flashing becomes pretty common in desktop screen and the computer keeps freezing quite regularly. We are presenting some real effective resolutions in the next segment and hope this will work for you. For your easy navigating to resolutions, here is all of them in a nutshell –
WHEA_INTERNAL_ERROR BSOD in Windows 10 Solutions
Here is how to fix WHEA_INTERNAL_ERROR BSOD in Windows 10 –
1] Disable the Automatic Rebooting of Windows
The major thing that gives you lots of trouble in case of a BSOD error is, computer keeps rebooting on startup. Definitely, this is disgusting as you cannot really continue working properly. In the process, regular work hours and attempts to prevent the error goes in vain. Well, we can make the environment well for working by making disable automatic restart. Here is the way you need to move on –
Step-1: First of all, try saving all the ongoing processes to avoid losing them. Once done, move ahead to the desktop pressing Win+D keys together.
Step-2: When in the place, do a right click on This PC icon available.
Step-3: Select Properties when the options are upfront.
Step-4: After a new System window opens up, choose “Advanced system settings” located in the left pane.
Step-5: Immediately System Properties wizard will be available in the display. Shift into its Advanced tab.
Step-6: Move to the bottom in the current tab and do a click on Settings located in the Startup and Recovery area.
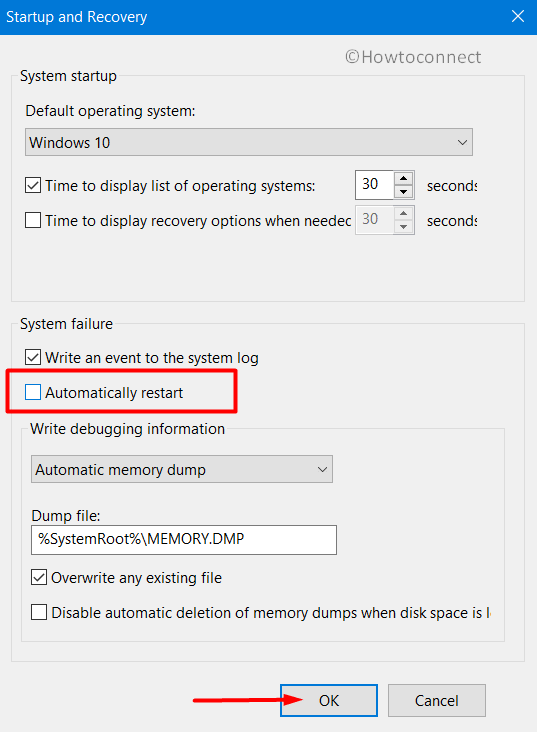
Step-7: A new wizard will open again and you need come down to System failure area in it.
Step-8: From this place, remove the checkmark from a box before the of option “Automatically restart“.
Step-9: Moving ahead, select Ok button at the tail end to save these changes.
As these changes are effective in a moment, from now on Windows restart automatically problem will vanish without prior notice.
2] Dismiss all the malware in Windows Security to Fix WHEA_INTERNAL_ERROR
Malware can do the maximum damage in case of any critical issues happening in Windows. Since they are present everywhere on the web, we cannot really stay away from them. When they manage to enter into the system by any means, deteriorates the valuable system resources. As a result of this act, WHEA_INTERNAL_ERROR BSOD error makes its way out. Microsoft has the built-in Windows Security app to dismiss them in a furnished way. To accomplish the task, here are the instructions –
- Open up Windows Search bar by pressing “Win+S” hotkeys.
- Write “Security” in the vacant area here and select Windows Security when peeks in the result.
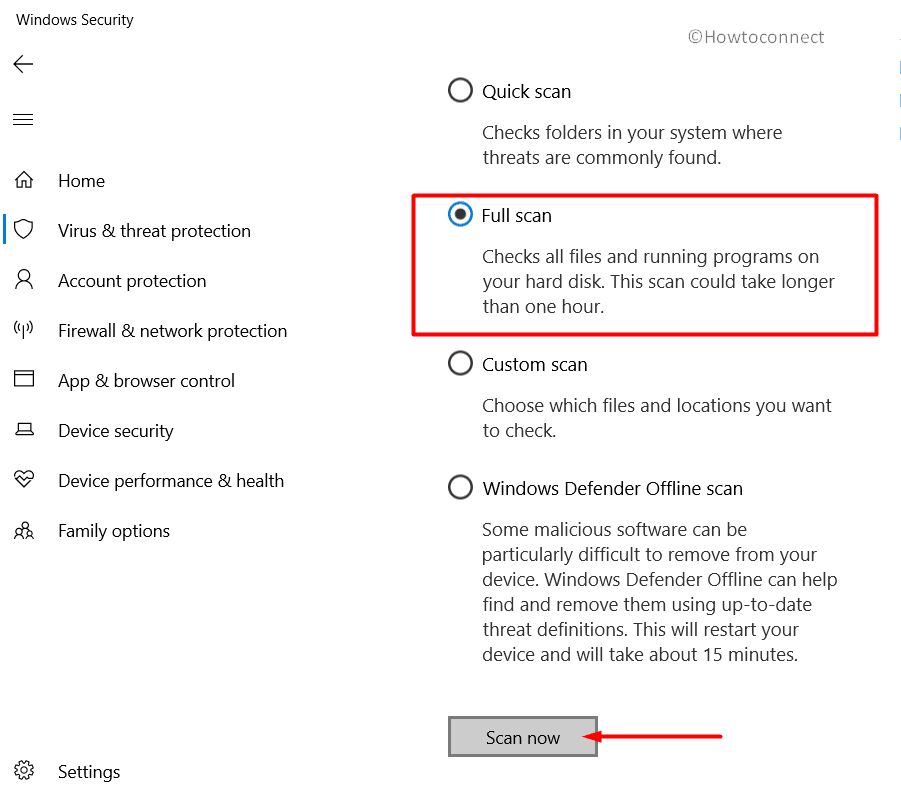
- When the app area is visible in the display, choose Virus & threat protection lying on the left.
- Sharply move aside to adjacent pane and perform a click Scan options link.
- When the methods are available, select the radio button before Full scan.
- Moving forward, do a click on Scan now button and let the process begin.
- You will be resented with the results after finishing detection. Hit Clean threats option if any virus traces out.
- On the consequent page, select Remove initially and then Start actions from there available options.
- Once this process ends, there should not be any malware present in your system which would possibly resolve WHEA INTERNAL ERROR.
3] Update the BIOS of your System
BIOS is undoubtedly one of the most important components in a system. Though it’s a software resource, many of the Hardware elements depend on it actively. We need to be sheer careful while making any modification in it. Sometimes, a corrupted BIOS can be a cause of WHEA_INTERNAL_ERROR BSOD as well. To update this, here is the process to progress forward –
- Firstly, open Run dialog box by hitting “Windows key + R” together.
- In the empty typing area of this wizard, write “msinfo32”.
- Press Enter key and let open the System Information page.
- In the appearing UI next, type “BIOS version” in the search box provided.
- Hit Enter and system will provide you information that let you check BIOS version.
- At this point, launch any web browser and visit the BIOS manufacturers website.
- Download the latest version from here. (Keep the laptop charger plugged in while doing the task).
- When the downloading gets over, make a double click on the downloaded file and install it.
- Once all the processes finish up successfully, reboot the device.
4] Try performing Safe Boot to Windows and load only basic processes
Often loading only basic processes in Safe Mode turns as a perfect solution for issues like WHEA_INTERNAL_ERROR in Windows 10. This resolution is very old and successfully prevailing from way before. Now, we will try to perform this Safe Boot in the below process –
- Invoke Cortana search bar in the way shown up in the previous workaround.
- Type msconfig in the text box and select System Configuration when it shows up in the result.
- Transfer to the Boot tab when the app hits on display.
- Scroll down and reach to the lower half of this window to have Boot Options.
- In the forward move, mark the checkbox against Safe Boot.
- Once all the grayed out options be active, choose Minimal.
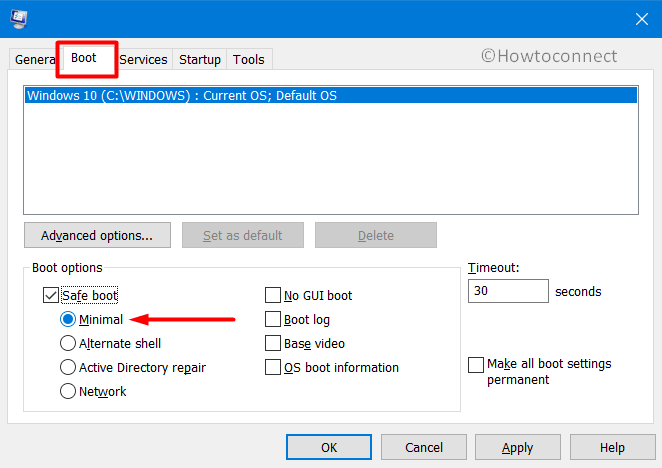
- Select the Apply button and lately Ok to save the changes.
- Now, leave this window and perform a reboot in a prevalent method.
- When the device will boot at the startup next, keep pressing F8 key continuously.
- Once headed to the Advanced boot menu, choose Safe boot from here.
5] Do install all the update patches through the Settings app
An outdated operating system can easily be affected by bugs and problems. To keep it safe and strong, Microsoft cumulative updates play an important role. All these files consist of various fixes. Often we might ignore these and in the meantime, gets affected with WHEA_INTERNAL_ERROR BSOD in Windows 10. The ideal solution in this regard is to install these patches. Here is how to do it –
Try connecting with high-speed internet to limit time consumption while downloading files. If you choose to do it from Mobile Hotspot, disable Metered Connection Windows 10.
- Open Windows Settings app pressing “Win+I” shortcut keys.
- From the App UI, head to Update & Security and perform a click on it.
- When next page unrolls, Windows Update tab located at the left-hand side shows up by default.
- Move on the right and directly hit on the button saying Check for updates.
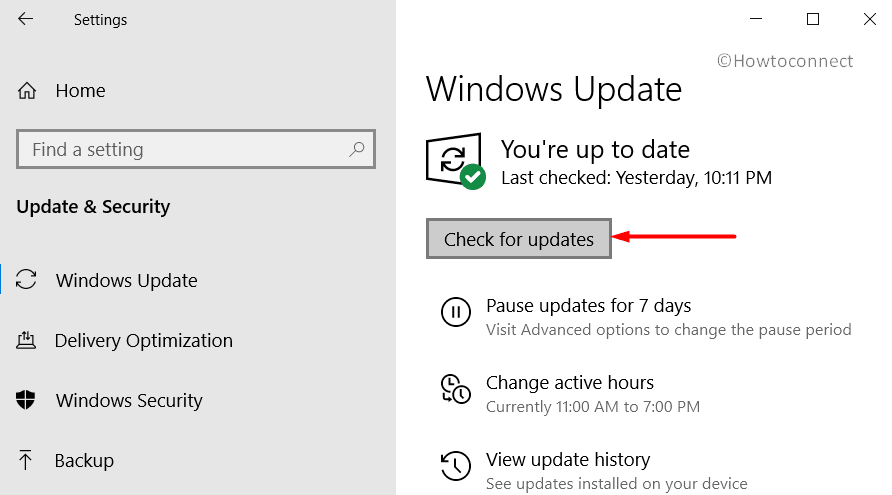
- Upon finishing the searching, available patches will display here. Do a click on Download button.
- Once files are already in the system, the installation will take place automatically.
- If Windows prompts for restarting, attend all the requirements in the process.
6] Rectify Windows Resources and recover DLL files
System files are important to flawlessly run the Operating system. Any issue here might lead to WHEA_INTERNAL_ERROR BSOD. To rectify these from corruption or to recover ant DLL files, we have the System File Checker. Here is how to proceed for that –
- Make a right-click on Start menu icon taking the cursor over the left bottom corner of Desktop.
- Select Run from there and invoke the dialog.
- In the empty space provided herein wizard, type cmd.exe.
- Now press Ctrl+ Shift+ Enter keyboard shortcuts together to access the Elevated Command Prompt.
- When in the dark window, enter following command line at winking cursor –
Sfc /scannow
- Press Enter key now to activate the system file checker tool.
- When the process starts, this tool will detect and fix corrupted files automatically.
- Be patient and wait until the fixing ends up completely.
- Reboot the system after ending the process.
- Once the desktop comes up, carry out a check for the existence of this WHEA INTERNAL ERROR.
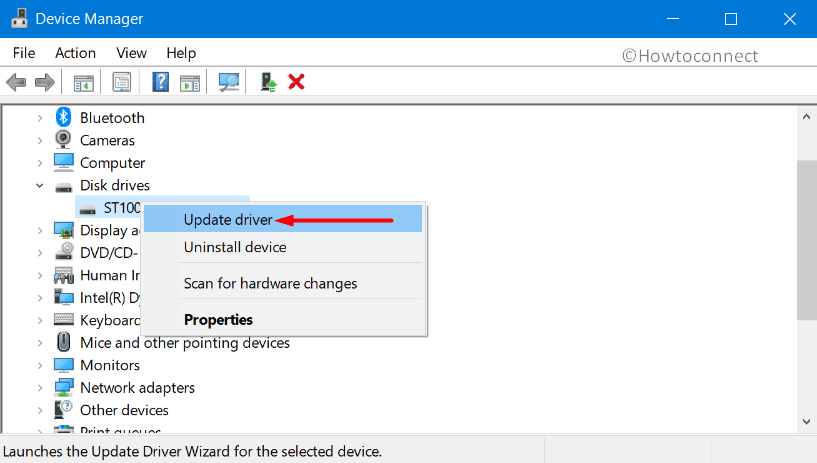
7] Take help from Device Manager for updating outdated drivers
Outdated device drivers are vulnerable to serious damages especially in case of blue screen error. The easiest way to update them is to use the Device Manager. Here, the outdated ones are identified nicely with yellow exclamation mark. This makes the whole task a lot smoother. Here is how to proceed –
- Open Run command making a combined press of Windows key + R.
- When the wizard arrives, type devmgmt.msc in the empty text area.
- Now, hit the OK button located beneath the box.
- Once the Device Manager is upfront, have a close look in the console.
- Expand the device having a mark of exclamation.
- After expansion, perform a right click on the drivers one by one. When a menu shows up, select Update driver option and let the process begin.
8] Run Windows Blue Screen Troubleshooter to resolve WHEA_INTERNAL_ERROR
Having Blue Screen of Death error present in a good number of devices, it was indeed necessary to find a solution which can eradicate the issue internally. Microsoft proving its legacy, introduced a new default tool in Windows 10 for this. A utility named Blue Screen Troubleshooter started its journey in Windows 10 Fall Creators Update version. If you are using an updated version of this OS, can access it going through the Settings app. Here is how to apply the tool –
- Call up the Windows Settings app initially pressing Windows + I together.
- Click Update & Security tile on the main interface of the app.
- After succeeding page comes in, select Troubleshoot lying in the left pane and then jump to the corresponding right.
- Here, find Blue Screen option and do a click on it.
- Hit the Run the Troubleshooter button from the extended pane once visible.
Now, the tool will start detecting WHEA_INTERNAL_ERROR in the system. If it finds the root cause, it will resolve them immediately.
9] Remove the similar programs colliding with one another
If you have installed similar programs in Windows, that might go wrong sometimes. The reason is, they will have a tendency to collide with each other. As a result, some of the necessary system resources go missing also. As for absent components, BSOD error evolves in a computer. To stop this act, we need to uninstall one of these programs. Here is how to delete an app –
- Press Windows key and let open the Start menu.
- Do a click on the Gear icon and launch the Settings app.
- From the appearing window, perform a click on Apps tile.
- Jump to the corresponding right side of the consequent page and find out apps colliding in the listed programs.
- Make a click on it for expanding and hit Uninstall once seen in the pane.
- If UAC asks for permission, select Yes to proceed.
- Follow the guidelines available on display next to remove the tool completely.
- Once the task finishes, restart the device using the usual process.
- When returning to the desktop, if you see the WHEA_INTERNAL_ERROR has already resolved, can step out for installing these programs again.
10] Settle down Memory Issues and fix up RAM corruption
If your device suffers from memory issues, it can eventually get affected with WHEA INTERNAL ERROR. Memory issue indicates bad RAM or having an incorrect allocation of it. To put an end of these burning problems, we can access the Windows Memory Diagnostic tool. This will detect and fix the troubles automatically if activated. To launch the tool, move with below guidelines –
- Launch the Settings app using guidelines we stated in the previous workaround.
- When you see a search box in the UI, type memory in it.
- After the results being shown, “Diagnose your computer’s memory problems”.
- This action will lead to the opening of the “Windows Memory Diagnostic tool”.
- Moving to the wizard, select “Restart now and check for problems (recommended)”.

- Windows will complete the first cycle of rebooting now and then load the desktop, a blue screen will be visible and it will detect memory issues.
- Once the progress hits 100 %, Windows will prompt to reboot for the second time.
- When the computer loads desktop next, the result of carrying out diagnostic will be available in the System tray- notification area.
11] Offer the Hardware components a momentary break
BSOD error is dangerous in a word and causes severe damages in the system. The worst news is that people discovered this issue after connecting a Hardware component like External Hard Disk. This is pathetic since nowadays we really need those. Well, the issue has a very simple solution like detaching the component only. Once the issue resolved, you can again connect them in the following order –
- First of all, remove the hard drive and similar accessories from the computer.
- Place all of them in an accessible and safe location.
- Now, Restart Windows 10 PC.
- Upon accomplishing the restarting, check for the WHEA_INTERNAL_ERROR BSOD in your system.
- If the issue resolves properly, plug the devices back in.
- Open web browser from Desktop and do a visit to the manufacturer’s website.
- Download and install updated drivers for the hardware accessories and use them smoothly.
12] Uninstall the defective Windows Update files
Usually, the Windows Updating process we follow through the Settings app is autonomous. Doesn’t really end up in disruption or abnormal termination. But sometimes, if that occurs, blue screen error codes might take place. To limit the probability, we need to delete corrupted files immediately. Here is how to uninstall them –
- Open Settings app and navigate to Update & security.
- Upon proceeding to the consequent page, jump on to the right side, hit on View update history.
- From the following window prior to opening, select Uninstall updates link available here.
- By default, a new window “Installed Updates” will show up.
- Move out for latest received patch in the appearing list.
- Select it from there and hit the Uninstall button showing in the top ribbon.
- Keep following the tasks shown in desktop until these are deleted completely.
13] Resolve the bad areas in Hard Disk itself using the Disk Checking tool
Due to using for longer period of time, bad areas might form inside Hard Disk. The ultimate result for this can be severe like BSOD error. Disk Checking utility is the best-suited tool to fix these areas. With the deployment of specific command line tool, it can turn down WHEA_INTERNAL_ERROR in Windows 10. The detailed process is as following –
- Do a click on Taskbar Search icon and allow opening it.
- Type cmd.exe in the gap and do a right click on Command Prompt when appears.
- Select Run as Administrator option from the menu.
- When UAC prompts for permission, choose Yes to follow through.
- When the black window cuts your view, insert the following command at the base of the blinking cursor –
chkdsk C: /f /r /x
- Now, press the Enter key to activate the Disk Checking Tool in this window. The utility will detect all the hard disk bad sector and also fix them automatically.
- The process may seem a long one so hold the nerve until it finishes up completely.
- After it ends, restart the device using any convenient way.
- Prior to returning back, see if there is any BSOD error present in the system.
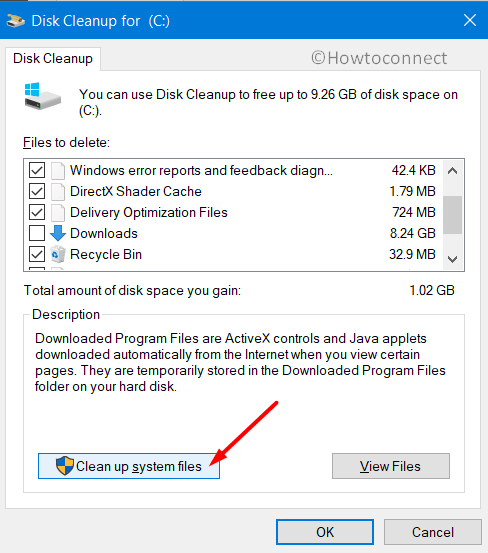
14] Free up memory covered by Junk files using Disk Cleanup utility
For the execution of various tasks, Windows produce junk. These are usually temporary but stored in Hard Disk Space. When they get big, occupy huge space in it. As a result, you see a message that hints you that storage space is running out. The immediate effect is a slow operation and in the long run BSOD error like WHEA_INTERNAL_ERROR in Windows 10. To delete these files, Disk Cleanup tool comes handy. In the meantime, you can recover some space as well. The process is as follows –
- Open Run Dialog box by pressing Win+R keyboard shortcut together.
- When the wizard is upfront, type cleanmgr in the blank space.
- Press Enter key and a small dialog box will come as to choose the drive where you want to carry out cleaning.
- Select C: by clicking on the dropdown menu and eventually press the Enter key.
- When the Disk Cleanup Utility arrives in the display, move down and select the Clean up system files button.
- Since the small popup dialog appears again, Choose C: and also select Ok button.
- Once the Disk Cleanup for C: cuts your view, reach straightly to Files to delete section.
- Now, put a checkmark in all the boxes here only except Downloads.
- Moving ahead to the bottom, hit Ok button to start the removing process.
Make sure, there is nothing left in the Recycle Bin as everything will be deleted in this process.
15] Undo recent changes done by System Restore
Some changes we make on Windows by installing a program or uninstalling always doesn’t go right. When anything wrong takes place, there might be BSOD error as well. The easiest way to scape this is to perform System Restore. This workaround reloads the previous point and no issues come across.
- Open up the Windows taskbar Search pressing Windows+S keys together.
- Enter the text ‘rstrui’ in the blank typing area.
- Pressing Enter key will put forward System Restore immediately.
- From the wizard appearing, select “Show more restore points“.
- Choose the latest one and hit Next option in the process.
- Choose Finish to start restoring process.
16] Fix up corrupted Windows Image files
When Windows image files fall into corruption, there is a sharp chance of having WHEA_INTERNAL_ERROR in Windows 10. To fix these, we can use the DISM tool and the process is as follows –
- Manage entrance to Elevated Command Prompt using above instructions related.
- When in the Dark window, type the following command at the place where a cursor is blinking –
DISM.exe /Online /Cleanup-image /Restorehealth
- The tool will be activated after pressing the Enter key and will rectify all the trouble Windows image files eventually.
- This might be a lengthy one, but thoroughly helpful. So, do not terminate until it finishes normally.
- Once ends, restart the system and when signing back in, perform an inspection for BSOD error.
17] Delete all third-party antivirus tools to fix WHEA_INTERNAL_ERROR
Since Malware causes most of the vulnerabilities nowadays, you may refer to an antivirus program. No matter if it is a third party one. But we have the best Windows Security, a default app for Operating System. We really don’t need a third party app as they might cause WHEA_INTERNAL_ERROR issues as well. We need to uninstall these programs using below guidelines –
- Right click on Start menu icon and select Run from the visible list.
- Type appwiz.cpl in the empty area.
- Select OK button located in the wizard.
- Programs and Features window will show up immediately.
- Reach out to the third party Antivirus program listed there.
- Do a right click on the app and choose Uninstall.
- Proceed with the on-screen guidelines to uninstall it completely.
18] Perform Reinstallation of Windows 10 as of last resort
When all of the above resolution processes fail to resolve WHEA_INTERNAL_ERROR BSOD, we need to think little out of the box. The last resort can be the reinstallation of Windows 10. This will definitively put an end to all the issues afterward if done accurately.
Before doing so, make sure you have saved a backup computer to external hard drive. Connect the device with speedy internet network. You can call an expert if fell nervous. This will eliminate the risk of having bog issues afterward.
These are all about resolutions to fix WHEA_INTERNAL_ERROR BSOD in Windows 10. Hopefully, you have eliminated the issue successfully.
Methods:
1] Disable the Automatic Rebooting of Windows
2] Dismiss all the malware using Windows Security
3] Update the BIOS of your System
4] Try performing Safe Boot to Windows and load only basic processes
5] Do install all the update patches through the Settings app
6] Rectify Windows Resources and recover DLL files
7] Take help from Device Manager for updating outdated drivers
8] Run Windows Blue Screen Troubleshooter
9] Remove the similar programs colliding with one another
10] Settle down Memory Issues and fix up RAM corruption
11] Offer the Hardware components a momentary break
12] Uninstall the defective Windows Update files
13] Resolve the bad areas in Hard Disk itself using the Disk Checking tool
14] Free up memory covered by Junk files using Disk Cleanup utility
15] Undo recent changes done by System Restore
16] Fix up corrupted Windows Image files
17] Delete all third-party antivirus tools
18] Perform Reinstallation of Windows 10 as of last resort
That’s all!!