Windows Memory Diagnostic is a tool in Windows 10 which was also present in the earlier versions. Sometimes certain situations arise regarding memory crash that Windows cannot recognize on its own one because it itself resides in a similar RAM that is creating the problem. And at this point, Windows Memory Diagnostic comes into action. It goes to the root of the problem to diagnose and repair the issue
Now, Windows Memory Diagnostic is used when there are some serious issues in your computer like the crashing of the system, random mistakes, and when you notice some other abnormal performances. And also whenever Windows will suspect and find any problems with your computer’s memory. It will ask you to run the Windows Memory Diagnostic tool. We will portray you with the details of the tool of Windows 10 from where to access it and also how to use it.
Windows Memory Diagnostic Tool – Ways to open and Detect RAM Issues
1] Multiple Ways to open the Tool
Using Search
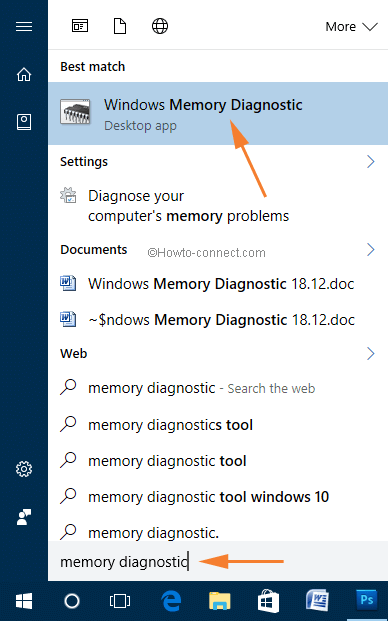
- Click on Start from the taskbar.
- Type memory diagnostic.
- Press Enter.
See – How to Check Ram Type in Windows 11 or 10 like DDR, DDR2.
Through Control Panel
- From Control Panel also, you can access this tool. For this, press Win+Q.
- Type – control.
- Press – Enter.
- Click on the drop-down for View by. Select Large icon.
- Now click on Windows Tools.
- From the next window, double-click on Windows Memory Diagnostic.


See – How to Open Memory Diagnostic Tool in Windows 10.
How to Detect Memory Issues with Windows Memory Diagnostic Tool
There are two methods to open the Windows Memory Diagnostic tool and both are mentioned above. So open the tool applying any of the methods you are comfortable with. Now, as you have clicked the appropriate options to open it, you will notice a small window with two options to choose from.
If you want to run it, click on Restart now and check for problems (recommended) option. But make sure of one thing, save and close all your work before going with this option.

And in the next moment, you will see your screen looking as if it went back to the past, in the DOS age. On the screen, you will notice that the tool is detecting the RAM’s problem.

As the testing process gets over your computer will get restarted all by itself. In the System Tray of the Notification Area, you will see a message which will give you the report of the test.
![]()
The reports of the tests carried out by the Windows Memory Diagnostic are located in the Event Viewer. Open Event Viewer and navigate to the following path to get there: Windows Log ->System->MemoryDiagnostic-Results.

Read – How to Fix Windows 11 performance problems (Solved!).
How to Use Advanced Diagnostic Options of Windows Memory Diagnostic Tool in Windows 10
After selecting the Restart now and check for problems (recommended) option, you have noticed the blue screen carrying out the testing. In the lower left corner of the screen, there is F1=Options, which means press F1 key to see more options.
It is highly recommended to go with the advanced options only if you are an advanced user and wish to alter some specifications. And for others, it is advised to use the basic settings only. The Windows Memory Diagnostics Tool – Options will list you three options: Test Mix, Cache, and Pass Count.
Test Mix: The Test Mix provides you with three options to choose from. Basically, the functioning of all three options is the same. They are Basic, Standard, and Extended. The time consumed by each option for the testing increases from Basic to Standard to Extended. The longest time and the most complex is the Extended one.
Cache: With the three availabilities, Default, On, and Off, select your required one. Well, the best option recommended is to select the Default Cache.
Pass Count: The number mentioned here is the number of times the test will be repeated. By default, the number is two and to have more tests is quite good.

Now, to apply your settings, press F10 key on your keyboard.
Note: This is for the users who might face a problem in opening the Windows Memory Diagnostic as the Windows is only not working. In that case, you cannot start Windows Memory Diagnostic tool. So, bring Windows installation disc into use or a system repair disc or a USB memory stick which has recovery tools.
Read – How to Check PC Specs in Windows 10 – Super Easy ways.
Know More About RAM / Random Access Memory, Clear your Concept.
Conclusion
To get rid of your computer’s RAM problem, Windows Memory Diagnostic is the best tool in Windows 10. Many problems as they seem are related to memory are actually not concerned with memory only. So, this is the easiest and safest tool as it digs out the detailed problems of the computer’s RAM. What are you waiting for? Experience it by yourself and let us know about it.
Thanks for your time. My problem is that after opening the windows memory Diagnostic tool. the “If 1” button does not respond. That is it????
good thing I looked this up, after seeing I had an issue, I removed 2 of the memory sticks and it still did it. I pulled those out and put the first 2 I removed in and the system is fine. I then added the 3 sticks 1 at a time, it was the last stick….that was in position 1 closest to the chip all along. thanks
Prior to running the Memory Diagnostic Tool, run SFC /SCANNOW on your surface.
No Good
The test just sat there, not doing anything,
Esc or Function key didn’t work.
Waited 20 mins and didn’t show any percentage.
Surface Book with 8 Gigs of RAM.
Gettting the unsolved running out of memory problem. Lunancy