Windows 10 Start Menu No Tiles is the common issue that many users confront after the installation of Creators Update. Additionally, a few users notice certain application icons and shortcuts missing from the desktop in this version. Microsoft has stated that you can easily get rid of this problem with several solutions.
Rather than the older versions, many drastic changes took place in the desktop appearance but with the advancement of the system, this is more furnished in Windows 10. In the fast running development works, there are always possibilities of bugs and flaws. And for every issue, there comes a lifesaver solution as in this case also. Various workarounds help you to run and display those applications that don’t appear on the desktop. Such apps will be reloaded from the Store in the recent version. We will discuss the fix below in order to bypass the problem Windows 10 Start Menu No Tiles. So let’s head towards the series of methods with their detail steps one by one.
Windows 10 Start Menu No Tiles Solutions
Solution 1 – Re-register Apps Using PowerShell
Step 1 – Press Windows and X shortcut keys and unfold the power user menu. Locate and select the option namely Windows PowerShell (Admin).
Also, explore some more ways to Open Elevated PowerShell on Windows 10 After Creators Update.
Step 2 – Upon the evoke of UAC prompt, proceed ahead by clicking Yes.
Step 3 – Type in the following commands in the blue panel and press Enter one after the other to execute them.
reg delete "HKCU\Software\Microsoft\Windows NT\CurrentVersion\TileDataModel\Migration\TileStore" /va /f
get-appxpackage -packageType bundle |% {add-appxpackage -register -disabledevelopmentmode ($_.installlocation + "\appxmetadata\appxbundlemanifest.xml")}
$bundlefamilies = (get-appxpackage -packagetype Bundle).packagefamilyname
get-appxpackage -packagetype main |? {-not ($bundlefamilies -contains $_.packagefamilyname)} |% {add-appxpackage -register -disabledevelopmentmode ($_.installlocation + "\appxmanifest.xml")}
Step 4 – Once you run the above commands, restart Windows 10 PC and check if it helps.
The system re-register the missing applications as well as you can see it on the Start Menu also. Keep it in mind that you need to close all the running application before inserting commands in PowerShell. Or else it may evolve additional error message.
Solution 2 – Troubleshoot Start Menu
Step 1 – Click on this link and the troubleshooter starts downloading all by itself.
Step 2 – Navigate to the Downloads folder and double-click the file startmenu.diagcab. This immediately launches the troubleshooter wizard.
Step 3 – So, follow the guidelines on the wizard and troubleshoot Start Menu.
Solution 3 – Reset the Missing Application
Resetting can be a good solution to the application missing from the Start. In order to do so, the steps are as follows:
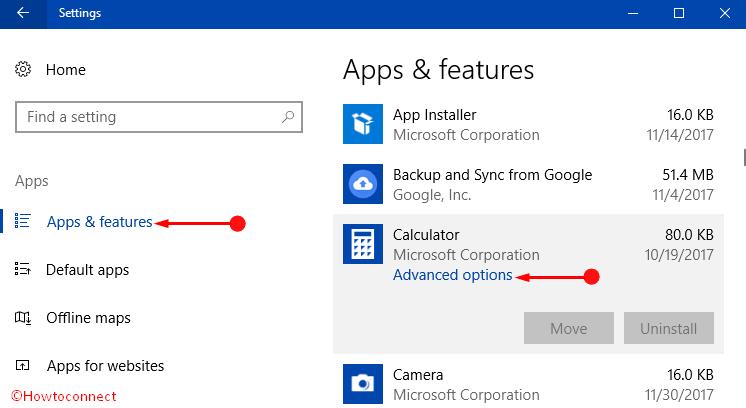
Step 1 – Open the default Settings program by jointly pressing Windows – I keys. On its homepage, make a click on Apps category.
Step 2 – On the following page, Apps & features section options up on the left sidebar.
Step 3 – Shift to its right pane and select the missing app. Click on the button “Advanced options“.
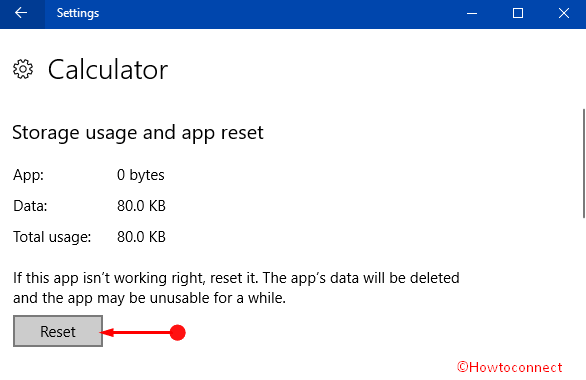
Step 4 – When the new window appears, you see a Reset option. Hit a click on it and reset the app by deleting its certain data.
Read our full guide on How to Reset App on Windows 10 to Fix it.
Hopefully, the application tile restores again on the Start Menu.
Solution 4 – Uninstall and reinstall the missing app
When an application goes missing from the Start, uninstall and reinstall can overcome the problem too.
Step 1 – Just like above Solution 3, launch App Settings here also. To do so, press Windows + I keys => Apps => Apps & features.
Step 2 – Select the dreadful program in the right pane and click Uninstall located just below the app name.
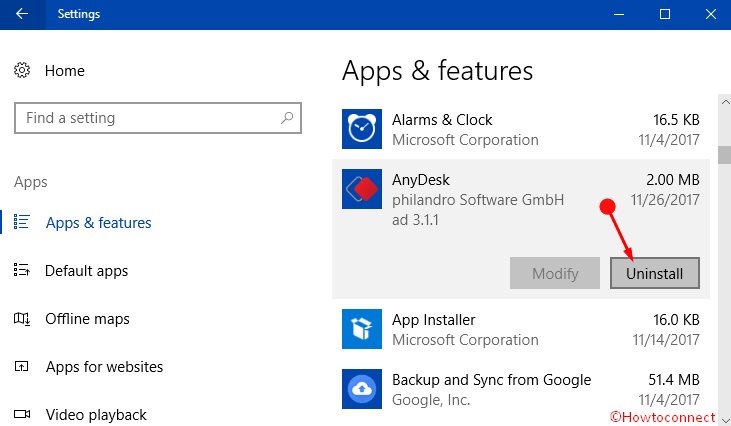
Step 3 – A pop-up box appears to confirm the uninstallation. Click on Uninstall button in order to continue and this uninstalls the app.
Step 4 – Now navigate to Microsoft Store and search by name of the app. When it appears, click on the option Get. The app gets installed again and when you open the Start Menu, it shows up there.
Solution 5 – System File Checker
Microsoft experts suggest executing an SFC scan to find out the culprit. Blank tiles are usually caused by the faulty system files and performing this scan repairs them.
Step 1 – To begin with, type in cmd on Cortana. Proceeding forward, keep a hold on Ctrl + Shift and hit Enter key. Upon the prompt of UAC, hit the Yes key.
Step 2 – Copy/paste or type sfc /scannow in the black panel that shows up on the screen and hit Enter to execute it.
Step 3 – Wait for the scan to complete and then check the report and Start Menu.
Solution 6 – Set up and use a new User Account
Another interesting workaround that you can attempt is to set up a new user account. Once you sign into it, check whether Windows 10 Start Menu No Tiles problem gets resolved or not.
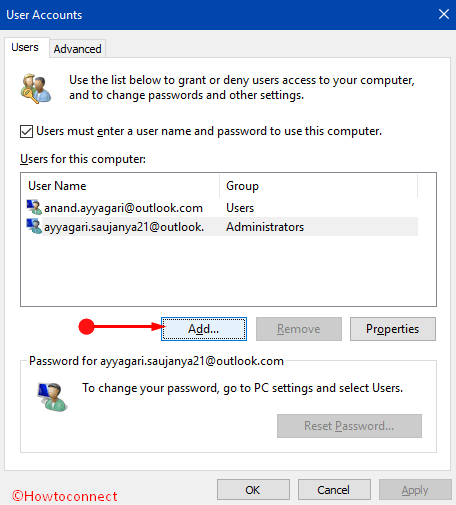
Step 1 – On the Run dialog, copy/paste the below command and click OK.
control userpasswords2
Step 2 – Click Add on the dialog that pops-up on the PC screen. In case, you see this button grayed out, then check the box namely Users must enter a username.
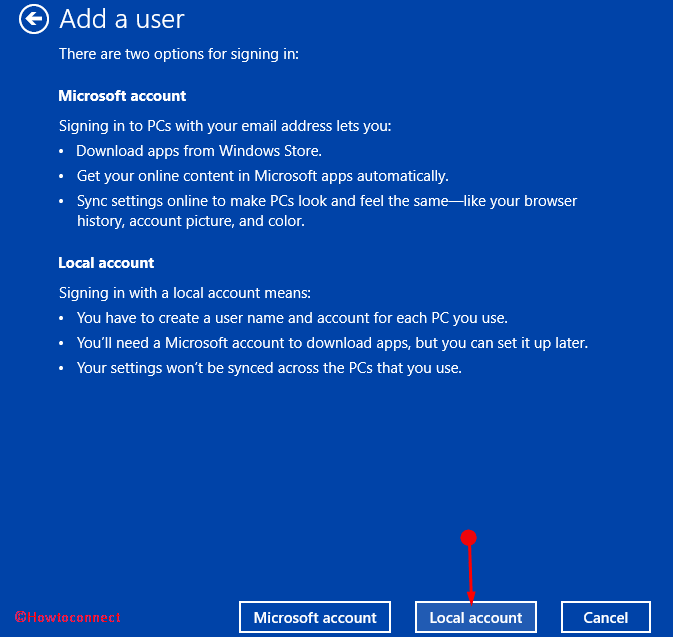
Step 3 – On the screen that comes into view, click Sign in without a Microsoft account on the extreme lower left corner.
Step 4 – Now, click Local account button on the next screen as indicated in the below image. Fill in the required details in their respective boxes and then sign in using that account.
Solution 7 – Restore the Previous Version of Windows 10
If troubleshooting the problem Windows 10 Start Menu No Tiles using any of the above workarounds fails to bring any relief, then there is only one option on hand to bypass it. You can restore the previous version of the OS by pursuing the below steps.
Step 1 – First of all, launch Settings program using any of your preferred methods. But the quickest one is to press Windows and I keys altogether.
Step 2 – When the program comes into view, click on the Update & Security icon.
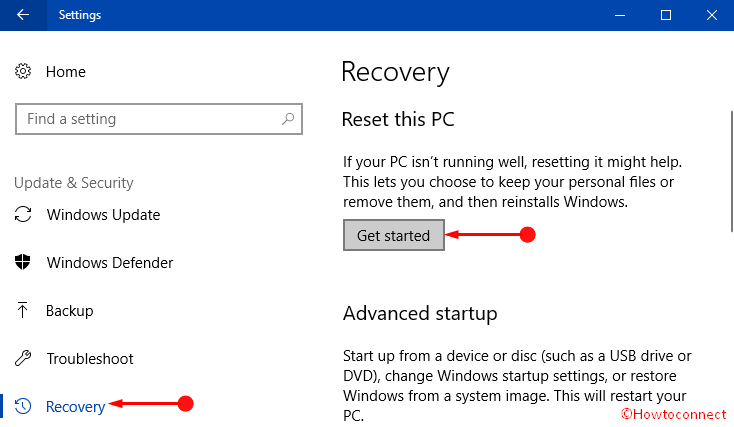
Step 3 – On the following page, you see a Recovery option on the left sidebar. Click on it and jump to the adjacent right pane.
Step 4 – Locate the section namely “Go back to a previous version of Windows 10“, click on the option Get started.
Note – If you don’t notice the above-mentioned option, make a click on Get started button underneath the section namely “Reset this PC” (see screenshot).
Step 5 – Next, click on the reason you are rolling back and hit on Next button. Moving ahead, click on the option No, thanks then select Next.
Step 6 – Hit Next button again and lastly click on Go back to earlier build in order to start the restoring process.
This is the last workaround that can get your missing apps back again on your Start Menu.
Conclusion
Desktop apps are examples of advanced technology introduced by Microsoft in Windows 10. They are much helpful to provide ease of access. Additionally, you really don’t need to search an app in the whole computer when you need. Any missing app from the desktop will be nagging and should be fixed as soon as possible. We have discussed some ways in order to fix Windows 10 Start Menu No Tiles. Hope you can recover the missing apps using these quite easily.