How to Enable USB Selective Suspend in Windows 10 – As said earlier that Windows 10 has come out with a good assortment of interesting features, we will still have to go a long way to cover all of them. Recently, a topic of battery power consumption had been covered in this website which explored quite good features to its users.
Talking about the features of Windows 10, we have experienced that it provides all sorts of beneficiaries in almost all segments of its new operating system whether it constitutes the look of resorted Start Menu or ways of saving battery power of the laptops and tablets or using the Power Options to put a control on the power consumption. Another good thing that can be said about power management in Windows 10 that you can set up a time after the expiry of which your computer will go to sleep if it is not in an active situation.
Since the topic rose on Windows 10 power control, a good and interesting feature comes here that can be put into use. The USB selective suspend of Windows 10 will preserve a good amount of your power. Now, the basic users must be wondering what is this USB selective suspend that saves the power. Let us see what it means.
What does USB Selective Suspend mean?
If you are new to this term, let it be cleared that it is not a newly added feature of Windows 10. It exists in Windows since the launch of Windows XP and continues to be there in all the later editions of Windows. Back to the explanation, this feature acts as a good power saver. This feature grants the hub driver to eliminate (or suspend) a particular port keeping the other available ports of the hub on a safe side. The suspension of a particular port will not disturb the other presented USB ports. And so it is normal that the gadget(s) affixed to the eliminated port also gets disabled. And it is here when you can save the power of your laptop or tablet that unnecessarily consumes so much of power with these active ports.
Not making you wait, let us see Multiple ways to Enable or Disable a Network Adapter on Windows.
How to Enable USB Selective Suspend in Windows 10
- From Windows 10 Control Panel, get into the Power Options window. If you are viewing the Control Panel in the Category mode, navigate Control Panel -> Hardware and Sound -> Power Options.
If you are a newbie then follow How to Open Control Panel on Windows 10 – Instant Ways and then go to the path.
- You can carry out the USB selective suspend for the separately available power plans of your computer. See for the available Power Plans. Click on the Change plan settings link to the power plan for which you wish to enable the USB selective suspend.

- Click Change advanced power settings link on the following screen.

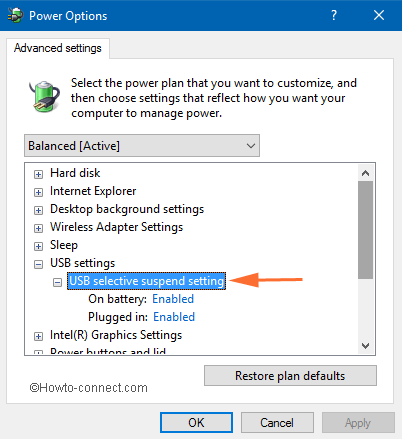
- This leads to the emergence of improved Power Options dialog box on your screen. Now, this is the place where you will carry out the main settings. Among the listed items of the power management look for the item called USB settings. Make a click on it and its sub-option USB selective suspend setting will appear. Here, you have two situations to work with. Choose the Enabled option for both On battery and Plugged in situations. Click the Ok button to save your new settings to Enable USB Selective Suspend in Windows 10.
Finished! If needed, you do it for the other available power plans of your computer.
Winding Up
To save more power in your system, this feature works well. And it benefits the notebooks, laptops, or tablet users a lot as they can save their systems battery power. Hoping that you also wish to save some of your battery power, you will definitely put Enable USB Selective Suspend in Windows 10 into use. Apply the changes and see your glowing happy face as you are saving a good amount of your battery power. Any problem, we are here to help you, always!
You can go with: Right Click on Desktop Taking Too Long in Windows 10
This seems promising but not working with my wireless mouse 🙁 any other solutions? I’m currently on Windows 10. It took about 2-3 seconds for my mouse to response after being idled for a while. I found this very annoying, specially when i’m playing games with it. Any help will be very appreciated 🙂
Thanks – that suggestion definitely made a difference.
Thanks for this article it fixed an issue I’ve had a laptop which is attached to a wireless keyboard and mouse most of the time. Everytime I would reboot I needed to unplug and replug the wireless usb puck. The issue was that the USB power was being disabled. I used your article to disable that power setting now the issue is resolved.