How to Customize Paging File Size for Disk Drives Windows 10. – Have you ever fall short of physical memory or are you using any such systems whose physical memory cannot be enhanced? Thinking why bullets of questions at the beginning of the post?! Ah! Don’t worry; our discussion for today’s write-up is something based on Random Access Memory or RAM as we all call it in short. As you all know the functioning of RAM and also its laborious support to your system, but sometimes it also faces difficulties with the storage space. Not miss this informative post – How to Tweak Paging File for better Windows 10 Performance.
There is a feature in Windows 10 called paging file and helps you in this difficult situation. It is a feature present in your operating system that lets your computer balance for the scarcity of physical memory by momentarily moving pages of data from RAM to disk storage. But in the end, the operating system will need to recover the data that was moved momentarily to disk storage. To settle the difficulty, the operating system requires moving the other pages to hard disk so that it creates space in order to get back the pages. And paging is referred to this entire process. Another name of the Paging File is Virtual Memory. It holds a special storehouse on the hard disk of your operating system. For all the disk drives, the paging files are by default controlled by the operating system.
This paging file feature of Windows 10 saves you from this problem and so we will see How to Customize Paging File Size for Disk Drives in Windows 10.
Let us go through the simple steps and witness the entire process!
How to Customize Paging File Size for Disk Drives in Windows 10
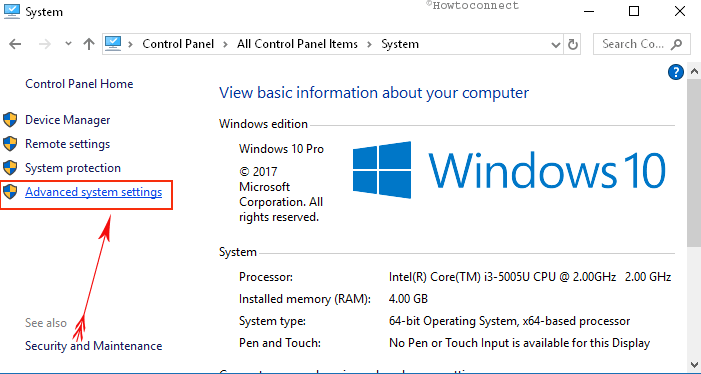
- Let’s get into the Control Panel and open the System window by clicking on System icon.

- When you see the System window opened, click on the Advanced system settings link which is obtainable from the left pane of the window.
The System Properties dialog box will turn up on your screen and select the Advanced tab. See the Performance section of the Advanced tab and click on its Settings link.

- This action will bring up the Performance Options dialog box for you. Take your attention to the Advanced tab. To proceed further, click on the Change button.

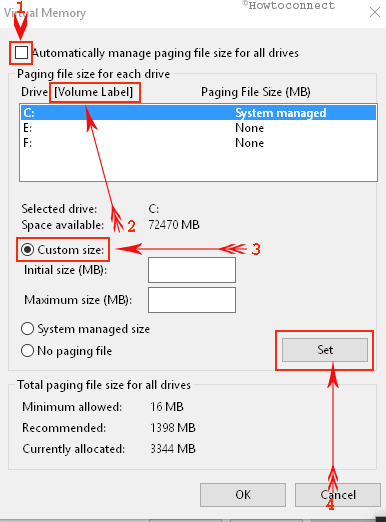
Finally, the Virtual Memory dialog box comes on the screen. This is the place where you will do all the required modifications. Windows, by default, itself controls the paging file size. Now to carry out this, you will deselect the option Automatically manage paging file size for all drives. Now, to set the paging file size of the drive, choose the required drive. After that go to the next section and selects the option of Custom size. Provide the Initial size and Maximum size (in MB) of disk space in the respective boxes. These sizes will be set as the paging file for your selected drive. Once done, click the Set button. Do these settings for all the drives.
Now onwards, Windows 10 will utilize the disk space mentioned by you. There are quite a few clicks, but it is not that hard to finish the things.
Closure
If you face any scarcity regarding the physical memory (RAM), Customize Paging File Size for Disk Drives in Windows 10 feature helps you in improving the effectiveness of your computer. But now as you can control the disk division by yourself, you will not face any problem in the future. If you are also encountering the problem, don’t worry and set your disk division of the paging file and see it all by yourself. Try this feature and tell us how it worked for you in Windows 10.