How to See and Use Windows Ink Workspace in Windows 10 – The Anniversary update is yet to arrive still speculations for the advanced stuff in it are at the center of discussion. Microsoft is also presenting it as a historical event. We are here with one of the most awaited feature Windows Ink Workspace. You will read here everything you need to know in the workspace.
At first, it is essential to know what is Windows Ink Workspace. Microsoft has planned to enhance a new element to Windows 10 according to which you can use your digital Pen to execute several functions via Windows Ink. Windows Ink facilitates you the platform where you are able to write Notes, Sketch your ideas and do a lot more things with the integration of few apps.
How to Use Windows Ink Workspace in Windows 10
If your computer has a working digital pen added to it, you can comfortably make the Windows Ink Workspace visible on your screen, alternatively, you can bring by following the below-written steps –
Open Windows Ink Workspace
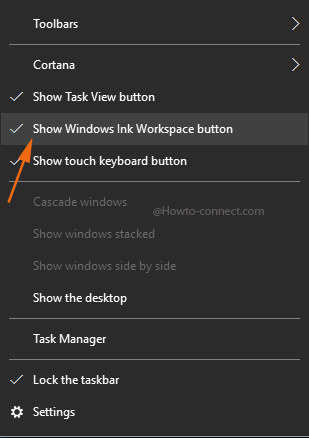
- Perform a right-click on an empty area of the taskbar and select “Show Windows Ink Workspace” button option.
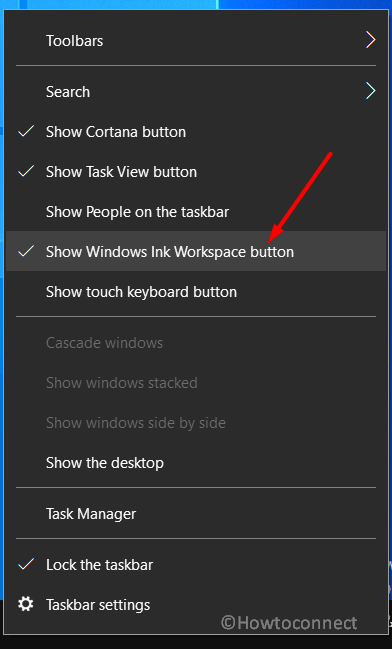
- This will immediately display its icon on the system tray.
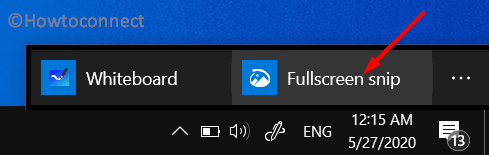
- Click on it and it will display two options – Whiteboard and Fullscreen snip.
Whiteboard
How to Access Whiteboard
- Click on the Whiteboard button and Microsoft Store will start downloading the app.
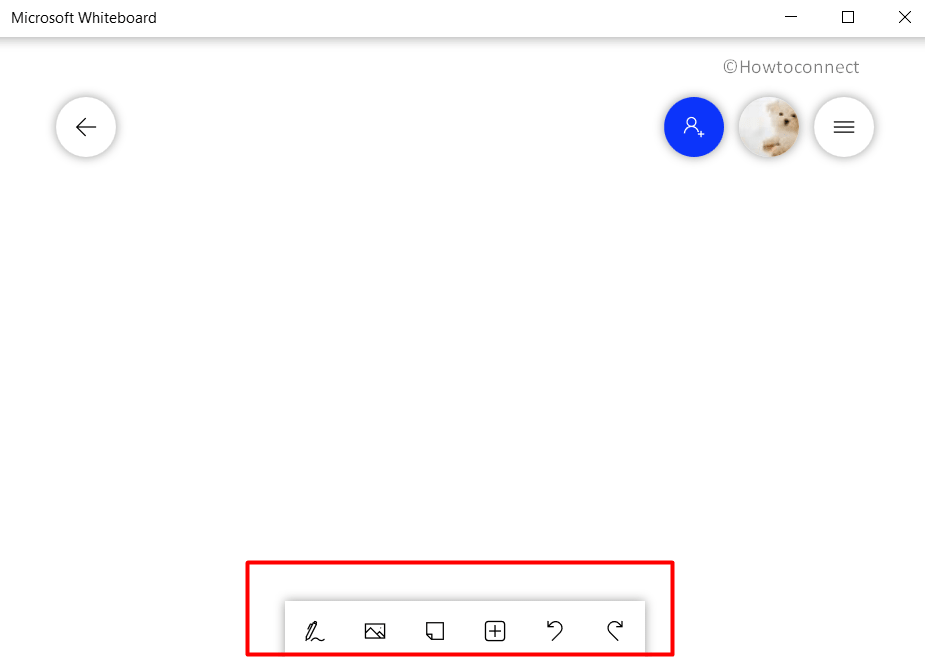
- Once the download gets over, open Microsoft Whiteboard to start using it. If you are accessing the app for the 1st time, it will provide you certain terms and conditions. Agree to them and you can see a Whiteboard on the screen.
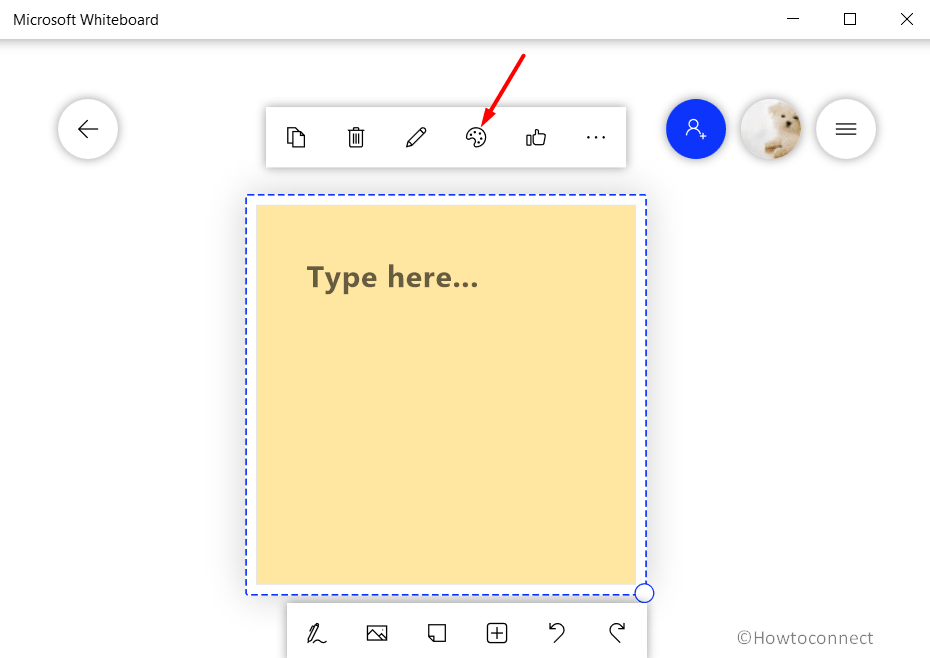
- When the app opens up, you can see a menu at the bottom of the screen. The options are Switch to inking mode, Add image, Add note, Insert menu, Undo, and Redo.
How to Switch to Inking Mode
If you prefer to use a pen or a highlighter to write down on the whiteboard, this option works great.
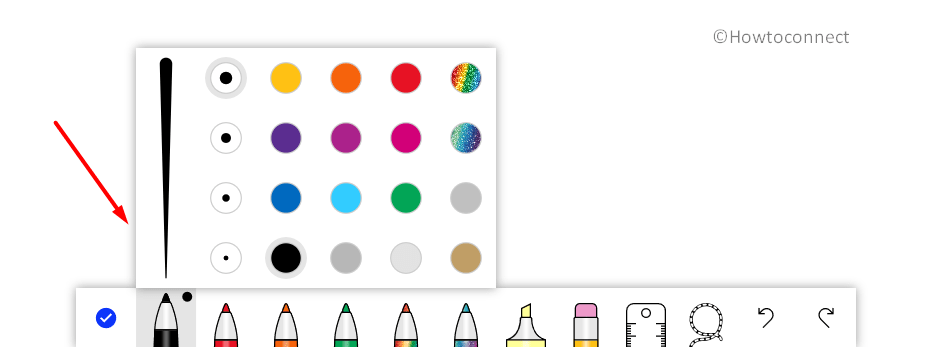
- Once you access canvas, the first option in the lower bottom toolbar is Switch to inking mode.
- Click on it and it will display a few color pens to choose from.
- Again clicking on the pen will let you select the thickness and opt for other colors as well. Moreover, this section includes a highlighter, eraser, Lasso select, Undo, and Redo buttons also.
How to Add Image in Whiteboard
To add an image to the Whiteboard, the app provides a few methods.
- Firstly, when into the app, simply click on Add image icon that appears at the toolbar.
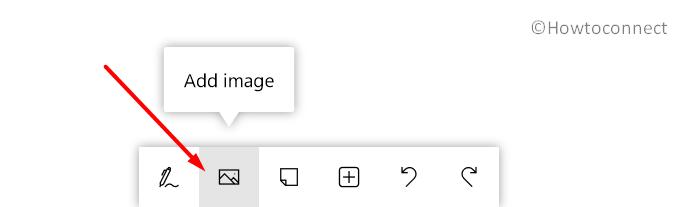
- It will directly open File Explorer directory. Navigate to the location and choose the image file that you want to include.
- Another way is to do a right-click any on an empty space on the Whiteboard. This will show some options, select Add image icon and upload any preferred picture from the hard disk.
How to Add a Note in Windows Ink Workspace
- Perform a right-click on a vacant space of the canvas and click Add note icon.
- A blank Sticky Note will appear on the board.
- You can hold and drag it to place it anywhere on the board. Type in your required text in the space provided.
- In addition, you can also directly click the Add note icon on the homepage of the Whiteboard. This will also fire up an empty Sticky Note to insert your preferred text into it.
How to Edit a Sticky Note
- If you have multiple notes on the board, select the one that you want to edit. A few options will pop up on the top of the note, select Edit.
- Now, do the editing and leave the note to save the changes.
How to Change Color of Sticky Note
- Select the Sticky Note whose color you prefer to change.
- Click on Background color picker and pick up the preferred color.
How to Lock An Image to Background
Placing an image and a second object on top of another makes the second object hidden. To avoid this, you can lock the image into the background. This will allow you to place the second object on top of it.
- Open image toolbar by selecting the image.
- Click Lock to background icon.
How to Add Text in Whiteboard
- Once into the Whiteboard, click Insert menu icon that resides at the bottom of the app.
- List options will appear, choose Text.
- Type in the text you want to add and drag the box to position it anywhere on the board.
- As an alternative, do a right-click on an empty area of the app and choose Add text option.
- Insert preferred text and when the text box is selected, you can view other related options as well.
How to Include Word or PowerPoint Document
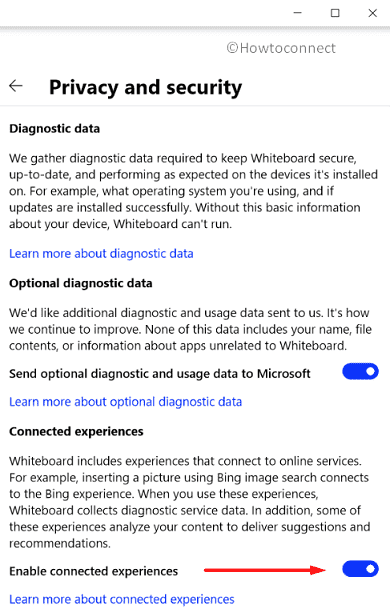
To insert Word or PowerPoint documents into Whiteboard, the app requires certain connected services to be enabled. Doing so will allow the app to access services like Bing and Office 365. Once you turn on the feature, you can easily insert the Office pages.
- Get access to Whiteboard, click Insert menu option.
- A huge list of options will appear, choose Word document or PowerPoint document.
- To insert these Office document pages, you need to enable certain connected services. So, click Take me there button that shows up on the top right side.
- Toggle ON Connected experiences switch (see screenshot).
- Now, again click Insert menu option and opt for Word document or PowerPoint document. Navigate to the File Explorer directory and select the required file.
- All the pages of the document will come into view. If you want to insert all of them, click Insert All Pages button.
- Otherwise, select the pages that you prefer to insert and then hit the Insert Selected button.
- Alternatively, click anywhere on the board, choose More and then select Word document or PowerPoint document.
How to Insert PDF Files in Whiteboard
- In the main interface of Whiteboard, click Insert menu icon.
- Choose PDF and select the PDF file from File Explorer that you prefer to insert.
- To include all the pages of the file, click Insert All Pages button. Else, select the individual pages that you wish to add and click Insert Selected.
- Furthermore, doing a right-click on an empty space of the Whiteboard will fire up some options. Hit on More and from the options, pick up PDF.
How to Show Bing Image
- Click Insert menu icon on the homepage of the app and select Bing images.
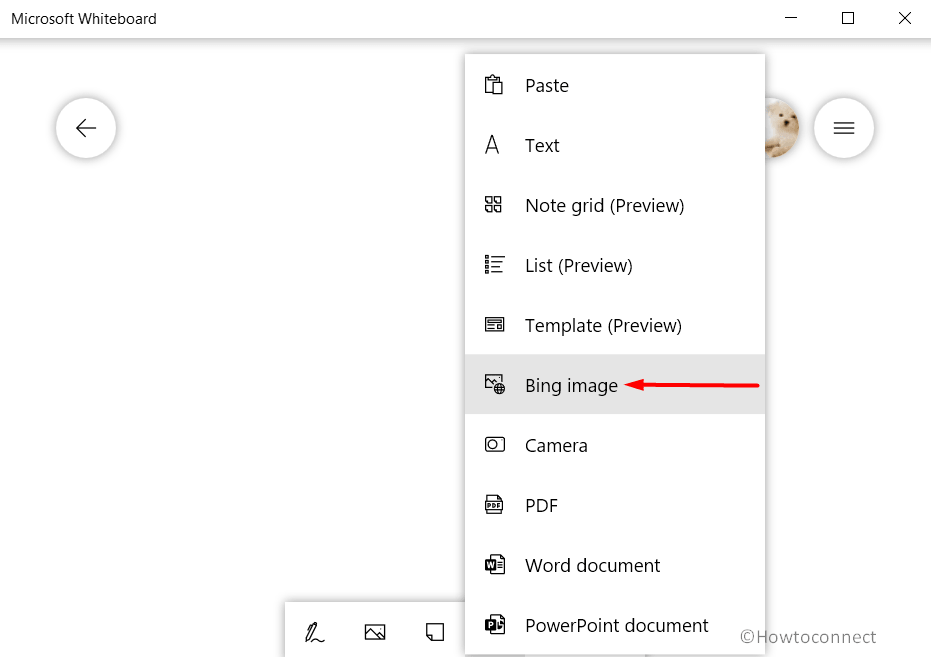
- This will immediately open Bing image search on the right corner of the screen. Type in your search query and from the list of images, select anyone.
- Once you select it, a plus (+) sign will appear on the image, click on it and it will be inserted in the Whiteboard instantly.
- Another way is to do a right-click on the board and choose More (…). Select Bing image and just like above the Bing image search will appear on the right side.
- Search for the image and include it.
How to Add Camera Pictures
- Make a hit on the Insert menu icon on the main screen of the board.
- Choose Camera option and this will open Camera app straight away.
- Take the picture and click Done to add the same.
- In addition, right-click on the vacant area of the board, select More followed by a hit on Camera.
- Using the Camera of the PC, capture the image, and insert it.
How to Insert Note grid (Preview)
- Hit the Insert menu icon and choose Note grid (Preview).
- Once the Note grid appears, click on Add note button at the top right.
- Type your text in the note and if you wish to insert another note, click Add note button again.
- Alternatively, right-click on a blank space of a Whiteboard. Choose More (…) and select Note grid (Preview).
How to Add List (Preview)
- Get into the main page of Whiteboard and click Insert menu.
- From the list of options, choose List (Preview).
- A small box will appear on the board to write down the list. By default, your text will show up in the bullet list. If you prefer to change the format, select the list and click on Change to checklist.
- In addition, you can also launch this List (Preview) by right-clicking on the board. Choose More and then opt for List (Preview).
How to Insert Template (Preview)
- The app provides several templates to enhance your creativity. Click on Insert menu and choose Template (Preview).
- This will quickly display a few templates on the right side of the screen. Go through them and select the one you wish to use.
- Or do a right-click on a blank area on the Whiteboard. Hit More followed by a click on Templates (Preview).
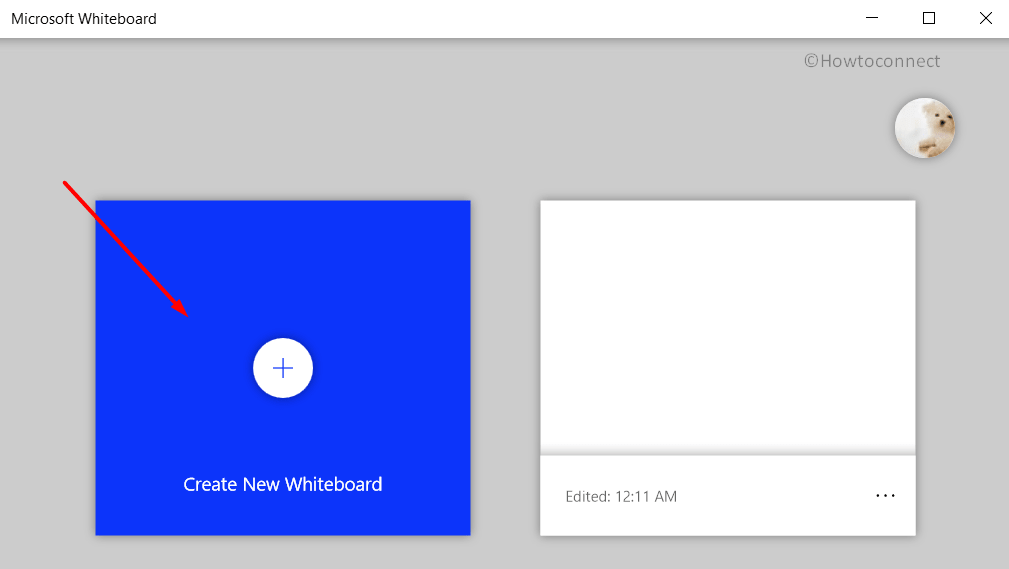
How to Create New Whiteboards
- Click the Back button (My Whiteboards) that appears on the top left corner of the whiteboard.
- Select Create New Whiteboard box to generate a new one.
How to Provide a Name to your Whiteboard
In the case of multiple whiteboards, you can name recognize them by their names.
- Click the Back button and explore the page where all the whiteboards are stored.
- Hit the three-dotted icon (…) visible on the whiteboard. Insert a name in the Untitled Whiteboard section.
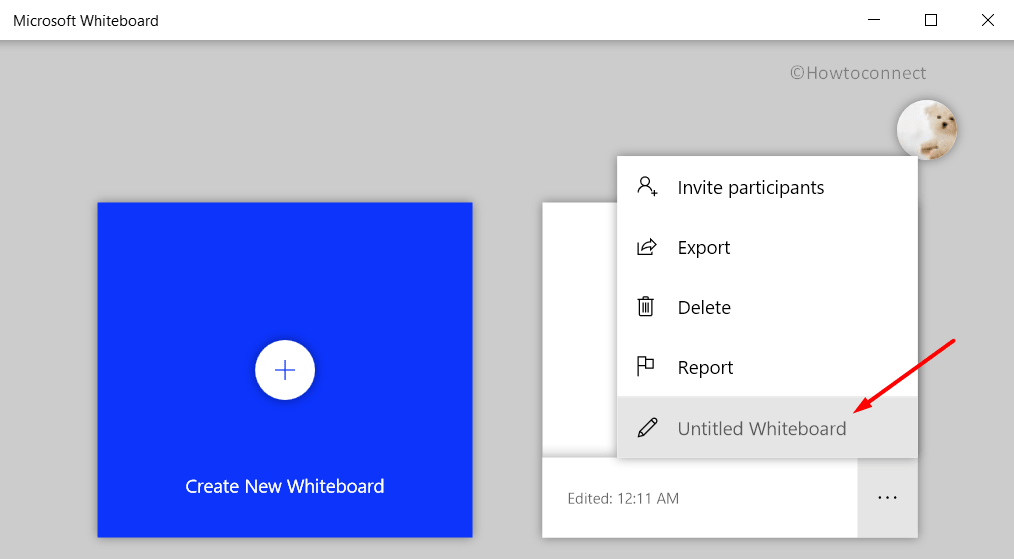
How to Delete an Entire Whiteboard
- Apart from clearing the canvas, you can even choose to delete the Whiteboard as well.
- To do so, click the three-dotted icon (…) on the whiteboard and choose Delete.
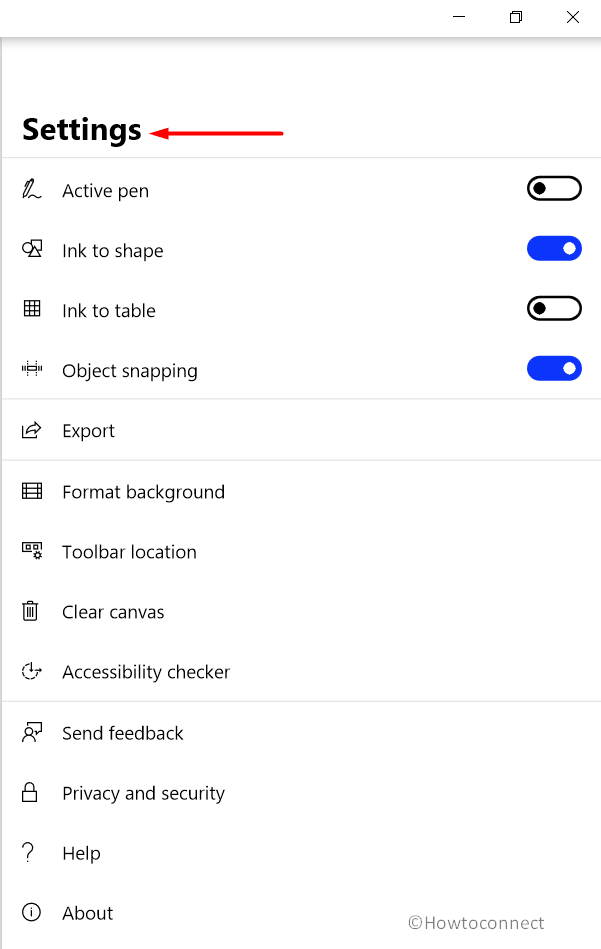
Whiteboard Settings
Microsoft Whiteboard serves a wide range of settings for a user to tweak with. Let’s see them now –
- Once into the canvas, click the Settings menu (three horizontal lines) icon on the top right corner.
- A huge list of settings options will pop up.
Active pen –
Ink to shape – Changes the hand-drawn strokes to a precise shape all by itself.
Ink to table – Lets you create and organize clean tables with a few ink strokes. Moreover, it also allows you to highlight cells and add or remove columns or rows.
Object snapping – This feature helps you align the content by providing a visual clue. A line will show up when you move an object like an image or Sticky Note close to another object.
Export – Allows you to save the whiteboards in PNG or SVG file formats.
Format background – You can change the background color and grid type of the canvas. Click on this setting and it will provide more color options for the background and grid choices as well for the canvas.
Toolbar location – By default, the toolbar appears on the bottom of the canvas. If you prefer to change its location, select this setting and select Top, Left, or Bottom.
Clear canvas – To wipe out all the objects from the canvas in one attempt, choose this option.
Accessibility checker – Ensure that the content is understandable for everyone. Selecting an individual object also lets you add a description for the object.
Fullscreen snip
When you select this option on Windows Ink Workspace, the built-in Snip & Sketch tool will immediately capture the entire screen. It will further give you a wide range of editing options.
See How to Take Screenshot in Windows 10
Pen Settings
- Click on the Windows Ink Workspace icon on the taskbar. Select See more icon (…) and choose Pen settings.
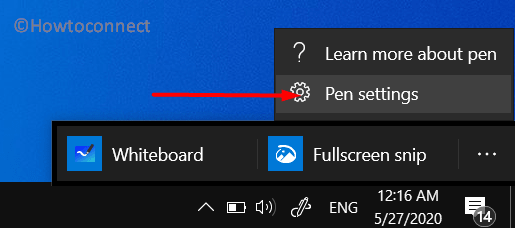
- This will open Pen & Windows Ink Settings page on the screen.
- When using a pen, you can change the font style of the text. So click the drop-down under Font when using handwriting and pick up the desired font format.
- Write in the handwriting panel with your fingertip option will let you write in with a pen or your fingertip to insert a text.
That’s all!!!
Following is the outdated part of the post which is updated above on 27.05.2020 –
See Windows Ink Workspace
Step 1 – Locate some vacant space on your taskbar and perform a right-click over there, and on the visible popped up menu click or tap the choice entitled as Show Windows Ink Workspace button.
Step 2 – After executing the above step you will soon notice an icon for Windows Ink Workspace being shown at the taskbar and when you hit it, the Workspace will be appearing along the right edge of the screen.
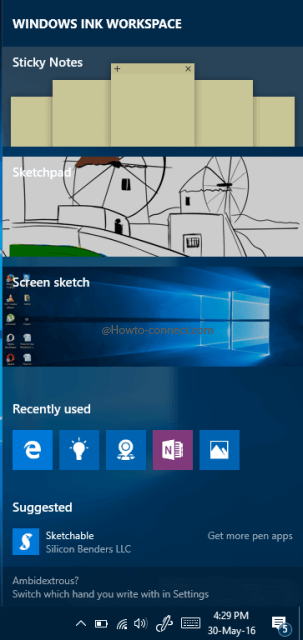
Use Windows Ink Workspace
Step 3 – In the popped up menu, in the first place stands the Sticky Notes whereas the second spot is occupied by Sketchpad where you can draw your thoughts and the last feature is the Screen sketch.
Sticky Notes
The first built-in experience that you will see are the Sticky Notes which facilitates you to create and save your notes to your PC and also empowers you to modify the feature in little ways like color and size but however there are lots to come in future updates.
Step 1 – Click or hit on Sticky Notes and you will witness one note being displayed on the screen.
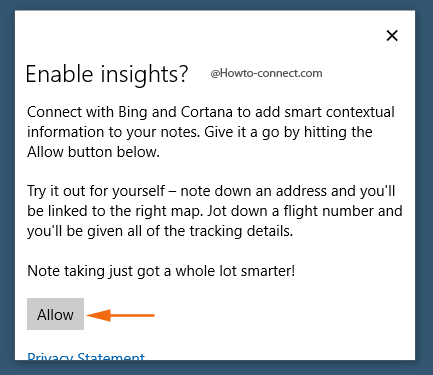
Note – When you open this for the first time, a box with a title that reads as Enable insights will arrive, click or hit the Allow button to add extra data to your notes and the help will be provided by Cortana and Bing.
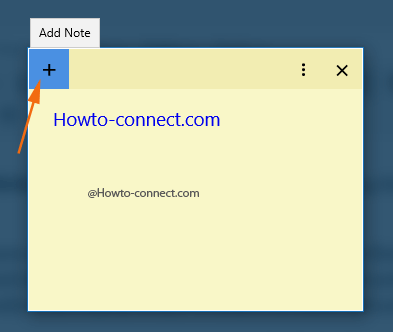
Step 2 – To include more notes, click or hit the Add note (+) button that is visible on the upper left end of the note and you will notice another blank note, however, you can also jointly strike Ctrl & N keys to launch an additional note.
Step 3 – In the current preview, it carried an update where the Sticky Notes holds the capability to create Cortana reminders from your notes which will cover all your devices and eventually Bing will also come into the picture in future updates.
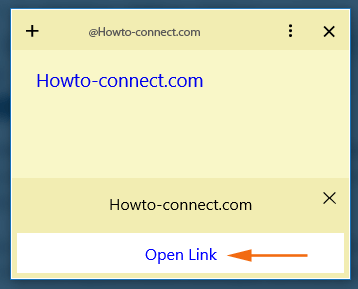
Step 4 – When you write a URL, you will notice a link entitled Open Link at the bottom and a click or hit on it will straightaway Edge will launch showing the entered webpage.
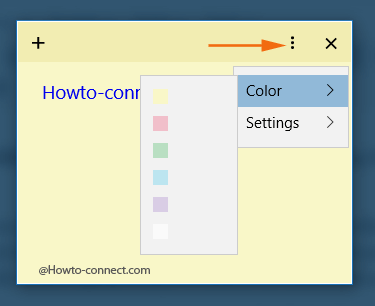
Step 5 – To modify the color of the Sticky Notes, click or hit the three vertical dots, point to Color, then click or hit the required shade and enjoy the look of your preferred color.
Step 6 – To view the settings of this ink powered feature, click or hit three vertical dots followed by a point on Settings and then you can notice two settings – Send application usage statistics and Enable insights.
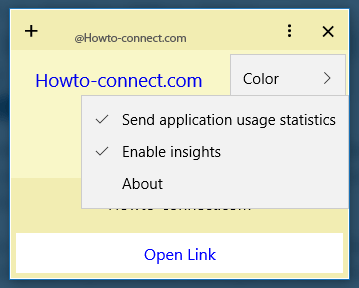
Send application usage statistics – A tick mark on this means this setting is enabled and statistics of the usage will be sent to Microsoft which will eventually help the team for further enhancements.
Enable insights – This is the same setting that you are asked in your first approach to Sticky Notes. A tick mark on it defines you are set to receive all the contextual help from Cortana and bing.
Step 7 – If you desire to alter the size of the notes, simply hold any of its corners and stretch it outwards to increase the size and inwards to decrease the size.
Sketchpad
With Sketchpad, you can draw your ideas and innovations straightaway on your computer.
Step 1 – Click or hit Sketchpad, and by default, you can view a sketch there.
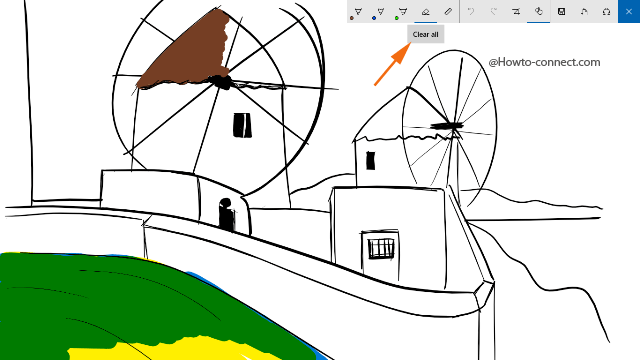
Step 2 – You can do away with default sketch by twice clicking on the Eraser button and clicking the Clear all option that pops up.
Step 3 – Now, the blank canvas is in front of you where you can sketch out your thoughts by using the tools that you can view on the top of the canvas.

Step 4 – You can take help of the ruler to draw straight lines and in the current update, a compass has been included whose indicator turns bold when the ruler is aligned on any of the cardinal points or midpoints.
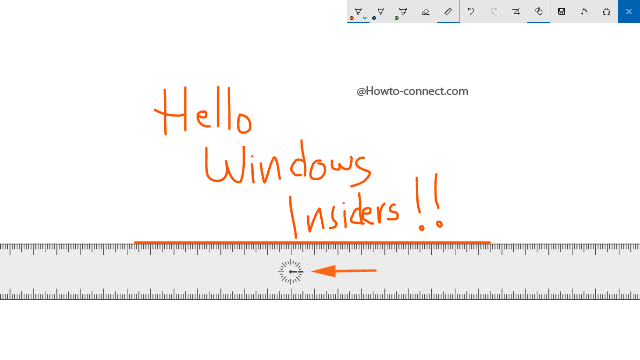
Step 5 – Click or hit the Save as button on the top and save your sketch in your preferred location or use the Share button to share the creativity with your colleagues or friends.
Screen sketch
This built-in ink feature can bestow you to draw on a screen capture of your full desktop, let us explain screen sketch with an illustration –
Step 1 – Spread out the apps or images on the screen on which you prefer to add your custom details, for example, let me open a picture on one side and Word app on the other half of the screen.
Step 2 – Now, launch Windows Ink Workspace and click or hit Screen sketch in the popped up menu, the third one that bestows you to put your thoughts on the screen grab of your full desktop.

Step 3 – The Screen sketch will exhibit the screen capture of the entire desktop and then you can add your emotions, thoughts, lines, sketches, drawing, whatever you like.
Step 4 – Just like the sketchpad, click Save as and Share button in order to store or share your work of art or creations with your colleagues, families and friends here also.
Well, this is something amazing where you can put your thoughts in the picture and Windows 10 bestows you certain pen settings that empower you to perform little customizations. To see the pen settings, observe the below steps –
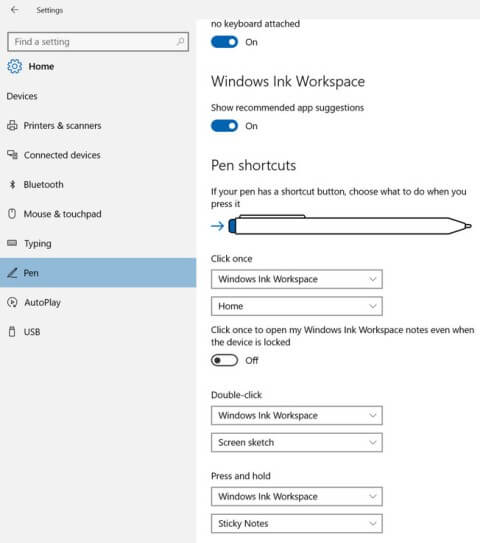
Step 1 – Strike the combination of Win logo and I key and in the popped up Settings program, click or hit Devices.
Step 2 – On the left column, click or hit Pen segment (this is noticeable for the devices that have digital pen assigned to their machines).
Step 3 – When you Look at the other side you notice all the related settings of a pen which bestows you the settings to manage the behavior of your pen along with the choices to decide what programs you desire to launch when a particular button is pressed.
More on this topic is yet to arrive and hopefully, this summer might present the awesome features.
HI,
any Ideas on how to use Windows Ink if my Surface is docked and not the primary screen. Windows Ink seems to start always on the primary screen and I didn’t find any settings where I could Change this.