You will get here the resources to fix CRITICAL_OBJECT_TERMINATION stop error in Windows 10. This annoying BSOD issue has the bugcheck value 0x000000F4. Commonly the automatic restart of system, freezing, flashing and hanging of desktop are the symptoms of the Blue Screen of Death problem. The code represents “an unexpected exit or termination of process or thread crucial to system operation”. Most often you encounter the error while starting a new program or ending it.
CRITICAL OBJECT TERMINATION BSOD error is mainly an outcome of missing system resources and outdated device drivers. It might also show up when there are memory problems, Hard Disk having bad areas or having low space in it. When virus components erase system elements or necessary OS files go missing due to the collision of two similar programs, the issue comes into play. Well, the issue being so dangerous to the system, needs to resolve immediately once diagnosed. See the list of resources first –
CRITICAL_OBJECT_TERMINATION BSOD in Windows 10 Solutions
Here is how to fix CRITICAL_OBJECT_TERMINATION BSOD in Windows 10 –
1] Hold up Device from Restarting Automatically
Among all the problems caused by CRITICAL_OBJECT_TERMINATION BSOD, Automatic Restarting will annoy you the most. This is so disturbing that, you can neither step out to resolve the issue as there is no ample time nor can sit idle. So, disabling this feature comes at the top of the priority and let us follow the below guidelines to accomplish the same –
- First of all, save and close all the ongoing processes. Try minimizing at least if the closing is not possible.
- Move ahead to the Desktop area from an ongoing process by pressing Win+D keys combined.
- After coming at the place, move the cursor to This PC icon and perform a right click on it.
- Choose the Properties option from the menu which will eventually show System Properties popup.
- Proceeding forward, select “Advanced system settings” from the left pane and move alongside right.
- Move down a little to Startup and Recovery section and perform a click on the Settings button.
- When the wizard is upfront, go to the System failure section and uncheck the box against option namely Automatically restart.
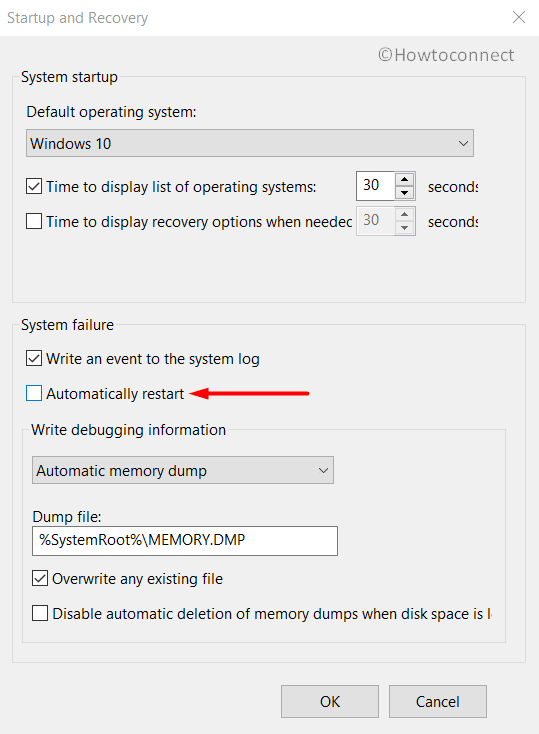
- Lastly, choose the Ok button to save the changes.
This will just block the automatic rebooting of Windows. Hence, you can now go for applying the next resolution processes and resolve CRITICAL OBJECT TERMINATION in Windows 10.
2] Boot Windows 10 into Safe Mode
Among the resolutions owing to fix CRITICAL_OBJECT_TERMINATION BSOD, Booting in the Safe Mode is the most ancient one. It came out as savior in all the crucial issues happened to the OS after development. In the special startup method, Windows loads only the basic processes and that heals most of the problems. To boot the device in Safe Mode, go through the given series of steps –
Step-1: Make a combined press of Win+R hotkeys and open Run dialog box on display.
Step-2: When it appears, type msconfig in the blank text area and hit the Enter key as well.
Step-3: System Configuration wizard arrives on display and you need to shift to Boot tab.
Step-4: Move down and reach out Boot options area and check the box beside Safe boot.
Step-5: Proceeding ahead, select the radio button before Minimal to continue.
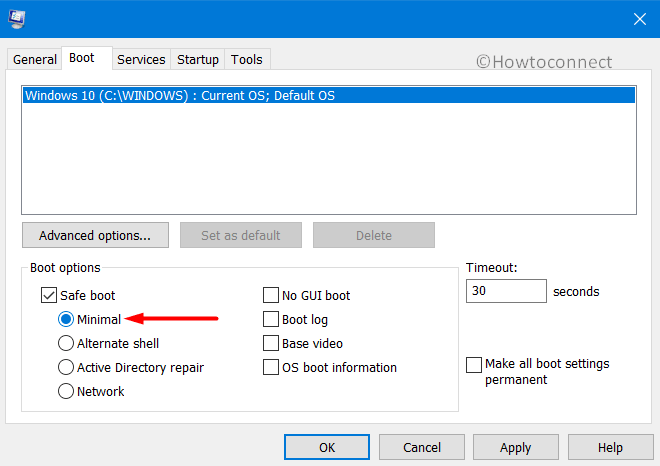
Step-6: Hit the Apply button initially and then Ok from bottom to save these changes.
Step-7: Now, leave the current wizard and launch the Start menu by pressing the Windows key.
Step-8: Hit the Power icon and select the Restart option from there.
Step-9: When Windows is booting after completing the restarting process, keep pressing F8 key continuously.
Step-10: A new page will come in the view with option Safe Boot in Advanced Boot options.
Step-11: Select it and Enter Safe Mode on succeeding move.
3] Update the Drivers with Yellow warning mark in Device Manager
After people started to come across the Stop errors, case study confirms outdated and incompatible drivers are guilty. We need to make them up to date and for that reason, the Device Manager comes handy. In the console, the outdated drivers are indicated in Yellow indication. Thus the task becomes a lot easier. Follow the below guidelines to update the drivers in order to fix CRITICAL OBJECT TERMINATION –
- Move the pointer to Start menu and do a right click on it eventually.
- Select Run and welcome the dialog on display.
- Type “devmgmt.msc” in the given area and then press the Enter Key.
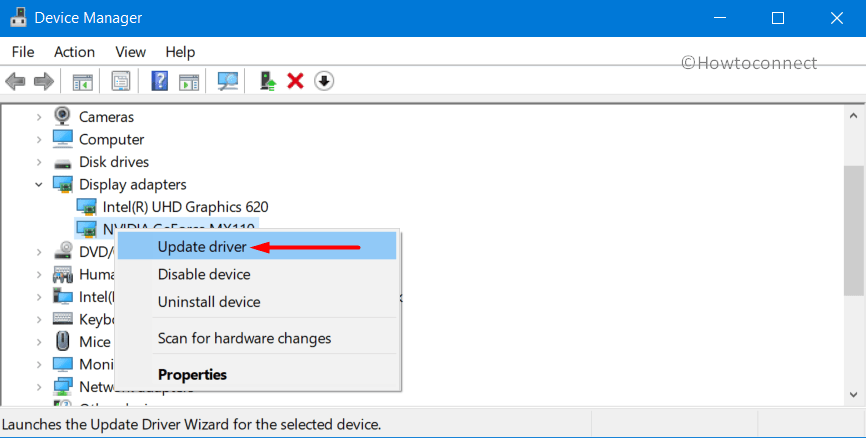
- Soon after that, you will find the Device Manager on display. Now, check carefully if there is an exclamation mark on a device in the whole console.
- If positive, expand that very device by clicking on it.
- Once spread, make a right click on its drivers one by one.
- Choose the option Update driver and the rest will be assured by the system itself.
- Later on, follow the instructions coming on display and make all the drivers up to date in this way.
4] Activate Default Windows BSOD Tool- Blue Screen Troubleshooter
Microsoft developed a new default utility that can potentially resolve BSOD error like CRITICAL OBJECT TERMINATION. The tool is Windows Blue Screen Troubleshooter and it is a built-in utility. You really don’t need to download the additional tool from Store or do similar kinds of stuff. You must upgrade the OS Windows 10 Fall Creators Update or more as to use the tool. If you are already using that, move with below guidelines –
- Do press Win+I keys together to call the Windows Settings app in the display.
- Move ahead to the Update & Security area from App UI and make a click on it.
- Proceeding to the additional settings page, select Troubleshoot subsection from the left wing and straightway jump to the sideward pane.
- Here, reach out to Blue Screen option and perform a click on it.
- Hit Run the Troubleshooter button to allow the tool for resolving BSOD issues in the device.
5] Resolve the corrupted Windows System components and recover missing DLL files
Windows system components fall into corruption for so many reasons like malware infection or any. In due course, the ultimate result is CRITICAL_OBJECT_TERMINATION BSOD. Affording this action will be dangerous to the system. Fortunately, System File Checker is developed by Microsoft and undoubtedly it can serve the best. See the method below –
Step#-1: Roll the cursor over Taskbar and perform a right-click at an empty place.
Step#-2: When the menu unveils, select Task Manager and let it open on display.
Step#-3: Hit a click on File option located at the top left end and select “Run new task” option once visible.
Step#-4: When a dialog appears, type cmd in the empty text field provided here.
Step#-5: Moving ahead, put a checkmark in the box before “Create this task with administrative privileges”
Step#-6: Now, get the entrance to Elevated Command Prompt with hitting the Ok button located under the box.
Step#-7: When in the black window, type the following command where cursor blinks and hit Enter key –
sfc /scannow
Step#-8: In a moment, System File Checker will be executed and start checking the corrupted elements. If any discrepancy is discovered, it will resolve automatically also.
This process might take a while, wait until it finishes.
Step#-9: Reboot the device after the process ends completely. On the returning, check if there’s any BSOD error in the system.
6] Install all the released patches going through Windows Update Settings
Microsoft schedules the releasing of update patches on a regular basis so that you can avail the latest features. With the former, fixing of existing bugs is available in the patches. Outdated Operating System is very much prone to get affected with CRITICAL_OBJECT_TERMINATION BSOD. Therefore, we need to step up to update the OS moving ahead with Windows Settings app. Here is the method in brief –
- Manage to open the Windows Settings app using the above guidelines.
- Head to Update & Security tiles directly and do a click on it.
- When the next page come into the view, select Windows Update located at the left pane.
- Moving ahead to the alternate right side, do a click on Check for updates.
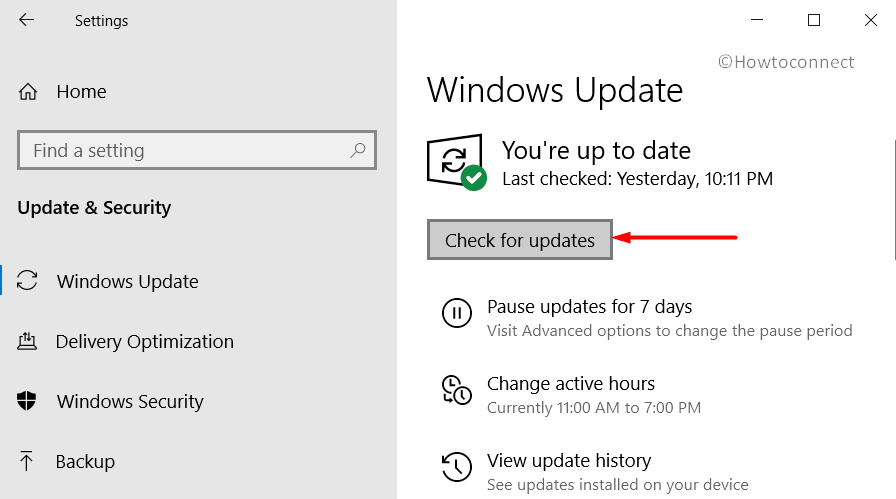
- When all the available update patches are upfront, hit a click on Download button under each of them.
- Downloading will start immediately and installation will follow once the process is finished.
- Don’t leave the desktop unmanned as you need to attend the restarting when Windows prompt.
Important- Note that, you have to get connected with a speedy internet connection. We recommend using a broadband one or wireless. While using from Mobile Data connection, disable Metered Connection going to the Network settings.
7] Dismiss the existing Malware in Windows Security
Malware is present everywhere on the web and we are well aware of this fact. Still, we are no longer safe from these vulnerabilities. Once they get a chance to enter into our systems, wipe out the most important data required for Windows. In the process, CRITICAL_OBJECT_TERMINATION BSOD evolves in the system. We can easily detect and dismiss the threats in Windows Security app, a default anti-virus program. To accomplish the task, move ahead with the below guidelines –
- Perform a conjugal press of Windows and S keys and let taskbar search come up.
- Type Security in the text typing area and load the results.
- Select Windows Security and let the app to open in a separate window.
- When the app interface is displayed, choose Virus & threat protection located at the left wing.
- Moving ahead to its corresponding side, make a click on the link saying Scan options.
- Upon opening all the criteria, select the radio button ahead of Full scan option.
- While proceeding hit the Scan now button and initiate the detection.
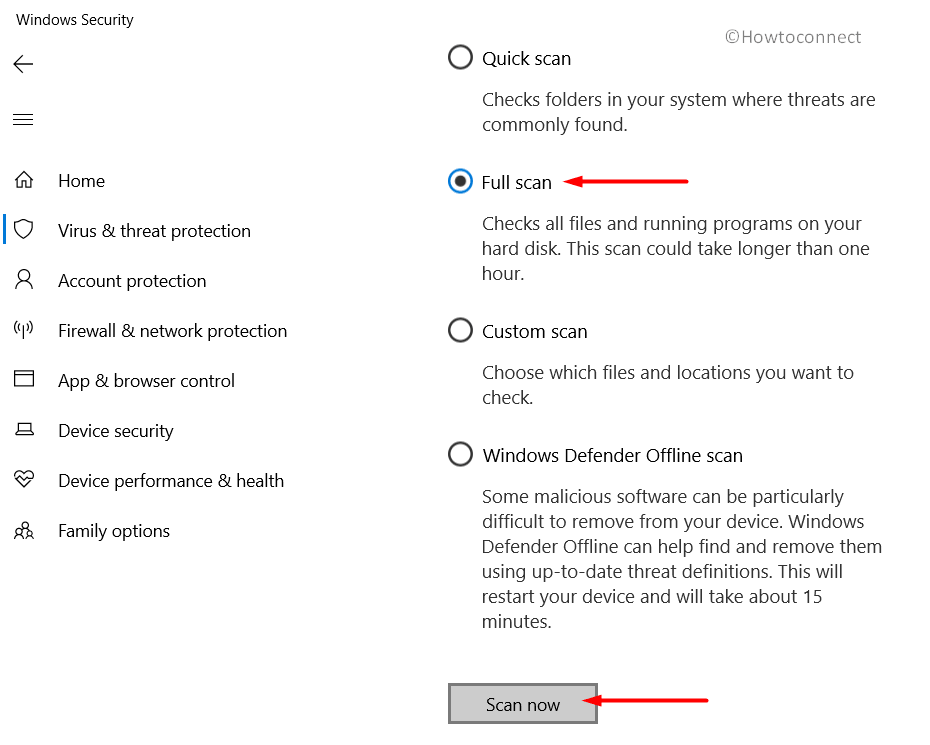
- The utility will search for viruses in every file in the system. It might take several minutes and when the process ends, you will view the result on the screen.
- If any malware is discovered in searching, choose Clean threats and dismiss those.
- From the following page where you will come across three more options, select Remove first and then hit Start actions to wipe out all the virus components.
8] Fix up all the memory issues in Windows Memory Diagnostic
Bad areas in Random Access Memory and incorrect allocation of memory can bring up CRITICAL_OBJECT_TERMINATION BSOD in the system. Windows Memory Diagnostic is a default tool that can easily resolve these issues and the BSOD error disappears. You can launch the app in the below steps –
- Open the Start menu and keep typing “memory” from the keyboard.
- Once the Windows Memory Diagnostic is seen in the result, select it.
- After the wizard unrolls, choose “Restart now and check for problems (recommended)”.
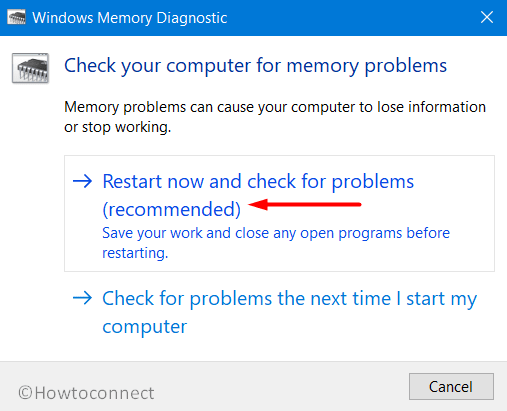
- As a consequence of this selection, Windows will attend the first cycle of the reboot.
- After it comes again in operation, there will a blue colored page detecting memory issues in the system.
- For the sake of facilitation, the progress rate will be visible in percentage and when it hits 100%, the device will restart again automatically.
- The results of this diagnosis will be available in the System tray- Notification area when Windows powers up next.
9] Delete all the junk files from Disk Storage using Disk Cleanup Tool
Junk files are temporary and useless after finishing an operation. Unnecessary they take up space in the storage and once pile up in large quantity, occupy huge space. In the end, the storage runs in low disk space and CRITICAL_OBJECT_TERMINATION BSOD evolves. Disk Cleanup utility can delete these files in a single shot and make free space. Here is how to do it-
- Perform a click on Start menu and start tying cleanmgr from the keyboard.
- Disk Cleanup Desktop app will come in front and do a click on it.
- Sharply a small pop up will be visible asking you to choose the drive where you want to carry out the freeing up.
- Choose C: by making a click in the drop-down menu and eventually hit the Enter from the keyboard.
- Disk Cleanup Utility will first make a calculation about how much space it can retrieve out of the drive and then show the wizard.
- Move little down in the wizard and make a click on the Clean up system file button.
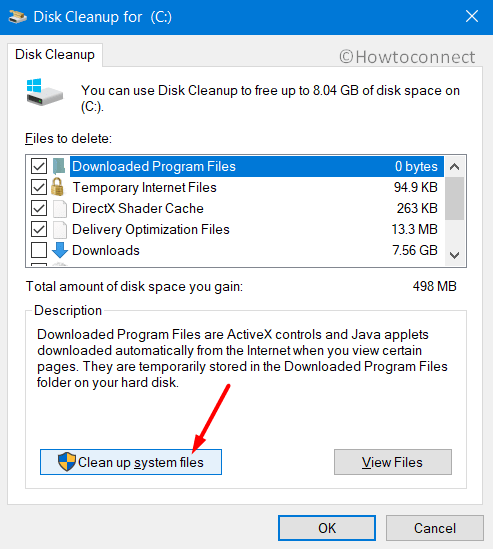
- When the small dialog will again show up, select C: in the same way before.
- Disk Cleanup for C: will one more time calculate retrievable space in system files and then flash up the wizard.
- Here, select all the checkboxes under Files to delete area without Downloads.
- Hit the Ok button from the tail end and start the cleaning process.
Important- Before hitting Ok in the above wizard, make sure there is nothing important in the Recycle Bin. If any, restore in the respective location
10] Uninstall similar Applications to reduce the risk of their conflict
When similar applications stay over in a system, they tend to collide with others and in the end, they delete necessary OS resources. Therefore, CRITICAL_OBJECT_TERMINATION BSOD is the ultimate outcome. To reduce the risk of collision, we need to uninstall one of these programs. Follow the below steps to uninstall an app –
- Do a combined press of Win+R hotkeys to invoke the Run dialog.
- Fill up the blank search area with appwiz.cpl and also select the Ok button located at the right bottom of it.
- Programs and Features window once being visible, reach out to applications causing CRITICAL_OBJECT_TERMINATION BSOD Error.
- Select those in the process and hit Uninstall option seen at the top ribbon.
- Follow the on-screen guidelines shown afterward to accomplish this task.
- Once finished the uninstalling process, open the Start menu and hit Power icon.
- Select the Restart option and let Windows perform the cycle of rebooting.
- When powers up next, perform a check for the trace of error in the system.
- If it resolves properly, download those apps again.
11] Offer Temporary break to the Hardware Accessories including Additional Hard Disk
Few users repeatedly reporting that CRITICAL_OBJECT_TERMINATION BSOD is prevalent in the system when they have started using an additional Hard Disk or DVD drive. The relief is that issue resolved only by removing them momentarily. So, let’s disconnect them and re-plug again using the below instructions –
- Disconnect the External Hard Disk from the device and leave it in a safe place.
- Make a click on the Start menu and let it spread up.
- Hit the Power icon initially and select the Restart option from there.
- Windows will reboot primarily and when it gets back to the desktop, perform a check for CRITICAL_OBJECT_TERMINATION BSOD in Windows 10.
- If it resolves successfully, do a visit to manufacture website for that particular HDD.
- Download and install the latest driver to use safely.
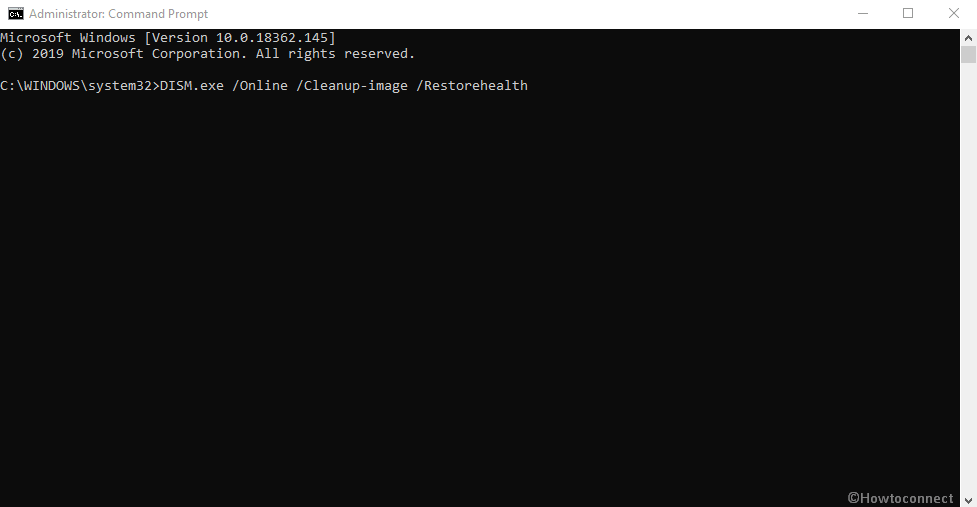
12] Execute Deployment Image Servicing and Management (DISM) tool to repair dreadful Windows image files
When Windows Image files run in disruption, so many errors are like to occur in the system like CRITICAL_OBJECT_TERMINATION BSOD. We have a very effective utility called DISM tool to rectify this problem. To run, proceed with the following guidelines –
- Manage to get entrance to the Elevated Command Prompt window using the same instruction we have shown before.
- When in the dark window, type the following command at the base of winking cursor –
DISM.exe /Online /Cleanup-image /Restorehealth
- Now, press the Enter key to activate the DISM tool. It will power up in a moment and rectify defective image files once detected.
- After the process ends finally, restart Windows 10 PC using the usual way.
- Once you sign back in onward, perform a check for the existence of CRITICAL_OBJECT_TERMINATION BSOD in Windows 10.
13] Dissipate Windows Update Files terminated at the midway of installation
Windows Updating process using the Settings app is an autonomous process and there is a thin chance of terminating at the midway. But, if it happens so, CRITICAL_OBJECT_TERMINATION BSOD will be the immediate result. Therefore, we need to delete these files from the system. Using the following steps, you can uninstall those in a simple way –
- Open Windows Settings app using any method you like.
- From the app interface, move ahead to Update & Security tile and select it.
- When the next page arrives, choose Windows Update from the left-hand side.
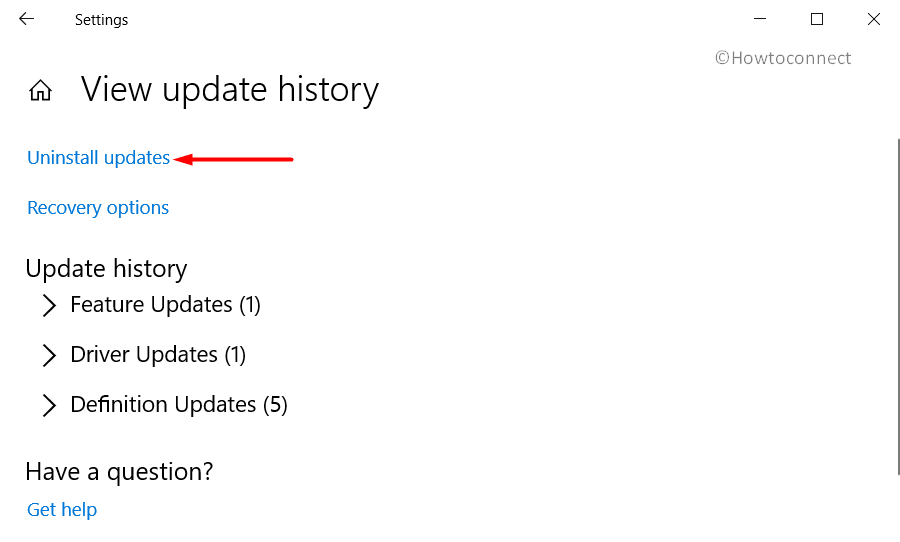
- Jumping on the corresponding pane, select the View update history link.
- After the consequent page hits on display, do a click on Uninstall updates option.
- Immediately a new window will hang on in the name of Installed Updates.
- Reach out to the recently received patch in the list and perform a right click on it.
- Hit Uninstall option once available to proceed.
- Follow the upcoming guidelines available in the display to completely remove these files.
14] Return back to the Previous State using System Restore
Changes in the Windows OS like installing some of the applications or uninstalling few will leave footmark in the registry. If anything goes wrong in the whole procedure, there will be CRITICAL_OBJECT_TERMINATION BSOD in Windows 10. However, you can revert back to a previous point of no error if have a before created System Restore Point. Here is how to Undo the recent changes –
- Perform a right click on the Start menu and select Run option from there.
- When the dialog appears, type rstrui in the text field and select Ok from down.
- Once the System Restore wizard appears, choose the Next option to generate PC’s Restore points.
- To see all the available restore points, do a click on Show more restore points option.
- Select the last restore point and hit the Next button to proceed.
- From the following window, choose the Finish option to initiate the restoring process.
Note – This process demands a previously created Restore point. In case you don’t have any, skip the workaround and proceed to the next one.
15] Run Disk Checking Utility in Elevated Command Prompt
Using a device continuously for a long period of time causes fatigue in it. The result is the evolution of bad areas in it. When such things happen, you can experience CRITICAL_OBJECT_TERMINATION BSOD in the system. Disk Checking Utility will be super handy to deal with this. Here are the details of the process –
- Roll the cursor to the left bottom side of Taskbar and make a click on the Search icon.
- Once the Taskbar Search launches, type cmd.exe in the empty text field.
- When Command Prompt shows in the result, hit a right click on it and select Run as Administrator option.
- When UAC prompts for permission, hit Yes to continue.
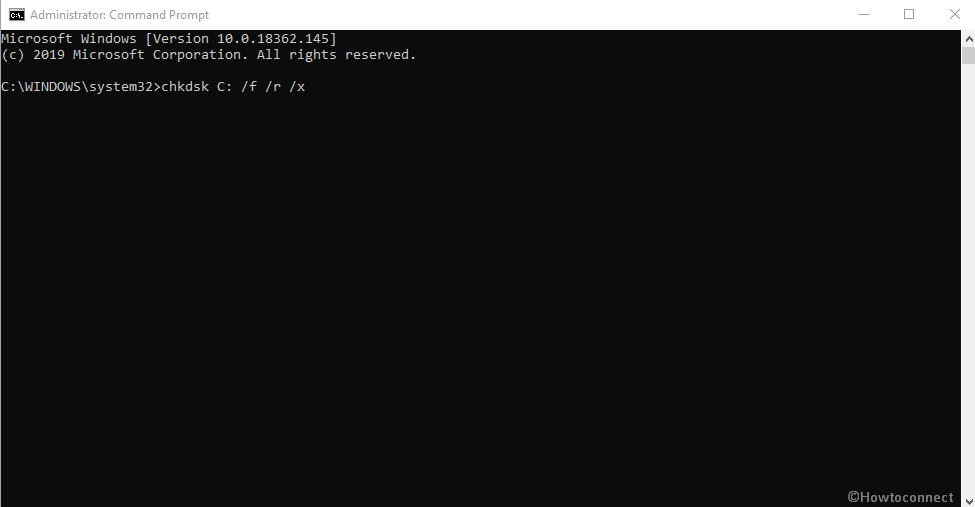
- On the Elevated Command Prompt window, type the following command where the cursor winks –
chkdsk C: /f /r /x
- Here, CHKDSK will show only the Disk status upon activation. We have used a few other notations indicating following –
f- represents fixing the detected problems.
r- represents detecting the existing problems in the Disk.
x- represents splitting up of the disk volume to facilitate the detection process.
C: – represent the Disk where the OS is installed. You can change this to D:, E: or any depending upon your usage.
- Once you hit Enter key, the Disk Checking Utility will detect and fix all the problems immediately. This process will take some time, so, hold the patience and wait until it gets over.
- Restart the computer once finished and after returning back, check if there is an issue in the system.
16] Never allow Third Party Anti-Malware program to stay in the system
People often use a third party anti-virus tool in malware issues and this is quite legit. But as Windows Security is the default app and well-renowned one, we can use it only. Other applications are unnecessary and might welcome CRITICAL_OBJECT_TERMINATION BSOD in the system. Therefore, try removing them in the below process –
- Manage access to Windows Settings app using any convenient method discussed early on.
- While in the UI, move ahead to the Apps area and make a click on it.
- After the next page hits on display, select Apps & features from the left pane and sharply jump to the adjacent wing.
- List of applications after being finally loaded, reach out to Anti-virus program in the list.
- Select the program to expand in the pane and finally hit the Uninstall button when available.
- If UAC floats up asking permission, provide consent by clicking on Yes.
- Follow the on-screen visible guidelines further to remove it from the device.
As you have come this far, we can expect that you have successfully resolved CRITICAL_OBJECT_TERMINATION BSOD error in Windows 10. It’s unfortunate and frustrating if you are failed to do so. Well, we have the last resort for you in that case. This is to perform a complete installation of Windows 10. By doing so, you can call an end to all the existing problems and troubles.
Before starting to do the clean installation, make sure you have saved all the necessary files in the backup document. We recommend saving these in an external drive preferable in USB storage. Try connecting the device with a speedy internet connection via wireless or broadband means. Don’t try unless being competent, better to ask help from professionals. This will limit the risk of more issues evolving afterward.
Methods:
1] Hold up Device from Restarting Automatically
2] Boot Windows 10 into Safe Mode
3] Update the Drivers with Yellow warning mark in Device Manager
4] Take Help from Windows Device Manager and Update Drivers
5] Resolve the corrupted Windows System components
6] Install all the released patches
7] Dismiss the existing Malware in Windows Security
8] Fix up all the memory issues
9] Delete all the junk files from Disk Storage
10] Uninstall similar Applications to reduce the risk of their conflict
11] Offer Temporary break to the Hardware Accessories including Additional Hard Disk
12] Execute Deployment Image Servicing and Management (DISM) tool
13] Dissipate Windows Update Files
14] Return back to the Previous State using System Restore
15] Run Disk Checking Utility
16] Never allow Third Party Anti-Malware program
That’s all!!