To provide maximum usability, Microsoft allows to Enable, Disable and Choose Color Filters in Windows 10. You can optimize the colors of the installed software, third-party applications as well as the Microsoft apps in order to have a clear vision on the screen. This setting is useful for visually impaired users, specifically during differentiation between things in 2 palettes.
Windows 10 has a built-in feature of showing all the installed software and apps on the screen as a thumbnail view. Some find difficulties in recognizing the apps from each other. As a result, Microsoft is now allowing you to Enable, Disable and Choose Color Filters on Windows 10 so that you can distinguish the each and every app easily. The home screen of Windows 10 shows all the installed applications and software altogether, but sometimes because of impairment, it becomes a heavy task for the users to identify the application they want. It becomes a serious issue when they run out of time.
So, in order to help out users who are blind or visually handicapped, Microsoft came up with this feature. Color filters not only perform at the system level, but also works on all the installed software, Microsoft Apps, and 3rd party applications. Till this moment, below given are the list of colors that are functioning on Windows 10 so far with this feature:
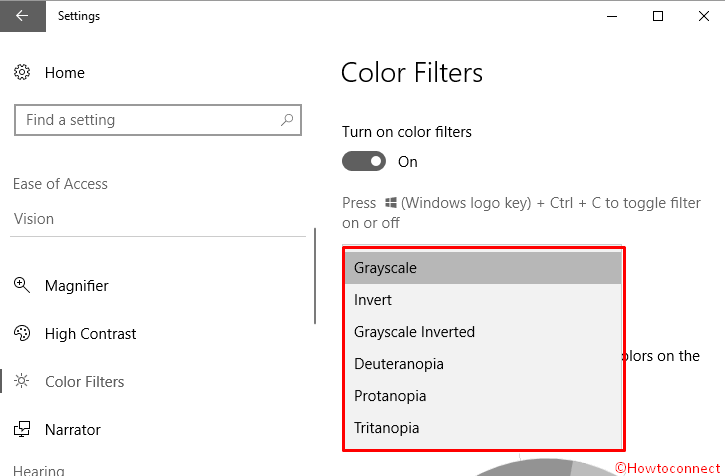
- Protanopia
- Tritanopia
- Grayscale
- Invert
- Deuteranopia
- Grayscale Inverted.
How to Enable, Disable and Choose Color Filters on Windows 10
1st Method – Through Settings
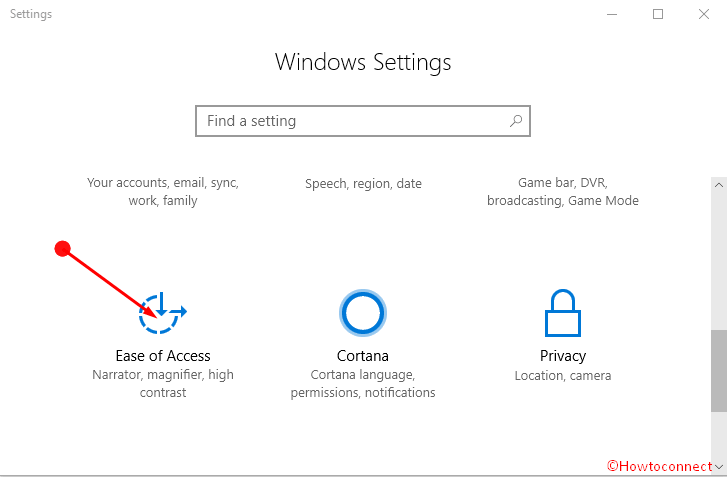
Step 1 – Launch the Settings application Enable, Disable and Choose Color Filters by using Win+I shortcut. When various tabs come into view, reach out to Ease of Access and select it.
Step 2 – Proceeding forward, click Color Filters in the left pane. On its corresponding right pane, toggle On the option for the setting Turn on color filters. Alternatively, you can also press the Windows key+ Ctrl + C together from the keyboard. This shortcut combination of keys will enable or disable the Grayscale on your computer as a default color filter.

Step 3 – Now, click the drop-down underneath the option Choose a filter. Choose any color you like from the list and the feature applies the selected filter instantly.
2nd Method – Registry Editor
You can configure the Color filters with the help of registry key too. The steps of this method are as follows:
Step 1 – First of all, open Registry Editor in order to Enable, Disable and Choose Color Filters. Next, go to the following key –
Computer\HKEY_CURRENT_USER\Software\Microsoft\ColorFiltering
Step 2 – On the right side of the screen, you see 2 DWORDs – Active and FilterType.
Step 3 – The first DWORD Active lets you Enable and Disable Color Filters by modifying its value. So, to enable Color Filters, execute a right-click on Active, choose Modify from the list of options. On its edit box, type 1 in the Value data field and click OK to implement the changes.
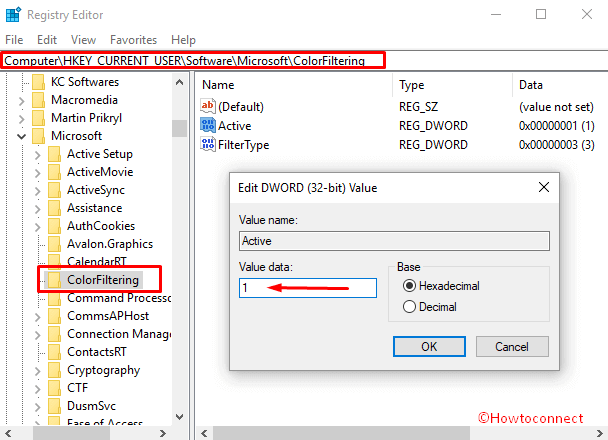
Step 4 – In contrast, to disable provide 0 in the same space and click OK.
Step 5 – The second DWORD FilterType ensures what filter you use in the Color Filter. Perform a right click on the FilterType, choose Modify and then select the one from following.
| Color Filters | Registry Values |
| Grayscale | 0 |
| Invert | 1 |
| Grayscale Inverted | 2 |
| Deuteranopia | 3 |
| Protanopia | 4 |
| Tritanopia | 5 |
Step 6 – Here also, on the edit dialog, insert any of the above Registry Value and click OK to make the changes effective.
Conclusion
Color filters make the apps look beautiful and as well as users can easily distinguish every different app. For this reason, Microsoft has allowed the users to enable, disable and choose Color Filters on Windows 10 to offer the flexibility in use. You can now customize your PC if you have eye problems as you prefer using either of the methods.