Though Windows 10 version 1903 was full of new exciting features it was not free from complications. Problems like Start menu and Search Issues, IME High CPU usage or Unresponsive and more are pretty common in 19H1. Likewise, the installation of this feature update throws 0xc1900101 0x30017 Error in the First Boot Phase itself which eventually reverts back the system to the previous build or version.
Users often face some kind of interruptions while they try to upgrade to a version or are upgrading with a major update. Most of the errors related to the installation are caused due to a problematic device driver or third party software or some sort of misconfiguration in the Registry. Read on to know more and fix the issue with the installation that you are facing.
0xc1900101 0x30017 Error Installation Windows 10 Solutions
Here is how to fix 0xc1900101 0x30017 Error Installation Windows 10 –
1] Ensure Sufficient Disk Space
The overloaded disk is one of the common reasons for various types of errors, crashes and slothful working. In order to deal with it, you should take some time out to clean up the disk. All you got to do is simply deleting all the unnecessary files and uninstall any unused apps. Also, for quickly removing the junk and temporary files from the system, you can utilize the Disk Cleanup utility of Windows. It is pretty simple to use and can potentially free up a few GB of storage occupied by useless files.
- In the search box on your taskbar, type Disk. From the results, double click on ‘Disk Cleanup’ to open the utility.
- When you do, a small window will come up. In this, you will have to select the particular drive that you want to clean up. Select the one (go for C: that’s where most of the temporary files get stored automatically) and hit OK.
- The tool will analyze the space occupied by junk files in your system, which can clean up and retrieve. Once the scan is complete, you can see a list of folders having temporary data. Along with them would be the amount of storage occupied by them. Here, perform a click on the Clean up system files button.
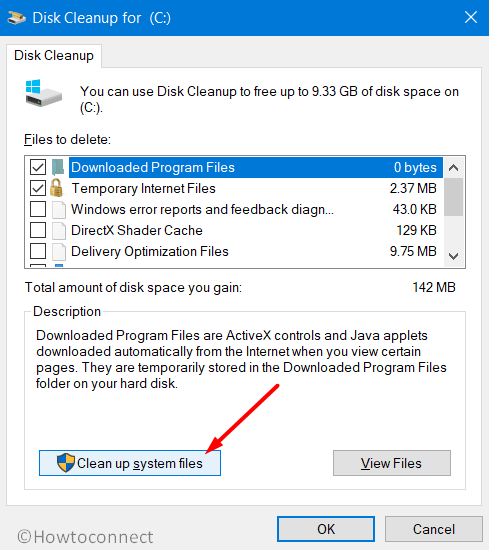
- Select all the checkboxes and then hit the OK button. Here, note that this may include the ‘Downloads’, ‘Recycle Bin’, etc. Once you hit OK, all the files in them would be permanently removed. So, it is advisable to check through them beforehand for any important files that you should move.
The process will complete after which you must restart the device and see the problem has been resolved.
2] Temporarily disable active Firewall or antivirus programs
Sometimes users find obstacles in the installation process due to the blockage caused by actions of firewall or anti-virus programs. This is pretty common as well. So, as a fix, you can try temporarily disabling your anti-malware programs. Here is how you can do it:
- First of all, click on the system tray icon. When it expands right click on the anti-malware software installed and active on your system.
- From the flyout menu select Disable or Disable Auto protect.
- When prompted, select the duration (preferably 30 minutes or one hour) for which you will like the anti-malware software to be inactive.
- Now try connecting to your Wi-Fi and see whether the problem has been resolved. Otherwise, in the next step, we will disable the firewall.
- To block firewall, first, open Control panel =>System and Security => Windows Firewall.
- Now, from the pane on the left of the screen, select the link namely “Turn Windows Firewall on or off“.
- Finally, select “Turn off Windows Firewall and restart your PC“.
- Try the upgrade installation again and if the problem is still unresolved you may reactivate the firewall and the anti-virus.
3] Run Windows Update Troubleshooter
Running the relevant troubleshooter should actually be one of the first fixes that you should try out when you face system errors or problems like 0xc1900101 0x30017 Error. Windows have a specific troubleshooter for resolving the update related issues. That is what we are suggesting you use in this step. Here is how you can use a particular function.
- Open Windows Settings app as mentioned previously and just like before, head to the Update & security section.
- From the tabs on the left, select Troubleshoot.
- When the relevant panel appears, simply click on Windows updates.
- The option will expand, revealing the Run the troubleshooter button. Click on the same to trigger the update troubleshoot function.
See if the 0xc1900101 0x30017 is resolved by attempting the upgrade you were attempting.
4] Check for any pending updates to Fix 0xc1900101 0x30017 Error
Keeping your system up to date can go a long way in the smooth functioning of your computer. While these updates are usually automatically downloaded by Windows, sometimes the update processes may fail due to network interruptions, force shutdown, or if you have disabled the process.
Anyway, in case you have been postponing the installation of the latest patches and your system has started facing error issues, you might want to try updating. Given below are the steps to manually update your Windows –
- Right-click on the Start icon and choose Settings.
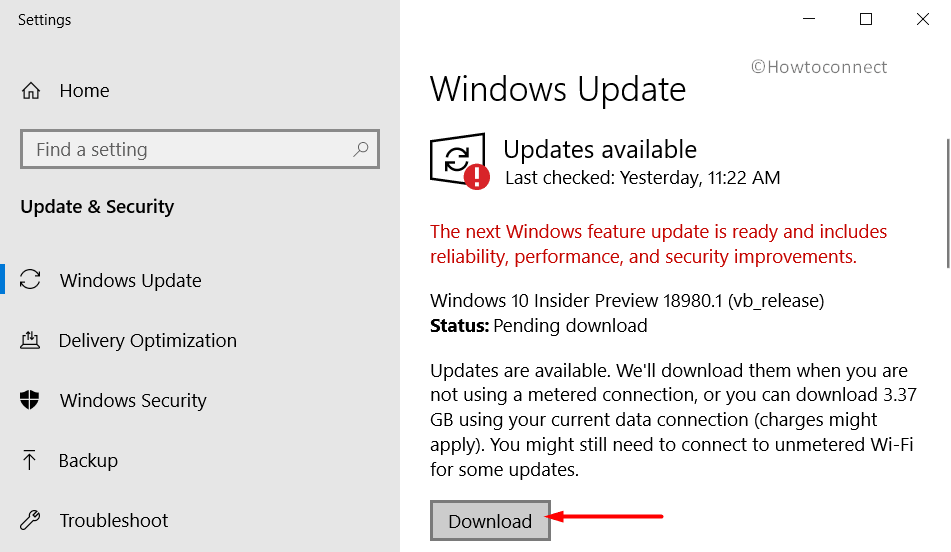
- When the application UI for Settings comes up, head to Update & Security section and there, to the Windows update tab. (Mostly, this tab would be open by default when you head to the said section).
- Click on Check for updates button to see if any updates are listed in the right panel and click the Download button to get them.
- If the update requires a reboot, let the system do it to complete the process.
5] Go for a Clean Boot of the system
Clean boot is an option that users have when they want to start Windows with a minimal set of programs and drivers. This is a good alternative in case your system has not been starting normally. It is however different from the safe boot. This is in the sense that the latter involves shutting down most of the programs or drivers which are not needed in order to launch the operating system. In other words, all the non-core components and non-essential processes will be disabled. The Clean boot would be relatively basic in comparison and wouldn’t put so many limitations. Basically, it troubleshoots any software compatibility related problems. Here’s how you can use this workaround –
- Press “Win logo + R” keys together to open Run dialog box and then insert the command msconfig in it. Hit Enter.
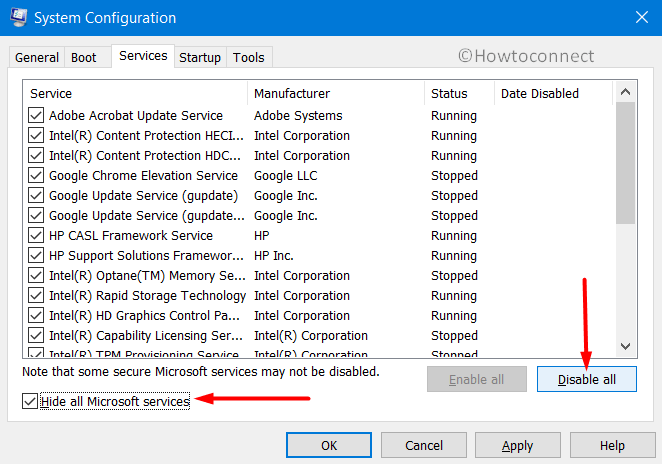
- The window for System configuration will come up. There, in the General tab, uncheck the checkbox corresponding to Load startup items under Selective Startup.
- Now click on the Service tab and then check the box against the option “Hide all Microsoft services”.
- Thereafter, hit the Disable all button in order to block the unnecessary services that might be causing conflict.
- In the next step, go to the Startup tab and click on Open Task Manager.
- When the Startup tab in the Task Manager comes up, simply disable all the startup items, of which the status is “Enabled”.
- Click on OK and then restart the system.
6] Rename SoftwareDistribution Folder to Resolve 0xc1900101 0x30017 Error
Some users found renaming the SoftwareDistribution Folder as a workaround to the 0xc1900101 0x30017 error. To do this, follow the below steps:
- Open the Command Prompt as an administrator.
- The next step is to stop the Windows update services. To do this, in the command line, type the following commands one at a time and hit the Enter key after each one –
net stop wuauserv
net stop cryptSvc
net stop bits
net stop msiserver - Now, type in or copy & paste the below command line in order to rename the SoftwareDistribution folder –
ren C:\Windows\SoftwareDistribution SoftwareDistribution.old
ren C:\Windows\System32\catroot2 catroot2.old - Hit Enter.
- The last set of commands that you need to pass are the ones to activate the update services that we earlier stopped.
net start wuauserv
net start cryptSvc
net start bits
net start msiserver - Press Enter and close the window.
- Finally, reboot the system and attempt the installation. See if you are still facing the issue.
7] A Tweak with the Registry
As we mentioned in the beginning, some misconfigurations in the Registry can lead to 0xc1900101 0x30017 error. Therefore, attempting to fix it may resolve the situation that you are facing. You can avoid this workaround in case you are a total beginner and don’t want to risk any damage. However, it suggested to Import and Export Registry Editor to save the system from further loss. For the solution, here are the steps –
- Type regedit in the taskbar Search box and hit the Enter key. Click Yes to the prompt of UAC.
Once you access Registry Editor, go to the following location -
Computer\HKEY_LOCAL_MACHINE\SOFTWARE\Microsoft\Windows\CurrentVersion\WindowsUpdate\OSUpgrade- In case you are unable to find OSupgrade key in WindowsUpdte, you can simply create one by right-clicking on WindowsUpdate => New => Key.
- Once you create OSupgrade, select it and create a new DWORD (32 bit) and name it AllowOSUpgrade. Change its value to 1.
Try installing the update now.
8] Remove the file interfering with the upgrade
There is a possibility that a file present in your PC is responsible for the failure of the installation of the upgrade. If that is the case, then you need to find and delete that file immediately. You can follow the following steps to delete the file interfering with the upgrade –
- Open This PC and navigate to the below-given path –
C:\Users\UserName\AppData\Roaming\Microsoft\Windows\Start Menu\Programs\Orbx
Note – Make sure you change the ‘UserName’ to your own Windows user name. You can also find the Orbx folder by searching the folders step by step as mentioned in the above text. In this procedure, you will be required to checkmark the “Show hidden files and folders” option as the AppData folder is hidden by default.
- Also, you can open the AppData folder directly by using the Run command.
- Get access to Run and insert the following and hit Enter.
%appdata%\Microsoft\Windows\Start Menu\Programs\Orbx - The next step is to find a file named Todo in the Orbx folder. This file is often responsible for up-gradation failure.
- Delete the above file permanently.
- Restart Windows 10 PC and check if it upgrades properly.
9]Update the current BIOS version of your system
BIOS (basic input/output system) performs hardware initialization when you boot your PC. Basically, it also manages the data flow between the operating system and the devices of your computer.
An older version of BIOS may create some problems in the up-gradation of Windows 10 and therefore updating it may fix your issues.
Caution: If the BIOS update is not done properly, it may heavily affect your system or cause further damage. Therefore, it is advised to perform the update either with proper understanding or under expert supervision.
- Find your current BIOS version, and to do so access Run, type “msinfo32“, and press Enter. In the System Information window, you will get the BIOS version.
- Now you need to know the recommended BIOS version for your system. For this, visit your PC manufacturer’s website and enter the computer details.
- Download the recommended update of the BIOS. Powering off your PC during the update may damage the system.
- Run the downloaded file and check if updating BIOS has solved your upgrading issues.
10] Disable Secure Boot Settings
This type of boot ensures that your PC only starts up with firmware that is trusted by the manufacturer. Therefore, sometimes secure boot restricts some of the files or software to install in your device. Disabling this may fix your Windows upgrade problem but remember after disabling it and upgrading, it may become difficult to re-enable it.
- First of all, you need to restart your computer.
- During the bootup sequence, open the BIOS setup by pressing a key such as F1, F2, etc.
- Set the Secure boot setting to ‘Disabled‘.
- Save changes, exit and let the device reboot.
- Try to upgrade the Windows now and then switch the Secure boot setting to ‘Enabled’ again.
11] Use Windows Security to Fix 0xc1900101 0x30017 Error
Some malware may also cause trouble in the process of upgrading Windows. In this case, some cleaning to the PC is necessary and the Windows Security app comes into great use. This built-in protection tool will scan for the presence of threats and malware on the system. If it detects any, you can take action accordingly.
- Click the shield icon on the taskbar to access Windows Security app.
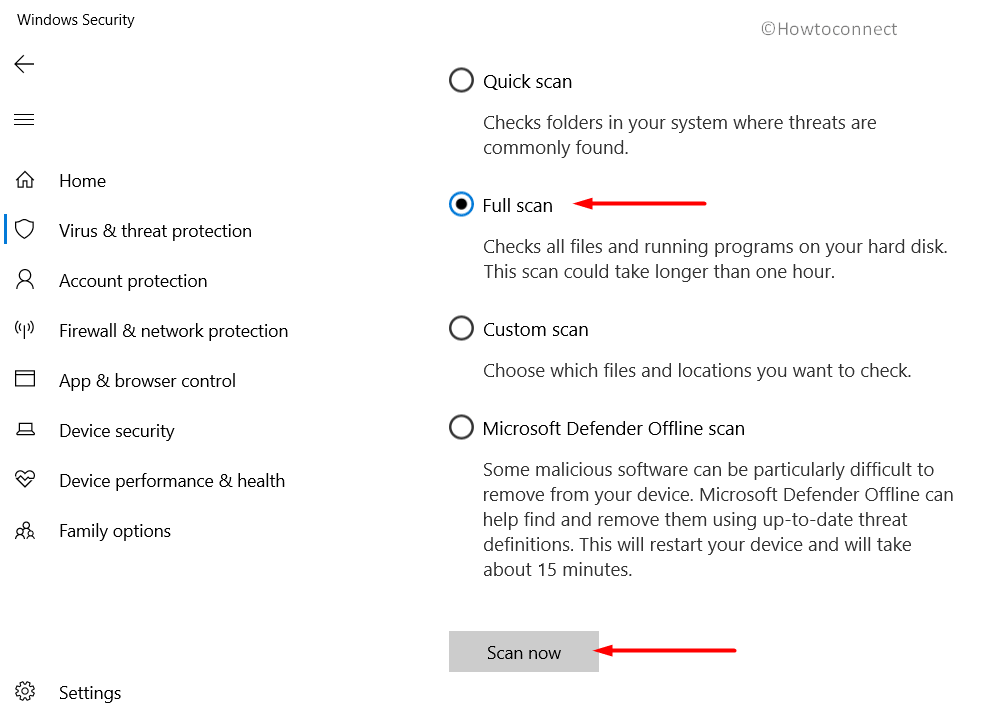
- Go to Virus & threat protection.
- Click the Scan options link. Choose Full scan and then do a hit on Scan now.
- This might take a long time and once it lists down the threats, remove them right away.
12] Run System File Checker and DISM tool
You probably know the fact that every system file is extremely important in the overall computer functioning. Any missing file or any kind of discrepancy with any component can leave to various issues which may include 0xc1900101 0x30017 Error. This fix is to check the same –
- Launch Command Prompt with admin rights using any of the preferred methods.
- Type the following command and hit Enter.
Sfc /scannow
- If the above command doesn’t work then type the below one –
sfc /scannow /offbootdir=c:\ /offwindir=c:\windows
- Wait while the above process finishes and then reboot the PC.
- Now, again access Command Prompt and insert the below commands one after another.
Dism /Online /Cleanup-Image /CheckHealth
Dism /Online /Cleanup-Image /ScanHealth
Dism /Online /Cleanup-Image /RestoreHealth
- Once the scans get over, restart the device and check for the error.
By now, hopefully, you are able to get rid of 0xc1900101 0x30017 Error Installation Windows 10. If you have more tips for this installation issue, do share with us.
Methods:
1] Ensure Sufficient Disk Space
2] Temporarily disable active Firewall or antivirus programs
3] Run Windows Update Troubleshooter
4] Check for any pending updates to Fix 0xc1900101 0x30017 Error
5] Go for a Clean Boot of the system
6] Rename SoftwareDistribution Folder
7] A Tweak with the Registry
8] Remove the file interfering with the upgrade
9]Update the current BIOS version of your system
10] Disable Secure Boot Settings
11] Use Windows Security
12] Run System File Checker and DISM tool
That’s all!!