NETWORK_BOOT_INITIALIZATION_FAILED is a critical drawback in Windows 10 and generally identified as blue screen of death error. The stop code mainly appears when the OS is booting, meanwhile, a critical process fails to operate at the time of I/O initialization. Like all others, the setback has an identifying bug check code of 0x000000BB representing Windows has failed to boot off a network successfully. Usually, these sorts of errors are prominent due to software problems mostly, where hardware issues can be named guilty as well. From the software side, invalid driver issues, memory problems including bad RAM, missing system components are pretty common when you go for diagnosing the causes.
NETWORK BOOT INITIALIZATION FAILED blue screen error shouts its presence in the system by showing abnormal warning messages initially. Later on, the system will freeze for time being making the desktop area inaccessible, moreover, the Windows will reboot suddenly confirming that you are already affected by the hitch. The issue is a dangerous one and damages caused can go beyond imagination. Therefore, a necessary resolution is a must for the successful recovery of the system.
NETWORK BOOT INITIALIZATION FAILED
Here is how to fix NETWORK BOOT INITIALIZATION FAILED blue screen error in Windows 10 –
1] Keep Windows 10 updated always
Keeping Windows 10 up to date always serves big time and you can also explore lots of handy features added in the latest edition. Most importantly, these new builds provide fixes for existing bugs and that might be really helpful. Several reports claimed that the blue screen error with bug check code 0x000000BB is very protruding in an outdated Windows 10 device. Therefore, it’s been so necessary to keep the Windows up to date always.
Microsoft also releases cumulative updates on a regular basis and the process is made automatic to make your experience easier. However, the automatic process might end up creating enormous issues instead. It’s recommended to accomplish the task manually following below guidelines –
- Launch Windows Settings app by pressing Win+I keys together.
- When the app UI comes to sight, click on Update & Security and move to the next page.
- Jump to alongside right and click on Check for updates button to initiate searching.
- When the latest patches become visible, hit Download button located there.
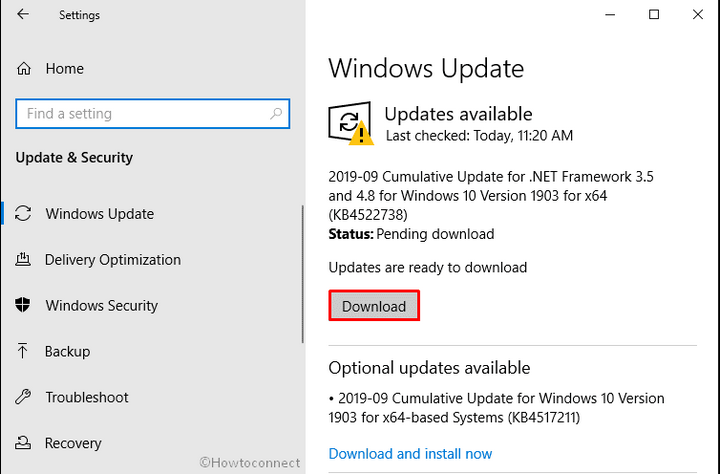
- Once the downloading finishes, the installation will begin automatically.
- The whole task may require consecutive restarting of Windows, therefore, be present in front of the machine to accomplish the process.
2] Look for malware in the system and resolve
A program that has the property of replicating itself into another one, in the process encrypts data from a system usually treated as Virus. Such bugs are nowadays available around the web with a motive to steal sensitive as well as necessary data. These malware are very much stronger compared to before and sneak through any type of defense you use.
When they enter into the system, not only steal private data but also damages the core components and give rise to blue screen error. The best way to protect you is to detect the threats using Windows Security and fix them eventually. The default program comes with the robust build which functions as malware eliminator both online and offline. Move through below process to eliminate existing threats –
- Press the Windows key and select Windows Security from the list of applications installed approaching alphabetically.
- When the program opens in a separate window, select Virus & threat protection from it’s the left pane
- Move straight on to the right pane and click on Scan options link.
- After all available methods are displayed; hit the radio button set for Full scan option.
- Later on, initiate the detection process by selecting Scan now option.
- If the tool traces out some malware in the system; do a click the Clean Threat option to get rid of them.
- When moved to the succeeding page you will get three options, select Remove followed by clicking Start actions to resolve NETWORK_BOOT_INITIALIZATION_FAILED.
3] Recover missing and corrupted system components
When a smoothly running system feels the absence of some necessary components from its core, it will usually feel the outbreak of blue screen error with abnormal bug check code 0x000000BB in it. There are few reasons for which these elements can go missing like software collision due to malware or virus attack.
When such damages occur, you have to give a try in recovering them and System File Checker will be prime tool here. The utility has the best built to refresh those core components when activated in the elevated Command Prompt. To access it, proceed with below guidelines –
- Press Win+R hotkeys together to open the Run dialog first.
- Type cmd.exe in the search box provided in wizard and press Ctrl + Shift + Enter keys altogether.
- When the User Account Control will prompt up for permission, click Yes to continue.
- When access to Elevated Command Prompt is granted, a black window will come to display.
- Type the below command tool and press Enter key –
Sfc /scannow
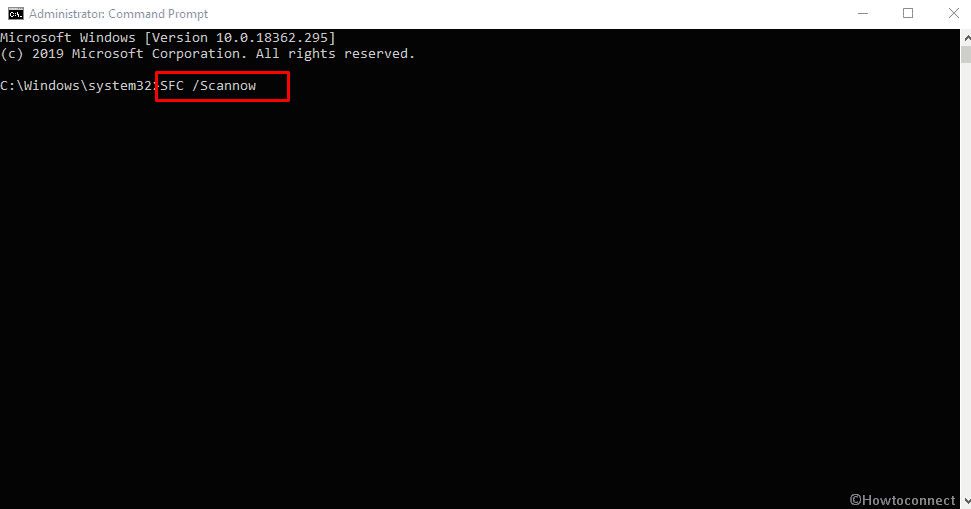
- With the action, System file checker tool will start looking for corrupted and missing system components in the device.
- Detected items will be resolved automatically and the process might be a little lengthy. Wait until it finishes and restart Windows 10 once done.
4] Disable invalid drivers or restore their default state
Most of the blue screen errors are associated from the drivers and NETWORK BOOT INITIALIZATION FAILED is no exception. Sometimes, few drivers can be detrimental so badly whereas few can be installed in an invalid format. In that case, you have to disable them if not quite necessary. Alternatively, reverting them to their default state is also another handy option as well. For that, use the below instructions –
- Open Run dialog following the same instruction from above workaround.
- Write devmgmt.msc in the empty text area of Run and press Enter key eventually.
- When the Device Manager opens up, reach to the dreadful device whose driver you opt to disable or restore to default.
- Do a double click on the same to spread its driver list.
- Right-click on the suspected driver and choose Properties option.
- After a new popup window launches, enter into its Driver tab
- Finally, click the Disable or Roll Back Driver.
- Repeat the same for all defective drivers and upon finishing the process, reboot Windows 10.
5] Update all the drivers using Device Manager to fix NETWORK BOOT INITIALIZATION FAILED
Various case studies are found to prove that, outdated device drivers are responsible for blue screen error with bug check code 0x000000BB. In fact, these items are very much essential parts as they maintain communication between the computer bus and specific hardware accessory. Once they are found in outdated conditions, a variety of vulnerabilities show up.
Though the updating process is autonomous with Windows itself, you can proceed to accomplish the task manually to avoid related errors. The process is as follows –
- Press Windows key and type devmgmt.msc in the search box provided.
- Once the result shows up, hit Enter to open Device Manager.
- From the new window, look for an outdated device with mark of exclamation on it.
- Extend the same and open up all the drivers adhered to it by double-clicking the device.
- Right-click on the outdated driver followed by selecting Update Driver option.
- Complete the process obeying on-screen guidelines provided.
- Do the same process for all the outdated drivers found in Device Manager console.
- Lastly, restart the Device and let all the changes to be saved.
6] Perform Clean Boot to the Operating System
The process of loading Windows 10 with only basic processes and settings is called Clean Boot. It usually helps in detecting setbacks like BSOD error with bug check code 0x000000BB and also enhances the device’s overall performance. In addition, it will also reduce the risk of software collision and therefore Windows 10 blue screen error can be resolved as well. The ways to perform Clean Boot is as follows –
- Press Win+Q hotkey at once and open up Taskbar Search.
- Type Windows Administrative Tools in the empty text area and select the utility when available in the result.
- Reach out to the System Configuration and make a double click on the same.
- From the new popup window, choose the radio button before Selective startup in General tab.
- Upon the grayed options become alive, uncheck the box before Load startup items
- Now, shift self to the Services tab and put a tick mark to the box against Hide all Microsoft services.
- Move down and click the Disable all button from the same wizard.
- Jump to the Startup tab next and click the link located there to load Task Manager.
- When the Task Manager opens, do a right-click on each program listed in this console one by one and chooses Disable for all.
- Move back in the System Configuration wizard and click on Apply button first followed by clicking OK.
7] Avoid the risk of Software collision by uninstalling unnecessary applications
Unnecessary software programs create additional problems always as for taking up extra space in disk space. These programs serving a series of purposes, people usually rely on them and keep installing more. Often, we see some similar applications are present in the system leading to cause a software collision in between.
The result of this action is too awful to afford as many Windows core components go missing. For a reason like earlier, NETWORK BOOT INITIALIZATION FAILED blue screen error takes place in Windows 10. To avoid, you can simply move through the below guidelines and uninstall the dual or similar applications –
- Right-click on the Start icon and choose Run.
- Type appwiz.cpl in the provided text space of the wizard.
- Hit the Enter key to launch the Program and Features window on display.
- Reach out to a similar application that you like to remove and make a click on the same.
- Now, select Uninstall option located at the top ribbon.
- If UAC asks for permission, select Yes to proceed.
- Follow the guidelines on the screen until the task finishes completely.
- Later on, restart the device to make these changes effective in Windows.
8] Clean the temporary files from the system to fix NETWORK BOOT INITIALIZATION FAILED
Temporary files such as junks and caches are produced in a good number daily in our system for the execution of tasks. Though they are useless after serving the purpose, take some space in the disk as a usual one. In the process, a lot of area in the disk is covered up and the Windows 10 runs in lack of space.
The ultimate effect is a slower operation and NETWORK BOOT INITIALIZATION FAILED error in Windows 10 to some extent. Cleaning them regularly will keep your disk healthy and free from any unwanted bugs. Disk Cleanup tool comes top-notch to serve this task and you can avail going through the below guidelines –
- Open the Run dialog box, type cleanmgr in its text area and press Enter key.
- A small pop-up will rise up immediately asking to choose the drive name.
- Make sure C: drive is selected and click on the OK button.
- After some time, a new wizard will arrive where you have to move bottom left end and click Clean up system files.
- When asked to choose the drive once more, select C: again and hit Enter key as well.
- In the upcoming window opening, Disk Cleanup for (C:) appears. Here, check all the options sitting under Files to delete.
Note – Ensure the Downloads and Recycle Bin are free from any important items or moved if present.
- Finally, click the OK button and let the tool to initiate cleanup.
9] Update the BIOS of your system to fix NETWORK BOOT INITIALIZATION FAILED
Basic Input/Output System or BIOS is a Firmware that actually starts the hardware initiation at the time of booting for a device. Furthermore, it has a great task of providing runtime services for Windows 10 OS and programs installed in the device.
BIOS is the first program to run when you operate a computer for the first time. Once this prime part of Windows leaves outdated, the consequence can be deadly and often cause NETWORK BOOT INITIALIZATION FAILED blue screen of death in Windows 10. To update, follow the below guidelines –
- Press Win+S hotkey at once and launch the Taskbar search.
- Type System in the provided blank area and select System Information app from results.
- In the newly opened window, look for BIOS Version/Date on the right-side pane.
- Note down the information and close the window.
- Open a browser and visit the maker’s webpage for the BIOS of your computer using information collected before.
- Now, Download the latest BIOS version and install it to Windows 10.
10] Remove dreadful Windows Update files
Microsoft as to providing the latest features of all time and resolve existing problems releases cumulative updates quite regularly. We have a decent task of installing them to Windows in time as a part of maintaining OS in healthy condition.
The updating process is autonomous and with an active internet connection, downloading and installation start immediately. When this process left alone and stuck in a loop of problems, files become dreadful. In the process, they get installed in the system and give away bug check code 0x000000BB. Therefore, we have to remove those files once found following the below guidelines –
- Right-click on the Start button and choose the gear icon from there.
- From the app UI, Click on Update & Security.
- Move to the right of the consequent page and click View Update history option available there.
- Upon loading the subsequent window, make a click on Uninstall updates link.
- After you are redirected to a new window from the Control panel, look for the latest installed update you opt to remove.
- Right-click on the same and select Uninstall option.
- Stick to the guidelines coming up on display until the process ends.
11] Deport hardware accessories for a while to fix NETWORK BOOT INITIALIZATION FAILED
While working with computers, have you ever thought about how it would be if there were no hardware accessory! Life would be terrible if we had no mouse, keyboard or something like speaker, printers. In recent times, some people have come across the blue screen error in Windows 10 after using such accessories which have created trembling among Windows users.
The resolution for this setback is really easier as only removing these hardware items eliminates the error. Therefore, step up to deport them momentarily and then reboot Windows. After loading the desktop again, connect the items you were using confirming that NETWORK BOOT INITIALIZATION FAILED BSOD error is no more prevalent in the system.
12] Fix up Memory problems in Windows
Memory problems basically occur from bad RAM mostly whereas, some other reasons can be attributed as well. These are one of the major reasons to give away blue screen error with bug check code 0x000000BB in the system. When such drawback protruding after device falls on the ground and RAM has bad areas in it, you may need to replace it full. Before doing that, you may proceed to the Windows Memory Diagnostic tool to fix memory issues. Guidelines are as follows –
- Click the Start button and type Windows memory in the blank box.
- When Windows Memory Diagnostic show up in the result, select it.
- After opening the wizard, choose the option Restart now and check for problems (recommended).
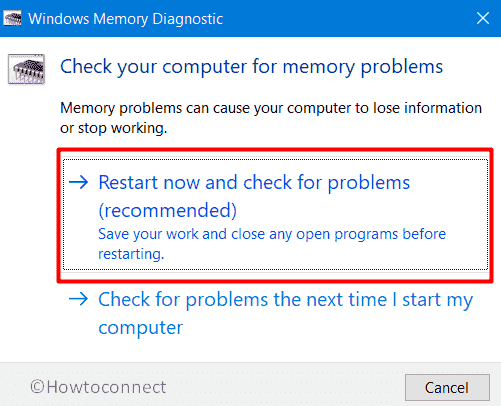
- For instance, Windows 10 machine will reboot and after a new session starts, you will notice a blue screen detecting memory issues in the system.
- Being completed the detection; Windows will restart itself for the second time.
- Look for the result of carried out Diagnosis in the system tray of the Notification area.
13] Disable Fast Boot option to fix NETWORK BOOT INITIALIZATION FAILED
Fast Boot is a combined process of computer’s usual shutting down process and Hibernate. Once the Fast boot activates, it actually carries over every single process in a device to the next session. If you have a NETWORK BOOT INITIALIZATION FAILED in your Windows 10 and resolved after deploying workaround, Fast Boot can carry it over again. Therefore, you have to disable this feature moving with below instructions –
- Hover the pointer to the rightmost bottom of Desktop and do a right-click on the battery icon.
- Choose Power Options once the menu shows up.
- From the new window opening, select What the power buttons do link from the left column.
- After loading the next page, click on Change settings that are currently unavailable to unveil the hidden options.
- Move a little downward and uncheck the box set for Turn on fast startup (recommended).
- Finally, click the Save Changes button from the bottom.
14] Use the default Windows Blue Screen Troubleshooter
Blue screen errors are breaking all previous records in respect of creating massive destruction in the Windows 10 system. Microsoft tried to reduce the effect using their own technologies and as a part of this plan, Windows Blue Screen Troubleshooter was introduced.
The utility made its journey for the first time in Windows 10 Fall Creators update edition. People found little complex as it was available in the Settings app which was shifted to the Control Panel Later on. You can use the tool for Blue Screen issues as well going through below guidelines –
- Press Widows+S together to invoke Taskbar Search.
- Type bluescreen in the empty text bar and click on Find and fix bluescreen problems option once available in the result.
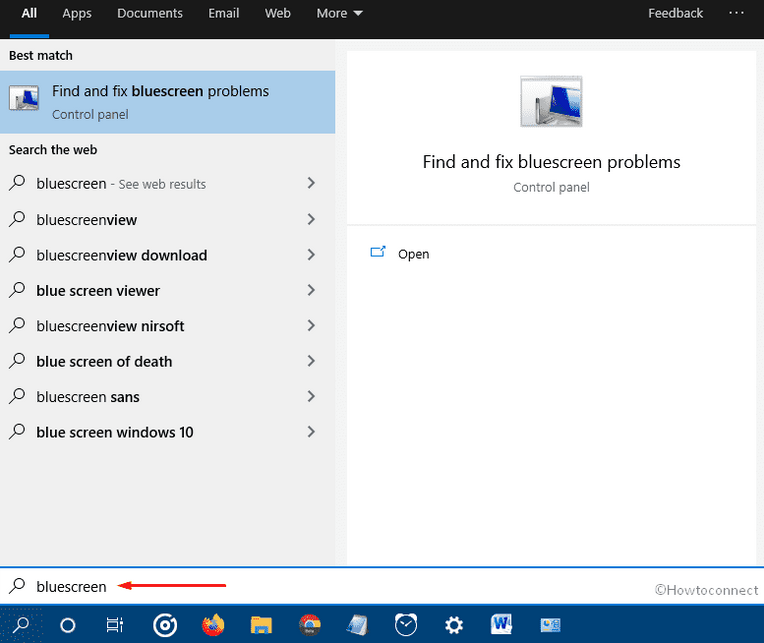
- On the next window, a troubleshooting wizard will be active to look for issues in the device.
- The utility will show up steps to do upon detecting snag and you have to follow then to the point in order to fix the BSOD error.
15] Keep only one Anti-malware program in the System
Antivirus programs keep the computers safe from potential malware and also resolves them if detected after real-time scanning. Since, the virus programs are now a days quite strongly coded, we need a trusted security program. To serve this big deal, Microsoft introduced Windows Security and this is undoubtedly the best one.
Yet some of us might feel interested to third party one sidewise with Windows Security. Therefore, there is always a chance of software collision leading to NETWORK BOOT INITIALIZATION FAILED blue screen error in Windows 10. To minimize this risk, you need to continue with only one security program and uninstall anther using below guidelines –
- Open the Start menu and click the Settings cog.
- When the layout loads fully, select Apps.
- Move to the right pane of the consequent page.
- When the list of installed apps is available, hover to the third-party antimalware tool.
- Click to expand the same and choose Uninstall from the expanded pane.
- If UAC prompts for authorization, choose Yes to continue.
- Follow the next steps as shown on display until the uninstallation finishes.
- Restart Windows 10 upon ending the process.
16] Perform System Restore and load the previous state of Windows
System Restore is a process to revert the current state of Windows to a previous one. Usually, when a user makes some changes on Windows by installing a new program or removing another, the registry is tweaked.
Usually, Windows Registry is a super-sensitive part and any wrong entry will mislead the whole system to have BSOD with bug check code 0x000000BB. To avoid this drawback, the best way is to load back the previous state of Windows where there was no blue screen of death. The way to accomplish this task is as following –
- Call upon Run dialog pressing Windows key and R at once.
- Type rstrui in blank typing area of the wizard and hit Enter key.
- System Restore will open up on display immediately and you need to select Show more restore points.
- Clink on latest point and hit Next option in the process.
- Finally, select Finish from the next page and start restoring process.
17] Boot the System to reliable Safe Mode to fix NETWORK BOOT INITIALIZATION FAILED
Windows from its initial period were affected by numerous bugs and issues from time to time. Some snags were easy to resolve where few were stubborn and hard to fix. But in every case, one resolution acted as savior and that is Booting Windows in Safe Mode. The process initiates a new session of the Windows loading only basic processes. Here is the process to enter into Safe mode –
- For the safe operation and avoid losing some ongoing progress, close all running programs and make your way to the desktop area.
- When in the place, Press Alt+f4 together.
- Select Restart using the drop-down list located under What do you want the computer to do?
- After the device reboots for the first, you see a blue screen holding few options, Choose Troubleshoot.
- From the menu, choose Advanced Options and then Startup Settings in the process.
- Now, do a click on Power cog. from the right bottom corner and select Restart to let Windows 10 reboot for the second time.
- After this reboot, you will have options to Boot in Safe Mode in the startup menu.
- Click that and enter into the Safe Mode.
18] Check the hard disk bad areas and fix them accordingly
Hard Disk after using for quite long period of time demands to be maintained in healthy conditions always. If a user leaves it neglected, some bad areas might be formed inside and cause blue screen error in it.
To keep the hard disk in good condition, there are few ways where only one utility can fix the bad areas in it. The tool named Disk Checking Utility and it will only serve the system when powered up in elevated Command Prompt. Here are the guidelines to accomplish –
- Click the taskbar search and type cmd.exe in the blank text field.
- Right-click on Command Prompt once available in the result
- Select Run as Administrator from options and also click Yes when UAC prompts.
- In the black panel, insert the following command tool and press Enter key –
chkdsk C: /f /r /x
- The Disk Checking tool will now find out bad areas present in HDD and eventually fix those automatically.
- This process may take a good amount of time, so schedule the task accordingly.
- Once finished the task, reboot Windows 10 and hopefully, you will not come across the error from the next session.
19] Fix the corrupted Windows image files
Windows image files are components of ISO and they are released at the time before a major update. When these files go defective, there is a plausible chance of having NETWORK BOOT INITIALIZATION FAILED blue screen error in Windows 10. The very handy way to fix those files is to use the DISM tool. This Utility activates in elevated Command Prompt when you proceed with below guidelines –
- Manage access to the elevated Command Prompt window following guidelines shown in above workaround.
- When in the place, enter the following command at the base of the blinking cursor –
DISM.exe /Online /Cleanup-image /Restorehealth
- When you press Enter key, the tool will start detecting for corrupted Windows image files in the system and fix them accordingly.
- Once the process ends normally, restart the device and check for the error when the desktop loads in the following Windows Session.
20] Use the Windows Automatic Repair tool to fix NETWORK BOOT INITIALIZATION FAILED
Whenever vulnerabilities like blue screen of death show up in the system, Automatic Repair becomes active by Windows in the third boot. In this step, a good number of diagnosis is carried out to detect the actual problem. Since a lot of tests are carried out; this process may be lengthy and time-consuming where you have already known the issue. Therefore, you can try performing Automatic Repair to Windows 10 manually using below guidelines –
- Open Windows Settings app pressing Win+I hotkeys together.
- Select the Update & Security tile once the app is loaded.
- From the consequent page, choose Recovery option from the left pane and shift to the adjacent right side.
- Move to Advanced startup section and click Restart now button located under it.
- After Windows finishes rebooting, select Troubleshoot =>Advanced options => Startup Repair.
- When the Automatic Repair page comes in the view, provide your Microsoft account credentials
- Lastly, choose Continue button to initiate the process.
Bonus tips
In most cases, above resolutions are effective when you deploy them perfectly. But the implementation can be hampered as Windows go for repetitive rebooting when affected. If the same happens with you, make the system stable by disabling this Automatic Restart feature. For that, you have to follow the below instructions –
- Your first task is to save and close all the ongoing process; it will help you avoid unwanted data loss unintentionally.
- Later on, load the Desktop area directly by pressing Win+D keys at once.
- Right-click on This PC icon and choose Properties option.
- When the System window opens up, select Advanced system settings lying on the left pane.
- Once shifted to System Properties Window, enter into the Advanced tab.
- Reach to the bottom in this tab and do a click on Settings located in Startup and Recovery area.
- From the new window appearing, move on to the System failure area.
- From here, remove the checkmark from the box against Automatically restart.
- Lastly, click the OK button at the bottom end to save these changes.
Methods:
1] Keep Windows 10 updated always
2] Look for malware in the system and resolve
3] Recover missing and corrupted system components
4] Disable invalid drivers or restore their default state
5] Update all the drivers using Device Manager
6] Perform Clean Boot to the Operating System
7] Avoid the risk of Software collision by uninstalling unnecessary applications
8] Clean the temporary files from the system
9] Update the BIOS of your system
10] Remove dreadful Windows Update files
11] Deport hardware accessories for a while
12] Fix up Memory problems in Windows
13] Disable Fast Boot option
14] Use the default Windows Blue Screen Troubleshooter
15] Keep only one Anti-malware program in the System
16] Perform System Restore and load the previous state of Windows
17] Boot the System to reliable Safe Mode
18] Check the hard disk bad areas and fix them accordingly
19] Fix the corrupted Windows image files
20] Use the Windows Automatic Repair tool
That’s all!!