The blue screen error CID_HANDLE_DELETION, holding a bug check value of 0x00000017 often occurs because of problems in the device driver. Not only in Windows 10, but this stop code with the BSOD is common in the previous editions as well. To prevent any further damage to the hardware and system files, the computer reboots itself once diagnosed with this issue. This behavior of the OS makes it difficult for the user to resolve the problem.
Addition to faulty drivers, there are other situations as well that enkindle blue screen error of CID Handle Deletion. Some examples are applications performing duplicate functions, lack of updates, low disk space, certain recent changes in the OS, etc. Read on to know how to resolve these troubles and what to do in such a situation. You can directly head to the following fixes that look most appropriate –
CID_HANDLE_DELETION Error in Windows 10 Solutions
1] Restarting the device
In a few instances, simply restarting the device has proved to be helpful in resolving this CID_HANDLE_DELETION error. If you have just started facing this issue, try rebooting your system and see whether this situation is resolved. You can restart by clicking on Start => Power button => Restart.
2] Run blue screen troubleshooter to fix CID_HANDLE_DELETION
One of these things that you must try when confronting blue screen, no matter which one, do run the troubleshooter. It is one of the most basic things that you can do against BSOD without breaking a sweat and without having to worry about something going wrong. What’s more, there is a high possibility that simple troubleshooting may fix most minor and major issues for you quite easily. In order to run the blue screen troubleshooter, here are the steps that you need to follow –
- If the system crashed during initialization, you must restart the system. You can do this by whichever way possible at the time. If nothing works, simple power off directly from the power button. Then, get access to the Settings application.
- In the UI, navigate to Update & Security => Troubleshoot.
- When you scroll down in the main panel, you will find an option for Blue screen. Hit on the same in order to expand.
- When the option expands, you will be able to see yet another – Run the troubleshooter button. Click on it to initialize the Troubleshoot. This will start a scan for finding and fixing the issues that might be causing a blue screen.
3] Update your device drivers
In case you have any device driver that is obsolete or not up-to-date, there is a good chance that is causing the blue screen situation. Besides, we did read earlier that this particular BSOD is a result of some sort of corruption or incompatibility with driver. An alternative to this is, if you know which driver is causing the problem, you can simply uninstall it. And the system will reinstall the latest and trouble-free version of the same automatically. Now, for updating obsolete device drivers or for uninstalling problem causing drivers, here at the steps that you must follow –
- Type in “devmgmt.msc” in the search and open Device Manager from the results.
- When it opens up, scroll through and see if any of the devices carry a yellow exclamation mark alongside or atop its name. The yellow color mark is the sign that something is off or wrong with that particular component. That’s the one whose driver you are looking to update or uninstall or reinstall.
- Click and expand the particular device. When you do, it will reveal all its drivers. Right-click on them and hit “Update driver” from the fly-out.
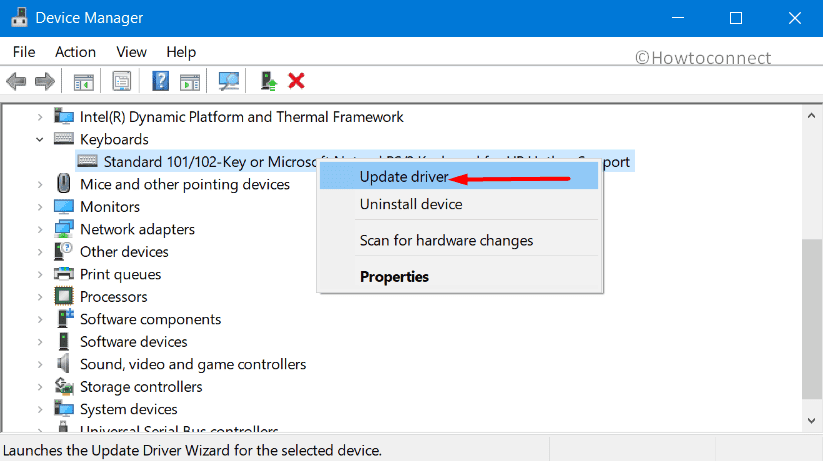
- Let the system update the driver. Reboot the device and see whether the exclamation mark is gone. If not, again right-click on it and this time, click “Uninstall device” and when prompted, click again on ‘Uninstall’ to confirm. When you restart the PC this time, the device will all by itself reinstall the uninstalled driver.
4] Work in Safe mode
Working in Safe Mode will enable you to keep away any unidentified, non-basic components that might be causing CID_HANDLE_DELETION. When you put your PC in safe mode, only the most basic components and essential drivers will work thereby preventing any affected ones from interrupting and creating trouble. Moreover, you will be able to secure only troubleshoot the issue which might be related to a corrupted driver or anything. This is why it is one of the most common fixes preferred in the matter of blue screen of death or this sort of severe fatal errors. Here is the sequence of steps to boot Windows 10 into Safe mode –
Step-1: First of all, you need to open the Windows Settings app from the Start menu.
Step-2: Then, in the interface, head to Update & Security and subsequently select Recovery from the subsections available on the left side.
Step-3: In the main panel, choose Restart now button from the Advanced startup section.

Step-4: Windows will undergo the restarting process. Once it does, select Troubleshoot when prompted. In the menu that subsequently comes up, click on Advanced Options.
Step-5: Then, select Startup Settings.
Step-6: Thereafter, you’d be seeing the screen with multiple startup alternatives, one of which would be Enable Safe mode. Note the number corresponding to it. Usually, it is 4.
Step-7: Hit the Restart button and as the PC reboots, press 4 to enter into Safe mode.
Note – There are alternative ways of enabling safe mode as well.
5] Temporary disconnect the hardware components
Every now and then, there have been reports of a newly added component causing some kind of error or system dysfunctions. This happens more frequently than you might think. If you started getting the errors shortly after adding a new hardware accessory to your device, chances are, they are causing the CID_HANDLE_DELETION. And, if that is the case, here is all that you need to do –
- Unplug or disconnect all the hardware components, especially the ones that you recently added. Keep them aside safely.
- Then, Restart Windows 10 PC and see whether you are still getting the errors.
- If the issues still exist, then possibly the BSOD was not a result of the newly added elements. So you can safely reconnect them.
- If, however, you think the error is resulting from the hardware components, you should go to the device manufacturer’s website and try to get the latest update for its respective driver.
6] Get Windows Updates to prevent CID_HANDLE_DELETION
We are pretty sure you don’t need to explain why is it very crucial and necessary to keep your Windows update. They come with security features and workaround against bugs and problems that give way to errors in the system. Manually check and ensure that your PC is up to date, by following below steps –
- In case the system crashed, restart the system first of all.
- Then, open the Settings application from the Start menu itself or with the shortcut keys for the same which is, “Win+I”.
- In the UI, navigate to Update & Security => Windows Update.
- Move to the adjacent right pane and hit on the button “Check for update“. Do this even if you see the message ‘Your system is up to date’.
- After the scan, if any new updates are listed, click on Download button corresponding to it. Let the PC carry out the installation as usual.
7] Remove conflicting applications
Having multiple applications or programs on PC that performs duplicate or very similar functions always affects the overall performance of the computer. An example of instances creating such conflicts is having a security or antivirus application while you have Windows Defender active and working. Such situations often lead to not just poor performance but also can lead to errors like CID_HANDLE_DELETION. If you have been facing such a situation and doubt that duplicate apps might be responsible, try uninstalling them. You can do this by going to the “Programs and Features” section of the Control Panel.
8] Try removing the latest update
Now, this must sound weird immediately after discussing how keeping Windows up to date is important. However, it’s true that in a few instances, the updates that come to you might consist of certain bugs or loopholes, which may affect the functioning of this system. Also, in case, the patch was not completely downloaded over into troubled network connectivity or device shutdown, etc., the partially installed patch may be the root of trouble too. To check this, figure out whether you started getting the CID_HANDLE_DELETION after installing the latest update. Or, just uninstall the newly installed patch and observe for the BSOD.
- First and foremost, launch the built-in Settings application and go to Update & Security category. Windows Update subsection will come up by default.
- Move to the adjacent right pane and hit on “View Update history” and then do a click on “Uninstall updates“.
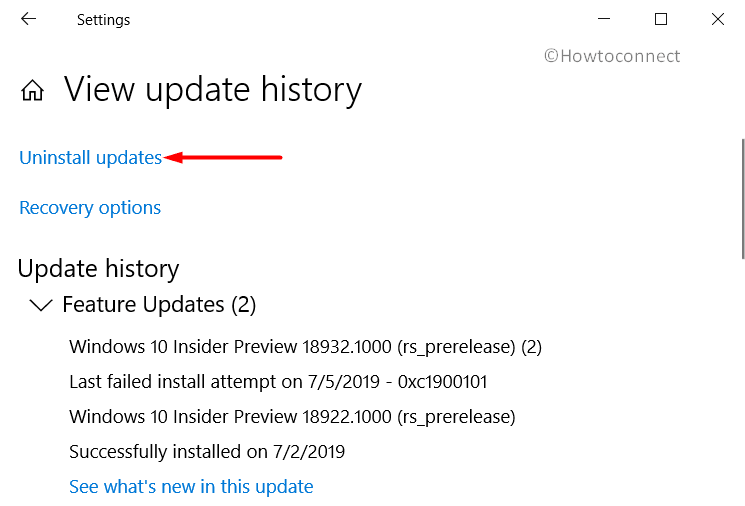
- Now, the installed updates section of the Control Panel will appear with a list of patches on your PC. Select the latest one and hit Uninstall on the top ribbon.
- Once done, simply restart the device and see whether the issue persists.
9] Full system scan to eliminate CID_HANDLE_DELETION
As you might have already noticed, Windows now has special functionality for the system that takes care of malicious activities – Windows Security. You can use this very program for running a full system scan in order to ensure that the blue screen error that you are facing is not a result of some malware or virus attacks. Earlier, users would have to rely on third-party applications or antivirus software for performing this function. Well, no more. In order to run the scan here are the steps that you need to observe –
- Enter the term ‘security’ in the search box on the Taskbar that you see on your screen.
- From the results select Windows security app to launch it.
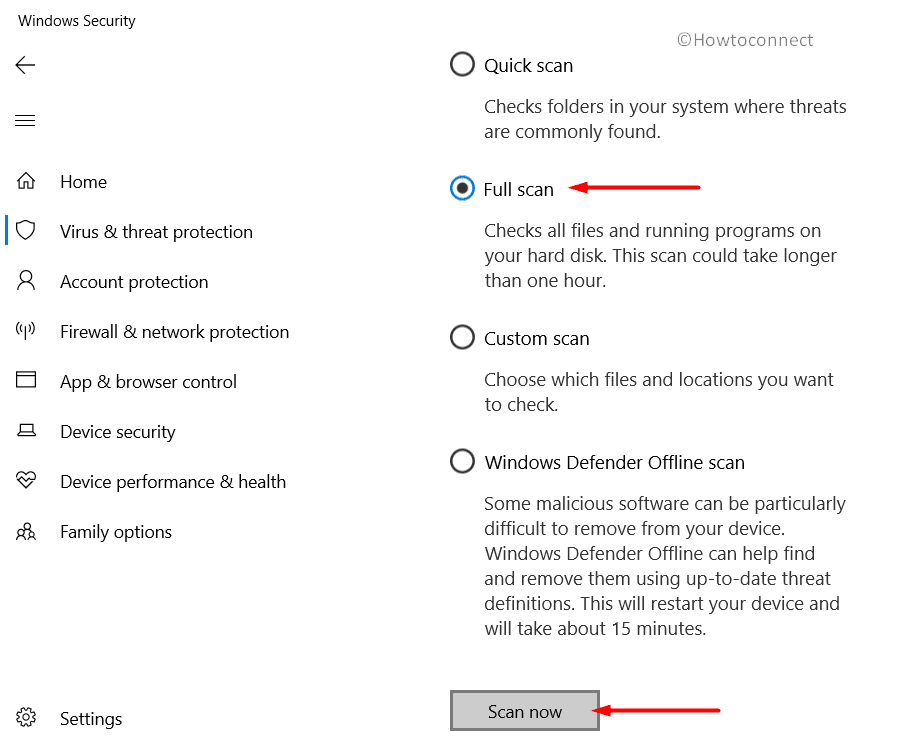
- Head straight to the section Virus & threat protection.
- In the main area, look for the link Scan options, and further choose Full scan.
- Finally, click on the Scan now button in order to initiate the scanning procedure for the detection of any virus or malware on your system.
- Now, when the results are displayed of any threats detected, simply hit the Clean threats option for cleaning them up from the system. Further, when prompted, click Remove and Start actions.
10] Delete all the unnecessary files
When you are working with your device it is inevitable for OS to create temporary files. As time goes by these files stack up and fill a certain part of the memory, which results in longer operation response. But there is a way to get rid of CID_HANDLE_DELETION problem with an application used for hard drive clean up.
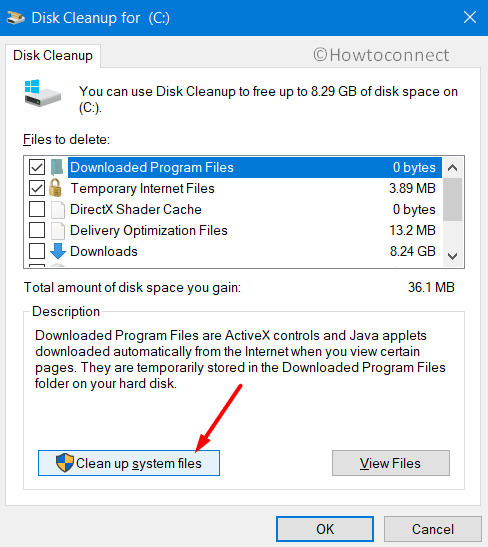
- Type in cleanmgr on the taskbar search box.
- When you will see Disk Cleanup – select it.
- Now you will have a choice of a Hard Drive you want to clean up. You can choose the one you need by hitting it in the dropdown, for example, C drive.
- The application will examine all the memory and give you a percentage of what it can cleanup. In a newly appearing window, go down and choose Clean up system files.
- In the following window, you will have to select the Hard Drive you need to clean up again. Press OK.
- You will encounter a list of areas from where this utility can restore space. Mark all the options except for Downloads.
- If some important files were deleted check your “Recycle Bin” and bring them back to the folder they belong in.
- Press OK to start the cleanup.
- After finishing its check system for the error presence.
11] Use DISM application
Damaged pictures and other related files can cause a BSOD error in your OS, but fortunately, you have a tool to deal with it. You can restore these files and never encounter this kind of problem by using DISM (Deployment Image Servicing) and Management applications.
- Use “Win + S” combination to get access to a search bar.
- Type CMD and press right mouse button on the Command Prompt.
- Select Run as Administrator and go forward by clicking Yes on the UAC prompt.
- In a newly appearing window put in:
DISM.exe /Online /Cleanup-image /Restorehealth - To start the file restoration press Enter. It will take some time so be patient.
- After this process will be finished reset your OS and look for CID_HANDLE_DELETION error.
12] Reset all the system’s latest settings
Some actions or installed applications in your OS can cause CID_HANDLE_DELETION error. If you are experiencing this type of error you can reset your system to a previous Restore Point.
- Press right mouse button on the “Win” icon in the bottom left corner.
- Choose Run from the Win+X menu.
- Put in rstrui in a newly appearing wizard. Press OK to proceed.
- When Restore Wizard launches, press Next.
- You can look through all the points information by clicking “Show more restore points”.
- Select the latest available point and press Next.
- Now select Finish to initiate the restoration process.
13] Find and restore damaged areas of your Hard Drive
Damaged areas of your Hard Drive can become a reason for CID_HANDLE_DELETION error to occur in your OS. But do not worry, CHKDSK function is here to help you with this issue. You can start using this very useful application by following instructions provided below —
- Access the Elevated Command Prompt.
- In a newly appearing search window, put in:
chkdsk [Drive:] [parameters] - Now, steps above you will get the Disk Status, but no way to fix damaged areas. And to restore damaged areas we will need to make some changes —
/f /r /x
f – fix damaged areas that are present in your Hard Drive.
r – find Hard Drive’s damaged areas.
x – to get rid of all processes that Hard Drive is involved in.
- Now your command, with all the modifications applied, will be:
chkdsk C: /f /r /x - Side Note – C: stands for the Hard Drive you need to restore. You can use your Hard Drive’s name instead.
- After this process will be finished reboot your OS and check for the presence of an error that was displayed earlier.
14] Get rid of CID_HANDLE_DELETION Error by solving memory-related issues
This BSOD error can be caused by different USB devices and data location issues. But these problems can be resolved with Memory Diagnostic application, and here’s how to use it —
- To begin with, close all the active processes.
- Put Windows Memory in newly appearing Taskbar window.
- Choose “Windows Memory Diagnostic“.
- A new window will appear and from the provided options you will have to select “Restart now and check for problems (recommended)”.
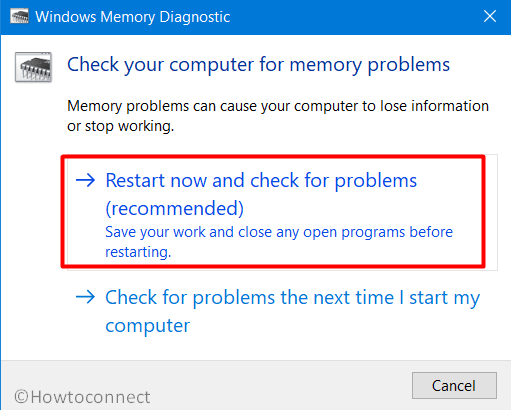
- By selecting this option you will set off a process for finding any memory issues. Your device will reboot after this process will be finished.
- After the reboot, you will get a notification detailing the results.
15] Use Clean Installation
It can be very frustrating to try out all the methods that were described above and to find out that CID_HANDLE_DELETION issue is still present. But there is one more thing you can do to get rid of this error – updating your OS.
First, you need to create a copy or backup of all important files that are present on your device. You can use a different device to save files on. If you are installing Windows for the first time try asking for the help of people who have some experience with it. This way you will lower the probability of any mistakes happening.
All methods described above will help you to solve a lot of OS issues and CID_HANDLE_DELETION is one of them.
Methods:
1] Restart the device
2] Run the special tool for fixing blue screen error
3] Update your device drivers
4] Work in safe mode
5] Temporarily disconnect the hardware components
6] Get Windows updates to prevent CID Handle Deletion blue screen error
7] Remove conflicting applications
8] Try removing the latest update
9] Full system malware scan to eliminate the virus or malicious programs
10] Delete all the unnecessary files to have more memory on the Hard Drive
11] Use DISM application in Elevated Command Prompt
12] Reset all the system’s latest settings
13] Find and restore damaged areas of your Hard Drive
14] Get rid of memory related issues
15] Use Clean Installation if there is no other way to solve your issue
That’s all!!